


Automist Smartscan
®
Handbook v1.2.3
Plumis Ltd Copyright © 2017. All Rights Reserved.
Page 45 of 64
S MA RT SC AN
®
F) Commissioning and maintenance
IMPORTANT!
Commissioning is required:
•
Once all the components of the system have been installed and the system is powered.
•
As part of a yearly maintenance cycle.
•
If plumbing or construction work takes places, new alarms are installed or maintenance work
occurs which could affect the system.
•
Commissioning must be performed annually by an Accredited Automist Smartscan Installer.
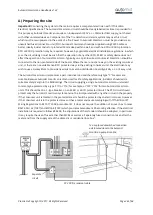
When Automist Smartscan is powered up for the first time the yellow FAULT LED will flash twice to indicate
that the system has not been commissioned. Commissioning is a simple programmed procedure which
allows Automist Smartscan to be tested. During commissioning, the pump runs for 60 seconds and the
output pressure is monitored.
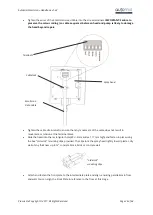
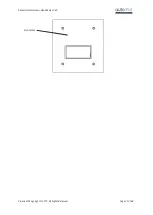
Use the Automist Smartscan commissioning tool to prevent mist being sprayed into the room. The spray
nozzle and the screws holes to affix it are only exposed during the commissioning procedure. Use the
provided screws and rubber gasket to fasten the tool in place and put a bucket under the hose during the
test procedure.
Commissioning Procedure
1.
Unscrew the cap and connect the test hose and gauge to the test point adapter.
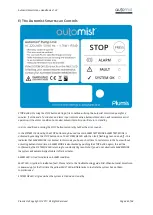
2.
Press and hold the STOP button for 5 seconds. Three short beeps accompanied by four short
flashes of the ALARM LED and the blue LED at the Smartscan head indicate that you may
release the button and that you entered the first stage of the COMMISSIONING MODE
“Sensor
Testing
”
.
3.
The spray head will scan back and forth and stop at the hottest observed position for 5
seconds. It will then scan again, back and forth, and stop once again at the hottest observed
position. Please note that you will need to run through at least one successful scan, back and
forth, to ensure that the internal logic also validates if the sensor is performing as expected.
4.
Verify that the heat scanning system works correctly at 3 different angles. Use your hand at a
fixed position and at a distance of 5cm from Smartscan to simulate a heat source.
5.
This process will continue for 5 minutes or until the STOP button is pressed on the pump.
6.
Press the STOP button when you are confident that the sensor is working properly. This will
take you to the next stage of the COMMISSIONING MODE “Pressure Testing”
.


