background image

2

34

Make sure that the [staple icon] is present on the copier control panel. If not, turn off the 

Copier and Booklet Maker. First turn the Booklet Maker ON and then turn the Copier ON.

Make sure that the Booklet maker system is set according to your job specification.

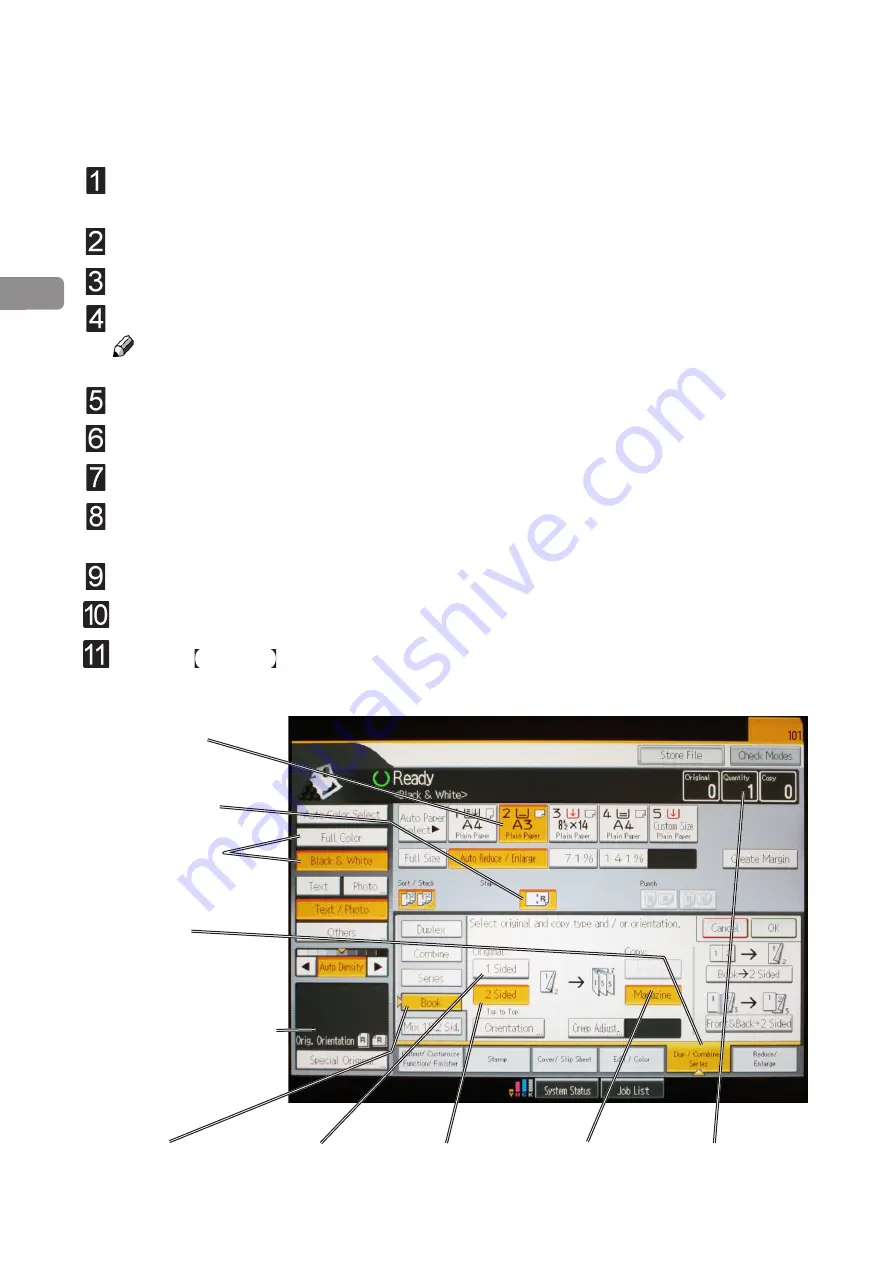
Select [Paper tray] (A).

Select [Staple icon] (B).


Note

  Make sure correct original orientation (C) is selected. 

  Select Color/Black & White (D).

Select [Dup / Combine / Series] (E).

Select [Book] (F).

Select [1 Sided] (G) if your originals are only printed on one side or [2 Sided] (H) if they 

are printed on both sides.

Select [Magazine] (I).

Select [Quantity] (J).

Press the  Start key .

Begin On-line Production

A.  Paper tray

B.  Staple icon

C. Color/B&W

E.  Dup. / Combine /

 Series

F. Book

H.  2 Sided

G.  1 Sided

I. Magazine

J. Quantity

D.  Original orientation

Summary of Contents for BK5030

Page 1: ...5030 Operating Instruction Stapler Folder Reference Read this manual carefully before you use this product and keep it handy for future reference For safety please follow the instructions in this manual 13 August 2015 ...

Page 2: ...se radio interference in which case the user may be required to take adequate measures The product System which is connected to this machine will be class A Note The domestic environment is an environment where the use of broadcast radio and television receivers may be expected within a distance of 10 m of the apparatus concerned ...

Page 3: ...lly hazardous situation which if instructions are not followed could result in death or serious injury CAUTION Indicates a potentiality hazardous situation which if instructions are not followed may result in minor or moderate injury or damage to machine or property Note This sign refers to Remarks for making the operation much easier You get practical hints or knowledge to assist you in the machi...

Page 4: ...uring operation General safety WARNING Always connect the equipment to a properly grounded power source wall outlet Wall outlet should be located near the system and easily accessible If in doubt have the power source checked by a qualified electrician Improper grounding of the equipment can result in electrical shock Never connect the machine to a power source that lacks a ground connection termi...

Page 5: ...he machine always exercise care and make sure that the power cord will not be damaged under the machine Always contact service if relocating the equipment Do not move the machine while the machine is running Do not open covers while the machine is running Do not switch off the power while the machine is running Make sure the machine cycle has ended Lay the power cord in a way that nobody will stum...

Page 6: ...Page intentionally blank ...

Page 7: ...27 Changing settings 27 General procedure 27 Paper Size 27 Selecting standard paper sizes 27 Custom paper size 28 Staple 28 Selecting stapling On or Off 28 Staple position 29 Adjusting staple position 29 Fold position 29 Adjusting fold position 29 Cover 30 Using covers 30 Air Separation 31 Double Sheet Detection 31 Trim 31 Select trimming Auto Manual or Off 31 Book fold unit 32 General 32 Selectin...

Page 8: ...aple cartridge 47 Set too thick 47 Remove purged sets 47 Illegal feed mode 47 Stacker full 47 Cover feeder fault codes 47 Misfeed 47 Double feed 47 Load covers 48 Trimmer fault codes 49 Trim bin full 49 Close trimmer belts 49 Book Folder fault codes 49 Feed errors 49 7 REMARKS 51 Do s And Don ts 51 Where to put Your Machine 52 Machine environment 52 Power connection 52 Access to machine 53 Maintai...

Page 9: ... In order to rectify creep the TR5030 Trimmer optional can be attached after the Booklet Maker The booklets are then transported from the Booklet Maker into the Trimmer where the trail edge will be cut off If a TR5030 Trimmer is installed to the BK5030 Booklet Maker you can attach the BF5030 Book Folder optional The printouts which have been stapled folded and trimmed will be fed into the BF5030 T...

Page 10: ...panel located on the Booklet Maker The control panel will allow you to easily set up adjust and operate the complete system The user interface control panel is of touch screen type Point at the screen and press the button to reach the desired function or change the desired setting ...

Page 11: ...Guide To Components 2 3 6 7 1 1 Top cover 2 Control panel 3 Main power switch 4 Infeed assembly 5 Exit tray storing shelf 4 Booklet Maker 6 Base 7 Docking assembly 8 Belt Stacker 9 Belt Stacker Cover 5 8 9 ...

Page 12: ...12 8 9 8 Connections 9 Fold stop gate Booklet Maker continues Main Power Terminator COM TR5030 Terminator Stacker COM Copier POW BF5030 Interlock jumper POW TR5030 ...

Page 13: ...13 2 1 Staple cartridges incl stapler heads 2 Hand feeding paper guides Booklet Maker continues 1 ...

Page 14: ...7 Options Cover Feeder 1 Loading capacity mark 2 Rear side guide 3 Feed roller assembly 4 Paper separator pad also see page 52 8 5 Front side guide 6 Paper orientation indicator 7 Air nozzle 2x 8 Jam clearance baffle ...

Page 15: ...15 Trimmer 1 2 4 1 Top cover 2 Trim bin 3 Base 4 Connections 3 Stacker COM BK5030 Terminator Com BF5030 Power from BK5030 ...

Page 16: ... has parts that you will come in contact with if a misfeed occurs 1 Set counter 2 Trimmer stop 3 Outfeed drive release 4 Pre trimming compressing brackets 5 Transport belt 6 Infeed roller shaft 7 Trimmer fan 8 Upper knife 9 Infeed drive release Trimmer top view ...

Page 17: ...17 1 1 Top cover 2 Trim bin location 3 Base 4 Connections 3 Stacker COM BF5030 Terminator POW BF5030 2 Book Folder 4 ...

Page 18: ...ts 2 Upper feed belt release latch 3 Upper feed belts 1 2 3 Book Folder top view Upper feed belts in lifted up Book Folder continues The Book Folder interior has parts that you will come in contact with if a misfeed occur ...

Page 19: ...in section 4 Jobs The Tools screen Pressing the Tools button in the Ready screen takes you to the tools screen This screen looks different depending of how the system is configured From here you can change the display language set units from millimetres to inches and more See section 3 Tools for how to get around in the Tools screen Changing settings To change or adjust settings just point at an i...

Page 20: ... While the machine sometimes needs time to perform changes in settings the Please wait screen will be shown The machine will automatically return to the Ready screen after changes have been implemented The Power save mode screen The machine will go into a power saving mode if it is left unused for more than app 10 minutes Touch the control panel send a job from the printer or open a cover to reins...

Page 21: ...from the Finisher and put it on the shelf on the Booklet Maker MovetheBookletMakeruptothecopieranddockit Note Make sure the Booklet Maker is powered on Turn the Copier on The Copier is now in Booklet maker mode and a staple icon is now present in the Copier display panel 1 Basics Docking Undocking Docking the Booklet Maker ...

Page 22: ...er away from the Copier Note Be careful not to damage the communication cable Take the Exit tray from the shelf on the Booklet Maker and install it on the Finisher Lift up the Exit arm catcher and move the Exit paper arm to the lower position Turn the Copier on The Copier is now in standard Copier mode Undocking the Booklet Maker ...

Page 23: ...l are powered from the Booklet Maker Open the Top cover 1 Set main power switch 2 on Booklet Maker to ON position Note The main power switch also controls Cover Feeder optional Trimmer optional and Book Folder optional Close the Top cover Turning On Off the Main Power Booklet Maker Cover Feeder Trimmer and Book Folder 2 1 ...

Page 24: ...cover Pull out the staple cartridge using the grip A at both sides at the top of the staple cartridge Renew by pushing a new staple cartridge into stapler until it snaps in position Close booklet maker top cover and restart the job Change left right staple cartridge s The staple cartridges contains approximately 5000 staples each Each cartridge includes all wear out and service parts i e the stapl...

Page 25: ...er until it snaps in position Close booklet maker top cover and restart the job Note If the error message persists for no reason or if staple jam reoccurs renew the staple cartridge as described above Check left right stapler Loading covers A Make sure that the cover sheets are well fanned to avoid misfeeds or double feeds Align the cover sheets well to achieve a reliable feeding operation and goo...

Page 26: ...1 26 Emptying the trim bin Remove the trim bin by lifting it and pulling it out trim bin no Book Folder installed trim bin with Book Folder installed ...

Page 27: ...re for permanent changes From the Ready screen press the Jobs button to reach the Jobs screen Select the Job you want to change by pressing the Next button and then press the Change button Note Choose either of the above mentioned procedures when changing size stapling trimming covers or book folding as follows From the Ready screen press the Paper Size button General procedure Select Auto or any ...

Page 28: ...hrink function is activated See page 35 Select Length or Width and key in the desired value Save the custom size format by pressing the OK button Four different custom paper sizes can be stored Staple Selecting stapling On or Off From the Ready screen press the Staple button Select On or Off by pressing the corresponding button and save setting by pressing the OK button ...

Page 29: ... be performed during run Fold position The position of the fold can be changed up to 3 mm 0 12 on either side of the centre of the set Press the or button to change position of the fold and save setting by pressing the OK button Note This change can be performed during run Note You may want to turn off trimming to see the result more clearly when you move the fold position Adjusting staple positio...

Page 30: ...sheet Note If you open and close the Top Cover without removing the cover sheet the cover sheet will be stapled and folded and then fed to the stacker Cover If a Cover Feeder is present the Cover button will be visible in the control panel Set to On the cover feeder will automatically feed one cover to each set from the copier or if you are manually feeding a set The cover feeder can be used in ei...

Page 31: ...sing the OK button Normally double sheet detection should be set to On when you are feeding covers However if you experience false double sheet feeds for example when running covers that are thick with dark print or with mixed prints on the covers the double sheet detection can be set to Off Note Misfeed detection will work regardlessly Trim Select trimming Auto Manual or Off From the Ready screen...

Page 32: ...quare forming action Use the manual modes to override the auto function There are five different manual modes to select from Mode 1 Approximately 6 to 11 sheets Decreased amount of square forming Mode 2 Approximately 12 to 16 sheets Medium amount of square forming Mode 3 Approximately 17 to 23 sheets Increased amount of square forming Mode 4 Approximately 24 to 30 sheets Maximum amount of square f...

Page 33: ...off line mode working as a stand alone unit Off line mode Follow Undocking the Booklet maker in section 1 Basics Adjust the hand feeding paper guides to the correct paper size Turn on the Booklet maker The Booklet maker is now in stand by and will start automatically when a set is fed into the Booklet maker If settings need to be changed follow Changing settings earlier in this section ...

Page 34: ...tray A Select Staple icon B Note Make sure correct original orientation C is selected Select Color Black White D Select Dup Combine Series E Select Book F Select 1 Sided G if your originals are only printed on one side or 2 Sided H if they are printed on both sides Select Magazine I Select Quantity J Press the Start key Begin On line Production A Paper tray B Staple icon C Color B W E Dup Combine ...

Page 35: ... save setting by pressing the OK button An asterisk star in front of the paper format indicates that Auto shrink is on Note Compensation for shrinkage will not be activated if the cover feeder is on or when sets are hand fed Select millimetres or inch by pressing the corresponding button and then save setting by pressing the OK button Based on the information about paper weight paper size and numb...

Page 36: ...o go back to the Settings screen Software version Service access Sheet feeder This function is for authorized service personnel only and is password protected This function allows you to individually fold the sheets loaded in the cover feeder in a sequence Load the cover feeder and press the Start button to begin folding Press the Stop button to stop See section 2 Making Booklets for how to load t...

Page 37: ...lets From the Ready screen press the Jobs button to be able to store change or delete jobs Saving a Job To store a new job press the Save as new job button Enter a job name and save by pressing the OK button If you already have a job active you can choose either to save your new settings as a new job or to save to the active job Press the corresponding button to continue Continued on next page ...

Page 38: ...4 38 Handling stored Jobs To access already stored jobs press the Saved jobs button Rename open load or delete any stored job by pressing the job button and choose action ...

Page 39: ...ooklet Maker display The message Clear Misfeed s an error code and the location of the misfeed is displayed See examples below General Misfeeds in the Booklet Maker are indicated as area A B or C and by the error code BK XXX Misfeeds in the Book Folder are indicated as area E and by the error code BF XXX ...

Page 40: ...ition remains Switch off the main power Switch on the main power If misfeed condition remains Switch off the main power If a Trimmer is installed first remove the trim bin to get access to the fold stop By hand pull down the fold stop page 8 item 9 Remove misfed sheets Push the fold stop back into the upper position Switch on the main power Clearing misfeed s Booklet Maker Inside the Booklet Maker...

Page 41: ...heets are removed lower the latch B and place the infeed roller shaft into operating position Clearing misfeed in input area The upper trimmer blade on the trimmer is protected by a knife protection plate that moves away during the cutting stroke WARNING Never put fingers or other parts of the body between the upper and lower trimmer knives A B ...

Page 42: ... brackets A Secure them under the latch B Remove the misfed sheets from the exit area After the misfed sheets are removed lift up the latch B and place the compressing brackets in operating position Location of bracket not shown just indicated Clearing misfeed in exit area ...

Page 43: ...5 43 Open the Top Cover Lift the jam clearance baffle A Remove the misfed cover Put the jam clearance baffle back in normal position Clearing misfeed s in vertical transport area Cover Feeder A ...

Page 44: ...ts B on the latches to release Remove the misfeeds Place the upper feed belts in normal position Close the top cover Inside the Book Folder Exit area Open the top cover Remove the misfeeds through the jam clearance area A Close the top cover A Clearing misfeed s Book Folder B B A ...

Page 45: ...hangestaplecartridgeintheBookletmaker BK 504 indicates Stacker full CF 201 indicates Out of covers in the Cover feeder CF 202 to CF 205 indicates Clear Misfeed s in the Cover feeder and CF 207 CF 206 indicates Double feed in the Cover feeder CF 501 indicates Load covers when the Cover feeder is almost out of Covers How to clear see Cover feeder fault codes CF 502 indicates that there is a format m...

Page 46: ...e and the jam area will be displayed See section 5 Clearing Misfeeds for how to clear a misfeed Close cover s When the message Close Cover s is displayed any of the interlock switches are actuated Check that the top cover is in down position Make sure that the cover of the Belt Stacker is in normal position see section 5 Clearing Misfeeds Exit area ...

Page 47: ... set is in the infeed area Open the top cover remove the set and close the top cover Illegal feed mode If this message is displayed contact customer support Stacker full This message will be displayed when the Stacker is full Empty Stacker Double feed This message will be displayed when the Cover Feeder detects that more than one cover was fed from the cover bin If more than one cover was fed chec...

Page 48: ...nd copier will start Note Be aware that if you use this method the system will hard stop i e without completing the cycle when there is no covers left Code CF 503 Load covers is displayed when covers are empty There are two ways to continue operation If you wish to continue production Load cover sheets according to section 2 Making Booklets and press the Done button Code CF 501 will extinguish and...

Page 49: ...ver If feed errors occur the feed belts need to be cleaned or the pressure on the upper feed belts need to be increased To clean the feed belts see section 7 REMARKS Maintaining Your Machine To increase the pressure on the upper feed belts follow this procedure Open the top cover Place both springs in the upper position Close the top cover Book Folder fault codes Feed errors Spring in normal posit...

Page 50: ...6 50 Page intentionally blank ...

Page 51: ...Do not override or bypass electrical or mechanical interlock devices Do not operate the equipment if you notice unusual noises or odors Disconnect the power cord from the power source and call your authorized technician to correct the problem Warning Do not put fingers or other parts of the body between the upper and lower trimmer knives Do not switch off the main power switch while machine is run...

Page 52: ... the machine to a power source that lacks a ground connection terminal Always locate the equipment on a solid support surface with adequate strength for the weight of the machine Always keep magnets and all devices with strong magnetic fields away from the machine If the place of installation is air conditioned or heated do not place the machine where it will be Subjected to sudden temperature cha...

Page 53: ...7 53 Access to machine Place the machine near the power source providing clearance as shown 1 Left more than 400 mm 15 8 2 Front more than 555 mm 21 8 3 Right more than 400 mm 15 8 off line use 1 2 3 ...

Page 54: ... upper feed belts A The upper feed belts can easily be rotated in either direction Press the release latch and lift up the upper feed belts to access the lower feed belts Clean the lower feed belts B Rotate the lower feed belts towards the outfeed side for complete cleaning Place the upper feed belts in normal position Close the top cover Maintaining Your Machines Never attempt any maintenance fun...

Page 55: ...r some white coated stock such as Silk type two sided coated paper occasional fold roller marks may be observed on the top side of the book The use of protection sheet eliminates this marking Simplex booklets are not supported The double feed sensor should be turned off when feeding cover 200 gsm or more from the CF5030 module You may also have to turn off this function if you have heavy dark area...

Page 56: ...is used for cover sheet Changing to heavier stock or turning book fold module off usu ally fixes the problem Staple may be radius shaped bent when running with Book Fold module Moving sta ple position so staple is centered on the spine will reduce this phenomenon Covers may show marking along the spine of the booklet from the clamp in the BF5030 module The more pages in the booklet the more eviden...

Page 57: ...ength 457 2mm 18 Paper Weight Minimum 64gsm 16 lb Bond Paper Weight Maximum 300gsm 110 lb Cover Belt stacker capaciy 2 sheets 200 sets 8 sheets 70 sets 15 sheets 35 sets 20 sheets 25 sets 30 sheets 15 sets 80 gsm 20 lb Bond Input Output Sheets 1 30 Sheets 80 gsm 20 lb Bond Stapled see Set size Guide on page 64 Input Output Sheets 1 2 Sheets Non Stapled Folding Off line Use Possible Stitch Fold 2 s...

Page 58: ...nd will not add anything more to the space Power Source From BK5030 Trimmer TR5030 option Specifications Remarks Speed 1800 sets per hour Standard Paper Sizes Same as BK5030 Custom sizes are available Default trim length 4 5 mm 11 64 Adjustable in 0 5 mm steps Minimum trimming 1 mm 0 0394 in Adjustable in 0 5 mm steps Maximum trimming 16 mm 0 63 Adjustable in 0 5 mm steps Paper Weight Minimum Same...

Page 59: ...andard Paper Sizes Same as BK5030 Custom sizes are available Paper Weight Minimum Same as BK5030 Paper Weight Maximum Same as BK5030 Input Output Sheets Same as BK5030 Off line Use Possible Together with Booklet maker Trimmer Weight 59 kg 130 lb Dimensions 360 x 1010 x 620 mm 14 2 x 39 8 x 24 4 Power Source From BK5030 ...

Page 60: ...160 12 12 12 12 12 11 12 12 11 11 11 9 44 110 61 102 92 170 12 12 12 12 11 10 12 11 10 10 10 9 47 120 65 108 97 180 12 12 11 11 10 10 11 10 10 10 9 8 190 12 11 10 10 10 9 10 10 9 9 9 8 53 135 74 122 110 200 11 10 10 10 9 8 10 9 8 9 8 7 54 137 75 125 113 210 10 10 9 9 9 8 9 9 8 8 8 7 58 146 80 134 120 220 9 9 9 9 8 8 9 8 8 8 7 6 230 9 9 8 8 8 7 8 8 7 7 7 6 65 165 90 150 135 240 9 8 8 8 7 7 8 7 7 7 ...

Page 61: ...ar of CE Marking 2011 Conformity of the product s with the requirements of EU and other directives is established through full compliance with the following standards Certifications Description Certification Body IEC 60950 1 2005 2nd Edition EN 60950 1 2006 A11 2009 UL 60950 1 2nd Edition 2007 03 27 CSA C22 2 No 60950 1 07 2nd Edition 2007 03 Information Technology Equipment Safety Part 1 General ...

Page 62: ...Page intentionally blank ...

Page 63: ... storing deleting 37 L Language 36 Limitations in the BK5030 system 55 Loading covers 25 M Turning On Off the Main Power 23 Machine environment 52 specifications 57 Machine environment 52 Maintaining Your Machines 54 Making Booklets 27 Misfeed s clearing 39 O On line Off line 33 Options 14 P The Please wait screen 20 The Processing screen 20 Turning On Off the Main Power 23 Paper Size setting 27 P...

Page 64: ......

Reviews:

Related manuals for BK5030