background image

Section 5. Maintenance and Troubleshooting 

34

  PX-B310U/ PX-B310SA Installation and Users Manual 

Emergency Eject 

If the computer power is turned off or the automatic eject button at the 
front of the drive does not work, use this procedure to open the drive. 
 

To use the emergency eject tool to open the drive: 

1.


Make sure power to the drive is OFF. (That is, turn off your 
computer.) 

 
2.


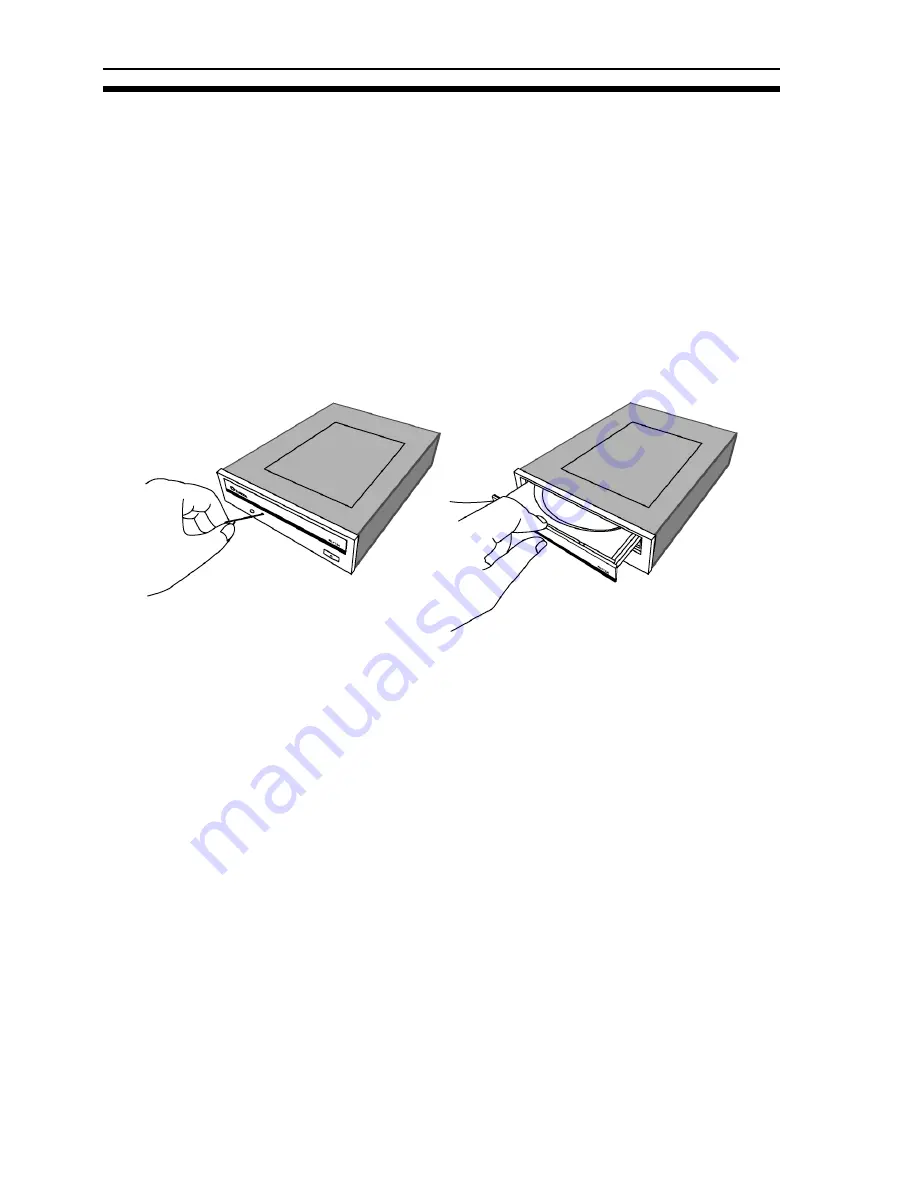
At the front of the drive, insert the emergency eject tool, or a paper 
clip or other thin, rigid object, into the emergency eject hole. 


Figure 14: Emergency eject 

 
3.


Push the tool or other object straight in, until the disc tray clicks 
open. 

 
4.


Carefully continue to slide the disc tray open. 

 
5.


Remove the disc from the disc tray. 

 
6.


Carefully push the disc tray shut. 


Summary of Contents for PX-B310SA

Page 1: ...BD ROM DVD R DL DOUBLE LAYER DUAL LAYER DVD R RW DVD RAM CD R RW DRIVE December 2008 INSTALLATION AND USERS MANUAL Model PX B310U External USB Drive Model PX B310SA Internal SATA Drive...

Page 2: ...t without obligation to notify any person or organization of such revision or change This manual is copyrighted all rights reserved It may not be copied photocopied translated or reduced to any electr...

Page 3: ...io Interference Regulations of the Canadian Department of Communications This class B digital apparatus complies with Canadian ICES 003 Cet appareil num rique de la classe B est conforme a la norme NM...

Page 4: ...10U Drive Features and Controls 10 Front Panel PX B310U External Drive 10 Rear Panel PX B310U External Drive 11 What Else Is In the PX B310U Box 11 Save Your Box 12 PX B310U QuickStart Installation 12...

Page 5: ...dicator 30 5 Maintenance and Troubleshooting 32 Cleaning the your Plextor Drive 32 Upgrading Firmware 33 Emergency Eject 34 Troubleshooting 35 Make Sure the Drive Is Recognized 35 6 Frequently Asked Q...

Page 6: ...Table of Contents vi PX B310U PX B310SA Installation and Users Manual This page intentionally left blank...

Page 7: ...ce Use the manual for installation operation and troubleshooting If your drive needs service see your dealer or call Plextor s Technical Support Department In this manual you should find all the infor...

Page 8: ...on recommended media Writes DVD R DL double layer media at up to 8X speed Writes DVD R DL double layer media at up to 8X speed Writes DVD R recordable DVD dash format media at up to 16X speed on recom...

Page 9: ...ers The PX B310U supports high speed transfers via the USB interface The PX B310SA supports next generation high speed transfers via the Serial ATA 1 0 interface Flash memory Allows upgrading the PX B...

Page 10: ...8 5 gigabyte DVD disc Wide media compatibility Compatible with a wide range of DVD RAM DVD R and DVD RW media DVD Multi Recorder Supports the DVD Multi specification for read and write can read and w...

Page 11: ...rategy CD TEXT Supports CD TEXT Minimum Configuration to Use the PX B310U PX B310SA Here s what you ll need in order to install and use the PX B310U drive Computer Computer CPU Memory and configuratio...

Page 12: ...neakernet to share information with colleagues just use software such as Cyberlink BD Suite to drag and drop files onto DVD R DVD RW CD R or CD RW media then continue adding files and sharing the same...

Page 13: ...ties of the drive Concurrently you can reveal extensive information about the inserted disc like format sessions and tracks manufacturer and CD TEXT Permitting Drive Identification and Control allows...

Page 14: ...ttempt to open the drive and service it yourself Removing the cover may expose you to harmful electrical voltages or the laser beam For your safety entrust service to experienced service personnel onl...

Page 15: ...n and Users Manual 9 Where to Go From Here If you have an External USB drive see Section 2 beginning on page 10 to learn how to install your drive If you have an Internal drive with the Serial ATA int...

Page 16: ...elow Front Panel PX B310U External Drive Figure 1 Front panel of the PX B310U external USB drive Tray front door Attached to tray drawer Emergency eject hole If the automatic eject button does not wor...

Page 17: ...connector Connects to your computer s power supply to provide DC 5 volts and 12 volts to the PX B310U On Off Switch What Else Is In the PX B310U Box What you find in your Plextor box depends on what...

Page 18: ...e been shipped in a different box with other contents depending on whom you purchased the drive from and what they included inside the box If your drive came pre installed some or all of the items abo...

Page 19: ...rd Troubleshooting tip You can verify that your external DVD drive has power by pressing the EJECT button on the front of the external DVD drive to open and close the tray If the tray does not open en...

Page 20: ...Section 2 Installing the PX B310U External USB Drive 14 PX B310U PX B310SA Installation and Users Manual This page intentionally left blank...

Page 21: ...ter system ON The following pages give more details for this procedure NOTE Your computer s SATA connection must support the ATAPI command set Some computer motherboards have SATA RAID Redundant Array...

Page 22: ...below Front Panel PX B310SA Internal Drive Figure 3 Front panel of the PX B310SA internal SATA drive A Eject Close Button Push button to open or close the tray B On Busy LED Indication of drive s ope...

Page 23: ...Rear panel of the PX B310SA internal SATA drive SATA cable connector Connects to your computer s SATA interface using a 7 pin SATA interface cable Power connector Connects to your computer s 15 pin SA...

Page 24: ...ive in working order If you have to ship your drive back to Plextor you ll want to send it in the original box For more details about returning your drive to Plextor see page 41 If the security sticke...

Page 25: ...OTE The drive can be mounted horizontally or vertically If you don t have an empty bay remove the existing DVD ROM or CD ROM drive and install the PX B310SA You must make two cable connections to your...

Page 26: ...al Figure 5 Removing a typical computer s cover 3 Remove the cover panel from the bay that will hold the drive To remove the cover panel pop it out by pressing outward lightly In some older computers...

Page 27: ...s If you need rails you can obtain them from the computer manufacturer or from a computer supply retail or mail order store 5 If you must use mounting rails fasten the rails to the lower pair of holes...

Page 28: ...mputer s SATA connection must support the ATAPI command set Some computer motherboards have SATA RAID Redundant Array of Independent Discs chipsets that do not support the command set used by optical...

Page 29: ...pin SATA power cable adapter that came with your PX B310SA drive CAUTION The power connector on the cable and the receptacle on the drive are keyed Do not force the power connector into the drive or t...

Page 30: ...dentifies the type of BD media Your PX B310U and PX B310SA can read these media formats in single layer or double layer media DVD Media DVD recordable media is available in two different non compatibl...

Page 31: ...top box then read it on the PX B310U or PX B310SA drive The PX B310U and PX B310SA supports reading and writing with 4 7 GB version 2 DVD RAM discs CD ROM Media You can use these types of CD media CD...

Page 32: ...Ultra Speed CD RW discs only on drives that support this media Drives that are capable of writing to Ultra Speed ReWritable media such as the Plextor PX B310U or PX B310SA are identified by a Compact...

Page 33: ...the center hole and one finger on the outer edge Once you have finished creating a disc label it by writing on the top using permanent ink CAUTION We recommend using a non toxic marker such as a Shar...

Page 34: ...horizontal or a vertical position Playing BDs To play a Blu ray video disc insert the DVD as you would any other disc The drive plays both single layer and double layer discs The first time A code on...

Page 35: ...h single layer and double layer discs The first time A code on each DVD allows it to be played only on players designed for a certain regional area such as North America Europe etc When the drive ship...

Page 36: ...RW or R RW The selection is automatically made for you based on the media you insert in the drive Writing to CD R and CD RW Media In conjunction with your drive mastering and packet writing software...

Page 37: ...Section 4 Using Your PX B310U or PX B310SA PX B310U PX B310SA Installation and Users Manual 31 This page intentionally left blank...

Page 38: ...aser lens In this case If your drive is still in warranty and you are experiencing problems send the drive to Plextor See Returns on page 41 If your drive is out of warranty before returning the drive...

Page 39: ...www plextor com to check if you have the latest firmware With the installation of PlexUTILITIES firmware upgrades are automated When a new firmware is available PlexUTILITIES will automatically downlo...

Page 40: ...emergency eject tool to open the drive 1 Make sure power to the drive is OFF That is turn off your computer 2 At the front of the drive insert the emergency eject tool or a paper clip or other thin ri...

Page 41: ...for the Plextor drive the hard disk and another DVD or CD ROM drive if present The Plextor icon may be D or E or another designator 3 If the PX B310U or PX B310SA drive is not recognized in Windows re...

Page 42: ...select Properties Click on the Hardware tab then click on the Device Manager button Click the sign next to the DVD CD ROM drives heading and look for the PLEXTOR BD PX B310U or PLEXTOR BD PX B310SA en...

Page 43: ...pecification it can read and write the formats used by today s computers and consumer electronic CE DVD devices Note that DVD Multi does not prescribe that devices should accommodate DVD RAM cartridge...

Page 44: ...layer A Nothing really It s simply a difference of opinion within the industry about how to label media and drive capabilities DVD R DL as named by the DVD RW Alliance stands for DVD R Double Layer DV...

Page 45: ...of our web site to assist you in troubleshooting the problem on your own NOTE We encourage you to go the Plextor web site www plextor com before attempting to contact Technical Support The answers to...

Page 46: ...of drivers used Call 1 800 204 0332 or 1 510 824 9693 and select the tech support option Before You E mail or Call for Support Please gather as much of the following information as possible before co...

Page 47: ...ive 4 Write the RMA number in large bold numbers on the outside of the box and ship it to Plextor Contacting Plextor s RMA Department You can contact our RMA Department and request an RMA number at te...

Page 48: ...n the outside of the shipping box Any drive sent to Plextor without an RMA number will not be accepted NOTE The RMA number must be clearly visible on the outside of the shipping box Drives must be sen...

Page 49: ...be liable for direct special or consequential damages such as but not limited to damage or loss of property or equipment loss of profits or revenues cost of replacement goods or expense or inconvenien...

Page 50: ...nited States For a drive originating outside of the United States the customer is responsible for shipping costs in both directions NOTE Warranty validity is limited to that applicable in the location...

Page 51: ...PX B310U PX B310SA Installation and Users Manual 45...

Page 52: ...CD RW compatibility 5 media 25 reading speed 2 writing 30 writing speed 2 CD TEXT 5 cleaning disc 27 cleaning your drive 32 precautions 8 32 closing tray 27 compatibility CD R 5 CD RW 5 DVD 4 DVD R 37...

Page 53: ...Video reading speed 2 editing DVD RW 4 eject emergency 10 34 eject button 10 closing tray 27 emergency eject hole 10 34 emergency eject tool 10 34 FAQs 37 features 3 CD R 5 DVD 4 firmware obtaining 33...

Page 54: ...ear panel 17 contents of box 18 controls front panel 16 installation 15 19 interface 3 5 mounting 19 operating system 5 rear panel connectors 17 PX B310U contents of box 11 installation 12 interface 3...

Page 55: ...ding 26 troubleshooting 35 ultra DMA support 3 ultra speed CD RW media 25 write speed 26 upgrading firmware 3 33 USB cable 11 warranty 43 web site Plextor 39 write methods CD 5 DVD 4 writing DVD RAM 2...

Page 56: ...PLEXTOR 42000 Christy Street Fremont CA 94538 Phone Fax E mail 510 824 9693 408 404 0142 Info it plextor com www plextor com...

Reviews: