Section 2. Installing the PX-712A Internal ATAPI Drive
PX-712 Installation and Users Manual
11
•
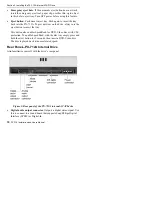
Analog audio output connector: Outputs an analog stereo signal.
Use this to connect to a sound board or audio amplifier. Use a
standard MPC-3 type, 4-pin connector.
•
Mode jumper: Use the mode jumper to select operation as an IDE
master or slave, or for cable select. In general, leave this jumper at
its factory setting, which is master; and ensure that any other device
on the bus is jumpered as slave.
•
DMA jumper: Use the DMA jumper to convert between Ultra
DMA Mode 0-2 (no jumper, default) and Multiword DMA Mode 0-2
(with jumper installed). In general, leave this jumper at its factory
setting, which is Ultra DMA (that is, no jumper installed).
•
IDE cable connector: Connects to your computer’s IDE (ATAPI)
interface using 40-pin IDE flat ribbon cable.
•
Power connector: Connects to your computer’s power supply to
provide DC +5 volts and +12 volts to the PX-712A.
What Else Is In the PX-712A Box
What you find in your Plextor box depends on what the company that
sold you the box put in—or took out—while the Plextor drive was in
their possession. Plextor currently sells the PX-712A drive in this
configuration:
•
PX-712A DVD±R/RW and CD-R/RW drive
•
40-pin IDE ribbon cable
•
1 piece of approved DVD+R media
•
4 mounting screws
•
Extra jumper
•
Emergency eject tool
•
Plextor software disc with bundled PlexTools® Professional. Also
contains Roxio Easy CD and DVD Creator 6 Basic DVD Edition.
•
PX-712 Installation and Users Manual
Summary of Contents for PX-712
Page 5: ...Detail of PX 712SA Laser Caution Labels...
Page 6: ...This page intentionally left blank...
Page 10: ...Table of Contents x PX 712 Installation and Users Manual This page intentionally left blank...
Page 134: ...Index 124 PX 712 Installation and Users Manual This page intentionally left blank...
Page 135: ...PX 712 Installation and Users Manual 125 Notes...

