background image

26


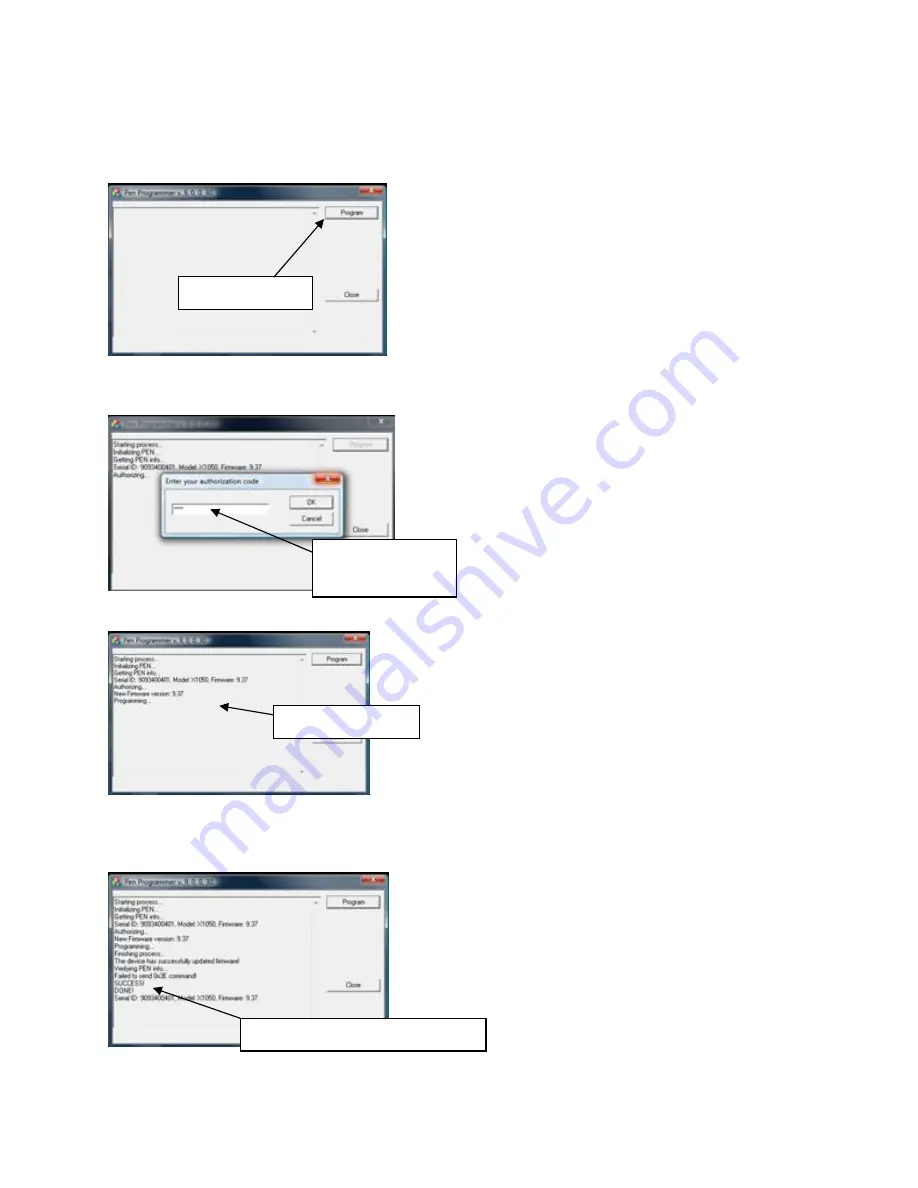
Then


click


“Program”


Enter


authorization


code:


solo


Please


do


not


disconnect


pen


while


in


programming


mode


After


the


programming


has


successfully


completed


disconnect


the


DocuPen


Xseries


scanner


from


your


PC


and


close


the


Xseries


Firmware


Programmer.


Click


“Program”


Type


in:


solo


now


press


OK.


Programming…


Success!


Programming


complete


Summary of Contents for DocuPen XSERIES

Page 1: ...1 DocuPen XSERIES Scanner ...

Page 2: ...tware 10 Scan Settings 11 Mode Resolutions Select Scan 11 Setting Time Date 11 Bluetooth Settings 13 Color Calibration 14 Roller Calibration 15 Points to Remember before you scan 17 On board memory and External memory card 18 MAC OS X Installation 18 BlackBerry Bluetooth 18 Windows Pocket PC and Windows Mobile Pen driver 23 Xseries Firmware Programming 25 Warranty 27 Appendix 27 DocuPen Xseries Sp...

Page 3: ...performance and longer service life from the unit Retain this manual for future reference Support In case you have any questions need further information or experience any kind of difficulties during installation or operation don t hesitate to contact our Customer Support at support planon com Customer Service 1 905 507 3926 Technical Support 1 877 DOCUPEN or 1 905 507 3926 For International calle...

Page 4: ...d on press the Settings button once to go into the setting mode In this mode you will be able to set the following options color mode scan resolution specific scanned image time and date You can also view the Technical Information In the Color Mode you can select Printstik mode which allows your DocuPen XSERIES scanner to print documents from the portable Planon PRINTSTIK printer B W TIF mode allo...

Page 5: ...capabilities Software Installation USB Driver Installation We recommend that you close all the Windows programs and disable all virus protection software temporarily during the USB driver PaperPort installation 1 Insert the DocuPen CD ROM into your CD drive 2 DocuPen Install window will appear in a few moments 3 In the DocuPen Install window please click on the button USB Driver 4 In the Welcome w...

Page 6: ...Software Installation PaperPort Installation From the DocuPen Install window select PaperPort and simply follow the onscreen instructions 1 In the Welcome window select your language and click this button 2 In the following window please click on the Start Installation button 3 In the following window click the Next button Click Next Click Finish Click Start Installation Click Next ...

Page 7: ...owing window select Complete Set up and then click the Next button 7 I n the following window click the install button 8 In the following window you will see the installation progress 9 The following window will display that the installation is complete click the Finish button Click Next Select Accept Click Next Fill in your information Click Next Click Install Select Complete ...

Page 8: ...nstallation 3 After the installation is complete the following window will appear click the Finish button to close the window Download the scanned Images to DocuDesk 1 Start the DocuDesk application from the programs menu 2 Click on the download button and the scanned image will start downloading 3 These images are stored in pen folder located in my documents Click Next Click Next Click Finish Con...

Page 9: ...ialog prompts you to turn your DocuPen ON Press the Power ON button on the DocuPen and click on the OK button in the dialog window 4 The DocuPen memory bank will be erased Download the scanned Images to PaperPort 1 Start the PaperPort software 2 On your very first start you will see the How to Guide prompt window Feel free to explore the detailed How to instructions within this guide 3 In the comm...

Page 10: ... bottom status bar of the PaperPort window All this moment you can run the OCR function by simply selecting the image and clicking on the Word icon in the bottom Status Bar For further details on using PaperPort Software please look at the getting started guide which may be found in the PaperPort folder under Program Files in your computer Bottom Status Bar NOTE The Abbyy software does not come wi...

Page 11: ...u can 1 Select the desired setting which you would like to change By pushing the Bluetooth ON OFF button you can 1 You turn ON the Bluetooth device in your DocuPen Xseries scanner 2 You turn OFF the Bluetooth device in your DocuPen Xseries scanner Scan Settings continued Settings Explained Mode Represents the mode which you would like to scan your image with These modes are Mode PRINTSTIK By selec...

Page 12: ...esolution DPI Represents the resolution DPI dots per inch which you would like to scan your image with There can be 3 resolution DPI settings chosen 150 DPI 150 dots per inch this is the lowest quality of sharpness at which the image can be scanned 300 DPI 300 dots per inch this is a very good quality of sharpness at which the image can be scanned 600 DPI 600 dots per inch this is highest quality ...

Page 13: ...anner has a Bluetooth module inside that allows you to transfer images wirelessly to your computer Smartphone and PLANON portable PRINTSTIK printer Using the Bluetooth connection from your DocuPen Xseries scanner to your computer 1 Press the Bluetooth ON OFF button to turn ON the Bluetooth module in the DocuPen Xseries scanner You will see a message on the LCD screen saying BT TRANSFER this is a n...

Page 14: ... dpi then follow the below instructions to re calibrate color Then select 600 dpi resolutions and repeat the color calibration 1 Connect the DocuPen Xseries scanner to your computer using the USB cable 2 Start the DocuDesk software 3 The DocuDesk window will appear Click options and select the auto calibration option 4 In the Calibration Setup window that appears please select Calibrate Color from...

Page 15: ... the link The DocuPen is factory calibrated and there should be no need to re calibrate We advise you to recalibrate only if you experience poor scan quality e g scanned image appears in white or black As a rule color calibration must be performed before roller calibration IMPORTANT Roller Calibration has to be done in 600 dpi B W mode 1 Connect the DocuPen Xseries scanner to your computer using t...

Page 16: ...n result dialog window will appear You should see the roller calibration values to the left If the accuracy is within 96 104 you have successfully calibrated the rollers 9 Finally click Upload Values to pen button in the Calibration result dialog window to send the calibration result to the DocuPen Xseries scanner You will be prompted to turn the DocuPen Xseries ON Press the Power ON button on the...

Page 17: ...he LCD on the left side of the document to be scanned Remove staples or clips as they will impede the gliding movement and the resulted scan will be distorted Apply even pressure in the center of the scanner to allow the rollers to rotate smoothly Press the Power ON button select he desired color and resolution settings and slowly glide the DocuPen Xseries scanner down across the area you want to ...

Page 18: ...B installed into the Xseries scanner Use the USB cable to connect the pen to your MAC computer Turn on the pen and on your MAC desktop you will see an additional drive the Xseries scanner is seen as a mass storage device All scans will be displayed in the drive Please note that the PaperPort software is not MAC compatible software Blackberry Bluetooth Driver Installation Verify your BlackBerry OS ...

Page 19: ...er alx Select the file and click open to copy the files After choosing the files the window below will appear The window will indicate the action status install for each driver file Scroll down the list to verify Click on Next The window below will appear and gives the summary of what will be installed Click Finish Click Start Task in Progress window Click Browse Select planon_BB_scanner alx and c...

Page 20: ... select Planon Bluetooth Scanner Driver select edit Permissions and make sure all items in the list are set for allow then click save BlackBerry Installation guide through WAP browser In your BlackBerry phone open your web browser and type in the URL http www planonftp BBPenDriver wml Confirm your device OS and download the corresponding driver Check the box that says Set application permissions a...

Page 21: ...earch for devices from here Wait while the BlackBerry is searching for devices Select your device and click OK Download image from scanner Turn on scanner Turn on BT transfer mode see page 13 In BlackBerry run the Planon Bluetooth scanner icon Located in Downloads or Application depending on your BlackBerry model Set Up Bluetooth Icon ...

Page 22: ...u button and select Server Setup Enter the IP address 64 254 252 180 and Remote server port 80 Then enter your email address For users with the X50 pen scanner to upload image to server go into the Planon Bluetooth scanner icon hit the menu button and select upload to server Select from the image list to upload to the server Image Explorer Options Run the Planon Bluetooth scanner icon and select i...

Page 23: ...ect the image you want enter the email address and send Rename Image This allows you to rename the image file Select the image and select Rename image from the options list Back This allows you to go back to the Planon Bluetooth scanner menu Planon Pen Driver Installation for Windows Mobile and Windows Pocket PC Download Microsoft ActiveSync v4 5 from Microsoft website and install on your PC Conne...

Page 24: ...ult Upload Images Select image that will upload to server from image list Click Upload on the menu image will be upload to remote server When upload image is done message window will display and show result of upload Server Setup Click server setup on Main Menu remote server set up window will display Fill the IP of Server the value is 64 254 252 180 Fill the Port of Server the value is 80 Fill th...

Page 25: ...and message window will display and show result of email sending Pen Manager Under Pen manager you can add or remove Planon Bluetooth Pen and Prinstik Add Pen Click Add Pen on the menu warning window will be displayed If yes to add pen you will wait for Bluetooth device searching Select the Bluetooth device from the list Click Add Pen on the menu to save pen to stored list Remove Pen Click Add Pen...

Page 26: ...t disconnect pen while in programming mode After the programming has successfully completed disconnect the DocuPen Xseries scanner from your PC and close the Xseries Firmware Programmer Click Program Type in solo now press OK Programming Success Programming complete ...

Page 27: ...ecommend use Sandisk or Kingston memory cards The number of pages varies depending on text graphics and scanning resolution USB 1 0 or 2 0 Bluetooth 2 4 GHz Battery Lithium Ion Rechargeable Battery Charge Full Battery Charge 60 minutes Software interface PenTwain driver DocuPen application OCR Software Scanning method Contact image sensor Included Accessories USB cable Leather Case CD Installation...

Page 28: ...28 ...

Reviews: