background image


8


Panel Tilt  


Diagram 1


                    Diagram 2 


Diagram 2-1


Diagram 2-2


Diagram 1 – 

Illustrates the display can tilt forward or backwards. 


Diagram 2 – 

Illustrates the display can rotate left or right.  


Diagram 2 –1   

Swivel angle left


Diagram 2 –2   

Swivel angle right 


5

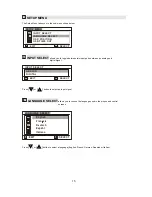
O

20

O

4

5

O

4

5

O

Summary of Contents for PL201M

Page 1: ...PLANAR LCD MONITOR PL201M MANUAL www planar com ...

Page 2: ...e separation between the equipment and receiver Connect the equipment into an outlet on a circuit different from that to which the receiver is connected Consult the dealer or an experienced radio TV technician for help FCC Warning To assure continued FCC compliance the user must use the provided grounded power supply cord and the provided shielded video interface cable with bonded ferrite cores Al...

Page 3: ... it 10 Check the current flow tolerance of an extension cord before use make sure that the total amount of the product s current flow does not exceed the limit A current flow of a wall outlet can never exceed up to 15 amperes 11 Do not insert objects or pour liquid into this product through it s casting apertures It may touch a high voltage area causing an electric shock or short the circuit 12 Do...

Page 4: ... 1 FCC Warning 1 Safety Precautions 1 Important Safety Instructions 2 Getting Started Package Contents 4 Unique Features 4 SRS Trademark and Logo 5 Precautions 5 Cleaning the TFT LCD Monitor 5 Quick Installation 6 Operation Front Control Panel 7 Hot Key 7 Panel Tilt 8 OSD Main Menu 9 Image Adjust Menu 10 11 Color Adjust Menu 12 13 Audio Menu 14 Advanced Menu 15 Setup Menu 16 17 Technical Data Spec...

Page 5: ... VESA DPMS standard that reduces the energy consumption when the LCD monitor is not in use Equipped with DDC2B for Plug Play compatibility Supports a true UXGA resolution of 1600 x 1200 60Hz Saves more than 2 3 of space foot print energy power All plastic parts are recyclable All materials are strictly selected to ensure case of maintenance inspection and disposal Approved for TCO 99 Free run feat...

Page 6: ... power cord adapter video or audio cables If smoke abnormal noise or strange odor occurs immediately turn the LCD monitor off and call your dealer It is dangerous to continue using the LCD monitor Do not remove the rear cover by yourself the display unit contains high voltage parts it may expose you to the electric shock hazard Contact your local dealer for the service if it is needed Always handl...

Page 7: ...ale end in the socket of the computer power supply if equipped 5 Plug one end of the video cable in the Analog or Digital video signal connector of LCD monitor and the other end in video signal connector of the computer 6 Turn on the computer 7 Turn on the LCD monitor 8 Adjust the user controls to optimize your personal preference see Operation section call your local dealer if you have any proble...

Page 8: ...e menu To select menu item To scroll up or down the menu PowerLED PowerSwitch To adjust the level of the control Earphone jack Hot Keys Input Select Press B button to activate Input select then choose your Analog or Digital video input preference Volume Contrast Brightness Press or button to activate the volume menu then use the B button to select between the Volume Contrast Brightness functions U...

Page 9: ... 2 Diagram 2 1 Diagram 2 2 Diagram 1 Illustrates the display can tilt forward or backwards Diagram 2 Illustrates the display can rotate left or right Diagram 2 1 Swivel angle left Diagram 2 2 Swivel angle right 5 O 20 O 4 5 O 4 5 O ...

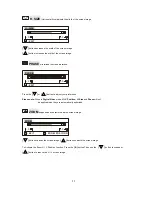
Page 10: ... background black level and the foreground white level BRIGHTNESS adjusts the background black level of the screen image CONTRAST EXIT A BRIGHTNESS B button decreases the Contrast button increases the Contrast button decreases the Brightness button increases the Brightness Shortcut Press or button at anytime to activate Volume Contrast Brightness menu then use the same buttons to make your adjustm...

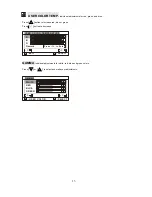
Page 11: ...activate Auto tune H POSITION Horizontal Position moves the screen image to the left or to the right button moves the screen image to the left button moves the screen image to the right V POSITION Vertical Position moves the screen image up or down button moves the screen image down button moves the screen image up H V Position Diagram V POSITION H POSITION USE UP AND DOWN TO ADJUST EXIT A B V POS...

Page 12: ...button to adjust your preference Please note When in Digital Video mode H V Position H Size and Phase will not be applicable as they are automatically optimized ZOOM expands and contacts the entire screen image ZOOM ZOOM POSITION EXIT A B button expands the screen image button contracts the screen image To Activate the Zoom H V Position function Press the B button Then use the button to expand or ...

Page 13: ...and Blue B The factory setting for this product is 9300K 9300 Kelvin 9300K 6500K 5400K 5000K COLOR TEMPERATURE SELECT EXIT A B Press or button to scroll to your selection 9300K Adds blue to the screen image for cooler white used in most office settings with fluorescent lighting 6500K Adds red to the screen image for a warmer white and richer red 5400K Adds green to the screen image for a darker co...

Page 14: ...on to increase red blue or green Press button to decrease R B G Gamma USER COLOR TEMPERATURE SELECT EXIT A B Press to Enter GAMMA Individual adjustments for white red blue and green colors Press or to select and make your adjustments WHITE RED BLUE GREEN SELECT USER COLOR A B ...

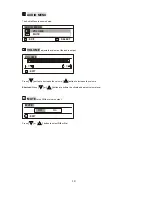
Page 15: ...VOLUME adjusts the volume of the audio output VOLUME EXIT A Press button to decrease the volume button to increase the volume Shortcut Press or button at anytime to activate and adjust volume level MUTE turns Off the volume output MUTE Off On EXIT A Press or button to select Off or On ...

Page 16: ...tions 1 1 adjusts the video signal so that the height and width of the picture are the same SHARPNESS adjusts the clarity and focus of the screen image SHARPNESS SHARP SOFT EXIT A Press or button to adjust the image sharpness INFORMATION displays the timing mode Video Signal Input coming from the graphics card in your computer See your graphic card s user guide for instructions on changing the ref...

Page 17: ...between two input ports between an analog and digital signal ANALOG DIGITAL INPUT SELECT SELECT EXIT A B Press or button to select an input signal LANGUAGE SELECT allows you to choose the language used in the menus and control screens LANGUAGE SELECT SELECT EXIT A B English Francais Deutsch Espanl ltaliano Press or button to select a language English French German Spanish or Italian ...

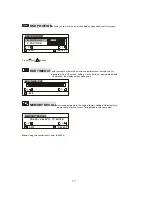
Page 18: ...play screen is displayed For example with a 30 second setting if a control is not manipulated within 30 seconds the display screen disappears OSD TIME OUT A EXIT MEMORY RECALL returns adjustments to the original factory settings if the display is operating in a factory Preset Timing Mode in this user guide MEMORY RECALL PRESS SELECT TO ENTER SELECT EXIT A B Note Using this control resets color to ...

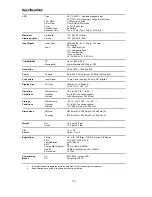
Page 19: ...Analog 24 pin DVI Digital Display Area Full scan 408mm H x 306mm V 16 06 H x 12 05 V Operating Temperature 32 F to 104 F 0 to 40 Conditions Humidity 5 to 95 no condensation Altitude to 3000 meters or 10 000 feet Storage Temperature 4 F to 140 F 20 to 60 Conditions Humidity 5 to 95 no condensation Altitude to 12 000 meters or 40 000 feet Dimensions Physical 482 0mm W x 200 0mm D x 458 0mm H Package...

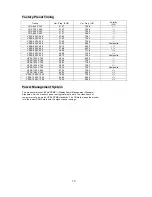
Page 20: ...49 72 74 54 Composite VESA 1024 X 768 48 36 60 00 VESA 1024 X 768 56 48 70 07 VESA 1024 X 768 58 04 71 92 VESA 1024 X 768 60 02 75 03 VESA 1024 X 768 60 24 74 93 Composite VESA 1152 X 864 67 50 75 00 VESA 1280 X 960 60 00 60 00 VESA 1280 X 1024 79 98 75 03 VESA 1280 X 1024 63 98 60 02 VESA 1600 X 1200 75 00 60 00 Power Management System This monitor matches VESA DPMS Display Power Management Stand...

Page 21: ...PLANAR 1 1 866 752 6271 Hours M F 7am 6pm Pacific Time 2002 Planar Systems Inc 04 02 Planar is a registered trademark of Planar Systems Inc Other brands and names are the property of their respective owners Technical information in this document is subject to change without notice ...

Reviews: