3
8
XW-NAC3-K
1
2
3
4
A
B
C
D
E
F
1
2
3
4
8
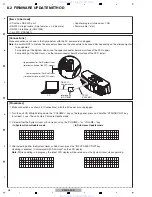
.2 FIRMWARE UPDATE METHOD
S o f
t
u p d a t e
S u b
S o f
t
u p d a t e
S u b
D o w n l o a d
S o f
t
u p d a t e
S y s
D o w n l o a d
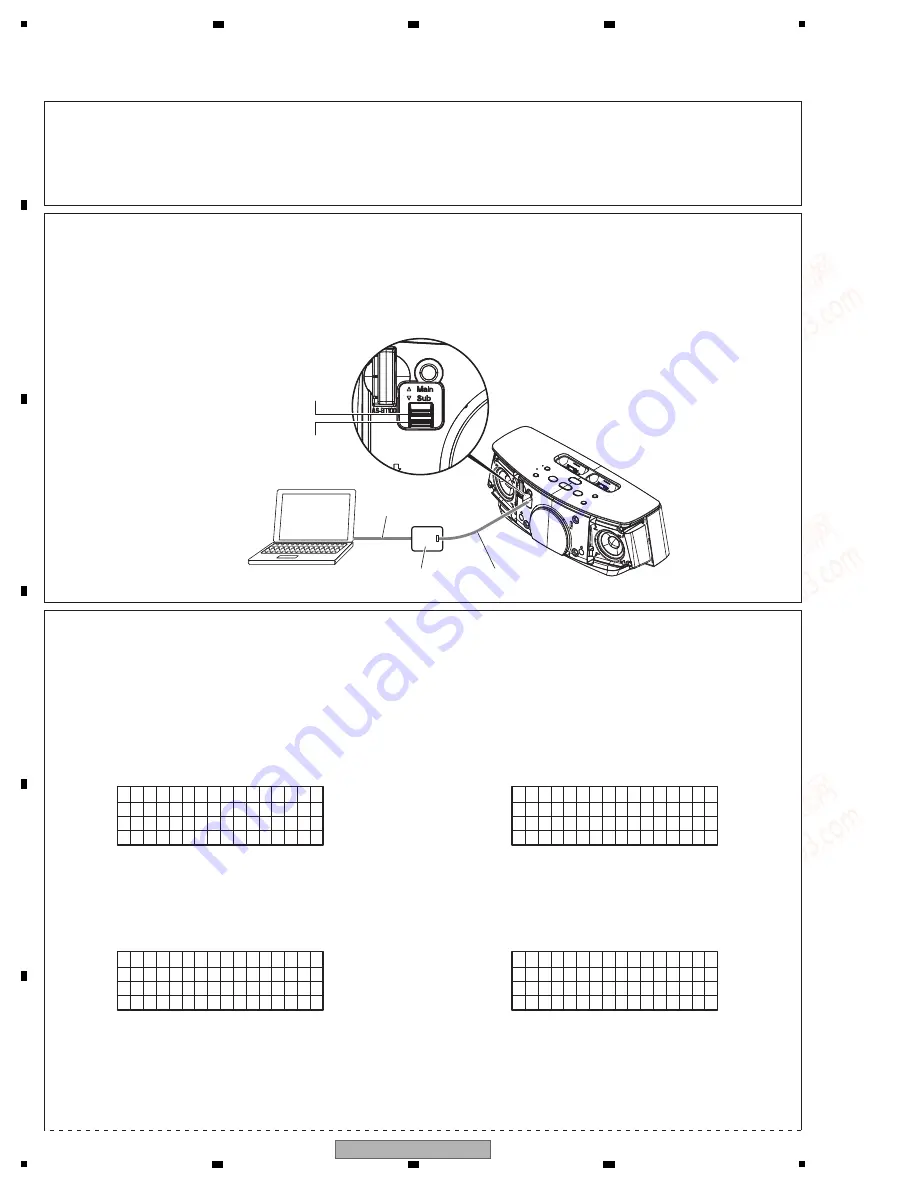
[Items to be Used]
• PC with an RS-232C port
• RS-232C straight cable (9-pin female <-> 25-pin male)
• RS-232C interface jig (GGF1348)
• 7-pin FFC (
V
DA1681)
[Connections]
Make connections as shown in the figure below, with the AC power cord unplugged.
Note:
Be careful
N
OT to mistake the connectors, because the connectors to be used differ depending on the microcomputer
to be updated.
For updating of the System Ucom, use the upper connector (terminal surface of the FFC: upper).
For updating of the Sub Ucom, use the lower connector (terminal surface of the FFC: lower).
[Procedures]
1
Make connections, as shown in [Connections], with the AC power cord unplugged.
2
Turn the unit O
N
.
W
hile holding down the "
V
OLUME +" key on the top panel, press and hold the "STA
N
DBY/O
N
" key
for at least 3 sec. The unit enters Firmware Update mode.
3
Select either the System Ucom or Sub Ucom, using the "
V
OLUME +" or "
V
OLUME –" key.
•
In System Ucom Update mode
•
In Sub Ucom Update mode
After selecting either the System Ucom or Sub Ucom, press the "I
N
PUT SELECTOR" key.
Updating is enabled. It is displayed with “Download” on the LCD display.
hile updating is in progress, the latest LCD display will be retained, as the System Ucom stops operating.
• Updater program (ufu.exe: ver. 1.08)
• Firmware file (*.mot)
PC
7P FFC
(
V
DA1681)
Upper connector: For System Ucom
(terminal surface of the FFC: upper)
Lower connector: For Sub Ucom
(terminal surface of the FFC: lower)
Interface jig
(GGF1348)
RS-232C
straight cable
www. xiaoyu163. com
QQ 376315150
9
9
2
8
9
4
2
9
8
TEL 13942296513
9
9
2
8
9
4
2
9
8
0
5
1
5
1
3
6
7
3
Q
Q
TEL 13942296513 QQ 376315150 892498299
TEL 13942296513 QQ 376315150 892498299


