32
XW-NAC3-K
1
2
3
4
A
B
C
D
E
F
1
2
3
4
7. DISASSEMBLY
Note:
(1) Even if the unit shown in the photos and illustrations in this manual may differ from your product, the
procedures described here are common.
(2) For performing the diagnosis shown below, the following jigs for service is required:
• 25P FFC (GGD1309)
• 7P FFC (
V
DA1681)
1
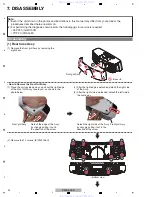
(1) Remove the front grill Assy by removing the
eight
boss.
(2) Remove the 10 screws. (8109230A0U)
Front grill Assy
Disassembly
[1] Rear Case Assy
2
2
2
2
2
2
2
2
2
2
• Bottom view
: Boss
×
8
1
Front grill Assy
Front grill Assy
2
(1) Place the unit upside down and pull out the right edge
of the Front Grill Assy toward you, as shown in the
photo
below.
(2) After the right edge is detached, detach the right side
of the Assy.
(3) After the right side is detached, detach the left side in
the same way.
Detach the edge of the Assy
by strongly pulling it out in
the direction of the arrow.
Detach the right side of the Assy
by strongly pulling it out in the
direction of the arrow.
• How to Remove the Front Grill Assy
www. xiaoyu163. com
QQ 376315150
9
9
2
8
9
4
2
9
8
TEL 13942296513
9
9
2
8
9
4
2
9
8
0
5
1
5
1
3
6
7
3
Q
Q
TEL 13942296513 QQ 376315150 892498299
TEL 13942296513 QQ 376315150 892498299


