Connecting your equipment
03
37
En
•
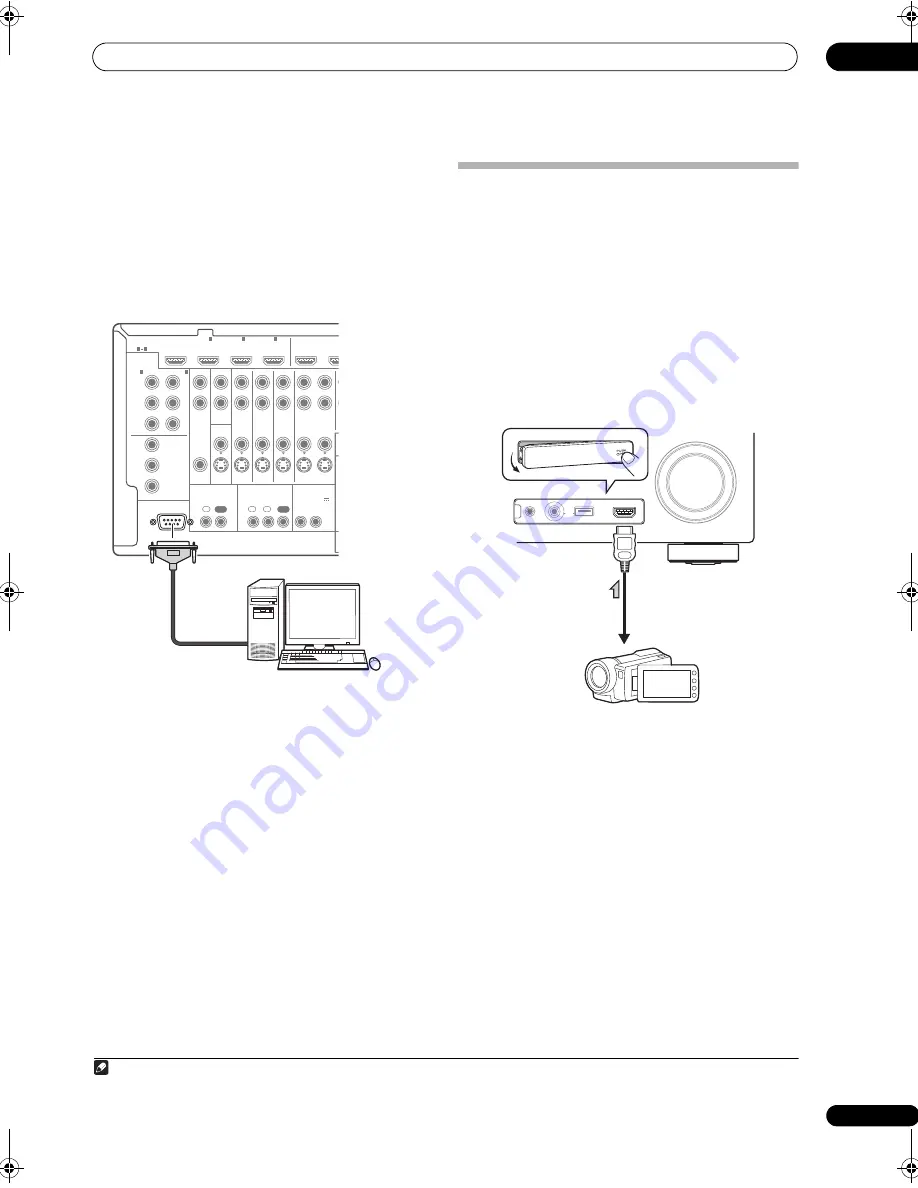
Connect your computer to the RS-232C jack on the
rear panel of the receiver.
Make su
r
e that the
r
eceive
r
and all connected
com
p
onents a
r
e switched off and disconnected f
r
om the
p
owe
r
outlet when you do this.
1
Use a comme
r
cially-available cable to connect the RS-
232C jack on you
r
com
p
ute
r
to the 9-
p
in RS-232C jack on
this
r
eceive
r
. See the documentation
pr
ovided with the
Advanced MCACC a
pp
lication fo
r
mo
r
e info
r
mation.
Connecting an HDMI-equipped
component to the front panel input
(VSX-9140TXH only)
The
r
e is an HDMI in
p
ut te
r
minal on the f
r
ont
p
anel. High
quality
p
ictu
r
es can be viewed via the
r
eceive
r
sim
p
ly by
connecting an HDMI-equi
pp
ed video came
r
a with a
single HDMI cable. HDMI-equi
pp
ed com
p
onents othe
r
than video came
r
as can also be connected to this
te
r
minal.
• Push down on the
PUSH OPEN
tab to access the
f
r
ont
p
anel in
p
ut.
• Select this in
p
ut using
INPUT SELECT
(
r
emote) o
r
the
INPUT SELECTOR
dial (f
r
ont
p
anel) to select
HDMI 4
.
Note
1 The va
r
ious
p
a
r
amete
r
s and the
r
eve
r
b cha
r
acte
r
istics data used fo
r
dis
p
lay on the com
p
ute
r
a
r
e not clea
r
ed when the
p
owe
r
is tu
r
ned off (see
Output PC
on
p
age 88).
RS-232C
COMPONENT
VIDEO
HDMI
ZONE2
VIDEO
S-VIDEO
ASSIGNABLE
ASSIGNABLE
MONITOR
OUT
MONITOR
OUT
IN
Y
L
R
P
B
P
R
Y
P
B
P
R
Y
OUT
DVD
IN
TV/SAT
IN
VIDEO
DVR
IN
IN
OUT
ZONE3
OUT
P
B
P
R
1
IN
BD IN
1
IN
2
IN
OUT 1
OU
(KURO
LINK)
3
1
3
(DVD)
IN
2
(DVR)
CONTROL
IR
12 V TRIGGER
IN
IN
IN
OUT
OUT
1
2
1
2
(OUTPUT 12 V
TOTAL 50 mA MAX)
RS-232C
Pe
r
sonal com
p
ute
r
VSX-9140TXH
MASTER
VOLUME
MCACC SETUP MIC
USB
iPod
iPhone
VIDEO CAMERA
HDMI 4
CONTROL
ON / OFF
Video came
r
a, etc.
VSX-9140TXH_CUXJ.book 37 ページ 2009年4月16日 木曜日 午前10時36分


