17
En
Displays and Controls
PREP
ARA
TION
-
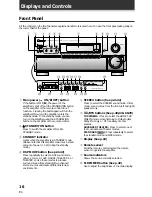
INPUT SELECTOR dial
Turn to select a source component. The source
indicators show the current component:
DVD/LD :
DVD player or LaserDisc player.
TV/SAT :
TV tuner or satellite tuner.
CD :
Compact Disc player.
MD/TAPE 1/CD-R :
Tape deck or Mini Disc
recorder connected to MD/TAPE 1/CD-R inputs/
outputs.
LINE/TUNER :
FM/AM tuner.
PHONO :
Turntable.
VIDEO :
Video camera (etc.) connected to the
VIDEO INPUT on the front panel.
VCR 1/DVR :
Video cassette recorder connected
to VCR 1/DVR inputs.
VCR 2 :
Video cassette recorder or other
component connected to VCR 2 inputs.
=
MASTER VOLUME
Adjusts the overall amplifier volume.
~
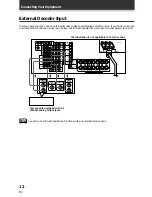
EXTERNAL DECODER IN button (See
p.47)
Use to hook up an external component that can
decode other types of signals and input them into
the amplifier.
!
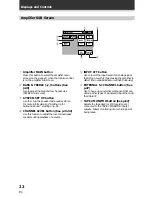
DIRECT button (See p.49)
Switches DIRECT playback on or off. Use to
bypass the tone controls and channel level for the
most accurate reproduction of a program source.
It will automatically put the amplifier in STEREO
mode for the function being used for DIRECT
playback.
@
LOUDNESS button (See p.48)
Switches the LOUDNESS mode on or off.
#
MIDNIGHT button (See p.47)
Switches the MIDNIGHT listening mode on or
off.
$
DIGITAL NR button (See p.46)
Switches the DIGITAL NR on or off (STEREO
mode only).
%
SIGNAL SELECT button (See p.45)
Use to select the signal from the digital
components.
Press SIGNAL SELECT repeatedly to select one
of the following:
ANALOG :
To select an analog signal.
DIGITAL :
To select an optical or coaxial digital
signal.
AC-3 RF :
To select an AC-3 RF signal.
AUTO :
This is the default. If there are both
analog and digital input signals, the amplifier
automatically selects the best possible signal.
^
EFFECT/CHANNEL SELECT LEVEL(–/+)
buttons
EFFECT :
Use these buttons to increase or
decrease the amount of effect applied in a DSP or
Advanced Theater mode. When the amount of
effect is increased in a DSP/Advanced Theater
mode, the characteristics of that mode become
stronger and more noticeable. The scale ranges
from 10-90 with 70 as the default setting. First
turn on the DSP or ADVANCED Theater you want
(by pressing the DSP MODE/ADVANCED button
until you get the mode) and then increase or
decrease the amount of effect.
CHANNEL :
You may want to adjust the channels
when listening to some sound sources. Use this
button to select the channel you want to adjust.
–/+ :
Use these buttons to select the amount of
effect in a sound mode or to adjust the channel
level when making surround sound settings.
&
TAPE 2 MONITOR button (See p.62)
Selects the tape deck (MD recorder, etc.)
connected to the TAPE 2 MONITOR inputs/
outputs. Allows monitoring of a recording as it's
being made.
*
INPUT ATT button
Use to lower the input level of an analog signal
that is too powerful, thus causing the amplifier to
distort (the overload indicator will light furiously).
(
TREBLE (–/+) button (See p.48)
Use to adjust the high frequencies.
)
BASS (–/+) button (See p.48)
Use to adjust low frequencies.
_
SPEAKERS (A/B) buttons
A is the primary setting. It plays all speakers
hooked up to the A system. A & B setting only
plays the front speakers of both the A & B
systems and the sub-woofer. Multi channel
sources will be down-mixed to these speakers so
no sound will be lost. B setting only plays the
front speakers connected to the B system and
multi channel sources will be down-mixed to
these two speakers.
A
A+B
OFF
B
+
VIDEO INPUT jacks (See p.9)
S-VIDEO :
Video input for connecting a video
camera (etc.), that has an S-Video out.
VIDEO / AUDIO (L/R) :
Video input for
connecting a video camera, etc. that has standard
video/audio outputs.
¡
PHONES jack
Connect headphones for private listening (no
sound will be heard through the speakers).


