background image

9  Using the Tape Deck

45

En

English

1

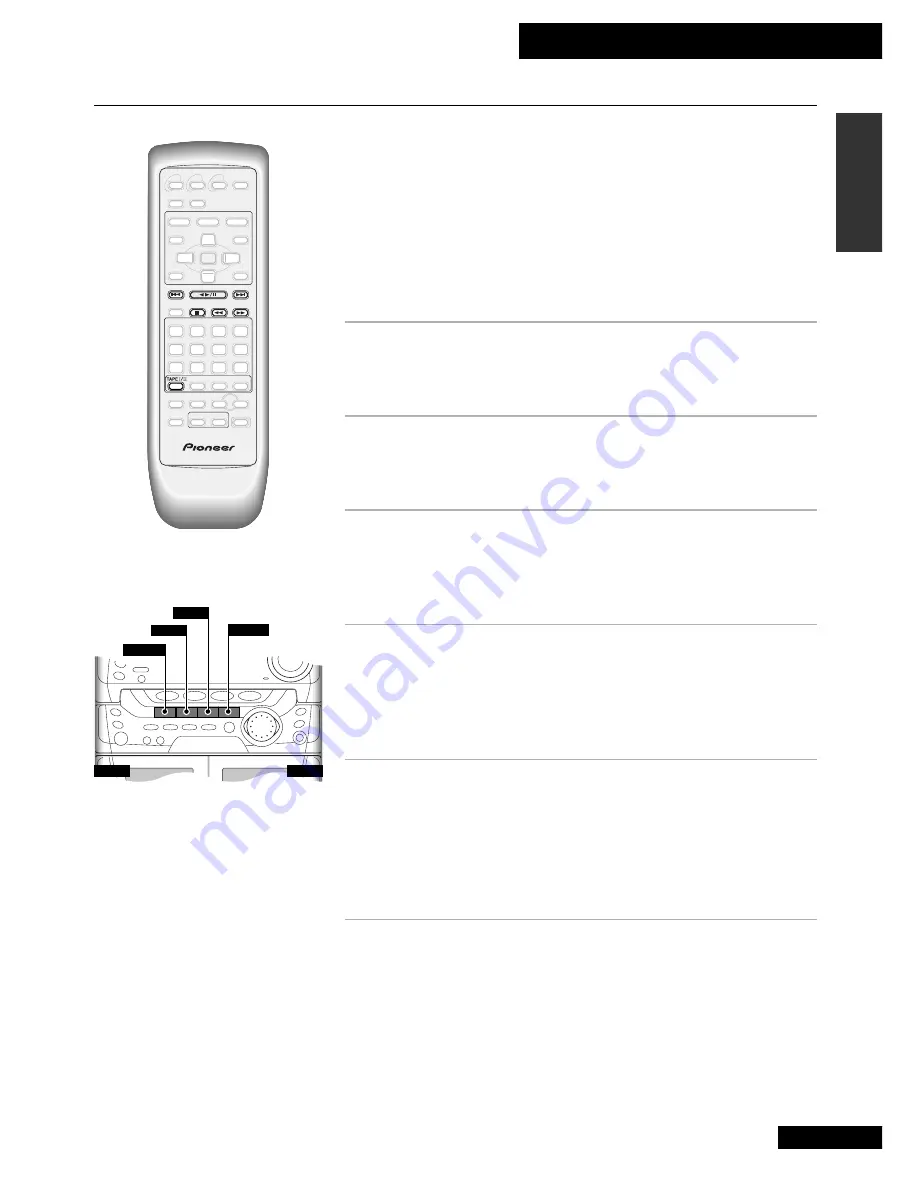
Press TAPE I/II to switch to tape mode.

Press repeatedly to switch between tape decks I and II.

If there’s only one tape loaded, the player automatically selects that deck.

2

Press EJECT on the front panel to open one of
the cassette doors.

Remember: 

both decks can play tapes, but only deck I records.

3

Load a cassette tape then push the cassette
door shut.

Use a tape that's already recorded on so you can hear something in the
following steps!

4

Press 

26

 to start playback.

On the front panel, press 

2 3

.

The side of the tape you'll hear is whichever is forward facing when you load
it. This is the 'forward' (

3

) direction, while the other side is 'reverse'

(

2

). The forward indicator is shown in the display.

5

To play the other side of the tape, press 

26

.

On the front panel, press 

2 3

.

Each time you press 

26


during playback, the other side of the tape starts

playing. Pressing 

26


when the tape is stopped starts playback on the side

it was playing previously.

The current tape direction is indicated in the display.

6

To skip back or forward a track on the tape,
press 

4

 or 

¢

.

On the front panel, press 

4

·

1

 and 

¡

·

¢


(the tape should

be playing when you do this).

¢

 searches for the next blank space between tracks on the side currently

playing (in other words, to the start of the next track), then resumes playback.

4

 searches for the previous blank space between tracks on the side currently

playing (in other words, to the start of the current track), then resumes
playback.

This unit has two tape decks; one exclusively for playback, the other for both
recording and playback. Other features include auto-reverse, relay play, Dolby B Noise
Reduction and auto tape select. Auto-reverse lets you play or record a tape without
physically taking it out and turning it over. Using relay play, you can listen to two
complete tapes back-to-back for up to 3 hours of continuous music.Dolby B NR
reduces tape hiss on tapes recorded using Dolby B NR (which includes almost all
commercially recorded tapes). Auto tape select means that the deck automatically
detects the type of tape you’re playing/recording—normal (Type I), or high-position
(Type II/IV)—so there’s no need to check the tape type and switch manually.

Playing Cassette Tapes

0

 EJECT

0

 EJECT

7

2 3

  4

 · 

1


¡

 · 

¢ 

Summary of Contents for S-A9700V

Page 1: ...Operating Instructions Mode d emploi STEREO DVD CASSETTE DECK RECEIVER AMPLI TUNER LECTEUR DVD DOUBLE PLATINE A CASSETTE XR A9700DV XR VS100D S A9700V S VS100V SPEAKER SYSTEM ENCEINTES ACOUSTIQUES ...

Page 2: ...tion or modifications carried out without appropriate authorization may invalidate the user s right to operate the equipment FOR U S MODEL CAUTION Use of controls or adjustments or performance of procedures other than those specified herein may result in hazardous radiation exposure The use of optical instruments with this product will increase eye hazard This equipment has been tested and found t...

Page 3: ...to cords at plugs convenience receptacles and the point where they exit from the product OUTDOOR ANTENNA GROUNDING If an outside antenna or cable system is connected to the product be sure the antenna or cable system is groundedsoastoprovidesomeprotectionagainst voltage surges and built up static charges Article 810 of the National Electrical Code ANSI NFPA 70 provides information with regard to p...

Page 4: ... Deafness Research Foundation 90 Subway motorcycle truck traffic lawn mower 100 Garbage truck chain saw pneumatic drill 120 Rock band concert in front of speakers thunderclap 140 Gunshot blast jet plane 180 Rocket launching pad THE FOLLOWING NOISES CAN BE DANGEROUS UNDER CONSTANT EXPOSURE 30 Quiet library soft whispers 40 Living room refrigerator bedroom away from traffic 50 Light traffic normal c...

Page 5: ...tting Language Preferences 30 Setting your preferred audio language 31 Setting your preferred subtitle language 31 Setting subtitle display preferences 31 Changing default subtitles 32 Switching off Auto Language 32 Selecting the disc menu language 32 Language Code List 33 6 More Disc Functions Playing Tracks at Random 34 Repeating Tracks 34 Programming the Track Order 35 Displaying Disc Informati...

Page 6: ...e the cover of the battery case CAUTION Remove the battery if the remote is not going to be used for a month or more Remove dead batteries promptly they can leak and damage the unit Using the remote control Keep in mind the following when using the remote control unit Make sure that there are no obstacles in between the remote and the remote sensor on the unit Use within the operating range and an...

Page 7: ...ely dusty or damp environment Place directly on top of any appliance which becomes hot in use Use near a television or monitor as you may experience interference especially if the television uses an indoor antenna Use in a kitchen or other room where the unit may be exposed to smoke or steam Place on an unstable surface or one that is not large enough to support all four of the unit s feet or the ...

Page 8: ...ipe lightly from the center of the disc using straight strokes Don t wipe the disc surface using circular strokes Handling discs When holding discs of any type take care not to leave fingerprints dirt or scratches on the disc surface Hold the disc by its edge or by the center hole and edge Damaged or dirty discs can affect playback performance Take care also not to scratch the label side of the di...

Page 9: ...ging any rear panel connections make sure that all the components are switched off and unplugged from the power supply To get the best sound from the system it s important that you connect the two strands of speaker wire for each speaker to the correct speaker terminal To help you match up the wires and terminals correctly the supplied speaker cord is color coded connect the black half of the cord...

Page 10: ...ou wish to connect speakers other than the ones supplied to this system use only speakers with a nominal impedance of between 6Ω and 16Ω Refer to the instructions that came with your speakers if you are unsure of their impedance before connecting them and switching on Connecting to Your TV This system has two video outputs one standard VIDEO OUT and one S VIDEO If your TV has an S Video input we r...

Page 11: ... AM antenna wires Place the AM antenna on a flat surface and point in the direction giving the best reception If necessary stabilize with a pen or pencil through the hole near the base Avoid placing near computers television sets or other electrical appliances and do not let it come into contact with metal objects It s also possible to fix the AM antenna to a wall using two small screws or pins th...

Page 12: ...UT plugs After making sure that everything is connected properly plug in the power cord to the AC INLET and the other end to a mains power outlet Congratulations You re done setting up Connecting the Power Connecting an external AV amplifier Another use for the optical digital output is to connect this system to an external AV amplifier with built in Dolby Digital DTS and or MPEG decoder This will...

Page 13: ... for smooth adjustment SOUND MORPHING JOG DYNAMIC POWER SUPPLY AMPLIFIER 2 3 4 5 6 7 8 9 10 11 17 16 15 14 13 12 1 9 P BASS DEMO button press to switch between P Bass modes use the S M JOG dial for smooth adjustment 10 SET button use to enter timer settings made with the S M JOG dial 1 1 SOUND MORPHING JOG S M JOG use to change Preset Equalizer Zoom Surround and P Bass modes Also used when setting...

Page 14: ...se Reduction on off 21 FREQ STATION button press to switch between tuning and preset station modes 22 REC STOP button press to start stop tape recording 23 ASES COPY button press to start automatic CD tape recording 24 0 EJECT tape I press to open the cassette door of deck I 25 0 EJECT tape II press to open the cassette door of deck II 26 Control buttons use to control tape playback for manual tun...

Page 15: ...ck point was memorized for the loaded disc 15 96kHz lights when a DVD disc is playing that contains 96kHz audio 16 CONDITION lights when a DVD disc is loaded that has had preferences set for language screen etc 17 DOLBY DIGITAL lights when a Dolby Digital DVD disc is playing 18 Sound morphing sound level display 19 EQ highlights when EQ is active 20 SURR highlights when zoom surround is active 21 ...

Page 16: ...SETUP press to display the system setup menu for access to various sound picture and language options 12 ENTER use to select items from on screen menus 13 RETURN press to exit from a menu screen 14 SELECT 26 press to start playing a disc or tape or pause one already playing 15 PREV 4 use to skip back tracks chapters on a disc or tape switch menu screens on a Video CD PBC menu tune to radio station...

Page 17: ...22 CLEAR press to clear or cancel various operations 23 10 Use to select numbers over 10 24 10 0 use as zero or 10 when entering numbers shift PBC press to switch Video CD playback control on or off 1 2 3 9 4 5 6 7 8 21 22 23 24 25 26 27 28 25 TAPE I II press to switch to the tape function and to switch between tape decks I and II 26 BAND use to switch between FM and AM bands 27 AUX press to switc...

Page 18: ...tched on the unit CLK ADJ should already be displayed 4 Press SET 5 Use the S M JOG to set the hour The time is in 24 hour clock format i e 13 00 is 1pm 6 Press SET 7 Use the S M JOG to set the minute 8 Press SET to finish Press DISPLAY to show the current time The display will revert to it s previous state after about five seconds Tip There are a number of buttons other than STANDBY ON which will...

Page 19: ...make it fit onto a 4 3 screen Even though the picture looks larger on the screen because it uses the whole height of the screen you re actually seeing less of the movie because the sides are lost Titles chapters and tracks Ordinary music CDs and Video CDs are divided into tracks to make finding a particular piece on the disc easier The same things on DVDs are called chapters as in chapters of a bo...

Page 20: ...can select a part of the disc to watch Under PBC features such as repeat program and random play are not available Disc and player restrictions The DVD format gives disc makers a lot of flexibility and control over how material on a disc is presented If you try and do something that the disc currently playing does not permit the following symbol appears on screen If you attempt an operation that t...

Page 21: ...mpted to enter the Setup Navigator If this screen does not appear read Using the On screen Menus on page 28 then select General Setup Navigator In this and the following screens the yellow text near the bottom of the screen gives you more information on the highlighted option 3 Press ENTER to start the Setup Navigator 4 Select your preferred on screen display OSD menu language Note The choice avai...

Page 22: ... 7 Choose VALID to confirm the setup To exit the Setup Navigator without making the changes you just input select Invalid To start again select Redo 8 You re done setting up Press SETUP to exit the menu screen Note The next time you press SETUP you ll be asked whether you want to use the Setup Navigator just press ENTER to select Not Used Setup Navigator Audio1 General Language Video 2 Move Exit S...

Page 23: ... in scan mode press 26 remote or 2 3 front panel to resume playback Note with DVD fast forward playback appears much smoother than fast reverse playback This is due to the way the picture is recorded on the disc 6 To skip back or forward to another chapter press 4 or On the front panel these buttons are marked 4 1 and Pressing once skips to the start of the next chapter on the disc Further presses...

Page 24: ...ess E SHIFT If the Video CD is not in PBC mode you can also use the 26 button 2 3 on the front panel To resume playback press 26 or 2 3 5 To scan backward or forward press and hold 1 or On the front panel these buttons are marked 4 1 and Release the button to resume normal playback If the disc continues in scan mode press 26 remote or 2 3 front panel to resume playback 6 To skip back or forward to...

Page 25: ...e disc continues in scan mode press 26 remote or 2 3 front panel to resume playback 6 To skip back or forward to another track press 4 or On the front panel these buttons are marked 4 1 and Pressing once skips to the start of the next track chapter on the disc Further presses take you to subsequent tracks Pressing 4 once takes you to the beginning of the current track Further presses skip to the s...

Page 26: ...FT to freeze the picture Unless you are playing a Video CD in PBC mode you can also use the 26 button on the front panel to freeze the picture 2 Press but don t hold E SHIFT again to advance a single frame Each press takes you a frame further Depending on what your watching it may take several presses before you notice any change on the screen If you loaded a DVD try pressing e SHIFT 1 to go in th...

Page 27: ...k 4 Press 1 2 to select title chapter track 12 Enter times as minutes and seconds Press 2 2 3 0 to select 22 minutes 30 seconds Press 8 0 0 0 to select 1 hour 20 minutes 80 minutes 3 Re start playback Press 26 on the remote or 2 3 on the front panel TIP Some DVD discs have their own menus from which you can select titles and or chapters Access it from the MENU or TOP MENU button then make your sel...

Page 28: ...he screen represents a different menu At the moment you re looking at the AUDIO 1 menu 2 Use the 2 and 3 cursor left right buttons to switch between menu tabs There are five menu tabs AUDIO 1 AUDIO 2 VIDEO LANGUAGE and GENERAL As you switch between them the list of options changes To exit the menu system at any time press SETUP 3 Press the cursor down button to highlight the first item in a menu T...

Page 29: ...ck to Basic Select General Setup Menu Mode Basic Changing the OSD menu language The on screen display OSD menus are available in several languages Here s how to change it Press SETUP and select LANGUAGE OSD LANGUAGE then your preferred language Note The choice available in your country region may vary from the illustration left Player menus and disc menus Some DVDs have their own menus programmed ...

Page 30: ...hrough all the languages available on the disc To switch subtitles off press SUBTITLE then CLEAR You may also be able to select a subtitle language from the disc menu of a multilin gual disc Press TOP MENU and follow the on screen displays Switching Languages on Playback Setting Language Preferences You can set up the player with your preferred language settings so the player automatically switche...

Page 31: ...E then your choice of language If your preferred language is something other than English or Spanish chooseOTHER See Selecting OTHER languages above for how to select a different language Note If your preferred audio and subtitle languages are different the auto language feature will not operate Setting subtitle display preferences By default the player displays subtitles according to the preferre...

Page 32: ... the disc menu language Some multilingual discs have disc menus recorded in several languages If you have this kind of disc loaded here s how to switch language Note To access this option the setup menu must be set to expert Press SETUP and select General Setup Menu Mode Expert Press SETUP and select LANGUAGE DVD LANGUAGE then your choice of language w Subtitle Language automatically sets it to th...

Page 33: ...1 Greenlandic kl 1112 Cambodian km 1113 Kannada kn 1114 Kashmiri ks 1119 Kurdish ku 1121 Kirghiz ky 1125 Latin la 1201 Lingala ln 1214 Laothian lo 1215 Lithuanian lt 1220 Latvian lv 1222 Malagasy mg 1307 Maori mi 1309 Macedonian mk 1311 Malayalam ml 1312 Mongolian mn 1314 Moldavian mo 1315 Marathi mr 1318 Malay ms 1319 Maltese mt 1320 Burmese my 1325 Nauru na 1401 Nepali ne 1405 Norwegian no 1415 ...

Page 34: ... RDM SHIFT 6 twice then ENTER Note during random play the 4 and buttons function a little differently to normal 4 returns to the beginning of the current track chapter You can t go back futher than this selects another track chapter at random from those remaining DVD Video CD CD You can set the player to repeat individual tracks on CDs or Video CDs chapters or titles on DVD discs a whole disc or a...

Page 35: ... sequence a playlist of up to 24 tracks chapters to play from any of the discs loaded in the disc changer The discs can be any combination of DVD Video CD and audio CD and the order any you choose Chapters tracks can appear more than once in the playlist or can be left out entirely The on screen display used to program the playlist is shown below 1 Step number 1 6 7 12 13 18 19 24 2 Disc number 1 ...

Page 36: ...sc title for Video CDs and audio CDs a track number For example to enter title track 6 press 6 To enter title track 14 press 1 4 To clear an entry press CLEAR 4 If the current disc is a DVD move the cursor to the CHAPTER field and enter a chapter number 5 Press ENTER The cursor moves down to the disc number field in the next step 6 Repeat steps 2 5 to add more items to the playlist 7 Press PGM SHI...

Page 37: ...ottom remaining disc time total disc time Video CDs These displays are only available when playing Video CDs in non PBC mode Press PBC on the remote to switch off PBC mode Disc info top disc number track number tracks on disc elapsed disc time bottom remaining disc time total disc time Track info 1 top disc number track number elapsed disc time bottom elapsed track time total track time Track info...

Page 38: ...dicator should be lit 2 Press LAST MEMO to start playback Clear the LAST MEMO indicator by pressing CLEAR DVD Some discs feature scenes shot from a number of angles with different cameras look for the multi angle mark on the disc box to check whether a disc features this During the multi angle scenes a icon appears on screen if you d rather this icon didn t appear you can switch it off see Hiding ...

Page 39: ...f restriction will need the password in order to watch it while setting it at level 8 gives unlimited access DVD discs are also rated from 1 to 8 Discs rated 1 or with no rating are suitable for any age of viewer and contain no offensive material As a guide discs rated 2 may contain scenes that some parents would feel are unsuitable for children Discs rated 8 on the other hand will almost certainl...

Page 40: ... the number you enter will become the new password 1 Press SETUP and select GENERAL PARENTAL LOCK PASSWORD CHANGE 2 Input your existing password and press ENTER 3 Input a new password and press ENTER If you change your mind before pressing ENTER press RETURN to exit this screen Setting Preferences for a Disc DVD Using this function you can have the player memorize all the settings you ve made for ...

Page 41: ... discs if the audio is converted to PCM format Select this option also if you connect an AV amplifier without a built in Dolby Digital decoder Audio 1 DTS Out Off Select if you connect an MD DAT or CD recorder these components can generally only record PCM format audio Select this option also if you connect an AV amplifier without a built in DTS decoder DTS Select if you connect an external DTS de...

Page 42: ...he on screen display position If you have a widescreen TV set the OSD Position to Wide This ensures that you ll be able to read the on screen messages without them disappearing off the top of the screen Otherwise leave this on the default setting of Normal Press SETUP and select Video OSD Position Wide Setting the OSD background color You can switch the background color of the on screen displays f...

Page 43: ...hen release The tuner will stop on the next station it finds Repeat to search for other stations High speed tuning Press and hold the 1 or button until the frequency display starts to move rapidly Keep the button held down until you reach the frequency you want If necessary fine tune the frequency using the step tuning method When you re tuned into a station the tuned indicator lights in the displ...

Page 44: ... ST MEMORY The frequency display starts blinking 3 Choose a station memory in which to store the station s frequency There are 24 memory locations each can store one station Use the 4 1 and buttons to step through the locations available 4 Press 7 STOP ST MEMORY again to memorize the station Memorizing Stations for Quick Recall Listening to memorized stations 1 Press BAND to switch to tuner mode I...

Page 45: ...n the display 6 To skip back or forward a track on the tape press 4 or On the front panel press 4 1 and the tape should be playing when you do this searches for the next blank space between tracks on the side currently playing in other words to the start of the next track then resumes playback 4 searches for the previous blank space between tracks on the side currently playing in other words to th...

Page 46: ...y produced tapes look for the double D symbol 2 on the inlay card or on the cassette tape itself To switch Dolby NR on and off Press 2 NR to switch ON or OFF as required Press to switch ON 2 NR indicator lit press again to switch OFF Note This function is only accessible from the front panel don t confuse the DOLBY VIRTUAL button on the remote with Dolby NR Dolby noise reduction manufactured under...

Page 47: ...t the tape is either a type I normal position or type II high position CrO2 you can t record on type IV metal tapes using this deck If you re recording from the start of a tape it s a good idea to wind the tape on a little so that you don t accidently start recording over the leader tape You can either do this by hand or load the tape into the deck and play the tape for 5 6 seconds 1 Load a casset...

Page 48: ...ff as required 2 Load a CD Make sure that you ve selected the correct disc and that it s stopped If you want to record the tracks in a different order use the program play feature see page 35 for how to do this 3 Press ASES COPY to start recording 4 If you want to stop recording before the end of the CD press 7 Note ASES may not work correctly if the first side of the tape finishes at the same tim...

Page 49: ...NR on and off independently for each deck 4 Press ASES COPY to start recording Recording starts in the 3 direction and continues onto the other side unless the erase protect tab is broken on the TAPE I cassette 5 If you want to stop recording before the end of the tape is reached press 7 TAPE I TAPE II ASES COPY 2 NR TAPE I II 7 REC STOP 1 Switch the power into standby 2 Press REC STOP for about 3...

Page 50: ...sound USER 1 3 use to store your own settings see page 51 EQUALIZER mode Press EQUALIZER to switch between modes or the S M JOG to morph from one mode to the next FLAT the original uneffected sound TECHNO emphasized highs for electronic music HIP HOP deep bass for heavy beats SOUL brings out the vocal frequencies in the mix ROCK strong mid frequencies for driving guitar sounds ZOOM SURROUND mode Z...

Page 51: ...hey are lost 1 Adjust the EQUALIZER ZOOM SURROUND and P BASS to your liking Note the Bass Blaster setting is not stored as a user preset 2 Push and hold the SET button for about three seconds USER 1 flashes in the display 3 Select USER 1 2 or 3 by turning the S M JOG 4 Push the SET button again to store the settings Changing the sound display There are six different sound level displays on the mai...

Page 52: ...pe make sure that it is stopped 3 Set the volume Remember that things tend to sound louder first thing in the morning 4 Press TIMER CLOCK ADJ 5 Turn the S M JOG dial until the display shows TIMER then press SET 6 Set the switch on time Use the S M JOG to set the hour then press SET Set the minute in the same way pressing SET when you re done 7 Set the switch off time Use the S M JOG to set the hou...

Page 53: ...g time is displayed momentarily don t press SLEEP again while the time is displayed or you ll change the sleep timer to a different setting Setting the Sleep Timer The clock must be set to the correct time for the record timer to work properly You can set the timer to record something off the radio For example you might want to record a program that is broadcast while you re at work During the act...

Page 54: ...s last time 8 Switch the system into standby mode 9 Press TIMER CLOCK ADJ 10 Turn the S M JOG dial until the display shows REC then press SET The record timer indicator lights in the display and record timer setup is complete Note There is no way to edit the timer settings once made If you make a mistake work through the rest of the settings then start over Here s how to cancel the wake up or reco...

Page 55: ...heck that the disc is clean and in good condition Do not try and play damaged discs p 8 Check that the disc is seated properly in the disc guide in the disc tray Check that the disc is loaded with the label side face up Check that the DVD region number is compatible with the player p 20 There may be condensation inside the unit Leave for about an hour before trying again p 7 The current disc does ...

Page 56: ...ched off during playback p 46 If the recording was made with Dolby NR switched on check that Dolby NR is also switched on during playback p 46 The spaces between songs may be too short for music search to work p 45 46 Make sure that the tape is playing when using music search it will not work from stop mode Tape Deck Tuner Sound is distorted or noisy Sound is in mono only Timer does not work Remot...

Page 57: ... wide screen presentation of a movie on a standard TV 4 3 aspect ratio Pan Scan setting Any setting Wide screen format DVD unnatural squeezed effect If you are viewing a wide screen format DVD on a standard TV and the TV Screen setting is set to Wide the picture may appear squeezed on the screen To remedy this condition select either Letter Box or Pan Scan DVD screen size format Setting and Appear...

Page 58: ...CDs and DVDs Video CD uses the older MPEG 1 standard while DVD uses the newer and much better quality MPEG 2 standard Terms Multi angle DVD only Scenes on a disc that were filmed simultaneously from more than one angle During these scenes you can switch between the various angles Especially good for sports programs and tutorial discs Optical digital output A jack that outputs digital audio in the ...

Page 59: ...W Australian models 870 W Power Consumption in standby mode 1 W Dimensions 10 5 8 W x 12 5 8 H x 13 3 8 D inch 270 W x 320 H x 339 D mm Weight without package 9 3 kg 20 5lbs Speaker system Enclosure Bass reflex bookshelf type magnetically shielded System 20 cm 7 7 8inch 3 way system Loudspeakers Woofer 20 cm 7 7 8inch cone type Mid range 6 6 cm 2 5 8inch cone type Tweeter 2 4 15 16inch cm ceramic ...

Page 60: ...reil est conçu pour consommer moins de 1 W d électricité lorsqu il est commuté au mode Attente Pour connaître la valeur exacte de la Consommation électrique en mode Attente reportez vous à la Fiche technique à la page 59 NOTE IMPORTANTE SUR LE CABLE D ALIMENTATION Tenir le câble d alimentation par la fiche Ne pas débrancher la prise en tirant sur le câble et ne pas toucher le câble avec des mains ...

Page 61: ...udio préférée 31 Réglage de votre langue de sous titres préférée 31 Réglage des préférences d affichage de sous titres 31 Changement des sous titres par défaut 32 Mise hors service du Réglage de Langue Automatique 32 Sélection de la langue du menu de disque 32 Liste des codes de langue 33 6 Autres fonctions des disques Lecture aléatoire des plages 34 Répétition des plages 34 Programmation de l ord...

Page 62: ... vous prévoyez de ne pas l utiliser pendant un mois ou plus Retirez les piles usées sans tarder car elles peuvent suinter et endommager la télécommande Utilisation de la télécommande Gardez à l esprit les points suivants lorsque vous utilisez la télécommande Assurez vous qu aucun obstacle ne se trouve entre la télécommande et le capteur de ses signaux sur l appareil Utilisez la télécommande à la d...

Page 63: ...sur un appareil devenant chaud pendant son utilisation Utiliser près d un téléviseur ou d un moniteur car des interférences peuvent en résulter surtout si le téléviseur utilise une antenne intérieure Utiliser dans une cuisine ou une pièce où l appareil serait exposé à de la fumée ou à de la vapeur Poser sur une surface instable ou trop petite pour soutenir les quatre pieds de l appareil ou toute l...

Page 64: ...z le verticalement Evitez de laisser vos disques dans un endroit très humide très froid ou très chaud y compris en plein soleil Disques à éviter Les disques tournent à grande vitesse dans l appareil pendant leur lecture N utilisez jamais un disque fissuré craquelé gondolé ou endommagé de quelque façon car vous pourriez abîmer l appareil Utilisation des cassettes La bande d une cassette peut s abîm...

Page 65: ...onnexions sur le panneau arrière mettez tous les composants hors tension et débranchez les au niveau de l alimentation secteur Pour obtenir des sons excellents de votre chaîne vous devez raccorder les deux torons du fil de chaque haut parleur sur la borne correcte Pour vous aider à faire correspondre correctement les fils et les bornes le cordon de haut parleur fourni a un code couleur branchez la...

Page 66: ... utiliser des haut parleurs autres que ceux qui sont fournis avec cette chaîne choisissez uniquement des unités ayant une impédance nominale comprise entre 6 et 16 Ω En cas de doute sur leur impédance reportez vous aux explications qui accompagnent les haut parleurs avant de les brancher et de les mettre en service Branchement du téléviseur Cette chaîne possède deux sorties vidéo une VIDEO OUT sta...

Page 67: ...sez l antenne AM sur une surface plate et orientez la dans la direction qui procure la meilleure réception Au besoin stabilisez l antenne à l aide d un crayon glissé dans l orifice de sa base Evitez de placer l antenne près d un ordinateur téléviseur ou tout autre appareil électrique et ne la laissez pas entrer en contact avec des objets métalliques Vous pouvez aussi fixer l antenne AM sur une par...

Page 68: ...AV externe Une autre utilisation de la sortie opto numérique consiste à raccorder cette chaîne à un amplificateur AV externe incorporant un décodeur Dolby Digital DTS et ou MPEG Vous pourrez alors profiter du véritable son surround multi canaux qu offrent de nombreux disques DVD Servez vous d un cordon opto numérique standard disponible chez les bons détaillants d appareils audio pour raccorder la...

Page 69: ...JOG pour effectuer un réglage précis SOUND MORPHING JOG DYNAMIC POWER SUPPLY AMPLIFIER 2 3 4 5 6 7 8 9 10 11 17 16 15 14 13 12 1 9 Bouton P BASS DEMO Pour permuter entre les modes P Bass Utilisez la bague S M JOG pour effectuer un réglage précis 10 Bouton SET Pour valider les réglages de minuterie effectués par la bague S M JOG 1 1 Bague SOUND MORPHING JOG S M JOG Pour changer les modes Preset Equ...

Page 70: ...ON Pour alterner entre les modes de syntonisation et de préréglage des stations 22 Bouton REC STOP Pour lancer arrêter l enregistrement sur bande 23 Bouton ASES COPY Pour lancer l enregistrement automatique d un CD ou d une bande 24 0 EJECT cassette I Pour ouvrir le volet de cassette de la Platine I 25 0 EJECT cassette II Pour ouvrir le volet de cassette de la Platine II 26 Boutons de contrôle Pou...

Page 71: ...reprise de lecture sur le disque installé 15 96kHz S allume à la lecture d un disque DVD contenant des sons à 96 kHz 16 CONDITION S allume lorsqu est installé un disque DVD pour lequel sont définies des préférences de langue écran etc 17 DOLBY DIGITAL S allume à la lecture d un disque DVD Dolby Digital 18 Affichage de façonnage sonore niveau sonore 19 EQ En surbrillance lorsque EQ est actif 20 SUR...

Page 72: ...NTER Poursélectionnerlesrubriquesdesmenussurécran 13 RETURN Pour quitter un écran de menu 14 SELECT 26 Pour lancer la lecture d un disque ou d une bande ou pour interrompre une lecture en cours 15 PREV 4 Pour sauter en arrière des plages chapitres sur un disque ou une bande changer les écrans de menu sur le Menu PBC d un CD vidéo ou accorder les stations radio 16 NEXT Pour sauter en avant des plag...

Page 73: ...cture 22 CLEAR Pour effacer ou annuler diverses opérations 23 10 Pour choisir des numéros au delà de 10 24 10 0 Pour entrer un zéro ou un 10 dans un numéro shift PBC Pour mettre la commande de lecture CD vidéo PBC en service et hors service 25 TAPE I II Pour passer à la fonction Cassette ou pour permuter entre les Platines I et II 26 BAND Pour permuter entre les gammes FM et AM 27 AUX Pour utilise...

Page 74: ...heure L heure est indiquée en cycle de 24 heures c à d que 13 00 signifie 1 h de l après midi 6 Appuyez sur SET 7 Utilisez la bague S M JOG pour régler les minutes 8 Appuyez sur SET pour terminer le réglage Appuyez sur DISPLAY pour afficher l heure actuelle L affichage revient à l état antérieur après 5 secondes environ TIMER CLOCK ADJ DISPLAY SET S M JOG STANDBY ON Mise sous tension et réglage de...

Page 75: ...enne à l écran 4 3 Bien que l image semble plus grande sur l écran car elle utilise toute la hauteur de l écran en réalité vous en voyez moins car les deux côtés sont perdus Titres chapitres et plages Les CD de musique ordinaires et les CD vidéo sont divisés en plages pour faciliter la localisation d une section donnée sur le disque Les mêmes sections sont appelées chapitres sur les DVD comme les ...

Page 76: ...st interdit Régions DVD Tous les disques DVD en vente dans le commerce contiennent un ou plusieurs code s de région Votre lecteur DVD aussi possède un code de région correspondant au pays région où vous l avez acheté Vous trouverez le code de région de votre lecteur sur son panneau arrière Cherchez y un symbole semblable à celui ci Vous trouverez un symbole comparable sur tous les étuis de disque ...

Page 77: ...ir le Navigateur de Configuration Si cet écran n apparaît pas reportez vous à Utilisation des Menus sur écran à la page 28 puis sélectionnez General Setup Navigator Sur cet écran et les suivants le texte en jaune dans le bas de l écran vous donne plus d informations sur l option mise en relief 3 Appuyez sur ENTER pour lancer le Navigateur de Configuration 4 Sélectionnez la langue de menu préférée ...

Page 78: ...nfirmer la configuration Pour quitter le Navigateur de Configuration sans valider les changements que vous venez d apporter choisissez Invalid Pour recommencer choisissez Redo 8 La configuration est ainsi terminée Appuyez sur SETUP pour quitter l écran de menu Remarque Lorsque vous appuyez sur SETUP la fois suivante il vous est demandé si vous voulez utiliser le Navigateur de Configuration Appuyez...

Page 79: ... Avec les DVD la lecture accélérée en marche avant est plus douce qu en marche arrière Ceci tient à la façon d enregistrer les images sur le disque 6 Pour sauter à un autre chapitre en arrière ou en avant appuyez sur 4 ou Sur le panneau avant ces boutons portent la marque 4 1 et Une seule poussée sur fait sauter au début du chapitre suivant sur le disque Les poussées suivantes font passer aux chap...

Page 80: ...puyez sur E SHIFT Si le CD vidéo n est pas en mode PBC vous pouvez aussi utiliser le bouton 26 ou 2 3 sur le panneau avant Pour reprendre la lecture appuyez sur 26 ou 2 3 5 Pour une exploration vers l arrière ou l avant maintenez le bouton 1 ou enfoncé Sur le panneau avant ces boutons portent la marque 4 1 et Relâchez le bouton pour revenir à la lecture normale Si le disque continue en mode Explor...

Page 81: ...u avant pour reprendre la lecture 6 Pour sauter à une autre plage en arrière ou en avant appuyez sur 4 ou Sur le panneau avant ces boutons portent la marque 4 1 et Une seule poussée sur fait sauter au début de la page chapitre suivant sur le disque Les poussées suivantes font passer aux plages suivantes Une seule poussée sur 4 fait sauter au début de la plage actuelle Les poussées suivantes font p...

Page 82: ...que vous ne fassiez la lecture d un CD vidéo en mode PBC vous pouvez aussi utiliser le bouton 26 ou sur le panneau avant pour geler l image 2 Appuyez à nouveau sans maintenir E SHIFT pour avancer d une image à la fois Chaque poussée fait avancer d une image Selon ce que vous regardez plusieurs poussées seront parfois nécessaires pour constater un changement sur l écran Si vous avez installé un DVD...

Page 83: ...sur 1 2 pour choisir le titre chapitre plage 12 Entrez la valeur horaire en minutes et secondes Appuyez sur 2 2 3 0 pour entrer 22 minutes 30 secondes Appuyez sur 8 0 0 0 pour entrer 1 heure 20 minutes 80 minutes 3 Lancez ou relancez la lecture Appuyez sur 26 de la télécommande ou sur 2 3 du panneau avant Conseil pratique Certains disques DVD ont leurs propres menus sur lesquels vous pouvez choisi...

Page 84: ... En ce moment vous regardez le menu AUDIO 1 2 Servez vous des boutons 2 et 3 curseur à gauche droite pour passer d un onglet de menu à un autre Il existe 5 onglets de menu AUDIO 1 AUDIO 2 VIDEO LANGUAGE et GENERAL La liste des options change lorsque vous passez de l un à l autre Pour quitter le menu à n importe quel moment appuyez sur SETUP 3 Appuyez sur le bouton curseur en bas pour accentuer la ...

Page 85: ...ectionnez General Setup Menu Mode Basic Changement de la langue de menu OSD Les menus d affichage sur écran OSD sont disponibles en plusieurs langues Voici comment vous pouvez en sélectionner une Appuyez sur SETUP et sélectionnez LANGUAGE OSD LANGUAGE puis votre langue préférée Remarque Le choix disponible dans votre pays région peut être différent de celui de l illustration de gauche Menus du lec...

Page 86: ...sques DVD sont enregistrés avec des pistes sonores et ou des sous titres en plusieurs langues Ainsi un disque peut contenir la piste son originale une version doublée plus des sous titres en trois ou quatre langues Vous avez le loisir de choisir n importe quelle combinaison la piste son originale sans sous titres la piste son originale avec sous titres ou la piste son doublée et des sous titres La...

Page 87: ... une sélection par le code de la langue amenez le curseur à la première case du code à 4 chiffres et entrez le code de la langue voulue Remarque Si vos préférences pour la langue audio et la langue des sous titres sont différentes la fonction Réglage de Langue Automatique n agira pas Réglage de votre langue de sous titres préférée Le réglage par défaut est l anglais Si votre langue préférée pour l...

Page 88: ...n Langue Automatique reste hors service jusqu à ce qu elle soit à nouveau mise en service Sélection de la langue du menu de disque Certains disques multilingues possèdent des menus disque enregistrés en plusieurs langues Si un tel disque est installé voici comment changer la langue Remarque Pour avoir accès à cette option le menu de configuration doit être réglé sur Expert Appuyez sur SETUP et sél...

Page 89: ...azakh kk 1111 Groenlandais kl 1112 Cambodgien km 1113 Kannada kn 1114 Cachemirois ks 1119 Kurde ku 1121 Kirgiz ky 1125 Latin la 1201 Lingala ln 1214 Laotien lo 1215 Lithuanien lt 1220 Letton lv 1222 Malgache mg 1307 Maori mi 1309 Macédonien mk 1311 Malayalam ml 1312 Mongol mn 1314 Moldave mo 1315 Marathi mr 1318 Malaisien ms 1319 Malte mt 1320 Birman my 1325 Naruru na 1401 Népalais ne 1405 Norvégi...

Page 90: ...tionnent un peu différemment que d habitude le bouton 4 fait revenir au début de la plage chapitre actuel mais vous ne pouvez pas aller au delà Le bouton choisit au hasard un autre plage chapitre parmi ceux qui restent DVD CD vidéo CD Vous pouvez faire en sorte que la platine reproduise des plages individuelles sur les CD ou les CD vidéo des chapitres ou des titres sur les disques DVD tout un disq...

Page 91: ...e séquence une liste de lecture d un maximum de 24 plages chapitres choisis parmi les disques installés dans le changeur de disques Vous pouvez combiner des disques DVD CD vidéo et CD audio et les utiliser dans l ordre de votre choix Des chapitres plages peuvent apparaître plusieurs fois sur la liste mais vous pouvez aussi les ignorer L affichage sur écran utilisé pour programmer la liste est le s...

Page 92: ...lage 6 appuyez sur 6 Pour entrer le titre plage 14 appuyez sur 1 4 Pour annuler une entrée appuyez sur CLEAR 4 Si le disque actuel est un DVD amenez le curseur à la zone CHAPTER et entrez un numéro de chapitre 5 Appuyez sur ENTER Le curseur descend à la zone de numéro de disque dans l étape suivante 6 Répétez les étapes 2 à 5 pour ajouter d autres éléments sur la liste de lecture 7 Appuyez sur PGM...

Page 93: ...e sur disque bas durée restante sur disque durée totale du disque CD vidéo Ces informations sont disponibles seulement à la lecture de CD vidéo en mode non PBC Pour annuler le mode PBC appuyez sur PBC de la télécommande Info Disque haut numéro de disque numéro de plage plages sur disque durée écoulée sur disque bas durée restante sur disque durée totale du disque Info 1 Plage haut numéro de disque...

Page 94: ...lancer la lecture Eteignez le voyant LAST MEMO en appuyant sur CLEAR DVD Certains disques contiennent des scènes filmées selon des angles différents par plusieurs caméras Vérifiez si le voyant multi angles se trouve sur l étui du disque pour savoir si cette fonction est présente sur le disque Pendant les scènes multi angles une icône apparaît sur l écran Si vous préférez faire disparaître cette ic...

Page 95: ... être reproduit tandis qu un réglage au niveau 8 laisse un accès illimité Les disques DVD aussi sont classifiés de 1 à 8 Les disques classés 1 ou sans classement ne contiennent rien de répréhensible et conviennent à tout âge Des disques classés 2 peuvent comporter des scènes que certains parents jugeront inadéquates pour leurs enfants En revanche les disques classés 8 contiennent certainement des ...

Page 96: ...eau le nombre entré deviendra le nouveau code secret 1 Appuyez sur SETUP et sélectionnez GENERAL PARENTAL LOCK PASSWORD CHANGE 2 Entrez le code secret existant et appuyez sur ENTER 3 Entrez un nouveau code secret et appuyez sur ENTER Si vous changez d idée avant d appuyer sur ENTER appuyez sur RETURN pour quitter cet écran Réglage des préférences pour un disque DVD Grâce à cette fonction vous pouv...

Page 97: ...ormat PCM Sélectionnez cette option également si vous raccordez un amplificateur AV sans décodeur Dolby Digital incorporé Audio 1 DTS Out Off A sélectionner si vous raccordez une platine MD DAT ou CD En général ces composants ne peuvent enregistrer que les sons en format PCM Sélectionnez cette option également si vous raccordez un amplificateur AV sans décodeur DTS incorporé DTS A sélectionner si ...

Page 98: ...ssages sur écran restent cachés jusqu à ce que vous les fassiez à nouveau apparaître Réglage de la position d affichage sur écran Si vous utilisez un téléviseur à écran large 16 9 réglez le paramètre OSD Position sur Wide Vous pourrez ainsi lire les messages sans qu ils disparaissent dans la bande du haut de l écran Sinon laissez ce paramètre sur Normal réglage par défaut Appuyez sur SETUP et séle...

Page 99: ...es fréquences commence à changer rapidement Maintenez la poussée sur le bouton jusqu à atteindre la fréquence souhaitée Au besoin effectuez une syntonisation précise par la méthode d accord par palier Lorsqu une station est syntonisée le voyant d accord s allume sur l affichage S il s agit d une station FM stéréo le voyant stéréo s allume Amélioration de la réception FM Si la réception d une stati...

Page 100: ... la fréquence de station sera mémorisée La mémoire comporte 24 positions pouvant recevoir chacune une station Servez vous des boutons 4 1 et pour faire le tour des positions disponibles 4 Appuyez à nouveau sur 7 STOP ST MEMORY pour mémoriser la station Ecoute des stations mémorisées 1 Appuyez sur BAND pour passer au mode Tuner Si vous utilisez les commandes du panneau avant appuyez sur TUNER BAND ...

Page 101: ...assette Rappel La lecture est possible sur les deux platines mais seule la Platine I enregistre 3 Installez une cassette puis refermez le volet de cassette Utilisez une bande déjà enregistrée pour entendre quelque chose pendant les étapes suivantes 4 Appuyez sur 26 pour lancer la lecture Sur le panneau avant appuyez sur 2 3 La face audible de la cassette est celle qui fait face vers l avant lorsqu...

Page 102: ...es vendues dans le commerce sont de ce genre Recherchez le symbole double D 2 sur l étui ou sur la cassette proprement dite Pour mettre le circuit Dolby NR en hors service Appuyez sur 2 NR pour mettre le circuit en hors service selon le cas Appuyez pour mettre en service le voyant 2 NR est allumé appuyez à nouveau pour mettre hors service Remarque L accès à cette fonction n est possible que sur le...

Page 103: ...de protection de la cassette ne sont pas brisés et qu elle est du type I position Normal ou du type II position High CrO2 Il n est pas possible d enregistrer une cassette de type IV Métal sur cette platine Avant d enregistrer une cassette depuis son début faites défiler un peu la bande pour ne pas commencer l enregistrement sur l amorce Laissez défiler la bande pendant 5 à 6 secondes dans la plati...

Page 104: ...circuit Dolby NR en service ou hors service 2 Installez un CD Assurez vous que vous avez choisi le disque correct et qu il est à l arrêt Si vous désirez enregistrer les plages dans un ordre différent utilisez la lecture programmée A ce sujet reportez vous à la plage 35 3 Appuyez sur ASES COPY pour lancer l enregistrement 4 Pour arrêter l enregistrement avant la fin du CD appuyez sur 7 Remarque Il ...

Page 105: ...e de mettre le circuit Dolby NR en hors service de façon indépendante sur chaque platine 4 Appuyez sur ASES COPY pour lancer l enregistrement L enregistrement commence dans le sens 3 et il continue sur l autre face à moins que l onglet de protection ne soit brisé sur la cassette de la Platine I 5 Pour arrêter l enregistrement avant la fin de la bande appuyez sur 7 Pour améliorer l enregistrement A...

Page 106: ...oriser vos propres réglages voir page 51 Mode EQUALIZER Appuyez sur EQUALIZER pour passer entre les modes ou tournez la bague S M JOG pour passer d un mode au suivant FLAT le son original sans modification TECHNO aigus accentués pour musique électronique HIP HOP basses profondes pour heavy beats SOUL renforce les fréquences vocales dans la musique ROCK fortes fréquences moyennes pour sons de premi...

Page 107: ...selon vos préférences Remarque Le réglage Bass Blaster ne peut pas être mémorisé comme réglage utilisateur 2 Maintenez le bouton SET enfoncé pendant 3 secondes environ USER 1 clignote alors sur l affichage 3 Sélectionnez USER 1 2 ou 3 en tournant la bague S M JOG 4 Appuyez à nouveau sur le bouton SET pour mémoriser les réglages Changement de l affichage du son Il existe six affichages différents d...

Page 108: ...ez vous que les sons ont tendance à paraître bruyants au réveil 4 Appuyez sur TIMER CLOCK ADJ 5 Tournez la bague S M JOG jusqu à ce que TIMER soit affiché puis appuyez sur SET 6 Programmez le moment de mise sous tension Servez vous de la bague S M JOG pour programmer l heure puis appuyez sur SET Programmez la minute de la même façon et appuyez ensuite sur SET 7 Programmez le moment de mise hors te...

Page 109: ...ur SLEEP La durée restante est affichée momentanément n appuyez pas une nouvelle fois sur SLEEP pendant que la durée est affichée car vous changeriez alors la durée du compte à rebours Programmation du chronorupteur L horloge doit être ajustée à l heure exacte pour que la minuterie d enregistrement puisse fonctionner correctement Vous pouvez programmer la minuterie de façon à enregistrer une émiss...

Page 110: ...sée sur le bouton SET 8 Réglez la chaîne en mode Attente 9 Appuyez sur TIMER CLOCK ADJ 10 Tournez la bague S M JOG jusqu à ce que l affichage indique REC puis appuyez sur SET Le voyant de minuterie d enregistrement s allume sur l affichage et la programmation est ainsi terminée Remarque Il n est pas possible de modifier les réglages de cette minuterie une fois qu ils sont terminés Si vous avez fai...

Page 111: ...Il se peut que l alimentation de l appareil ait été coupée panne de courant etc Dans ce cas tous les réglages reviennent aux valeurs par défaut Il se peut que l appareil ait été réinitialisé p 57 Vérifiez que le téléviseur est raccordé correctement à cet appareil et que l entrée du téléviseur est correctement réglée p 10 Vérifiez le réglage du rapport largeur hauteur p 21 57 Si vous utilisez un té...

Page 112: ...lement des cassettes de Type I Normal ou de Type II CrO2 Si l enregistrement n a pas été réalisé avec le circuit Dolby NR en service vérifiez que celui ci est hors service p 46 Si l enregistrement a été réalisé avec le circuit Dolby NR en service vérifiez que celui ci est en service pendant la lecture p 46 Il se peut que les espaces entre les plages soient trop courts pour que fonctionne la recher...

Page 113: ...rop rétréci A la lecture d un DVD à format Ecran large sur un téléviseur normal si le paramètre TV Sreen est réglé sur Wide large l image peut sembler étriquée sur l écran Pour remédier à cette situation sélectionnez Letter Box ou Pan Scan Format d écran DVD Réglage et aspect Réglage Wide Lecture sur téléviseur ou moniteur à écran large DVD à format Ecran normal A la lecture d un DVD à format Ecra...

Page 114: ...MPEG Format vidéo utilisé pour les CD vidéo et les DVD Les CD vidéo utilisent l ancienne norme MPEG 1 tandis que les DVD utilisent la nouvelle norme MPEG 2 assurant une meilleure qualité Multi angle DVD seulement Des scènes d un disque filmées simultanément sous plusieurs angles A la lecture un choix est possible entre ces angles Apprécié surtout pour les programmes sportifs et éducatifs Sortie op...

Page 115: ...en Secteur 240 V 50 60 Hz Consommation Modèle américain et canadien 170 W Modèle australien 870 W Consommation en mode Attente 1 W Dimensions 270 x 320 x 339 mm l h p Poids sans emballage 9 3 kg Enceintes acoustiques Coffret Type bibliothèque bass reflex à blindage magnétique Système Système à 3 voies 20 cm Haut parleurs Woofer Type à cône de 20 cm Medium Type à cône de 6 6 cm Tweeter Type à dome ...

Page 116: ...ary Road Braeside Victoria 3195 Australia TEL 03 9586 6300 PIONEER ELECTRONICS DE MEXICO S A DE C V San Lorenzo Num 1009 3er piso Desp 302 Col Del Valle Mexico D F C P 03100 TEL 5 688 52 90 PIONEER ELECTRONIC CORPORATION 4 1 Meguro 1 Chome Meguro ku Tokyo 153 8654 Japan Published by Pioneer Electronic Corporation Copyright 1999 Pioneer Electronic Corporation All rights reserved 99H00ZF0S00 Publica...

Reviews: