PDP-505MX
82
1
2
3
4
1
2
3
4
C
D
F
A
B
E
1
2
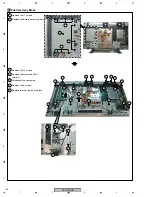
Remove the Shield cover main Assy.
1
1
1
2
Remove the 11 screws.
3
Remove the 19 screws.
6
Remove the 5 screws.
4
Remove the screw and GND
terminal.
5
Disconnect the connectors.
Sub flme Assy Block
5
4
3
6
6
6
6
3
3
3
3
3
3
3
6
5
3
3
3
3
3
3
3
3
3
3
3
7
Remove the sub flame Assy Block
7
Summary of Contents for PDP-505MX
Page 7: ...PDP 505MX 7 5 6 7 8 5 6 7 8 C D F A B E ...
Page 21: ...PDP 505MX 21 5 6 7 8 5 6 7 8 C D F A B E ...
Page 46: ...PDP 505MX 46 1 2 3 4 1 2 3 4 C D F A B E Sensor Board IR Board Power Switch Board ...
Page 47: ...PDP 505MX 47 5 6 7 8 5 6 7 8 C D F A B E Button ...
Page 48: ...PDP 505MX 48 1 2 3 4 1 2 3 4 C D F A B E Audio Board ...
Page 49: ...PDP 505MX 49 5 6 7 8 5 6 7 8 C D F A B E ...
Page 50: ...PDP 505MX 50 1 2 3 4 1 2 3 4 C D F A B E PS250 PWR 500W ...


