Controls and displays
03
27
En
Chapter 3
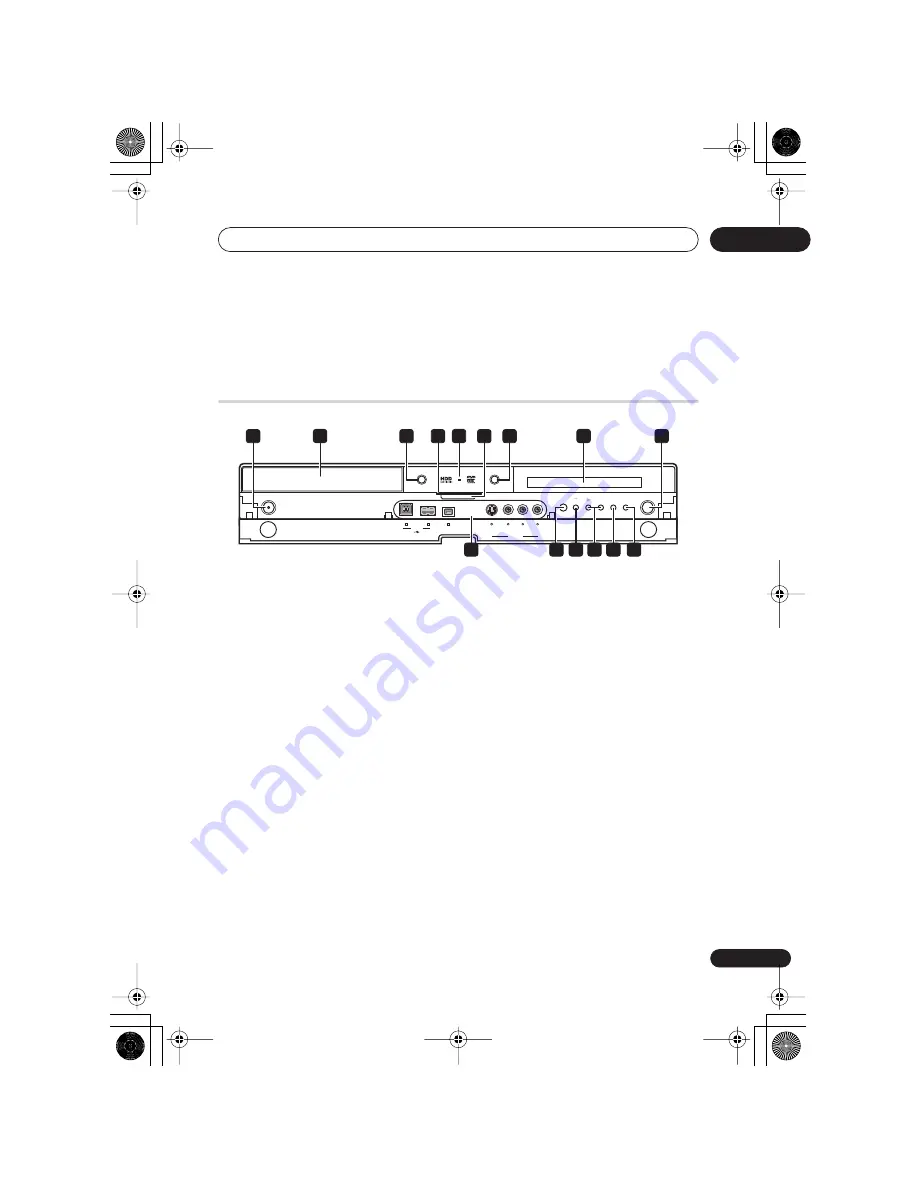
Controls and displays
Front panel
1
STANDBY/ON
Press to switch the recorder on/into standby.
2
Disc tray
3
OPEN/CLOSE
Press to open/close the disc tray.
4
HDD / DVD indicators
Indicator lights blue when the hard disk
(HDD) is selected; orange when the DVD
drive is selected.
5
HDMI indicator
Lights when this recorder is connected to
HDMI (HDCP) compatible component.
6
PAUSE LIVE TV
(page 61)
Press to start recording the current TV
channel, but with playback paused,
effectively pausing the broadcast.
7
HDD/DVD
Press to switch between HDD and DVD for
recording and playback.
8
Front panel display and IR remote
sensor
See
Display
on page 28 for details.
9
REC
Press to start recording. Press repeatedly to
set the recording time in 30 minute blocks.
10 Front panel inputs
See
Front panel connections
on page 15 for
more information on these.
11
Press to start or restart playback.
12
Press to stop playback.
13 CH +/–
Use to change channels, skip chapters/
tracks, etc.
14 ONE TOUCH COPY
(page 102)
Press to start One Touch Copy of the
currently playing title to DVD or the HDD.
15 STOP REC
Press to stop recording.
HDD/DVD
ONE
TOUCH
COPY
STOP
REC
CH
OPEN/CLOSE
STANDBY/ON
REC
+
–
HDMI
S-VIDEO
VIDEO
L AUDIO R
(MONO)
INPUT 2
DVR-645H-S
DV IN
USB
8
2
5
1
9
3
4
7
6
14
13
15
11 12
10
DVR645H_WY_EN.book 27 ページ 2006年7月5日 水曜日 午前10時25分


