8
<DRB1404>
En
MIXER OPERATIONS (BASIC OPERATIONS)
MIXER OPERATIONS
BASIC OPERATIONS
MIC
HEADPHONES
MASTER
BEAT EFFECTS
2
7
1
3
4
5
6
TRIM
POWER
MASTER
LEVEL
HI, MID,
LOW
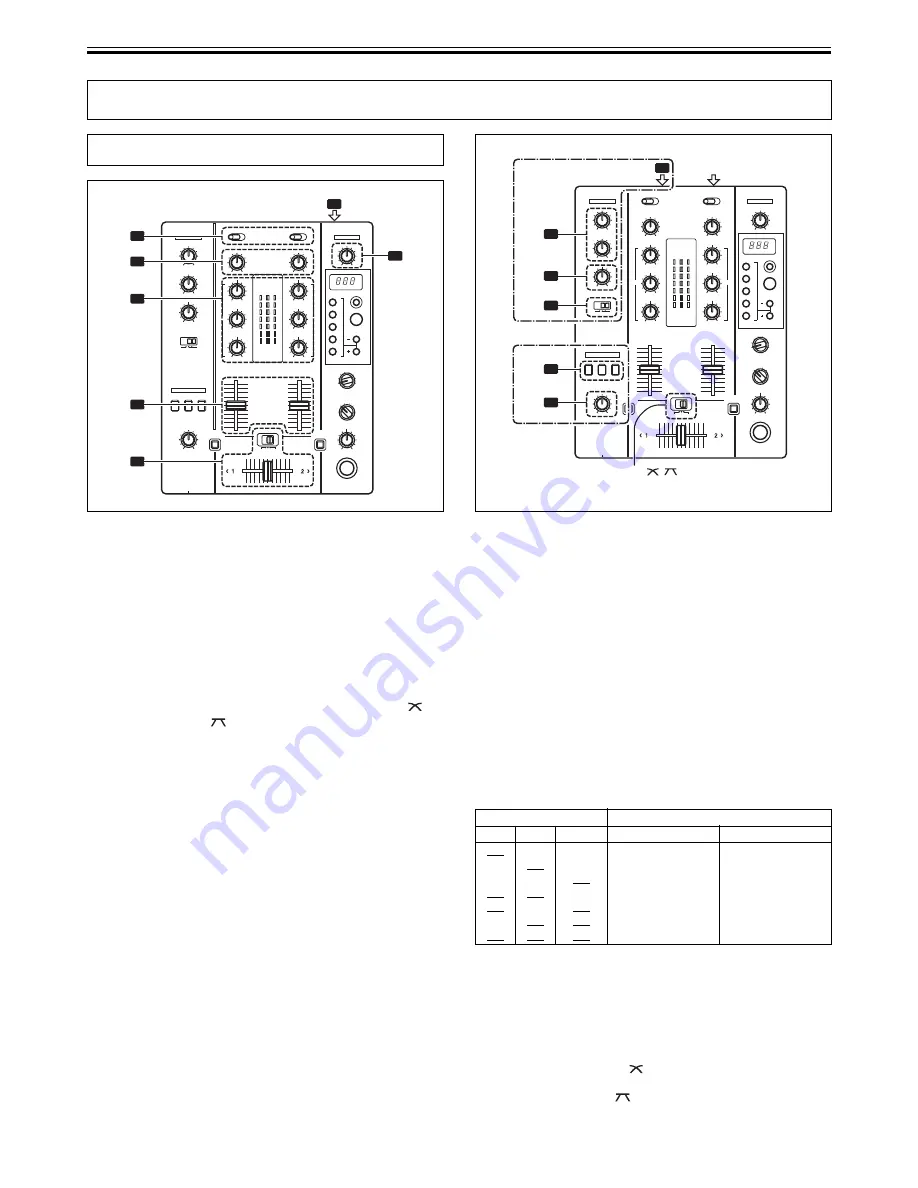
1. Set rear panel POWER switch to ON.
2. Set the input selector switch for the desired channel to
choose the connected component.
The function of the
PHONO/LINE
input connectors is set using
the
PHONO/LINE
switch on the connection panel.
3. Use the TRIM dial to adjust the input level.
4. Use the channel equalizer dials (HI, MID, LOW) to adjust
the tone.
5. Use the channel fader lever to adjust the sound volume of
the selected channel.
6. To use the cross fader on the selected channel, set the cross
fader selector switch to either the middle position (
) or
the right position (
), then operate the cross fader lever.
When not using the cross fader, set the cross fader selector
switch to [
THRU
].
7. Use the MASTER LEVEL dial to adjust the overall sound
volume.
[Selecting Stereo or Monaural]
When the connection panel’s
STEREO/MONO
switch is set to
[
MONO
], the master output becomes a monaural combination of L+R
channels.
[Microphone Input]
1. Set the connection panel’s MIC/AUX switch to [MIC].
2. Set the MIC switch to [ON] or [TALK OVER].
When the switch is set to [
TALK OVER
], if sounds of over –15
dB are detected by the microphone, the output for all sound
sources other than the microphone is attenuated by 20 dB.
3. Use the MIC 1 LEVEL dial to adjust the sound volume of
MIC 1, and the MIC 2 LEVEL dial to adjust the sound
volume of MIC 2.
4. Use the microphone equalizer dial (EQ) to adjust the tone
of the microphone sound.
The microphone equalizer function operates simultaneously
on microphones 1 and 2.
MIC
HEADPHONES
MASTER
BEAT EFFECTS
2
1
3
1
4
EQ
2
LEVEL
THRU/ /
MIC 1 LEVEL,
MIC 2 LEVEL
STEREO/MONO
MIC/AUX
CH-1, CH-2,
MASTER
[PHONES]
[MIC]
[AUX]
(Cross fader selector switch)
[Auxiliary Input]
1. Set the connection panel’s MIC/AUX switch to [AUX].
The
MIC1
input connector functions as
AUX(L)
input, and the
MIC2
input connector functions as
AUX(R)
input.
2. Set the MIC switch to [ON] or [TALK OVER].
When the switch is set to [
TALK OVER
], if a sound is input to
the
AUX
connectors, the output for all sources other than the
AUX
input is attenuated by 20 dB.
3. Use the MIC 1 LEVEL dial to adjust the sound from the L
channel, and MIC 2 LEVEL dial to adjust the sound from
the R channel.
4. Use the microphone equalizer dial (EQ) to adjust sound tone.
[Headphones Output]
1. Use the headphones cue button (CH-1, CH-2, MASTER) to
select the source to be output to the headphones.
The selected source button lights brightly.
[Relationship of headphones cue button and headphones output]
2. Use the LEVEL dial to adjust the headphones sound level.
[Selecting the Cross Fader Curve]
The sound volume response to fader lever operation can be set to
one of two characteristic curves.
7
Use the cross fader selector switch to select the desired
cross fader response curve.
At the center position (
), the curve operates to produce an
even, neutral rise throughout the cross fader’s movement.
At the right position (
), the curve operates to produce a rapid
rise with the cross fader’s movement (sound from [
2 >
] is
produced as soon as the lever leaves side [
< 1
]).
The curve settings operate the same on both sides [
< 1
] and
[
2 >
].
Headphone cue button
Headphones Output
CH-1
CH-2 MASTER
L channel
R channel
ON
OFF
OFF
CH-1(L)
CH-1(R)
OFF
ON
OFF
CH-2(L)
CH-2(R)
OFF
OFF
ON
MASTER(L)
MASTER(R)
ON
ON
OFF
CH-1(L)+CH-2(L)
CH-1(R)+CH-2(R)
ON
OFF
ON
CH-1(MONO)
MASTER(MONO)
OFF
ON
ON
CH-2(MONO)
MASTER(MONO)
ON
ON
ON
CH-1(MONO)+CH-2(MONO)
MASTER(MONO)


