background image

85

ᒶᐆ!GN2ȃ

GN3ȃ

GN4 ܗ BN ᓝࢳȄ

ໍ՘К୞።ᒚȄ
ໍ՘ཫસ።ᒚܗϛ໣ᘟཫસ
።ᒚȄ

฼ࡹԫࡹ໗ංऍយࡤܺ໡ȂѠ௄࿌ࠊᓝ౦ၱ
ՎഷߗႬᇄȄ
ߞࡹԫࡹ໗ȂѠໍ՘ϛ໣ᘟཫસ።ᒚȄ

ᡘұႲ೪ᓝၿఽ൑Ȅ

௄ఽ൑ϜᒶᐆΚঐ໷ҭȞ

ȶ2ȷՎȶ7ȷ

ȟ

Ȃ

ϹඳژႲ೪ᓝၿȄ

௄ϲԇϜ።ңԇᓾژΚঐࡹ໗Ϝ
ޠႲ೪ᓝၿȄ

஡࿌ࠊኅክᓝ౦ԇᓾژΚঐࡹ
໗Ȅ

HOLD

HOLD

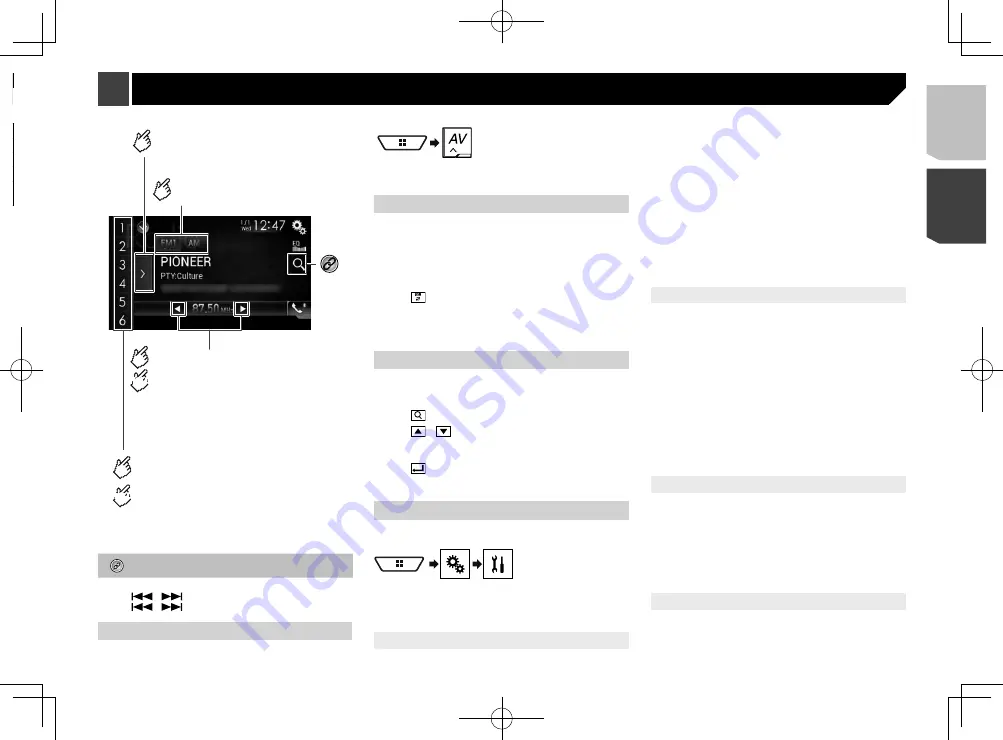
依PTY資訊搜尋廣播。

  請參閱 第85頁上

依PTY資訊搜尋

p

  按下

鍵,亦可切換預設的聲道。

p

  按住

鍵後再放開,亦可搜尋調頻。

開始程序

1  顯示AV來源選擇畫面。

2  觸碰[Radio]。

儲存最強的廣播頻率

BSM(最佳電台記憶)功能會將六個最強的廣播頻率儲存至預設
調頻按鍵之下的「

1

」到「

6

」。

p

  使用BSM儲存廣播頻率可取代已儲存的廣播頻率。

p

  若儲存的頻率數量尚未達到上限,先前儲存的廣播頻率可繼

續儲存。

1  觸碰預設的頻道清單顯示按鍵。

2  觸碰

可開始搜尋。

六個最強的廣播頻率會根據訊號強度,依序儲存於預設調頻按
鍵之下。

  觸碰[

取消

]可取消儲存程序。

依PTY資訊搜尋

您可以使用PTY(節目類型識別)資訊搜尋電台。
預設設定為「

新聞/資訊

」。

p

  只有在接收FM頻帶時才具有此功能。

1  觸碰

2  觸碰

可選擇項目。

可使用下列項目:

新聞/資訊

流行

古典

其他

3  觸碰

可開始搜尋。

  觸碰[

取消

]可取消搜尋程序。

顯示「Radio settings」畫面

1  顯示「系統設定」設定畫面。

2  觸碰[AV訊源設定]。

3  觸碰[收音機設定]。

調頻至訊號良好的頻率

本地頻道搜尋只能收聽訊號夠強的廣播電台。

預設的設定為「

關閉

」。

p

  只有在選擇「

Radio

」做為來源時才可使用此設定。

1  顯示「收音機設定」畫面。

  請參閱 第85頁上

顯示「Radio settings」畫面

2  觸碰[本地]。

3  觸碰想要的項目。


關閉

關閉搜尋調頻設定。


等級 1

等級 4

請將 FM 的靈敏度等級設定為 

等級 1

 至 

等級 4

(而 AM 則

為 

等級 1

 或 

等級 2

)。

p

  FM「

等級 4

」(AM「

等級 2

」)設定可讓您只收到訊號最強

的電台。

設定FM或AM調頻間隔

您可切換FM頻帶的搜尋調頻間隔,以及AM頻帶的搜尋/手動調
頻間隔。

p

  播放來源關閉時,可使用此設定。

p

  FM頻帶的手動調頻間隔固定為50 kHz。

1  顯示「收音機設定」畫面。

  請參閱 第85頁上

顯示「Radio settings」畫面

2  觸碰 [FM Step] 或 [AM Step] 來切換調頻間隔。

可使用下列項目:

FM Step


100kHz

(預設值)


50kHz

AM Step


9kHz

(預設值)


10kHz

設定備用頻率搜尋

調諧器無法取得良好收訊時,則搜尋目前網路中其他支援相同
節目的廣播電台。
預設設定為「

關閉

」。

p

  只有在接收FM頻帶時才具有此功能。

1  顯示「收音機設定」畫面。

  請參閱 第85頁上

顯示「Radio settings」畫面

2  觸碰[替代頻率]來切換「開啟」或「關閉」。

設定自動 PI搜尋

切換至內含RDS資料的廣播電台時,自動從所有頻帶搜尋相同
PI(節目識別)代碼的廣播電台。
預設設定為「

關閉

」。

p

  播放來源關閉時,可使用此設定。

廣播

Android裝置

連線需求

連接至USB連接埠2來使用 

Android Auto

可用來源

AppRadio Mode

Android Auto

 (*2)

(*1) 請選取「

Android Auto

」的「

開啟

」來使用 Android Auto。

(*2) 只有連接至 

Android Auto

相容裝置時才能使用。

85

< CRD4941-A >

iPod / iPhone或智慧型手機設定

廣播

Summary of Contents for AVH-X8850BT

Page 1: ...Owner s Manual 用戶手冊 AVH X8850BT DVD RDS AV RECEIVER DVD RDS AV接收機 English 1 CRD4941 A English 中文 ...

Page 2: ...the track name list 23 Switching the media file type 23 Searching for the part you want to play 23 Operating the DVD menu 23 Switching the subtitle audio language 23 Operating the DVD menu using touch panel keys 23 Compressed files 24 Starting procedure for Disc 26 Starting procedure for USB SD 26 Operations common to all file types 26 Audio file operations 26 Video file operations 26 Still image ...

Page 3: ...eads 51 Power amp sold separately 52 Connecting an iPod iPhone or an Android device 53 iPhone and smartphone 54 iPhone with Lightning connector 54 iPhone with 30 pin connector 54 Android device 55 Camera 55 External video component 56 Rear display 57 Installation 57 Precautions before installation 57 Before installing 57 Installation notes 57 Installation using the screw holes on the side of this ...

Page 4: ...park your vehicle in a safe location and apply the handbrake before making the necessary adjustments Never set the volume of this product so high that you cannot hear outside traffic and emergency vehicles To promote safety certain functions are disabled unless the vehicle is stopped and or the handbrake is applied Keep this manual handy as a reference for operating proce dures and safety informat...

Page 5: ...er ph In Vietnam http www pioneer vn In Indonesia http www pioneer co id In Australia http www pioneer com au In Israel http www pioneerisrael co il In Middle East Africa http www pioneer mea com en In Latin http www pioneer latin com en about pioneer html In Hong Kong http www pioneerhongkong com hk ct index php In Taiwan http www pioneer twn com tw In Korea http www pioneer co kr We offer the la...

Page 6: ...pack or batteries installed must not be exposed to excessive heat such as sunshine fire or the like CAUTION Remove the battery if the remote control is not used for a month or longer There is a danger of explosion if the battery is incorrectly replaced Replace only with the same or equivalent type Do not handle the battery with metallic tools Do not store the battery with metallic objects If the b...

Page 7: ...ext or previous title or folder Press to recall radio station frequencies assigned to preset channel keys Press to answer or end a call 11 AUDIO Press to change the audio language during DVD playback SUBTITLE Press to change the subtitle language during DVD playback ANGLE Press to change the viewing angle during DVD playback 12 BAND ESC Press to select the tuner band when Radio is selected as the ...

Page 8: ...1 Press the button 2 Touch or to adjust the angle of the LCD panel 3 Touch Returns to the previous screen Inserting ejecting connecting media CAUTION Do not insert anything other than a disc into the disc loading slot Do not insert anything other than SD memory cards into the SD card slot Ejecting an SD memory card during data transfer can damage the SD memory card Be sure to eject the SD memory c...

Page 9: ...storage device into the USB cable 2 1 1 USB cable 2 USB storage device p Check that no data is being accessed before pulling out the USB storage device On first time startup 1 Start the engine to boot up the system The Select Program Language screen appears p From the second time on the screen shown will differ depending on the previous conditions p From the second time on enter the password for t...

Page 10: ...se the screens Top menu screen Application menu screen Application operation screen Time and date setting screen Setting menu screen Phone menu screen AV source selection screen Favorite source icons AV operation screen 10 CRD4941 A Basic operation ...

Page 11: ... Touch the AV operation key 1 1 AV operation key The AV operation screen appears 1 2 1 Displays the source list 2 Recalls equalizer curves Refer to Using the equaliser on page 43 Selecting a source Source on the AV source selection screen 1 Display the AV source selection screen 2 Touch the source icon p When you select Source OFF the AV source is turned off Source on the source list 1 Display the...

Page 12: ...t and numbers symbols 8 Switches between capital and lower case letters Displaying the Bluetooth screen 1 Press the button 2 Touch and then Registering your Bluetooth devices 1 Activate the Bluetooth wireless technology on your devices 2 Display the Bluetooth screen Refer to Displaying the Bluetooth screen on page 12 3 Touch Connection 4 Touch The system searches for Bluetooth devices waiting for ...

Page 13: ... PIN Code Input 3 Touch 0 to 9 to input the pin code up to 8 digits 4 Touch Displaying the device information 1 Display the Bluetooth screen Refer to Displaying the Bluetooth screen on page 12 2 Touch Device Information The device name and address of the Bluetooth device on this product are displayed Clearing the Bluetooth memory CAUTION Never turn this product off while the Bluetooth memory is be...

Page 14: ...and dialling starts Calling a number in the phone book p The contacts on your phone will be automatically transferred to this product when the phone is connected 1 Display the phone menu screen Refer to Displaying the phone menu screen on page 14 2 Touch 3 Touch the desired name on the list 4 Touch the phone number The dial screen appears and dialling starts Dialling from the history 1 Display the...

Page 15: ... function by press ing and holding the button Notes for hands free phoning General notes Connection to all mobile phones featuring Bluetooth wire less technology is not guaranteed The line of sight distance between this product and your mobile phone must be 10 metres or less when sending and receiving voice and data via Bluetooth technology However the actual transmission distance may be shorter t...

Page 16: ...hone software versions Others may not work correctly iPhone 4 4s 5 5c 5s 6 6 Plus iOS 7 0 or later iPhone 3GS iOS 6 0 1 iPod touch 4th 5th generation iOS 6 0 1 iPod touch 3rd generation iOS 5 1 1 iPod touch 2nd generation iOS 4 2 1 iPod classic 160GB 2009 Ver 2 0 4 iPod classic 160GB 2008 Ver 2 0 1 iPod classic 80GB Ver 1 1 2 iPod nano 7th generation iPod nano 6th generation Ver 1 2 iPod nano 5th ...

Page 17: ...eparately When connecting via the following cables CD IH202 sold separately CD IU52 sold separately Lightning Digital AV Adapter sold separately Smartphone Setup Device iPhone iPod iPhone iPod iPhone iPod Connection Bluetooth USB1 Digital AV adapter Apple CarPlay On 2 Off Bluetooth connection Bluetooth connection is required Bluetooth connection is required Connection requirement Connect to USB po...

Page 18: ...SB2 HDMI Android Auto On 1 Off Bluetooth connection Bluetooth connection is required Bluetooth connection is required Bluetooth connection is required Connection requirement Connect to USB port 2 for using Android Auto Available sources AppRadio Mode Android Auto 2 1 Select On for Android Auto for using Android Auto 2 Available only when an Android Auto compatible device is connected 18 CRD4941 A ...

Page 19: ... the storage process Searching by PTY information You can tune into a station using PTY Program Type Identification information The default setting is News Info p This function is available only when you receive the FM band 1 Touch 2 Touch or to select the item The following items are available News Info Popular Classics Others 3 Touch to begin a search Touch Cancel to cancel the searching process...

Page 20: ... or Off Receiving traffic announcements TA The traffic announcement can be received from the last selected frequency interrupting the other sources The default setting is Off p This function is available only when you receive the FM band 1 Display the Radio Settings screen Refer to Displaying the Radio settings screen on page 19 2 Touch TA Interrupt to switch On or Off Receiving news announcements...

Page 21: ...deo signal setting The default setting is Auto p You can operate this function only for the video signal input into the AV input 1 Display the Video Setup screen 2 Touch Video Signal Setting 3 Touch TV 4 Touch the item The following items are available Auto PAL NTSC PAL M PAL N SECAM 1 Skips files forward or backward Switches between playback and pause 2 Audio source screen 1 Audio source screen 2...

Page 22: ... DVDs featuring multi angle recordings Sets a repeat play range Repeats all files Repeats the current chapter Repeats the current title Resumes playback Bookmark This function is available for DVD Video You can memorise one point as a Bookmark for a disc up to five discs To clear the bookmark on the disc touch and hold this key Returns and begins playback from the specified point This function is ...

Page 23: ...between media file types to play 1 Touch 2 Touch the item Music Switches the media file type to music compressed audio Video Switches the media file type to video CD DA Switches the media file type to CD audio data CD DA Searching for the part you want to play p For DVD Videos you can select Title Chapter or 10Key p For Video CDs you can select Track or 10Key PBC only 1 Touch 2 Touch Title Chapter...

Page 24: ... or the next folder Audio source screen 2 Example USB or Repeats all files Repeats the current folder or Repeats the current file 5 Stops playback 3 Performs frame by frame playback Performs slow motion playback Hides the touch panel keys To display again the keys touch anywhere on the screen Sets a repeat play range Repeats the current file Repeats the current folder or Repeats all files Video so...

Page 25: ...e on the screen Still image screen Touch again to change the playback speed Performs fast reverse or fast forward 4 Switches between playback and pause 1 Displays the MIXTRAX screen Refer to MIXTRAX on page 36 2 Displays the link search screen p This function is available for the external storage device USB SD only Refer to Selecting a song from the list related to the song currently playing link ...

Page 26: ... USB or SD p Play back is performed in order of folder numbers Folders are skipped if they contain no playable files Operations common to all file types Selecting files from the file name list You can find files or folders to play back using the file name or folder name list 1 Touch 2 Touch a file on the list to play back p Touching a folder on the list shows its contents You can play a file on th...

Page 27: ... Slide 3 Touch the item The following items are available 5sec 10sec 15sec Manual Audio source screen 1 1 Switches between playback and pause Skips files forward or backward 2 3 Sets the shuffle play Normal playback Fast playback Slow motion playback Audio source screen 2 Plays randomly songs or videos within the selected list Plays album randomly Sets a repeat play range Repeats all in the select...

Page 28: ...Settings are required according to the connected device Refer to Setup for iPod iPhone or smartphone on page 16 p The available sources vary depending on the selected method for connecting your device Refer to Information on the connections and functions for each device on page 17 p Depending on the generation or version of the iPod some functions may not be available p The video image of the iPod...

Page 29: ...he function is not availa ble for the current song p If you touch Play More Like This when the menu item is highlighted the function will turn off Setting the current song not to be played back again You can set the current song not to be played back again 1 Touch 2 Touch Never Play This Song p When the menu item is not active the function is not availa ble for the current song p If you touch Neve...

Page 30: ...ering your Bluetooth devices on page 12 1 Connect your iPhone Refer to iPhone with Lightning connector on page 54 Refer to iPhone with 30 pin connector on page 54 2 Press the button 3 Touch APPS p When you use an iPhone with a 30 pin connector messages appear on the screen of this product and your iPhone Proceed to the next step p When you use an iPhone with a Lightning connector the AppRadio app ...

Page 31: ...icking on the screen of this product p This function is only available when using iPod function with an iPhone 6 Plus iPhone 6 iPhone 5s iPhone 5c or iPhone 5 WARNING Certain uses of an iPhone may not be legal while driving in your jurisdiction so you must be aware of and obey any such restrictions If in doubt as to a particular function only perform it while the car is parked No feature should be...

Page 32: ... Touch to mute Touch again to unmute 2 Displays the main sound volume p You cannot adjust the volume of the main sound on the screen Press the VOL button to adjust the volume of the main sound 3 Adjusts the guidance volume and alert sound volume p Each touch of or increases or decreases the volume level You can control applications for a smartphone directly from the screen Android Auto In Android ...

Page 33: ...onnected to this product The default setting is On p Android Auto will launch automatically only when Smartphone Setup is correctly set for using Android Auto and an Android Auto compatible device is correctly connected to this product 1 Display the System setting screen 2 Touch Android Auto Auto launch to switch On or Off Setting the driving position To achieve optimum usability of Android Auto s...

Page 34: ... you try operating the signal may cause noise for song playback p When you are talking on the Bluetooth device connected to this product via Bluetooth it may pause playback p By pressing the or button you can also skip files forwards or backwards p By pressing and holding the or button you can also perform fast reverse or fast forwards Starting procedure p Before using the Bluetooth audio player r...

Page 35: ... component on page 56 p You can set the screen size for the video image Refer to Changing the wide screen mode on page 48 CAUTION For safety reasons video images cannot be viewed while your vehicle is in motion To view video images stop in a safe place and apply the handbrake Starting procedure You can display the video image output by the device connected to video input 1 Display the System setti...

Page 36: ... screen 2 Touch Input Output Settings 3 Touch AV Input repeatedly set to Camera 4 Display the AV source selection screen 5 Touch Camera View p When the camera view of both the rear view camera and 2nd camera are available the key to switch the display appears Touch this key to switch the display between the rear view image and 2nd camera image Setting the video signal When you connect this product...

Page 37: ...he following lists are available displays the mix pattern list displays the tag list displays the file list 2 Touch an item in the list Selecting songs not to be played You can select items or songs not to be played 1 Touch 2 Touch 3 Touch the category 4 Touch the box on the left of the item or song that you do not want to play Displaying the MIXTRAX Settings screen 1 Display the System setting sc...

Page 38: ...the System setting screen Refer to Displaying the System setting screen on page 38 2 Touch Beep Tone to switch On or Off Setting the rear view camera A separately sold rear view camera e g ND BC8 is required for utilising the rear view camera function For details consult your dealer Rear view camera This product features a function that automatically switches to the full screen image of the rear v...

Page 39: ...ght lines The image quality may deteriorate depending on the usage environment such as at night or in dark surroundings 1 Park your vehicle in a safe place and apply the handbrake 2 Using packing tape or similar place markings as follows Rear bumper 25 cm 25 cm 50 cm 2 m Markings Markings 3 Display the System setting screen Refer to Displaying the System setting screen on page 38 4 Touch Camera se...

Page 40: ...ouch two corners of the screen along the arrows and then touch the centres of two marks at the same time twice 4 Press the button The adjustment results are saved 5 Press the button once again Proceed to 16 point adjustment 6 Gently touch the centre of the mark dis played on the screen The target indicates the order When you press the button the previous adjustment position returns When you press ...

Page 41: ...System setting screen Refer to Displaying the System setting screen on page 38 2 Touch System Information 3 Touch Firmware Information Displaying the open source licences You can check the open source licenses of the functions that this product is equipped with 1 Display the System setting screen Refer to Displaying the System setting screen on page 38 2 Touch System Information 3 Touch Firmware I...

Page 42: ... setting is 0 Setting the rear speaker output A rear speaker output of this product can be turned on or off The default setting is On 1 Display the Audio setting screen Refer to Displaying the Audio setting screen on page 42 2 Touch Rear Speaker to switch On or Off p If Off is selected the rear speaker adjustment is not availa ble in Speaker Level Time Alignment and Crossover Setting the subwoofer...

Page 43: ...Bass Powerful Natural Vocal Flat Custom1 and Custom2 p The default setting is Powerful 1 Display the Audio setting screen Refer to Displaying the Audio setting screen on page 42 2 Touch Graphic EQ 3 Touch the equalizer curve name Customising the equaliser curves p If the preset equalizer curve other than Custom1 or Custom2 is modified the equalizer curve settings in Custom1 will be overwritten p I...

Page 44: ... Turn the source off Refer to Selecting a source on page 11 6 Display the Audio setting screen Refer to Displaying the Audio setting screen on page 42 7 Touch A EQ TA Measurement 8 Connect the microphone for acoustical meas urement sold separately with this product Plug the microphone into the auto EQ microphone input jack on this product Refer to Checking part names and functions on page 6 p Use ...

Page 45: ...lock 3 Touch the item Preset images Selects the desired preset style for the clock off Hides the clock display Changing the preinstalled splash screen You can change the splash screen to other images preinstalled in this product 1 Display the Theme screen Refer to Displaying the Theme setting screen on page 44 2 Touch Splash Screen 3 Touch the item Preset images Selects the desired preset splash s...

Page 46: ...splay the DVD DivX Setup screen Refer to Displaying the DVD DivX Setup screen on page 46 2 Touch Multi Angle to switch On or Off Setting the aspect ratio There are two kinds of displays A wide screen display has a width to height ratio TV aspect of 16 9 while a regular display has a TV aspect of 4 3 If you use a regular rear display with a TV aspect of 4 3 you can set the aspect ratio suitable for...

Page 47: ...een on page 46 2 Touch DivX VOD 3 Touch Deregistration Code Your 8 digit deregistration code is displayed p Make a note of the code as you will need it when you deregis ter from a DivX VOD provider Automatic playback of DVDs When a DVD disc with a DVD menu is inserted this product will cancel the menu automatically and start playback from the first chapter of the first title The default setting is...

Page 48: ...tion Changing the wide screen mode The default setting is Full and for JPEG images is Normal p JPEG can be set to either Normal or Trimming in wide screen mode p This setting is available only when you stop your vehicle in a safe place and apply the handbrake 1 Touch the following key 2 Touch the desired mode Full A 4 3 picture is enlarged in the horizontal direction only enabling you to enjoy an ...

Page 49: ...ered for a hint 7 Touch Go p If you want to change the password currently set enter the current password and then enter the new one 8 Check the password and then touch OK Deleting the password The current password and password hint can be deleted 1 Display the System setting screen Refer to Displaying the System setting screen on page 38 2 Touch 1 followed by 2 and then touch and hold 3 Refer to S...

Page 50: ...e danger It is extremely dangerous to allow cables to become wound around the steering column or gearstick Be sure to install this product its cables and wiring away in such so that they will not obstruct or hinder driving Make sure that the cables and wires will not interfere with or become caught in any of the vehicle s moving parts especially the steering wheel gearstick handbrake sliding seat ...

Page 51: ... supply 2 Power cord 3 Yellow To terminal supplied with power regardless of ignition switch position 4 Red To electric terminal controlled by ignition switch 12 V DC ON OFF 5 Orange white To lighting switch terminal 6 Black earth To vehicle metal body 7 Violet white Of the two lead wires connected to the back lamp connect the one in which the voltage changes when the gear shift is in the REVERSE R...

Page 52: ... 5 3 2 8 7 a 2 1 1 System remote control Connect to Blue white cable max 300 mA 12 V DC 2 Power amp sold separately 3 Connect with RCA cable sold separately 4 Rear outputs REAR OUTPUT 15 cm 5 Rear speaker 6 Front speaker 7 Front outputs FRONT OUTPUT 15 cm 8 This product 9 Subwoofer a Subwoofer outputs p You can change the RCA output of the subwoofer depending on your subwoofer system p The subwoof...

Page 53: ...nd 3rd generation iPod classic 80GB 160GB iPod nano 3rd 4th 5th 6th generation iPod audio iPod video Refer to Connecting via the AUX input iPhone on page 54 iPhone 4 4s iPod touch 4th generation iPod audio iPod video AppRadio Mode Refer to Connecting via the RGB input iPhone on page 54 iPod nano 7th generation iPod audio Refer to Connecting via the USB port iPhone on page 54 Android device AppRadi...

Page 54: ...SB port 1 4 iPhone with Lightning connector Connecting via the HDMI port iPhone 1 3 7 5 2 4 6 1 USB port 1 2 HDMI port 3 USB cable 1 5 m 4 High Speed HDMI Cable Type A A supplied with CD IH202 5 USB interface cable for iPod iPhone CD IU52 sold separately 6 Lightning Digital AV Adapter Apple Inc products sold separately 7 iPhone with Lightning connector p When you connect the High Speed HDMI Cable ...

Page 55: ...ce 1 2 4 3 1 USB port 2 2 USB cable supplied with CD MU200 3 USB micro USB cable Type USB A micro USB B sup plied with CD MU200 4 Android device For details on how to connect an external device using a separately sold cable refer to the manual for the cable Securing the High Speed HDMI Cable Be sure to fix the High Speed HDMI Cable with the lock tie when you connect the external device with the Hi...

Page 56: ...camera on page 38 External video component Using AV input 3 4 1 6 7 9 2 8 5 1 This product 2 Yellow VIDEO INPUT 15 cm 3 Red white AUDIO INPUT 23 cm 4 To Yellow 5 To Red white 6 RCA cables sold separately 7 To video output 8 To audio outputs 9 External video component sold separately p The appropriate setting is required to use the external video component Refer to AV input on page 36 Using an AUX ...

Page 57: ...ave the parts compatibility checked by your dealer If parts other than supplied or compatible ones are used they may damage internal parts of this product or they may work loose and the product may become detached Do not install this product where it may i obstruct the driver s vision ii impair the performance of any of the vehicle s operating systems or safety features including airbags hazard la...

Page 58: ...ocations on each side 1 3 5 2 4 1 Factory radio mounting bracket 2 If the pawl interferes with installation you may bend it down out of the way 3 Dashboard or console 4 Frame In some types of vehicles discrepancy may occur between the unit and the dashboard If this happens use the supplied frame to fill the gap 5 Truss head screw Be sure to use the screws supplied with this product Installing the ...

Page 59: ... camera image is displayed with no camera connection and the wrong camera polarity setting Press and hold the MUTE button to release the rear view camera screen and then change the camera polarity setting to Battery Problems with the AV screen CD or DVD playback is not possible The disc is inserted upside down Insert the disc with the label upward The disc is dirty Clean the disc The disc is crack...

Page 60: ... with the phone screen Dialling is impossible because the touch panel keys for dialling are inactive Your phone is out of range for service Retry after re entering the range for service The connection between the mobile phone and this product cannot be established Perform the connection process Problems with the Application screen A black screen is displayed While operating an application the appl...

Page 61: ...device USB SD contains DRM protected files The protected files are skipped Protect All the files on the connected external storage device USB SD are embedded with DRM Replace the external storage device USB SD Incompatible USB The connected USB storage device is not supported by this product Disconnect your device and replace it with a compatible USB storage device Incompatible SD The SD memory ca...

Page 62: ... Auto compatible device Park your vehicle in a safe place and follow the instruc tions displayed on the screen If the error message is still displayed after performing a on screen instructions please reconnect the device Handling and care of discs Some basic precautions are necessary when handling your discs Built in drive and care Use only conventional fully circular discs Do not use shaped discs...

Page 63: ...splayed by this product in the case of audio data CD DA Read the precautions with CD R CD RW discs before using them Common notes about the external storage device USB SD Do not leave the external storage device USB SD in any location with high temperatures Depending on the kind of the external storage device USB SD you use this product may not recognize the storage device or files may not be play...

Page 64: ...ransfer This product can recognise up to 32 characters beginning with the first character including extension for the file and folder name Depending on the display area this product may try to display them with a reduced font size However the maximum number of the characters that you can display varies according to the width of each character and of the display area Folder selection sequence or ot...

Page 65: ...um resolution 720 pixels 480 pixels Maximum Frame rate 30 fps Maximum file size 4 GB Maximum playback time 150 minutes 3gp Compatible video codec MPEG 4 H 264 H 263 Compatible audio codec AAC Maximum resolution 720 pixels 480 pixels Maximum Frame rate 30 fps Maximum file size 4 GB Maximum playback time 150 minutes mkv Compatible audio codec MPEG 4 H 264 VC 1 Xvid Compatible audio codec MP3 AAC Vor...

Page 66: ...license This DivX Certified device has passed rigorous testing to ensure it plays DivX video To play purchased DivX movies first register your device at vod divx com Find your registration code in the DivX VOD section of your device setup menu Refer to Displaying your DivX VOD registration code on page 47 AAC AAC is short for Advanced Audio Coding and refers to an audio compression technology stan...

Page 67: ...t is limited while driving with available functions determined by the App providers Availability of AppRadio Mode Apple CarPlay and Android Auto functionalities is determined by the App provider and not determined by Pioneer AppRadio Mode Apple CarPlay and Android Auto allow access to applications other than those listed subject to limitations while driving but the extent to which content can be u...

Page 68: ... aspect ratio 6 95 inch wide 16 9 effective display area 156 6 mm 81 6 mm Pixels 1 152 000 2 400 480 Display method TFT Active matrix driving Colour system PAL NTSC PAL M PAL N SECAM compatible Durable temperature range Power off 20 C to 80 C Audio Maximum power output 50 W 4 Continuous power output 22 W 4 50 Hz to 15 kHz 5 THD 4 Ω LOAD Both Channels Driven Load impedance 4 Ω 4 Ω to 8 Ω allowable ...

Page 69: ...er Frequency range 87 5 MHz to 108 0 MHz Usable sensitivity 11 dBf 0 8 µV 75 Ω mono S N 30 dB Signal to noise ratio 72 dB IEC A network AM tuner Frequency range 531 kHz to 1 602 kHz 9 kHz Frequency range 530 kHz to 1 640 kHz 10 kHz Usable sensitivity 25 µV S N 20 dB Signal to noise ratio 62 dB IEC A network Specifications and design are subject to possible modifica tions without notice due to impr...

Page 70: ...9 使用觸控面板按鍵操作DVD選單 89 壓縮檔案 89 開始程序 適用碟片 91 開始程序 適用USB SD 91 所有檔案類型通用的操作 91 音訊檔案操作 91 視訊檔案操作 91 靜態影像檔案操作 92 iPod 92 連接iPod 93 啟動程序 93 在播放清單畫面中選擇歌曲或視訊來源 93 在您的iPod中使用本產品的iPod功能 93 從目前播放歌曲的相關清單中選擇歌曲 連結搜尋 94 使用 Apple Music Radio 94 AppRadio Mode 94 AppRadio Mode相容性 94 使用AppRadio Mode 95 開始程序 95 使用鍵盤 適用iPhone使用者 95 調整影像大小 適用智慧型手機 Android 使用者 95 使用音訊混音功能 95 Apple CarPlay 96 使用 Apple CarPlay 96 開始程序 96 設定...

Page 71: ...118 安裝前注意事項 118 安裝前 118 安裝注意事項 118 使用本產品側邊螺絲孔安裝 118 安裝麥克風 119 安裝在遮陽板上 119 安裝在轉向機柱上 119 調整麥克風角度 119 附錄 120 故障排除 120 錯誤訊息 120 操作及保養碟片 122 可播放碟片 122 有關可播放媒體的詳細資訊 122 Bluetooth 125 SDHC 125 WMA WMV 125 FLAC 125 DivX 125 AAC 125 Google Google Play Android 125 Android Auto 125 MIXTRAX 125 有關連接iPod裝置的詳細資訊 125 使用應用程式架構連線內容 126 HDMI 126 MHL 126 有關觀看視訊的注意事項 126 有關觀看DVD Video的注意事項 126 有關使用MP3檔案的注意事項 126 相關開放...

Page 72: ...輛操作系統或安全功能 如氣囊或危險 警告燈按鈕 的地方 或 3 影響駕駛人員安全駕駛的地 方 行駛時 請記得隨時繫上安全帶 否則 若在未繫妥安全帶 的情況下發生事故 可能會大幅加重傷勢 切勿在駕駛時使用耳機 注意 本產品是在溫和和熱帶氣候中以音訊 視訊及類似電子設備進 行評估 安全規範 IEC 60065 行駛安全注意事項 本產品提供的特定功能 如觀看視訊影像及特定觸控面板按鍵操 作 若在行駛中使用可能會造成危險 可能導致重傷或死亡 為了避免在行車時使用這些功能 本產品配備可感應手煞車設定 狀態及車輛移動的連動系統 若要在行駛時使用上述功能 您必 須將車輛停在安全位置並拉起手煞車 連動系統才會停用 請在 放開手煞車之前先踩住煞車踏板 警告 電源接頭的淺綠色導線專為偵測駐車狀態所設計 必須連接 至手煞車開關的電源供應側 不當連接或使用這條導線 可 能會違反適用法律 並造成重傷或損壞 為了您的...

Page 73: ...用手指輕觸觸控面板 按鍵 內部記憶體注意事項 取出車輛電瓶之前 如果電池中斷連接或電量用盡 將清除記憶且必須重新設定 部分設定及記錄內容將不會重設 資料消除 中斷連接電瓶的黃色導線 或取出電瓶 即可消除資訊 部分設定及記錄內容將不會重設 重設微處理器 注意 按下 RESET 按鈕將設定與記錄內容重設為原廠設定值 請勿在本產品連接裝置時執行此操作 部分設定及記錄內容將不會重設 微處理器在以下情形必須重設 安裝本產品後首次使用之前 本產品無法正常運作 系統運轉出現問題 您車輛顯示在地圖上的位置出現明顯的定位錯誤 1 將點火開關切換至OFF 2 用筆尖或其他尖銳器具按下 RESET 按鈕 請參閱 第74頁上檢查零件名稱及功能 設定及記錄內容皆重設為原廠設定值 關於本手冊 本手冊使用實際產品畫面的截圖來解說操作 不過視使用的機型 而定 部分裝置上的畫面可能與本手冊上顯示的不符 本手冊所用符號的意義...

Page 74: ...前往下一個 曲目 章節 按住此按鈕可執行快倒或快進 按下可接聽或結束通話 7 按鈕 8 RESET按鈕 請參閱 第73頁上重設微處理器 9 碟片槽 請參閱 第76頁上插入及退出碟片 10 SD卡插槽 請參閱 第76頁上插入及退出SD記憶卡 11 自動EQ麥 克風輸入 插孔 用於連接測量聲音的麥克風 另售 遙控器 3 2 1 6 7 4 5 8 9 a b c 1 Volume 2 REAR SRC 按下可切換所有可用的後側播放來源 按住該按鈕可關閉後側播放來源 3 SRC OFF 按下可切換所有可用前端播放來源 按住該按鈕可關閉前端播放來源 4 來源模式 選擇開關 用於切換前方與後方來源的來源模式 5 姆指墊 可用來選擇DVD選單上的選單 6 MUTE 7 MENU 按該按鈕可在DVD播放時顯示DVD選單 TOP MENU 按該按鈕可在DVD播放時返回頂層選單 8 RETURN 按下以返回...

Page 75: ...他物品擺放在前面板上 方 重要事項 移除或安裝時 請務必小心拿取前面板 請避免使前面板受到劇烈撞擊 請將前面板遠離陽光直射和高溫 如果前面板已卸下 請在啟動車輛之前將其放回原位 拆卸前面板 1 按下 按鈕 2 觸碰 3 將前面板下方的轉盤滑向右側 並在提起前面板的 同時壓下轉盤 4 將前面板放入隨附的防盜箱中安全保存 安裝前面板 1 將前面板滑入本產品上方並推入至定位 將前面板上的隔板滑入本機上的插槽並壓至定位 2 推動前面板的下方直到卡至定位 使用液晶面板的注意事項 警告 開啟 關閉或調整液晶面板時 不要用手和手指碰觸本產 品 請特別注意兒童的手和手指 請勿在液晶面板維持開啟時使用 以免在發生意外時導致受 傷 注意 請勿用力開啟或關閉液晶面板 這可能造成故障 液晶面板完全開啟或關閉之前 請勿操作本產品 在LCD面 板開啟中或關閉中操作本產品時 LCD可能會停在該角度上 以策安全 請勿將玻...

Page 76: ...憶卡插槽中 4 按下 按鈕 退出SD記憶卡 1 按下 按鈕 2 觸碰 可開啟液晶面板 3 緩緩按下SD記憶卡的中間部分 直到卡入定位為 止 4 筆直拉出SD記憶卡 5 按下 按鈕 插入及拔除USB儲存裝置 p 搭配部分USB儲存裝置使用時 本產品可能無法達到最佳效 能 p 無法透過USB集線器連線 p 需使用USB纜線進行連線 1 將插頭拉出USB纜線的USB連接埠 2 將USB儲存裝置插入USB纜線中 2 1 1 USB纜線 2 USB儲存裝置 p 先確定系統並非正在存取資料 再拔出USB儲存裝置 首次啟動時 1 啟動引擎開啟系統 選取程式語言 畫面隨即出現 p 從第二次開始 顯示的畫面會視先前的條件而異 p 從第二次使用開始 請在密碼輸入畫面出現時 輸入防竊功 能的密碼 2 觸碰語言 3 觸碰 智慧型手機設定 畫面隨即出現 4 觸碰想要的項目 請參閱 第83頁上有關各裝置連接及功能的資...

Page 77: ...77 如何使用畫面 αቺ ᒊᄎ ᔗңโԓ ᒊᄎ ᔗңโԓᐈձᒊᄎ ਣ ᇅС ೪ۢᒊᄎ ೪ۢ ᒊᄎ Ⴌၘ ᒊᄎ BW ྜٿ ᒶᐆᒊᄎ ഷན ྜٿ შұ BWᐈձᒊᄎ p 在任何畫面上按下 按鈕 會顯示最上層選單畫面 77 CRD4941 A 基本操作 ...

Page 78: ... USB SD iPod 藍牙 音訊 AV輸入 AV AUX HDMI 顯示AV操作畫面 1 按下 按鈕 2 觸碰AV操作鍵 1 1 AV操作鍵 出現AV操作畫面 1 2 1 顯示來源清單 2 調用等化器曲線 請參閱 第106頁上使用等化器 選擇來源 AV來源選擇畫面上的來源 1 顯示AV來源選擇畫面 2 觸碰來源圖示 p 選擇 Source OFF 時 AV來源關閉 來源清單上的來源 1 顯示來源清單 請參閱 第78頁上顯示AV操作畫面 2 觸碰來源鍵 p 選擇 Source OFF 時 AV來源關閉 變更來源的顯示順序 變更來源圖示的顯示順序 1 顯示AV來源選擇畫面 2 觸碰來源圖示不放 再拖曳該圖示至所需的位置 變更來源按鍵的顯示順序 1 顯示來源清單 請參閱 第78頁上顯示AV操作畫面 2 觸碰 3 將來源按鍵拖曳至所需的位置 使用觸控面板 您可直接用手指觸碰畫面上的按鍵 以操作...

Page 79: ...為 0000 請參閱 第79頁上輸入藍牙無線連線的PIN碼 p 亦可使用藍牙裝置偵測本產品 以建立藍牙連線 登錄之 前 請先確定 可見性 位於 藍牙 選單中 已設為 開啟 有關藍牙裝置操作的詳細資訊 請參閱藍牙裝置隨 附的操作說明 請參閱 第79頁上切換可視性 設定藍牙裝置自動連線 此功能可將上次以 免持設定檔 連線至本產品的藍牙裝置 在 距離本產品數公尺內時自動連線 預設設定為 開啟 1 顯示 藍牙 畫面 請參閱 第79頁上顯示 藍牙 畫面 2 觸碰 自動連接 來切換 開啟 或 關閉 刪除已登錄的裝置 注意 切勿在刪除已配對藍牙裝置時關閉本產品 1 顯示 藍牙 畫面 請參閱 第79頁上顯示 藍牙 畫面 2 觸碰 連接 3 觸碰 4 觸碰 是 手動連接登錄的藍牙裝置 在下列情況下手動連接藍牙裝置 已登錄兩部以上的藍牙裝置 且您想手動選擇要使用的裝 置 您想重新連接已中斷的藍牙裝置 因某些因...

Page 80: ...藍牙模組版本 2 3 1 4 5 6 1 切換至預設撥號畫面 請參閱 第80頁上使用預設撥號清單 2 切換至電話簿清單 請參閱 第80頁上撥打電話簿中的號碼 3 切換未接 已接和已撥電話清單 請參閱 第80頁上從通話記錄中撥號 4 切換模式以直接輸入電話號碼 請參閱 第80頁上直接撥號 5 切換至語音辨識功能 請參閱 第81頁上使用語音辨識功能 6 會顯示出下列項目 目前行動電話的名稱 目前行動電話的清單編號 指示已連接藍牙電話 目前行動電話的收訊狀態 目前行動電話的電池狀態 若要使用此功能 必須事先透過藍牙功能將行動電話連接至本 產品 請參閱 第79頁上藍牙 連線 注意 為了您的安全起見 請盡可能避免在駕駛時使用電話交談 顯示電話選單畫面 1 按下 按鈕 2 觸碰 撥打電話 您可使用各種不同的方式撥打電話 p 若要結束通話 請觸碰 直接撥號 1 顯示電話選單畫面 請參閱 第80頁上顯示電...

Page 81: ...種音量等級 使用語音辨識功能 您可使用iPhone或智慧型手機的語音辨識功能 p 使用執行iOS 6 1 以上的iPhone時 可透過本產品使用Siri Eyes Free Mode p 智慧型手機若要使用此功能 該裝置必須與 Android Auto 相容 智慧型手機需先啟動 Android Auto 後 才能使用此 語音辨識功能 請參閱 第97頁上使用Android Auto 1 顯示電話選單畫面 請參閱 第80頁上顯示電話選單畫面 2 觸碰 此時語音辨識功能啟動 且出現語音控制畫面 p 您也可按住 按鈕來啟動語音辨識功能 免持聽話的注意事項 一般注意事項 不保證連線至所有具備藍牙無線技術的行動電話 透過藍牙技術傳送或接收語音和資料時 本產品與行動電話 之間的傳輸距離必須低於10公尺 不過 實際的傳輸距離會因使用環境的關係 而可能會短於 預估的距離 使用某些行動電話時 鈴聲可能不會從喇...

Page 82: ...OS 6 0 1 iPod touch 第四代 第五代 iOS 6 0 1 iPod touch 第三代 iOS 5 1 1 iPod touch 第二代 iOS 4 2 1 iPod classic 160GB 2009 版本 2 0 4 iPod classic 160GB 2008 版本 2 0 1 iPod classic 80GB 版本 1 1 2 iPod nano 第七代 iPod nano 第六代 版本 1 2 iPod nano 第五代 版本 1 0 2 iPod nano 第四代 版本 1 0 4 iPod nano 第三代 版本 1 1 3 p 您可以使用另售的接頭纜線來連接及控制與本產品相容的 iPod iPhone p 操作方式會因iPod iPhone機型和軟體版本而有所不同 p 視iPod iPhone軟體版本而定 有可能與本產品不相容 如需了解iPod iP...

Page 83: ...one iPod iPhone iPod 連接 Bluetooth USB1 數位 AV 轉接器 Apple CarPlay 開啟 2 關閉 藍牙連線 需要藍牙連線 需要藍牙連線 連線需求 連接至USB連接埠1來使用 Apple CarPlay 可用來源 iPod 音訊 1 iPod 視訊 1 AppRadio Mode Apple CarPlay 3 1 使用 AppRadio Mode 在 iPod iPhone 上播放音樂或視訊 若要使用 AppRadio Mode 請在您的 iPod iPhone 上安裝 CarMediaPlayer 如需了解有關 CarMediaPlayer的詳細資料 請參閱我們網站上的資訊 如需了解其他資訊 請參閱 CarMediaPlayer 手冊 2 請選取 Apple CarPlay 的 開啟 來使用 Apple CarPlay 3 只有連接至 Appl...

Page 84: ...84 p p 開 1 Android裝置 連線需求 連接至USB連接埠2來使用 Android Auto 可用來源 AppRadio Mode Android Auto 2 1 請選取 Android Auto 的 開啟 來使用 Android Auto 2 只有連接至 Android Auto相容裝置時才能使用 84 CRD4941 A iPod iPhone或智慧型手機設定 ...

Page 85: ... 其他 3 觸碰 可開始搜尋 觸碰 取消 可取消搜尋程序 顯示 Radio settings 畫面 1 顯示 系統設定 設定畫面 2 觸碰 AV訊源設定 3 觸碰 收音機設定 調頻至訊號良好的頻率 本地頻道搜尋只能收聽訊號夠強的廣播電台 預設的設定為 關閉 p 只有在選擇 Radio 做為來源時才可使用此設定 1 顯示 收音機設定 畫面 請參閱 第85頁上顯示 Radio settings 畫面 2 觸碰 本地 3 觸碰想要的項目 關閉 關閉搜尋調頻設定 等級 1至等級 4 請將 FM 的靈敏度等級設定為 等級 1 至 等級 4 而 AM 則 為 等級 1 或 等級 2 p FM 等級 4 AM 等級 2 設定可讓您只收到訊號最強 的電台 設定FM或AM調頻間隔 您可切換FM頻帶的搜尋調頻間隔 以及AM頻帶的搜尋 手動調 頻間隔 p 播放來源關閉時 可使用此設定 p FM頻帶的手動調頻間隔...

Page 86: ...顯示 收音機設定 畫面 請參閱 第85頁上顯示 Radio settings 畫面 2 觸碰 切播新聞 來切換 開啟 或 關閉 Ӫα ܗ ӪίϹඳႲ೪ᓝၿȄ ᗵᙡ ᒚᏣ ࡹښ ໗Ȅ स ӕԪᡘұࡹ໗Ȃ ដᄦᒊᄎα ޠ Ӊཏ ဋȄ ңႲ೪ᓝၿȄ ᡘұႬຝ ᒚᏣ Ȅ 您可以控制電視選台器 如 GEX 1550TV 另售 如需了解詳細資料 請參閱電視調諧器的操作手冊 p 按下 或 鍵 亦可切換預設的聲道 p 您可為視訊影像設定螢幕大小 請參閱 第110頁上變更寬螢幕模式 注意 基於安全考量 行車時 無法觀看視訊影像 若要觀看視訊影 像 請停在安全位置並拉起 踩踏手煞車 開始程序 1 顯示AV來源選擇畫面 2 觸碰 TV 儲存頻道 此功能會自動儲存您收聽的電台 在此步驟期間儲存的廣播頻率會取代先前以預設頻道按鍵儲存 的廣播頻率 1 觸碰 Menu 2 觸碰 Channel Search 預設頻道依...

Page 87: ...ᄎ 3 ٸ ᓎᐡ ז ክܺԣҭȄ Ȉϛࡹᓎᐡ ז ክܺԣҭȄ Ȉࡹᓎᐡ ז ክܺ ܛ ԥԣҭȄ ೪ဋ२ፓክܺጓ Ȅ Ȉ२ፓክܺ ࠊӏᆆȄ Ȉ२ፓክܺ ࠊԣҭȄ ԫѓ Ѡңܼॲ DEȄ ຝᓝ ဵྜᒊᄎ 2 5 ໍ ץ ଞ ໍץܗ Ȅ ӕԪដᄦп ᡑክܺഁ Ȅ ЦክܺȄ 4 3 ໍ ഃ ክܺȄ HOLD ໍ ᄛ ձክܺȄ ؑԪដᄦ Ȃְࡹпί ז ϸѳؐ ᡑ ഁ Ȉ2027 ʖ209 ʖ 205 ʖ 203 ᗵᙡដᄦࡏࡹ໗Ȅ स ӕԪᡘұࡹ໗Ȃដᄦᒊᄎα ޠ Ӊཏ ဋȄ 存 87 CRD4941 A 碟片 ...

Page 88: ...5 切換字幕 音訊語言 請參閱 第89頁上切換字幕 音訊語言 6 顯示DVD選單鍵盤 請參閱 第89頁上使用觸控面板按鍵操作DVD選 單 p 按下 或 按鈕也可以向前或向後略過檔案 章 節 p 按住 或 按鈕也可以執行倒轉或快轉 p 若正在播放開啟PBC的VCD 則 出現 p 您可為視訊影像設定螢幕大小 請參閱 第110頁上變更寬螢幕模式 注意 基於安全考量 行車時 無法觀看視訊影像 若要觀看視訊影 像 請停在安全位置並拉起 踩踏手煞車 啟動程序 您可利用本產品的內建光碟機播放一般音樂CD VCD或 DVD Video 1 放入碟片 請參閱 第76頁上插入及退出碟片 此時來源會變更 然後將開始播放 p 放入光碟後 選擇 Disc 作為播放來源 從曲目名稱清單中選擇檔案 1 觸碰 2 觸碰清單上的曲目以播放 切換媒體檔類型 播放含有多種媒體檔類型的數位媒體時 可切換要播放的媒體 檔類型 1 ...

Page 89: ...上設定第一優先語言 使用觸控面板按鍵操作DVD選單 DVD選單上的項目出現時 觸控面板按鍵會與項目重疊 此時 請使用觸控面板按鍵選擇項目 1 觸碰 2 觸碰 或 以選擇選單項目 3 觸碰 p 播放選單的方法視碟片而異 如觸碰 則觸控面板鍵會消失並顯示 圖 示 3 Ӫࠊ ܗ ӪࡤၱႇНӈȄ Ӷክܺ ڸ ኸ ϟ ໍ ϹඳȄ 4 ॲᓝ ဵྜᒊᄎ 2Ȟ پ ԄȈVTCȟ 1 2 Ϲඳ ࠊॲ ၦଊᡘұȄ ࡹᓎᐡ ז ክܺНӈȄ Ȉϛࡹᓎᐡ ז ክܺНӈȄ Ȉࡹᓎᐡ ז ክܺ२ፓክܺጓ ϲ ܛޠ ԥ НӈȄ ೪ဋ२ፓክܺጓ Ȅ ᒶᐆࠊΚঐНӈַ ܗ ίΚঐНӈַȄ ॲᓝ ဵྜᒊᄎ 3Ȟ پ ԄȈVTCȟ ܗ २ፓክܺ ܛ ԥНӈȄ २ፓክܺ ࠊНӈַȄ ܗ २ፓክܺ ࠊНӈȄ 影 體 k 89 CRD4941 A 碟片 壓縮檔案 ...

Page 90: ... २ፓክܺ ܛ ԥНӈȄ ຝଊ ྜٿ ᒊᄎȞ پ ԄȈӏᆆȟ HOLD ԫѓ Ѭԥᓾԇܼӏᆆα ޠ ᔇᕼຝᓝᔭ Ϙ ٻ ңȄ ӕԪដᄦп ᡑክܺഁ Ȅ ໍ ץ ଞ ໍץܗ Ȅ 4 Ӷክܺ ڸ ኸ ϟ ໍ ϹඳȄ ຝଊ ྜٿ ᒊᄎȞ پ ԄȈӏᆆȟ ᓘᄙኈ ᒊᄎ 3 ೪ဋ२ፓክܺጓ Ȅ Ȉ२ፓክܺ ܛ ԥНӈȄ Ȉ२ፓክܺ ࠊНӈַȄ ࡹᓎᐡ ז ክܺНӈȄ Ȉϛࡹᓎᐡ ז ክܺНӈȄ Ȉࡹᓎᐡ ז ክܺ ࠊ२ፓ ክܺጓ ϲ ܛޠ ԥНӈȄ ᒶᐆࠊΚঐ ܗ ίΚঐН ӈַȄ ϑᡘұ ޠ შ ਣଭఌ ᙾ 1ʶȄ ᗵᙡដᄦࡏࡹ໗Ȅ स ӕԪᡘұࡹ໗Ȃដᄦᒊᄎα ޠ Ӊཏ ဋȄ 90 CRD4941 A 壓縮檔案 ...

Page 91: ...觀看視訊影像 若要觀看視訊影 像 請停在安全位置並拉起 踩踏手煞車 開始程序 適用碟片 1 放入碟片 請參閱 第76頁上插入及退出碟片 p 放入碟片後 選擇 Disc 作為播放來源 開始程序 適用USB SD 1 將SD記憶卡插入SD卡插槽或將USB儲存裝置插入USB 接頭 請參閱 第76頁上插入及退出SD記憶卡 請參閱 第76頁上插入及拔除USB儲存裝置 2 顯示AV來源選擇畫面 3 觸碰 USB 或 SD p 依資料夾編號順序播放 若資料夾內沒有可播放檔案 則會 略過 所有檔案類型通用的操作 從檔案名稱清單中選擇檔案 您可以利用檔案名稱或資料夾名稱清單 尋找檔案或資料夾 1 觸碰 2 觸碰清單上的檔案進行播放 p 觸碰清單上的資料夾顯示其內容 您可觸碰清單上的檔案 進行播放 切換媒體檔類型 播放含有多種媒體檔類型的數位媒體時 可切換要播放的媒體 檔類型 1 觸碰 2 觸碰想要的項目 M...

Page 92: ...每張影像的播放時間間隔 預設設定為 10sec p 此設定適用於播放JPEG檔案時 1 顯示 視頻設定 畫面 2 觸碰 相片瀏覽 3 觸碰想要的項目 可使用下列項目 5sec 10sec 15sec 手動設定 ॲᓝ ဵྜᒊᄎ 2 1 Ӷክܺ ڸ ኸ ϟ ໍ ϹඳȄ Ӫࠊ ܗ ӪࡤၱႇНӈȄ 2 3 ೪ۢᓎᐡክܺȄ ȈҔளክܺ Ȉ ץ ഁክܺ Ȉᄛ ձክܺ ॲᓝ ဵྜᒊᄎ 3 Ȉᓎᐡክܺᒶۢఽ Ϝ ޠ ᅉԣ ܗ ຝ ᓝȄ Ȉᓎᐡክܺ ᒯȄ ೪ဋ२ፓክܺጓ Ȅ Ȉ२ፓክܺᒶۢఽ Ϝ ܛޠ ԥϲৡȄ Ȉ२ፓክܺ ࠊᅉԣ ܗ ຝᓝȄ ᡑԥᖑ ޑ ክܺഁ Ȅ 1 2 2 1 2 92 CRD4941 A 壓縮檔案 iPod ...

Page 93: ...所選擇用來連接裝置的方法而有所不同 請參閱 第83頁上有關各裝置連接及功能的資訊 p 視iPod的世代或版本而定 有些功能無法操作 p iPod的視訊影像如果以後顯示器輸出視訊影像時可能會有些 噪音 當iPod的視訊影像中產生了噪音時 請關閉後顯示器 的輸出設定 請參閱 第110頁上選擇適合後顯示器的視訊 啟動程序 p 若連接iPhone或iPod touch 請在連接裝置之前先結束所有 應用程式 1 連接iPod 請參閱 第93頁上連接iPod 2 顯示AV來源選擇畫面 3 觸碰 iPod 在播放清單畫面中選擇歌曲或視訊來 源 您可由播放清單畫面中搜尋所要播放的歌曲 視訊 或無線電 台 1 觸碰 2 觸碰 或 可切換音樂或視訊類別清單 p 搭配iPhone 6 Plus iPhone 6 iPhone 5s iPhone 5c iPhone 5或iPod touch 第五代 使用iPod...

Page 94: ...p 在選單項目亮起時觸碰 Play More Like This 會關閉此 功能 設定不再播放目前的歌曲 您可將目前的歌曲設定成不再播放 1 觸碰 2 觸碰 Never Play This Song p 當選單項目為啟用時 目前的歌曲就不會具有此功能 p 觸碰 Never Play This Song 則當選單項目亮起時 此功能 將會關閉 新增目前的歌曲至願望清單 您可將目前的歌曲新增至願望清單以便日後輕鬆存取 1 觸碰 2 觸碰 Add to iTunes Wish List p 若該首歌曲早已在願望清單中 會顯示出 Remove from iTunes Wish List 若觸碰此鍵 會將該首歌曲從願望清 單中移除 ᡘұః ᔗңโԓᒊᄎȄ ᡘұࠊΚঐᒊᄎȄ ᡘұ ᒊᄎȄ ᡘұ ࠊ ဵྜȄ p 按下 按鈕兩次可隱藏應用程式控制側邊列 再按兩次 按鈕可再次將其顯示 p 和 視類型裝置而定 ...

Page 95: ...以Lightning連接器來使用iPhone時 會啟動AppRadio app 並在本步驟後出現 AppRadio Mode的畫面 應用程式 選單畫面 在此情況時 就無需進行下列步驟 4 使用iPhone啟動應用程式 啟動了AppRadio app 5 觸碰本產品畫面上的 OK 出現AppRadio Mode畫面 應用程式選單畫面 智慧型手機 Android 使用者須知 1 登錄您的智慧型手機 並透過藍牙無線技術連接本 產品 請參閱 第79頁上登錄您的藍牙裝置 2 解除智慧型手機的鎖定並連接至本產品 請參閱 第115頁上Android裝置 3 按下 按鈕 4 觸碰 APPS 啟動AppRadio app 並出現AppRadio Mode畫面 應用程式選 單畫面 使用鍵盤 適用iPhone使用者 當您輕點iPhone應用程式的文字輸入區時 畫面上會顯示鍵盤 您可以直接從本產品中輸入所需的文字...

Page 96: ...不同 開始程序 將Apple CarPlay的相容裝置連接至本產品時 請選擇連接裝置 的方式 設定需依據連接的裝置為主 請參閱 第82頁上iPod iPhone或智慧型手機設定 p 若要達到 Apple CarPlay的最佳使用狀態 請依照車輛正確 地設置出駕駛位置的設定 請參閱 第96頁上設定駕駛位置 p 使用 Apple CarPlay 時 可從主音效音量上分別調整導引 音量及警示聲音量 請參閱 第96頁上調整音量 1 經由 USB 將 Apple CarPlay相容裝置連接至本產 品 請參閱 第115頁上透過USB連接埠連接 iPhone 即會出現應用程式選單畫面 p 若已連接Apple CarPlay的相容裝置並顯示其他畫面 觸碰 最上層選單畫面的 Apple CarPlay 即可顯示應用程式選單 畫面 p 與Apple CarPlay相容裝置的藍牙連線在Apple CarPlay...

Page 97: ...oid Auto 請參閱 第97頁上設定自動啟動功能 1 經由 USB 將 Android Auto相容裝置連接至本產 品 請參閱 第115頁上Android裝置 2 按下 按鈕 3 觸碰 Android Auto 將會自動建立起與Android Auto相容裝置的藍牙連線並將其他任 何裝置的藍牙連線中斷 p 若已配對三部裝置 訊息會確認是否要刪除所顯示的登錄裝 置 若要刪除該裝置 請觸碰 同意 若要刪除其他裝置 請觸碰 藍牙設定 然後手動刪除該裝置 請參閱 第79頁上登錄您的藍牙裝置 p 如果不是在Android Auto相容裝置而是在手機通話時開啟 了Android Auto 則藍牙連線在該通話結束後才會切換至 Android Auto的相容裝置 設定自動啟動功能 如果此功能設定開啟 則當Android Auto相容裝置連接至本產品 後 會自動啟動 Android Auto 預設設定為...

Page 98: ...電話時 可能會 暫停播放 p 按下 或 按鈕 亦可向前或向後略過檔案 p 按住 或 按鈕也可以執行倒轉或快轉 啟動程序 p 使用藍牙音訊播放器之前 請登錄並連接裝置與本產品 請參閱 第79頁上登錄您的藍牙裝置 1 拉出連接纜線 以便使用AppRadio Mode p 當AppRadio Mode所用的連接纜線已連線時 無法使用藍牙 音訊播放器 2 顯示 系統設定 設定畫面 3 觸碰 AV訊源設定 4 請確認 藍牙音訊 已開啟 5 顯示AV來源選擇畫面 6 觸碰 Bluetooth Audio 從檔案名稱清單中選擇檔案 p 只有藍牙裝置的AVRCP版本是1 4或以上時才可使用此功能 1 觸碰 2 觸碰清單上的檔案或資料夾進行播放 ᗵᙡដᄦࡏࡹ໗Ȅ स ӕԪᡘұࡹ໗Ȃដᄦᒊᄎα ޠ Ӊཏ ဋȄ p 連線需使用高速HDMI 傳輸線 另售 請參閱 第117頁上使用HDMI輸入 p 您可為視訊影像設...

Page 99: ...已開啟 4 顯示AV來源選擇畫面 5 觸碰 AUX 設定視訊訊號 連接本產品與AUX設備時 請選擇適合的視訊訊號設定 預設設定為 自動 p 只有在視訊訊號輸入至AUX輸入時 才能操作此功能 1 進入 視頻設定 畫面 2 觸碰 視頻信號設定 3 觸碰 AUX 4 觸碰想要的項目 可使用下列項目 自動 PAL NTSC PAL M PAL N SECAM ᗵᙡដᄦࡏࡹ໗Ȅ स ӕԪᡘұࡹ໗Ȃដᄦᒊᄎα ޠ Ӊཏ ဋȄ 注意 基於安全考量 行車時 無法觀看視訊影像 若要觀看視訊影 像 請停在安全位置並拉起 踩踏手煞車 開始程序 適用AV來源 您可藉由將裝置連接視訊輸入 顯示視訊影像輸出 請參閱 第117頁上外部視訊組件 1 顯示 系統設定 設定畫面 2 觸碰 輸入 輸出設定 3 重複觸碰 AV 輸入 設定為 來源 p 當選取了來源 時 第 2 部攝影機輸入 會自動設定至 關閉 請參閱 第103頁...

Page 100: ... 顯示 視頻設定 畫面 2 觸碰 視頻信號設定 3 觸碰 AV 4 觸碰想要的項目 可使用下列項目 自動 PAL NTSC PAL M PAL N SECAM ᒶᐆΚॷԣҭȄ ܗ ᜱഗ NJYUSBY ޠ ຝញᡘ ұȄ ᡘұ MjolHbuf ᒊᄎȄ ដᄦ Ԃ ޠ ҭȄᇅ ܛ ᒶ ҭࣻᜱ ޠ ᅉԣཽ ۗኧܺȄ Ӷክܺ ڸ ኸ ϟ ໍ ϹඳȄ Ӷ MjolHbuf ᒊᄎ ܗ ҭᒶᐆᒊᄎᡘұ ܛ ᒶ ޠ ҭȄ ᚕ NJYUSBY ᒊᄎȄ ࡿۢഁ Ȅ ඉ Ґ ޠ ഁ ೪ۢ Ȟؑϸយ ܰ ȟ Ȅ ࡿۢክܺጓ Ȅ ȈክܺϜ ࢳȄ ȈክܺΚτࢳȄ ȈክܺΚϊࢳȄ 1 2 1 從清單中選取一個項目 請參閱 第101頁上從清單中選取一個項目 2 選擇不播放的歌曲 請參閱 第101頁上選擇不播放的歌曲 使用MIXTRAX MIXTRAX是一種從您音訊程式庫建立連續混音選擇的原始技術 具備一應俱全的DJ音效 ...

Page 101: ...機1 閃爍圖案隨音量模式及低通模式而隨機變化 隨機2 閃爍圖案隨音量模式而隨機變化 隨機3 閃爍圖案隨低通模式而隨機變化 關閉 閃爍圖案不閃爍 顯示 系統設定 設定畫面 1 按下 按鈕 2 觸碰 接著觸碰 設定方向盤控制鍵 您可透過有線遙控纜線設定顯示幕上的方向盤控制鍵 請參閱 第113頁上電源線 需此設定才能使用方向盤遙控功能 p 此設定只有將車輛停妥至安全位置並使用手煞車後才能使 用 p 關閉所有來源時 才能使用此設定 p 您可以將功能鍵設定成對應一個方向盤鍵 p 如果此功能無法正確運作 請洽經銷商或先鋒授權維修站 p 開始設定時 會自動清除所有預設按鍵設定 使用方向盤控制轉接器的先鋒使用者須知 1 顯示 系統設定 設定畫面 請參閱 第101頁上顯示 系統設定 設定畫面 2 觸碰 方向盤控制 3 觸碰 使用轉接器 4 觸碰 確認 手動將功能登錄至各個按鍵 1 顯示 系統設定 設定畫面 ...

Page 102: ...像的顯示 設定後視攝影機啟動 預設設定為 關閉 1 顯示 系統設定 設定畫面 請參閱 第101頁上顯示 系統設定 設定畫面 2 觸碰 攝影機設定 3 觸碰 倒車攝影機輸入 來切換 開啟 或 關閉 設定後視攝影機極性 預設設定為 電池 1 顯示 系統設定 設定畫面 請參閱 第101頁上顯示 系統設定 設定畫面 2 觸碰 攝影機設定 3 觸碰 倒車檔設定 電池 連接的導線為正極 接地 連接的導線為負極 p 若攝影機沒有連接且攝影機的極性設定錯誤 則後視攝影機 影像在啟動後會立即出現全黑螢幕 此時 請按住MUTE鍵退 出後視攝影機畫面 然後將攝影機極性設定變更至 電池 設定後視影像的顛倒影像設顯示 可設定是否要顛倒後視攝影機的影像以顯示在前螢幕上 預設設定為 關閉 p 此設定只有在您停妥車輛至安全位置並拉起 踩踏手煞車時 才能使用 p 此功能可在 倒車攝影機輸入 設為 開啟 時使用 請參閱 第1...

Page 103: ...若內嵌的語言和選取的語言設定不同 便會無法正確顯示文 字資訊 p 某些字元可能無法正常顯示 1 顯示 系統設定 設定畫面 請參閱 第101頁上顯示 系統設定 設定畫面 2 觸碰 系統語言 3 觸碰語言 利用iPhone應用程式設定鍵盤語言 您可以設定iPhone鍵盤的語言 以便在AppRadio Mode中使用 鍵盤 p 此功能僅適用於iPhone上的AppRadio Mode 1 顯示 系統設定 設定畫面 請參閱 第101頁上顯示 系統設定 設定畫面 2 觸碰 鍵盤 3 觸碰語言 調整觸控面板的回應位置 觸控面板 校正 如果感覺畫面上的觸控面板按鍵偏離回應觸碰的實際位置 請調 整觸控面板畫面的回應位置 p 此設定只有在您停妥車輛至安全位置並拉起 踩踏手煞車時 才能使用 p 請勿使用尖頭工具 如原子筆或機械筆 以免損壞螢幕 p 儲存調整後的位置資料期間 請勿關閉引擎 1 顯示 系統設定 設...

Page 104: ...調 和 色濃度 觸碰 後方攝像 或 第 2 部攝影機 時 模式會變 更為所選擇的攝影機模式 觸碰 訊源 導航 或 Apps 可回到所選擇的模式 5 觸碰 以進行調整 p 亮度 對比度 和 調光器等級 的調整會與調光器 功能的開啟 關閉狀態分開儲存 會隨調光器的開啟或關閉 而自動切換 p 某些後視攝影機可能無法進行影像調整 p 設定內容可分開儲存 顯示韌體版本 1 顯示 系統設定 設定畫面 請參閱 第101頁上顯示 系統設定 設定畫面 2 觸碰 系統資訊 3 觸碰 韌體資訊 顯示開放原始碼授權 您可以檢查本產品所配備功能的開放原始碼授權 1 顯示 系統設定 設定畫面 請參閱 第101頁上顯示 系統設定 設定畫面 2 觸碰 系統資訊 3 觸碰 韌體資訊 4 觸碰 授權 更新韌體 注意 用來更新的外部儲存裝置只能含有正確的更新檔案 切勿在正在更新韌體時關閉本產品電源 退出SD記憶卡或中 斷連接U...

Page 105: ...低音揚聲器輸出機構 預設設定為 開啟 1 顯示 音頻 設定畫面 請參閱 第105頁上顯示 音頻 設定畫面 2 觸碰 重低音 來切換 開啟 或 關閉 p 若選取了 關閉 則在 揚聲器音壓 聲音時序校 準 和 分頻設定 中將不會有後揚聲器調整功能 調整截止頻率值 您可以調整各個揚聲器的截止頻率值 可調整下列揚聲器 Front Rear 重低音 p 只有當 後揚聲器 設定至 開啟 時才會有 Rear 功 能 請參閱 第105頁上設定後揚聲器輸出 p 只有當 重低音 設定至 開啟 時才會有 重低音 功 能 請參閱 第105頁上設定重低音揚聲器輸出 1 顯示 音頻 設定畫面 請參閱 第105頁上顯示 音頻 設定畫面 2 觸碰 分頻設定 或 重低音設定 3 觸碰 或 來切換揚聲器 4 拖曳圖形線來設定截止位置 5 拖曳圖形最低點來設定截止斜率 p 您也可以設定下列項目 將重低音揚聲器相位切換成正常或相...

Page 106: ...自動調整等化器曲線 警告 測量汽車音響時 揚聲器可能會發出響亮的聲音 噪音 切 勿在行車時執行自動EQ測量 注意 執行自動EQ之前 請先進行徹底檢查 若在下列情況下執行 此功能 可能會導致揚聲器受損 揚聲器連接方式錯誤 例如將後置揚聲器連接到重低音 揚聲器輸出插孔 揚聲器連接到輸出高於揚聲器最大輸出功率能力的功率放 大器 若未將聲音測量用麥克風 另售 置於適當位置 測量音可 能會變得較響亮 且測量可能要花很長的時間 導致耗用大 量電力 請務必將麥克風放在指定的位置 操作自動EQ功能之前 請盡可能在安靜的場所執行自動EQ 並且關閉引擎和空調 此外 請事先切斷車用電話或車內行動電話的電源 或從車 內取出 周遭的聲音可能會導致無法正確測量車輛音響 請務必使用聲音測量用麥克風 另售 使用其他麥克風可 能會無法測量 或導致車輛音響的測量結果不準確 若要執行自動EQ 必須連接前置揚聲器 將本產品連接至...

Page 107: ...資料大小為10 MB以下 限制的影像大小為4 000 4 000像素以下 1 設定外部儲存裝置 請參閱 第76頁上插入及退出SD記憶卡 請參閱 第76頁上插入及拔除USB儲存裝置 2 顯示 主題 畫面 請參閱 第107頁上顯示 主題 設定畫面 3 觸碰 背景 4 觸碰 5 觸碰所需的外部儲存裝置 6 觸碰影像 設定照明色彩 從一些預設的色彩中選取照明色彩 此外 也可以依序切換這 些照明色彩 從預設色彩中選擇色彩 您可以從色彩清單中選擇照明色彩 1 顯示 主題 畫面 請參閱 第107頁上顯示 主題 設定畫面 2 觸碰 照明顏色 3 觸碰色彩 有色按鍵 選擇想要的預設色彩 自訂 顯示自訂照明色彩的畫面 請參閱 第107頁上建立使用者定義色彩 彩虹 依序漸次變換預設色彩 建立使用者定義色彩 您可以建立使用者定義色彩 系統會儲存您建立的色彩 下次設 定照明色彩時 即可選擇該色彩 1 顯示 主題 畫...

Page 108: ... 2 顯示 主題 畫面 請參閱 第107頁上顯示 主題 設定畫面 3 觸碰 匯出 4 觸碰要匯出的項目 可使用下列項目 照明顏色 主題 初現畫面 全選 5 觸碰 匯出 匯入 主題 設定 1 設定外部儲存裝置 請參閱 第76頁上插入及退出SD記憶卡 請參閱 第76頁上插入及拔除USB儲存裝置 出現確認是否要匯入儲存設定資料的訊息 2 觸碰 匯入 設定視訊播放機 只有在選擇 Disc 做為來源時才可使用此設定 顯示 DVD DivX 設定 畫面 1 按下 按鈕 2 觸碰 接著觸碰 3 觸碰 DVD DivX 設定 設定第一優先語言 初次播放時 可指派第一優先語言至第一優先字幕 音訊及選 單 如果碟片已錄製您選擇的語言 便會以該語言顯示或輸出字 幕 音訊及選單 1 顯示 DVD DivX 設定 畫面 請參閱 第108頁上顯示 DVD DivX 設定 畫面 2 觸碰 字幕語言 音頻語言 或 選單語...

Page 109: ... DVD DivX 設定 畫面 請參閱 第108頁上顯示 DVD DivX 設定 畫面 2 觸碰 DivX VOD p 若已啟動登錄碼 將不會顯示 3 觸碰 註冊碼 隨即顯示10位數登錄碼 p 請記下代碼 向DivX VOD供應商取消登錄時 將需要代碼 顯示DivX VOD取消登錄碼 您可以刪除附有取消登錄碼的已登錄登錄碼 1 顯示 DVD DivX 設定 畫面 請參閱 第108頁上顯示 DVD DivX 設定 畫面 2 觸碰 DivX VOD 3 觸碰 註銷碼 隨即顯示8位數取消登錄碼 p 請記下代碼 向DivX VOD供應商取消登錄時 將需要代碼 自動播放DVD 插入有DVD選單的DVD碟片時 本產品將自動取消選單 然後從第 一個標題的第一個章節開始播放 預設設定為 關閉 p 有些DVD可能無法正常播放 如果此功能無法完整運作 請 關閉此功能 然後開始播放 1 顯示 DVD DivX ...

Page 110: ...Mode1 Mode2 啟動 Sound Retriever p 模式2效果強於模式1 關閉 停用 Sound Retriever 功能 變更寬螢幕模式 預設設定為 Full JPEG影像則為 Normal p JPEG可在寬螢幕模式中設定為 Normal 或 Trimming p 此設定只有在您停妥車輛至安全位置並拉起 踩踏手煞車時 才能使用 1 觸碰下列按鍵 2 觸碰想要的模式 Full 4 3影像僅朝水平方向放大 可讓您享受無任何遺漏的影 像 Zoom 4 3影像朝水平與垂直方向依相同比例放大 Normal 4 3影像正常顯示 比例不變 Trimming 顯示的影像佈滿整個螢幕 長寬比維持不變 如果螢幕比 例與影像不同 則顯示的影像上 下方或兩側可能會被裁 掉一部分 p 可針對各種視訊來源儲存不同的設定 p 若在與其原始螢幕比例不一致的寬螢幕模式下觀看視訊 可 能會出現差異 p 以 ...

Page 111: ...2 再觸碰並按住 3 1 2 3 3 觸碰 設定密碼 4 輸入密碼 p 密碼可輸入5到16個字元 5 觸碰 Go 6 輸入密碼提示 p 提示最多可輸入40個字元 7 觸碰 Go p 若您想要變更目前設定的密碼 請輸入目前的密碼然後再輸 入新的密碼 8 檢查密碼 然後觸碰 確認 刪除密碼 目前的密碼及密碼提示皆可刪除 1 顯示 系統設定 設定畫面 請參閱 第101頁上顯示 系統設定 設定畫面 2 觸碰 1 然後觸碰 2 再觸碰並按住 3 請參閱第111頁上設定密碼 3 觸碰 清除密碼 4 觸碰 是 5 觸碰 確認 6 輸入目前的密碼 7 觸碰 Go 出現代表安全設定取消的訊息 將本產品還原成預設設定 您可以將設定或記錄內容還原成預設設定 要清除使用者資料 可使用多種方法 方法1 移除車輛電瓶 p 部分設定及記錄內容將不會重設 方法2 從 系統設定 選單還原預設設定值 請參閱第111頁上還原預...

Page 112: ...椅滑軌 車門或任何車 輛操控裝置 請勿將電線配置在會接觸高溫的位置 若絕緣變熱 電線可 能會受損 導致短路或造成產品故障及永久性損壞 請勿縮短導線長度 若縮短導線長度 保護電路 保險絲 盒 保險絲電阻或濾波器等 可能會無法正常運作 切勿削除本產品的供電導線絕緣並接入導線 為其他電子產 品供電 否則將超過導線的電流容量 造成過熱 安裝本產品前 本產品限使用12伏特電池與負接地 否則可能會導致起火或 故障 為防止電子系統短路 安裝之前請務必拔下 電池電纜 防止受損 警告 請使用超過50 W 最大輸入功率 與介於4Ω至8Ω 阻抗 值 的揚聲器 本產品請勿使用1Ω至3Ω的揚聲器 黑色導線為接地 安裝本產品或功率放大器 另售 時 請 務必先連接接地線 請確保接地線已正確連接至車體的金屬 部位 功率放大器及本產品或其他任何裝置的接地線必須以 不同的螺絲分別連接至車輛 若接地線的螺絲鬆動或掉落 可能會導...

Page 113: ...至功率放大器 最大300 mA 12 V DC 的系統控制端 子 a 淺綠色 用來偵測手煞車的開啟 關閉狀態 此導線必須連接至手煞 車開關的電源供應側 b 電源供應側 c 手煞車開關 d 接地側 p 手剎車開關的位置會因車輛型號而有所不同 如需了解詳細 資訊 請查閱車主手冊或經銷商 揚聲器導線 1 2 9 a d e 7 4 3 5 6 8 b c L R F R 1 連接電源 2 電源線 3 左 4 右 5 前置揚聲器 6 後置揚聲器 7 白色 8 白色 黑色 9 灰色 a 灰色 黑色 b 綠色 c 綠色 黑色 d 紫色 e 紫色 黑色 p 若配備雙揚聲器系統 請勿連接任何東西至未與揚聲器連接 的揚聲器導線 功率放大器 另售 9 6 6 9 1 1 3 2 4 3 5 5 3 2 8 7 a 2 1 1 系統遙控器 連接至藍色 白纜線 最大300 mA 12 V DC 2 功率放大器 另...

Page 114: ...iPhone iPhone 3GS iPod touch 第2 第3代 iPod classic 80GB 160GB iPod nano 第3 第4 第5與第6代 iPod 音訊 iPod 視訊 請參閱 第115頁上透過AUX輸入連接 iPhone iPhone 4 4s iPod touch 第4代 iPod 音訊 iPod 視訊 AppRadio Mode 請參閱 第115頁上透過RGB輸入連接 iPhone iPod nano 第七代 iPod 音訊 請參閱 第115頁上透過USB連接埠連接 iPhone Android裝置 AppRadio Mode HDMI連接埠 請參閱 第115頁上透過HDMI連接埠連接 Android裝置 MHL連接埠 請參閱 第116頁上透過MHL連接埠連接 Android裝置 Android Auto 請參閱 第116頁上透過USB連接埠連接 Andr...

Page 115: ...5 iPod iPhone的USB介面纜線 CD IU52 另售 6 Lightning數位AV轉接器 Apple Inc 產品 另售 7 具有Lightning接頭的iPhone p 連接高速HDMI 傳輸線時 請使用束帶確實固定 請參閱 第116頁上固定住高速HDMI 傳輸線 具備30針接腳的iPhone 透過AUX輸入連接 iPhone 2 5 3 4 1 1 USB連接埠1 USB連接埠2 2 AUX輸入 3 USB纜線1 5 m 4 iPod iPhone的USB介面纜線 CD IU201V 另售 5 具備30針接腳的iPhone 透過RGB輸入連接 iPhone 5 1 3 4 2 1 USB 連接埠 1 2 RGB 輸入 3 USB纜線1 5 m 4 iPod iPhone的USB介面纜線 CD IU201S 另售 5 具備30針接腳的iPhone Android裝置 透過H...

Page 116: ...確實固定住 1 將高速HDMI 傳輸線插入HDMI連接埠 2 請以束帶纏繞到HDMI連接埠與高速HDMI 傳輸線上的 箍環 然後綁緊以確實固定住高速HDMI 傳輸線 1 2 3 1 掛勾 2 束帶 3 高速HDMI 傳輸線 注意 請勿將束帶鎖緊至超出必要程度 攝影機 使用後視攝影機時 會自動從視訊切換成後視影像 將排檔桿 排入 倒車檔 R 攝影機檢視模式也可讓您在行車時查看車 後情況 警告 僅限使用顛倒或鏡射後視攝影機的輸入影像 使用其他輸入影 像可能導致受傷或損壞 注意 螢幕影像可能會顛倒 後視攝影機可協助您留意後方車輛或倒車進入狹窄的停車 位 請勿用作娛樂用途 後視影像中的物體可能會比實際上更近或更遠 倒車或查看車輛後方時 顯示的全螢幕影像之影像區域可能 會略為不同 1 b 2 2 3 4 5 6 7 8 a 9 1 後視攝影機 ND BC8 另售 2 連接視訊輸出 3 RCA線 隨附...

Page 117: ... 紅色 白色 5 迷你插孔AV纜線CD RM10 另售 6 連接黃色 7 連接紅色 白色 8 RCA 傳輸線 另售 9 連接視訊輸出 a 連接音訊輸出 b 外部視訊組件 另售 p 必須採用適當的設定 才能使用外部視訊組件 請參閱 第99頁上AUX來源 p 使用迷你插孔AV纜線連接外部視訊組件時 請視需要使用另 售的AUX延長纜線 注意 請確實使用迷你插孔AV纜線 CD RM10 另售 進行佈線 若使用其他的纜線 佈線位置可能會不同而導致斷斷續續的影 像及聲音 OK G V R L G R V L L Left audio White R Right audio Red V Video Yellow G Ground 使用HDMI輸入 4 1 2 3 1 本產品 2 HDMI連接埠 3 高速 HDMI 傳輸線 另售 4 HDMI裝置 另售 p 連接高速HDMI 傳輸線時 請使用束帶確實固定 ...

Page 118: ...安全功能之性能 包括氣 囊 危險警告燈按鈕 iii 影響駕駛安全操作車輛的位置 切勿將本產品安裝在儀表板 車門或部署車輛氣囊的車柱 前方或附近 請參閱車輛的車主手冊瞭解前座氣囊的部署 區域 安裝前 若安裝工作需要對車輛進行鑽孔或其他修改 請洽詢最近的 經銷商 進行本產品最終安裝之前 請暫時連接電線以確認連線正確 且系統運作正常 安裝本產品的位置請勿選在LCD面板開口處有障礙物阻擋的 地方 例如排檔桿 安裝本產品之前 請確定預留了足夠的 空間讓LCD面板全開時不會阻礙到排檔桿 如此可能會妨礙 到排檔桿或造成本產品的機構故障 安裝注意事項 請勿將本產品安裝在接觸高溫或濕氣的位置 如 靠近暖氣 出風口或空調的位置 受陽光直射的位置 如儀表板上方 可能接觸雨水的位置 如車門或車輛地板附近 本產品需安裝在表面水平公差為0 至 30度的地方 離左或 右5度 若未正確安裝本產品而表面傾斜度超過上述的公 ...

Page 119: ...的不同 而讓麥克 風纜線的長度變得太短 在此情況時 請將麥克風安裝在方 向盤轉向機柱 安裝在遮陽板上 1 將麥克風導線裝入溝槽 1 2 1 麥克風導線 2 溝槽 2 將麥克風夾安裝在遮陽板上 1 2 1 麥克風夾 2 夾子 使用另售的夾子固定車輛內部的導線 遮陽板位於朝上位置時 將麥克風安裝至遮陽板上 若遮陽板位 在朝下的位置 則無法識別駕駛的聲音 安裝在轉向機柱上 1 滑動麥克風座並按壓突出部位 從麥克風夾拆下麥 克風座 4 1 2 3 1 麥克風 2 突出部位 3 麥克風座 4 麥克風夾 2 將麥克風安裝在轉向機柱上 2 1 1 雙面膠 將麥克風安裝在方向盤轉向機柱上 確保麥克風遠離方向 盤 2 夾子 使用另售的夾子固定車輛內部的導線 調整麥克風角度 麥克風角度可調整 必在 以免 的 119 CRD4941 A 安裝 ...

Page 120: ...所指定的音訊 字幕語言 來播放 該DVD不支援 DVD DivX 設定 中所選取的語言 碟片如果沒有錄製到 DVD DivX 設定 中所選取的語 言 則無法播放所選取的該語言 播放時 影像非常不清晰 失真 而且偏暗 碟片錄有防拷訊號 有些碟片可能錄有此訊號 由於本產品相容於類比防拷系統 因此 使用某些顯示器 觀看具有保護訊號的碟片時 影像可能會出現水平條紋或 其他缺陷 此並非故障 無法操作iPod iPod凍結 使用iPod iPhone專用USB介面纜線重新連接iPod 更新iPod軟體版本 發生錯誤 使用iPod iPhone專用USB介面纜線重新連接iPod 將車輛停在安全的位置並關閉點火開關 ACC OFF 接著 再次開啟點火開關 ACC ON 更新iPod軟體版本 纜線未正確連接 請以正確方式連接纜線 聽不見iPod的聲音 同時使用Bluetooth及USB連線時 音訊輸出方向可...

Page 121: ...安全功能 略過 連接的外部儲存裝置 USB SD 包含受DRM保護的檔案 已跳過受保護的檔案 保護 連接外部儲存裝置 USB SD 上的所有檔案皆透過DRM嵌 入 替換外部儲存裝置 USB SD 無法相容USB 本產品不支援連接的USB儲存裝置 移除裝置 更換成相容的USB儲存裝置 不相容的SD卡 本產品不支援此SD記憶卡 移除裝置並更換為相容的SD記憶卡 格式化SD記憶卡 建議您使用SD格式化程式來格式化SD記 憶卡 確認USB USB接頭或USB纜線發生短路 檢查USB接頭或USB纜線是否卡住或損壞 連接的USB儲存裝置消耗量超過最大允許電流 移除並停用USB儲存裝置 將點火開關轉至OFF 再轉至 ACC或ON 然後連接相容的USB儲存裝置 HUB 錯誤 本產品不支援連接的USB集線器 將USB儲存裝置直接連接至本產品 無回應 本產品無法辨識已連接的USB儲存裝置 移除裝置 更換成其他...

Page 122: ...碟片特性 碟片格式 錄製的應用程式 播放環境及存 放條件等緣故 可能會無法播放碟片 道路顛簸會中斷碟片的播放 使用碟片之前 請閱讀注意事項 播放碟片的環境條件 在極端的高溫下 過溫保護功能可自動關閉本產品電源以保 護本產品 儘管產品已經過精心設計 但因機械磨損 使用或操作碟片 之環境條件的緣故 碟片表面仍會出現不影響實際運作的小 型刮傷 這不是本產品故障的跡象 請視為正常磨損 可播放碟片 DVD Video p 是DVD Format Logo Licensing Corporation 的商 標 本產品無法播放DVD Audio碟片 本DVD光碟機可能無法播放 所有附有以上標記的碟片 CD 以AVCHD格式錄製的光碟 本機與以AVCHD 先進高畫質視訊編碼 格式錄製的光碟不相 容 請勿插入AVCHD碟片 否則可能無法退出碟片 播放雙面碟 雙面碟有兩面 一面為音訊的可燒錄CD 另一面為視訊...

Page 123: ...法建 立關聯 副檔名之前的字元字串與DivX檔案相同的字幕檔案 可與 DivX檔案建立關聯 副檔名之前的字元字串必須完全相同 但如果單一資料夾中只有一個DivX檔案及一個字幕檔案 即 使檔案名稱不同 這些檔案也會建立關聯 字幕檔案必須儲存在與DivX檔案相同的資料夾中 最多可使用255個字幕檔案 多出的字幕檔案不會被識別 字幕檔案名稱最多可使用64個字元 包括副檔名 若檔案名 稱使用超過64個字元 可能會無法識別字幕檔案 字幕檔案的字元代碼應符合ISO 8859 1 使用非ISO 8859 1 的字元會造成字元顯示錯誤 若顯示在字幕檔案中的字元包括控制碼 字幕可能不會正確 顯示 若資料使用高傳輸率 則字幕及視訊可能不會完全同步 若設定多行字幕在極短的時間範圍內 如0 1秒 顯示 字 幕可能不會在正確的時間顯示 媒體相容性表 一般 視建立檔案的環境或檔案內容而定 檔案可能無法正確播 放 本產...

Page 124: ... MP3 Dolby Digital 位元率 MP3 8 kbps 至320 kbps CBR VBR 取樣頻率 MP3 16 kHz 至48 kHz 32 kHz 44 1 kHz 48 kHz 用於加強 最大影像大小 720像素 576像素 最大檔案大小 4 GB 音訊與視訊檔案相容性 USB SD 視位元率而定 檔案可能無法播放 只有USB儲存裝置才能播放VOB檔案 avi 相容的視訊轉碼器 MPEG 4 H 264 H 263 Xvid 相容的音訊轉碼器 Linear PCM LPCM MP3 AAC 最大解析度 720像素 480像素 最大畫面播放速率 30 fps 最大檔案大小 4 GB 最長播放時間 150分鐘 mp4 相容的視訊轉碼器 MPEG 4 H 264 H 263 相容的音訊轉碼器 MP3 AAC 最大解析度 720像素 480像素 最大畫面播放速率 30 fps ...

Page 125: ...Certified 和相關標誌是DivX LLC的商標 必須 取得授權才能使用 本DivX Certified 裝置已通過嚴格的測試 以確保可正常播放 DivX 影片 如要播放購買的DivX電影 請先在vod divx com註冊您的裝置 從您裝置的設定選單 在 DivX VOD區段中找到您的註冊碼 請參閱 第109頁上顯示DivX VOD登錄碼 AAC AAC Advanced Audio Coding 進階音訊編碼 是MPEG 2及 MPEG 4使用的音訊壓縮技術標準 有多種應用程式可用來對AAC 檔案進行編碼 但檔案格式與副檔名因用於編碼的應用程式而 異 本機可播放由iTunes編碼的AAC檔案 Google Google Play Android Google Google Play Android皆為Google Inc的商標 Android Auto Android Auto是...

Page 126: ...ltimedia Interface和 HDMI Logo皆為HDMI Licensing LLC在美國及其他國家的註冊 商標 MHL MHL MHL標誌及Mobile High Definition Link皆為MHL LLC在 美國及其他國家的商標或註冊商標 有關觀看視訊的注意事項 請記住 若使用本系統從事商業或公開放映 可能會侵犯受著作 權法保護的版權 有關觀看DVD Video的注意事項 本項目使用的防拷技術受美國專利及其他Rovi Corporation的智 慧財產權保護 禁止反向工程及反組譯 有關使用MP3檔案的注意事項 本產品僅針對私人 非商業用途提供授權許可 除此之外 並未 提供授權許可 或暗示任何使用者具有將本產品用於任何商業 即創造營收 即時廣播 地面 衛星 有線和 或任何其他媒 體 透過網際網路 內部網路和 或其他網路的廣播 串流 或其他電子內容傳播系統 如付費音訊或...

Page 127: ...g mpeg dat MPEG 2 PS mpg mpeg MPEG 4 Part2 Visual MS MPEG 4 V er 3 avi USB USB標準規格 USB 1 1 USB 2 0高速版 最大電流供應 1 6 A USB等級 MSC 大量儲存等級 裝置 iPod 音訊等級 HID等 級 裝置 檔案系統 FAT16 FAT32 NTFS MP3解碼格式 MPEG 1 Layer 1 MPEG 1 Layer 2 MPEG 1 Layer 3 MPEG 2 Layer 1 MPEG 2 Layer 2 MPEG 2 Layer 3 MPEG 2 5 Layer 3 WMA解碼格式 WMA10 Std WMA10 Pro WMA9 Lossless AAC解碼格式 MPEG 2 A AC LC MPEG 4 AAC LC WAV 信號格式 Linear PCM FLAC解碼格式 ...

Page 128: ...901 TEL 905 479 4411 PIONEER EUROPE NV Haven 1087 Keetberglaan 1 B 9120 Melsele Belgium Belgique TEL 0 3 570 05 11 PIONEER ELECTRONICS ASIACENTRE PTE LTD 2 Jalan Kilang Barat 07 01 Singapore 159346 TEL 65 6378 7888 PIONEER ELECTRONICS AUSTRALIA PTY LTD 5 Arco Lane Heatherton Victoria 3202 Australia TEL 03 9586 6300 PIONEER ELECTRONICS DE MEXICO S A DE C V Blvd Manuel Avila Camacho 138 10 piso Col ...

Reviews: