background image


Evolve 512 Users Manual 

31 


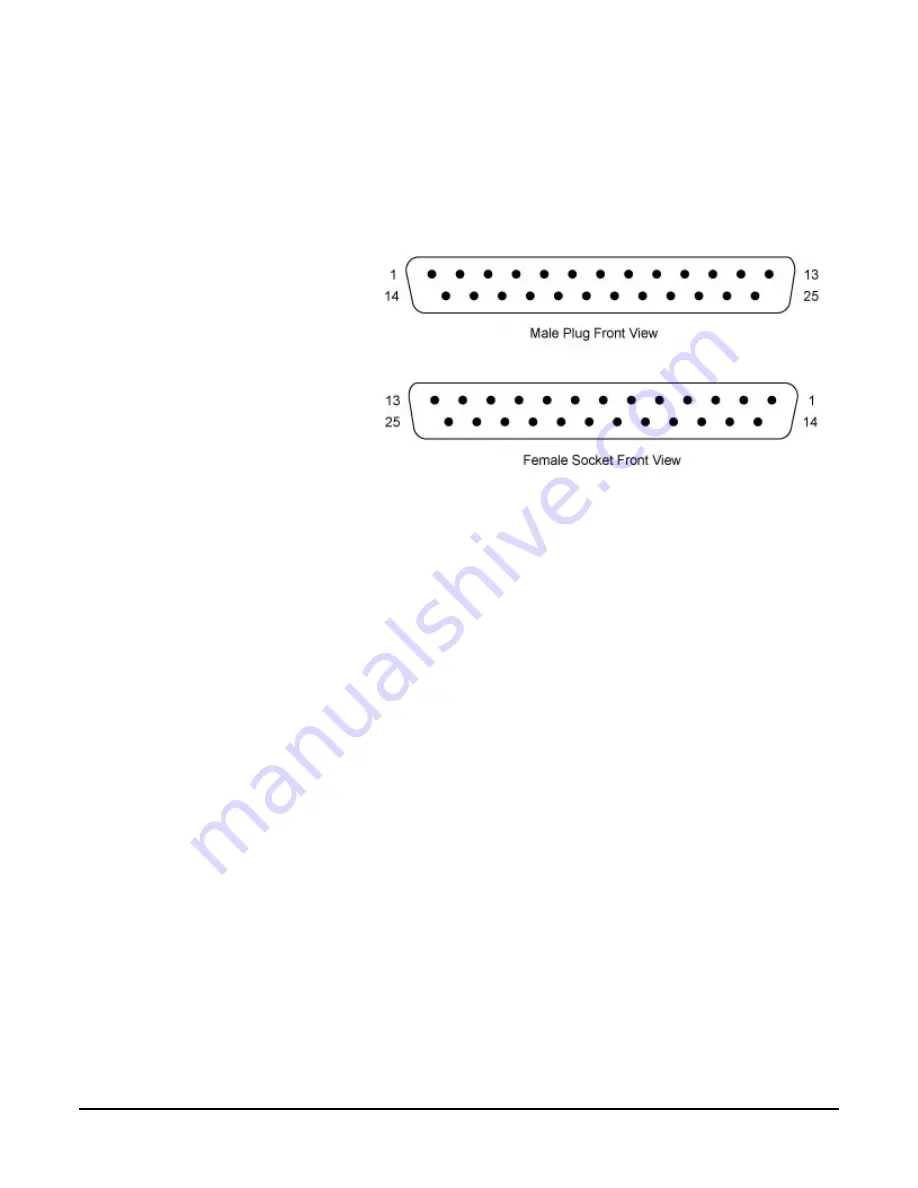
Power Connector 

Pinout: 


1.


 RX-IO 

2.


SHUTTER OUT 

3.


FPGA+5V 

4.


SPARE IO-1 

5.


/TRIG 

6.


/A PWR CONTROL 

7.


TEC-PWR 

8.


TEC-PWR 

9.


-15V 

10.


+37V 

11.


+3.3V 

12.


+3.3V 

13.


+16V 

14.


FPGA-GND 

15.


SPARE IO-2  


Figure 24.  Power Connector Pinout


16.


EXPOSE 

17.


TX-IO 

18.


EOF 

19.


GND 

20.


TEC GND 

21.


TEC CONTROL 

22.


TEC GND 

23.


+ 37V 

24.


GND 

25.


GND 


Summary of Contents for Evolve 512

Page 1: ......

Page 2: ...User Manual for Evolve 512...

Page 3: ...registered trademarks of Roper Scientific Inc Mac Macintosh and FireWire are trademarks of Apple Computer Inc registered in the U S and other countries Windows and Windows XP are registered trademark...

Page 4: ...fax 49 89 660 779 50 email support roperscientific de BENELUX Roper Scientific BV Ir D S Tuijnmanweg 10 4131 PN VIANEN Netherlands tel 31 347 324989 fax 31 347 324979 email mailto roperscientific com...

Page 5: ...e date of delivery the detector should experience a sealed chamber failure all parts and labor needed to restore the chamber seal will be covered by us Open chamber products carry NO WARRANTY TO THE C...

Page 6: ...nadequate maintenance or failure to follow instructions furnished by us had serial numbers removed altered defaced or rendered illegible been subjected to improper or unauthorized repair or been damag...

Page 7: ...Evolve 512 Users Manual v...

Page 8: ...vi Evolve 512 Users Manual...

Page 9: ...d 7 Connecting Your Evolve 512 Camera 7 To connect your Evolve 512 camera 7 Chapter 3 Operating Features Introduction 9 On Chip Multiplication Gain 9 Offset bias 9 Exposure Readout Modes 9 Non Overlap...

Page 10: ...equence 10 Figure 6 Required Settings for Non Overlap Mode Operation 11 Figure 7 Timing Diagram for Non Overlap Mode 11 Figure 8 Required Settings for Overlap Mode Operation 12 Figure 9 Timing Diagram...

Page 11: ...ers Manual ix Tables Table 1 Evolve 512 Readout Speeds and Typical Conversion Gains 25 Table 2 Application Type and Evolve 512 Setup Parameters 26 Table 3 CCD Specifications 30 Table 4 Input Output De...

Page 12: ...x Evolve 512 Users Manual THIS PAGE INTENTIONALLY LEFT BLANK...

Page 13: ...tween a charge multiplying CCD and a traditional CCD is the presence of an extended serial register in the new device see Figure 1 Electrons are accelerated from pixel to pixel in the extended portion...

Page 14: ...one available in traditional CCD cameras This makes these more versatile cameras that can be used for standard imaging applications requiring higher dynamic range System Components The Evolve 512 pack...

Page 15: ...ge ESD To avoid permanently damaging the system please observe the following precautions If you are using high voltage equipment such as an arc lamp with your camera system be sure to turn the camera...

Page 16: ...to a tripod using the tripod mounting attachment located on the sides of the camera The Evolve 512 C mount adapter is designed so it can be screwed in or out to change the focal depth Once the focal d...

Page 17: ...em components are linked by the data cable and controlled by your host computer system All of these hardware components should be included with your shipment Refer to the information and figures in th...

Page 18: ...pports 24 bit color millions of colors Multiple Cameras PVCAM supports multiple open cameras In order to use this function it must also be supported by your imaging software If your imaging software s...

Page 19: ...IEEE 1394a FireWire connector for data transfer POWER connector 25 pin Dsub connector for camera power see POWER Connector Pinout section in Chapter 5 for details Power switch Turns the camera on and...

Page 20: ...the side of the camera Figure 4 Evolve 512 Side Panel 3 Verify that the power switch on the side of the camera is in the off position 4 Connect the power supply to the Power connector on the side of...

Page 21: ...o light is present and the exposure time is set to zero 0 Typically the user subtracts an offset bias from the sample image for quantitative measurement Since the offset can change based on several fa...

Page 22: ...Steps 1 4 are repeated for each frame in a sequence Steps 1 and 3 clearing the CCD and shifting the image are usually very short and typically have minimum impact on the frame rate Figure 5 Non overla...

Page 23: ...o a frame rate of 25 3 fps 3 frames 0 1185 seconds Note The exposure and readout times listed are for illustration purpose only Actual values may vary Refer to the product data sheet for the actual re...

Page 24: ...Pre sequence as opposed to Pre exposure in Non Overlap mode Figure 8 Required Settings for Overlap Mode Operation Note In Overlap mode the minimum effective exposure time is the readout time The simul...

Page 25: ...set to 50 ms with the readout time remaining at 30 ms the time taken to acquire 3 frames will be 179 5 ms 3 50 ms 29 5 ms which is equivalent to a frame rate of 16 7 fps In Overlap mode when exposure...

Page 26: ...Trigger input Expose out Frame readout and Shutter out In the default mode the camera triggers on the rising edge of a TTL signal Evolve 512 cameras support the trigger modes described in the next se...

Page 27: ...ing the exposure readout of the previous frame it is ignored see Figure 13 For a sequence of one frame strobe mode and trigger first mode are the same The Trigger Ready signal goes high when Read Out...

Page 28: ...modes the camera can be operated in non overlap mode only Conversion Gain Apart from multiplication gain which actually multiplies the number of electrons generated in each pixel the Evolve 512 also h...

Page 29: ...fer to the product data sheets The camera uses a frame transfer CCD with a built in storage frame transfer area which makes simultaneous exposure and readout possible Overlap mode and which allows pre...

Page 30: ...data much more quantitative Vari Bit This feature allows camera users to decide at which bit depth the digitization of the image should occur Often with EMCCD imaging in biology the intrascene dynami...

Page 31: ...taining the entire dynamic range of the EMCCD The camera s highest bit depth in this quantitative mode is 16 bits This means that as many as 65 535 gray levels per pixel can be sent over the bus Howev...

Page 32: ...to prolong the device s lifetime Figure 16 DAC Setting vs Charge Multiplication Gain for Evolve 512 EMCCD cameras are subject to aging of the EMCCD register as a result of its usage The Evolve 512 has...

Page 33: ...pixel value from all of its neighboring pixels and if the pixel value is unusually large such that it cannot of come from real light through the microscope then the evolve camera will realign the pix...

Page 34: ...ron Traditional CCDs are set up to have electrons per ADU which makes sense as you can take the ADU measurement and convert it back to electrons However in the case of an EMCCD when EM gain is applied...

Page 35: ...ing released from a large feature A specific example would be something like small vesicles being released from the Golgi apparatus in a cell If the researcher is only interested in observing and trac...

Page 36: ...ul in applications requiring low light sensitivity at high frame rates e g Single molecule fluorescence ion imaging etc Note When used with a standard lens Port 1 multiplication port produces an image...

Page 37: ...e ADU Port 1 Multiplication 5 MHz 10 MHz 1 12e ADU 2 6e ADU 3 3e ADU Port 2 Non multiplication 1 25 MHz 5 MHz 1 4e ADU 2 2e ADU 3 1e ADU Table 1 Evolve 512 Readout Speeds and Typical Conversion Gains...

Page 38: ...Figure 6 and set the clearing mode to Pre exposure and clear count to 2 Example 3 I would like to image a bright target sample e g fluorescence or bright field that is fixed High resolution and high...

Page 39: ...metrics Customer Service New Hardware Found Dialog Box Does Not Appear Windows 2000 XP If the New Hardware Found dialog box does not appear after installing a new interface card to your computer and b...

Page 40: ...ns for airflow switch off the camera immediately and contact Photometrics Customer Service PVCAM Error Message Appears If a PVCAM error message appears note the message s number code and contact Photo...

Page 41: ...Evolve 512 Users Manual 29 Chapter 5 Basic Specifications Evolve 512 Front Side Views Figure 21 Evolve 512 Front View Figure 22 Evolve 512 Side View...

Page 42: ...D Process Back Illuminated Resolution 512 x 512 Pixel Size 16 m x 16 m Readout Amplifiers Ports 2 Digitalization Readout Rate 10 MHz 5 MHz 1 25 MHz Table 3 CCD Specifications Connectors Figure 23 Evol...

Page 43: ...UTTER OUT 3 FPGA 5V 4 SPARE IO 1 5 TRIG 6 A PWR CONTROL 7 TEC PWR 8 TEC PWR 9 15V 10 37V 11 3 3V 12 3 3V 13 16V 14 FPGA GND 15 SPARE IO 2 Figure 24 Power Connector Pinout 16 EXPOSE 17 TX IO 18 EOF 19...

Page 44: ...y hold this input low and then drive it high to initiate the trigger 2 Camera Exposing Output Active high A high level on this output indicates that the camera is exposing integrating 3 Frame Readout...

Page 45: ...tage Output 3 6 V 1 A 17 V 0 5 A 37 V 0 2 A 15 V 0 3 A 6 15 V 3 8 A Maximum Power Output 150 W Power Supply Weight 5 lb 2 267 kg Supply Cable Length 6 ft 1 828 m Note CE certification applies to the E...

Page 46: ...n 8 Unpack camera head power supply PCI card and interface cable 9 Inspect components and set up according to quick start guide for Evolve DO NOT power on camera 10 Slide large boot back along tubing...

Page 47: ...34 M Microscopes 4 Multiplication gain 1 port 16 register 1 N Non overlap readout mode 10 O On chip multiplication gain 9 Overlap readout mode 12 P Power connector 7 8 30 Power Supply 3 5 8 33 Power s...

Page 48: ...57 519 001 Rev A3...

Reviews: