background image

ErgoLine D330/D340

Customer Engineer Manual

Page 2-41

Installing Optional Line Interface

The ErgoLine terminal can be fitted with either a 2-wire or a 4-wire line interface.

To change the line interface, proceed as follows:

WARNING

: Do not open the ErgoLine terminal when line or external power is

connected.

1.  Turn the terminal upside down.

2.  Remove the line cord (if connected).

3.  Remove the DSS cover, as described previously.

4.  Remove the external power supply if fitted.

5.  Remove the handset plug and any auxiliary equipment fitted.

6.  Remove the base of the terminal. The base is fastened to the terminal with

screws, one of which is located under the DSS cover.

7.  Remove the existing interface.

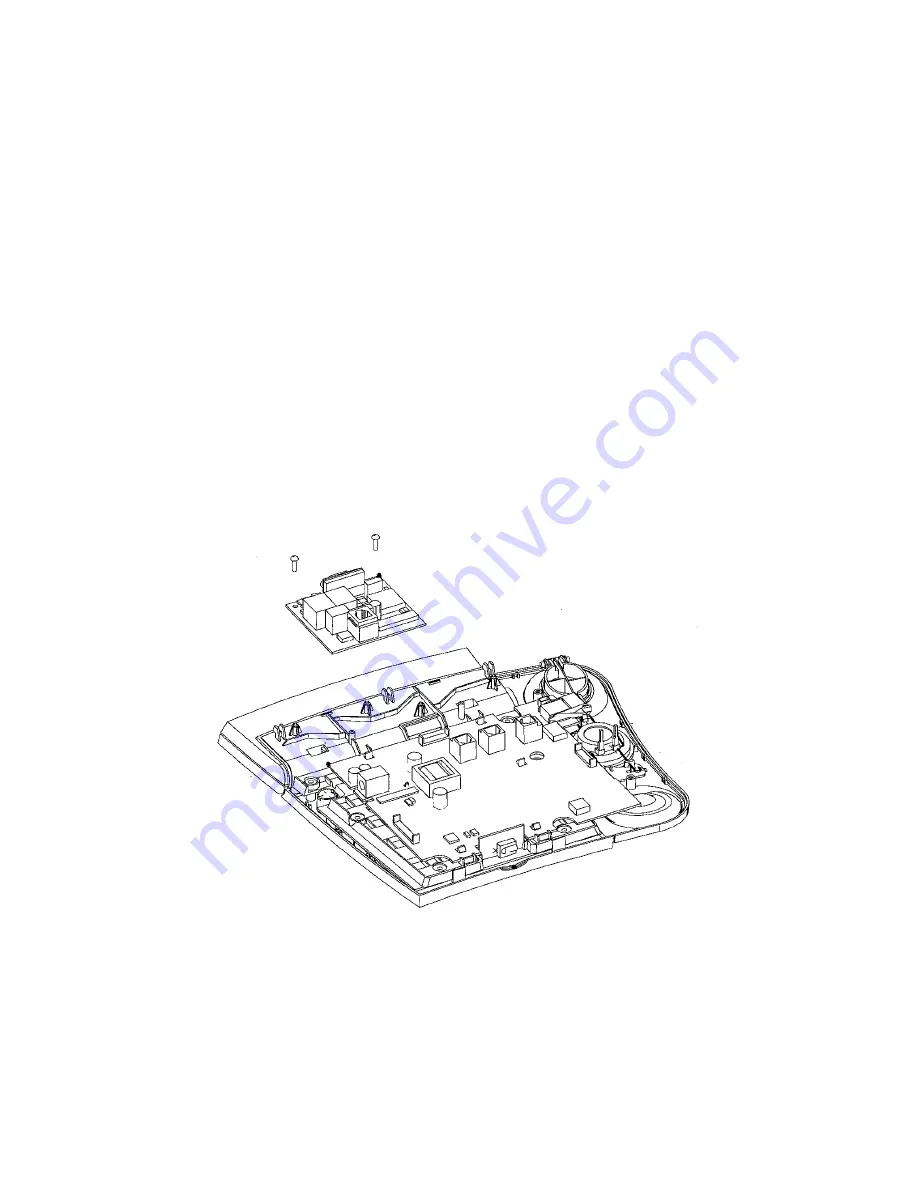
8.  Install the optional line interface as shown. Make sure that the board is secured

using the screws provided.

F

IGURE 

2-9. I

NSTALLING THE 

O

PTIONAL 

L

INE 

I

NTERFACE

9.  Replace the base cover of the terminal and secure it with the screws.

10.  Replace any auxiliary equipment and handset plug.

11.  Replace the line cord.

Summary of Contents for ErgoLine D310

Page 1: ...ErgoLine D330 D340 D310 D320 Customer Engineer Manual ...

Page 2: ...3513 302 60092 February 1999 ...

Page 3: ...c Keys 1 10 Programmable Keys 1 10 Fixed Function Keys 1 10 Cursor Keys 1 10 Soft Keys D340 1 11 2x24 Display D330 1 11 4x40 Display D340 1 11 Loudspeaker 1 12 External Microphone 1 12 2 Wire 4 Wire Line Interface 1 12 PC Interface 1 12 Handset Cord Socket 1 12 Software Hatch 1 12 Audio Socket D340 1 12 Static Interface Socket D340 1 12 Optional Power Supply D340 1 12 DSS Connector Cover D340 1 13...

Page 4: ...ns 2 17 System Preconditions 2 19 Downloading Examples 2 26 Optional Interfaces 2 29 Audio Interface 2 29 Static Interface 2 30 V 24 Interface Option 2 31 PC Interface Option 2 39 Installing the DSS Options 2 40 Installing Optional Line Interface 2 41 ASCII Keyboard 2 42 International Character Selection 2 43 Function Key Numbering 2 44 PROGRAMMING TELEPHONE PARAMETERS 3 1 ErgoLine D330 Programmin...

Page 5: ...5 5 Cabling 5 5 Handset Cord 5 5 Terminal Line Cord D310 2W D320 2W D320 4W 5 5 Terminal Line Cord D310 4W 5 5 PNT1 5 6 So Interface 5 6 UPN Interface 5 6 Cable and Distances 5 7 Connecting the ErgoLine Terminal 5 7 Endgerät Auswal Ziffer EAZ 5 8 Adjusting the EAZ for D320 5 8 Adjusting the EAZ for D310 5 9 PROGRAMMING 5 10 Terminal Locking and Unlocking of the D320 5 10 Locking of EAZ 5 10 Unlock...

Page 6: ...ErgoLine D310 D320 Customer Engineer Manual ii ...

Page 7: ...to 3x14 42 additional programmable keys ASCII keypad allowing data to be entered into the terminal via an Infra Red link V24 interface allowing users to send data files via the ErgoLine D340 FEATURES The terminals have the following features ErgoLine D330 User Features Tiltable 2x24 alphanumeric display Handset volume control 12 key numeric keypad all of which can also be used as speed dial keys L...

Page 8: ...t key backspace key 4 cursor keys for scrolling through information up down and horizontally OK key 12 programmable keys each of which can be programmed with 2 numbers functions Each key has associated LEDs labels to capture the information which is programmed under each key 12 key numeric key pad Interfaces Interchangeable line interfaces 4 wire S0 interface 2 wire UPN interface PC interface for ...

Page 9: ...f group members Auto answering mode Intercom operation Personal name and number directory 100 names Messaging Real time charging info in currency 136 memories consisting of 100 name number directory 12 dual level memory keys Keypad keys Help context sensitive Keys Fixed function keys volume control keys hold including LED loudspeaker including LED microphone mute including LED last number redial s...

Page 10: ...DSS 14 DSS 14 DSS 54 programmable keys Each key can be programmed with 2 functions or 2 speed dial numbers or 1 function and 1 speed dial number The DSS modules are field installable and require an external power supply V 24 data option allowing data transfer from the ErgoLine D340 The V 24 option requires an external power supply and is field upgradable The V 24 option occupies one of the two B c...

Page 11: ...e receive yes yes Notice send no yes Personal directory 100 names 100 names Dial by name yes yes Alphabet on keypad yes yes Charging info in currency yes yes Memo handling no yes typed User guidance via display yes yes Width 270mm 270 Depth 230mm 230mm Height 66 106mm 69 128mm Colours available Dark grey Light grey Dark grey Light grey Static interface no yes Audio input output no yes DSS module n...

Page 12: ...roprocessor Terminal Adapter 1 EPROM RAM EEPROM Static I F 1 Infra Red I F 1 TAPI Audio I O 1 Handset Loudspeaker Microphone ARCOFI Display LEDs Keys Tx Rx IN OUT V 24 8V 5V Interchangeable Line Interface 2 wire UPN 4 wire S0 voice B0 B1 data B1 messages D Note 1 The Infra Red Static Audio and V 24 interfaces are not available on the D330 ...

Page 13: ...d in the following diagrams 2x24 Display Loudspeaker Volume Control Cursor Keys Programmable Keys Alpha numeric Keys Microphone Fixed Function Keys FIGURE 1 2 TOP VIEW OF ERGOLINE D330 PC Interface Handset cord socket Software hatch 2 wire 4 wire Line I F 2 wire orientation 4 wire orientation FIGURE 1 3 BOTTOM VIEW OF ERGOLINE D330 ...

Page 14: ...ys Programmable Keys Alpha numeric Keys ASCII Keypad Infra red Port Fixed Function Keys FIGURE 1 4 TOP VIEW OF ERGOLINE D340 Figure 1 5 Bottom View of Ergoline D340 PC Interface V24 Data option Handset cord socket Audio socket Software hatch Static I F socket DSS connector cover 2 wire 4 wire Line I F Optional power supply ...

Page 15: ...ErgoLine D330 D340 Customer Engineer Manual Page 1 9 FIGURE 1 6 EXPLODED VIEW OF ERGOLINE TERMINAL ...

Page 16: ... cannot hear you LED on The microphone is on REDIAL Press this key to recall the re dial list 5 numbers on the D330 10 numbers on the D340 The number to be redialled can then be selected using the Cursor Keys EXIT Press this key to leave a programming function BACKSPACE Press this key to erase the last character when editing HELP D340 only OPTIONS D330 only Press this key for on screen context sen...

Page 17: ... programmed into memory 3 party conference members Time and date Cost indication for metered calls Duration of metered calls Call progress information System information Messages received not saved in callers list 4x40 Display D340 only The ErgoLine D340 has an LCD display with 4 lines of 40 alphanumeric characters The display shows the following information Numbers names dialled from the numeric ...

Page 18: ...nal A TAPI software driver will be provided enabling TAPI compliant applications to be used via the interface A basic TAPI application introducing the user to TAPI will be included The TAPI driver is compatible with Windows 3 1 3 11 and Windows 95 Handset Cord Socket This is used to connect the handset or headset A splitter can also be connected which allows switching between handset and headset S...

Page 19: ...d Port D340 only Refer to page 2 42 for more detail An infra red ASCII keyboard is available which can be used when entering messages or when updating the internal directory This option is supplied as a miniature keyboard which communicates remotely with the ErgoLine D340 via an infra red port on the terminal The ASCII keyboard has four soft keys which replicate the soft keys on the ErgoLine D340 ...

Page 20: ...ErgoLine D330 D340 Customer Engineer Manual Page 1 14 ...

Page 21: ...ence Guide ErgoLine D340 ErgoLine D340 main terminal unit Handset Line cord Handset cord PC interface TAPI software diskette 3 5 inch Function key labels blank Quick Reference Guide Power Supply The ErgoLine D330 can only be line powered The ErgoLine D340 can be line powered or mains powered An external power supply which is available as an option is required when the following options are fitted ...

Page 22: ...a four way male modular plug at the terminal side Pin Outs Pin Signal 1 Microphone 2 Telephone 3 Telephone 4 Microphone Terminal Line Cord On both ends the terminal line cord normal length 6 m terminates with an eight way plug Pin Outs Pin Signal S0 Signal UPN 1 n c n c 2 n c n c 3 Transmit n c 4 Receive a wire pos 5 Receive b wire neg 6 Transmit n c 7 n c n c 8 n c n c Note For more information o...

Page 23: ...ight way modular sockets for the connection of two S0 ErgoLine terminals On both jacks the corresponding pins 3 4 5 and 6 are interconnected 3 to 3 4 to 4 etc When the ErgoLine terminal is line powered power provision is done via pin 3 6 positive polarity and pin 4 5 negative polarity when the power source is in the normal power mode Pin Outs Pin Signal 1 n c 2 n c 3 Receive power 4 Transmit power...

Page 24: ...at 192kHz Round trip delay 1 µsec 100m max 23 µsec total ErgoLine line cord length 10m normally 6m 6m ErgoLine line cord connector 8 pin RJ45 according to ISO 8877 8 pin RJ45 according to ISO 8877 Figure 2 1 illustrates possible wiring configurations The distances given do not include the length of the ErgoLine terminal line cord this length is normally 6 m When using another cable the length must...

Page 25: ... m 100 m extended passive bus 600 m fixed TEI 500 m fixed TEI 100 m 600 m fixed TEI DLC C D DLC U DLC C D DLC U DLC C D DLC U DLC C D DLC U DLC I DTX I ISPBX DLC I DTX I DLC I DTX I TEI 0 TEI 1 TEI 0 TEI 0 TEI 1 TEI 0 TEI 1 TEI 0 or 0 1 TEI 0 TEI 1 TEI 0 TEI 1 Terminal UPN 1000 m TEI 0 or 0 1 see note DLX U Note DLX U must be projected in 2B mode in order to use speech data because the V 24 data p...

Page 26: ...Line terminal has been successfully connected to the following PNT1 or wall socket The following display will appear on the screen The ErgoLine terminal is now ready to receive commands from the Switch Programming the ErgoLine terminal is possible before download however call set up is not possible during this time The default values can be overruled by the Switch or can be changed by the programm...

Page 27: ...roll down until the Features option is displayed and press the OK key The following display will appear on the screen 2 Scroll down until the SetPhone option is displayed and press the OK key The following display will appear on the screen 3 Scroll down until the Select mode option is displayed and press the OK key The following display will appear on the screen 4 Enter the service password of the...

Page 28: ... after setting the TEI the message TEI Denied can be displayed by pressing the down arrow key Note If the TEI has been changed it is necessary to remove and re insert the line cord for the change to take effect Connecting the D340 ErgoLine Terminal The D340 ErgoLine terminal is connected as follows 1 Connect the handset cord to the handset port on the underside of the ErgoLine terminal and put the...

Page 29: ... screen Note If no dial tone is received check the status of the circuit in the Switch D340 Terminal Endpoint Identification TEI In the specification of the terminal message protocol TMP a B channel is identified by a port number The ErgoLine terminal uses fixed TEIs for B channel allocation For ErgoLine D340 terminals the TEI can have three different values 0 B channel 0 1 B channel 1 0 1 both B ...

Page 30: ...owing display will appear on the screen 4 Press the OK key The display will return to idle indicating that the Service Mode is active 5 Press Shift Hold The following display will appear on the screen 6 Press the TEI soft key The following display will appear on the screen Set phone à Options Set phone Enter password Password _ Set phone OK to accept Password _ Service menu à Options Set terminal ...

Page 31: ...ified TEI i d The terminal TEI i d needs to be changed to a unique value before it will be accepted If the set remains non operational after setting the TEI the message TEI Denied can be displayed by pressing the down arrow key Note If the TEI has been changed it is necessary to remove and re insert the line cord for the change to take effect System Requirements The following firmware and software...

Page 32: ...unction code is LED_CODE Note It is not recommended that a function code be stored under the first level and another function code be stored under the second level Once a function code is stored under one level the other level should be programmed with a number for speed dialling Some function codes also require that a specific number is stored under a specific level The function codes are listed ...

Page 33: ...78 79 40 Set data default See note 1 Speed dial number 45 Group ring soft ring None Speed dial number 42 51 Call waiting indication None Speed dial number 44 52 One keystroke set up None Speed dial number 40 57 Auto answer voice None Speed dial number 38 58 Ringer None Speed dial number 59 Status monitoring None Speed dial number 61 General facility cancel None Speed dial number 53 62 Show absent ...

Page 34: ...mber 117 Handset operation without hook None Speed dial number 118 Headset None Speed dial number Note 1 See V24 Data Guide for settings Function Key Layout When preparing download information in the Switch it is necessary to know the numbering of the keys on the ErgoLine The following diagram shows the numbering of the keys on the main terminal the three optional DSS s and on the ASCII keypad Not...

Page 35: ...PHO 34 Key 9 Test 1 46 SOPHO 35 Key 10 Test 1 29 SOPHO 9 Key 5 Test 1 43 SOPHO 4 Key Test 1 38 SOPHO 36 Key 0 Test 1 39 SOPHO 26 Key Test 1 40 SOPHO 37 Key 11 Test 1 47 SOPHO 10 Key 6 Test 1 37 SOPHO 5 Key 12 Test 1 41 SOPHO 11 Figure 2 3 ErgoLine Terminal Key Numbering other keys KEY DESCRIPTION TEST INDICATION Volume 1 0 Volume 1 1 Softkey 1 1 2 Softkey 2 1 3 Softkey 3 1 4 Softkey 4 CANCEL exits...

Page 36: ...6 Key 2 5 Test 3 13 SOPHO 104 Key 3 5 Test 4 13 SOPHO 118 Key 1 6 Test 2 16 SOPHO 17 Key 2 6 Test 3 16 SOPHO 105 Key 3 6 Test 4 16 SOPHO 119 Key 1 7 Test 2 19 SOPHO 18 Key 2 7 Test 3 19 SOPHO 106 Key 3 7 Test 4 19 SOPHO 120 Key 1 8 Test 2 22 SOPHO 19 Key 2 8 Test 3 22 SOPHO 107 Key 3 8 Test 4 22 SOPHO 121 Key 1 9 Test 2 0 SOPHO 20 Key 2 9 Test 3 0 SOPHO 108 Key 3 9 Test 4 0 SOPHO 122 Key 1 10 Test...

Page 37: ...h the actual keys and can be considered to be an address in the ErgoLine terminal memory Facility codes are always downloaded to key level 0 Table 2 3 provides a list of functions that can be downloaded and the Facility Number to which the information is written in the ErgoLine terminal Since the names used for particular facility codes differ in various ISPBXs their unique identity is given in th...

Page 38: ...ing pick up Call waiting pick up 75 51 52 Diversion on busy Activate diversion on busy Cancel diversion on busy 98 99 53 General facility cancel General cancel 103 57 58 Night absence Night extension absent Night extension present 44 45 59 End dial suffix End dial suffix x 61 Peripheral Facility Manager PFM PFM prefix 82 62 Camp on busy WAIT Camp on busy 102 63 Break in INTRUDE Break in 58 65 Dire...

Page 39: ...mode for specific key system messages The following pages contain a list of functions with their function codes and the Conditions required to allocate the function to a user NO FUNCTION FUNCTION CODE 0 FOLLOW ME DIVERSION FUNCTION CODE 1 Extension is Follow me entitled facility class mark 07 Facility codes for activate follow me from primary facility number 32 deactivate follow me from primary fa...

Page 40: ...ension present facility number 58 have to be downloaded EXECUTIVE SECRETARY ABSENCE FUNCTION CODE 7 Extension is a member of an executive secretary combination Facility codes for executive secretary absent facility number 26 and executive secretary present facility number 27 have to be downloaded when programmed without directory number GROUP ABSENCE FUNCTION CODE 8 Extension is a member of a grou...

Page 41: ...d the default setting is then overruled Extension user can not change the setting any more if downloading was done with priority level 3 Note When the switch facility class mark 34 is set the switch delivers a call waiting tone When the switch facility class mark 35 is set the switch will only deliver a tone for call waiting from an operator When facility class mark 34 is set and call waiting indi...

Page 42: ...hysical On Off hook switch The Off hook situation is indicated by the LED only in Headset or Headset without hookswitch mode Programmed locally under a key PFM FUNCTION CODE 73 A SOPHO System Manager system with the Peripheral Facility Manager PFM application must be available Facility code to start a service call facility number 61 must be downloaded DIRECT PASSWORD FUNCTION CODE 74 A password ha...

Page 43: ...de for call pick up facility number 49 has to be downloaded Group arrangement has the pick up property PRIVATE PARK FUNCTION CODE 105 Facility code for call pick up facility number 49 has to be downloaded Group arrangement has the pick up property Park position must be defined for group DNR GROUP PARK FUNCTION CODE 106 Facility code for call pick up facility number 49 has to be downloaded Group ar...

Page 44: ... 116 Digital equipment which support the X protocol can be enabled disabled in the idle and busy condition This can be done via the toggle list or via a function code HANDSET WITHOUT HOOKSWITCH FUNCTION CODE 117 Allows the use of the handset with the hookswitch disabled A function key with hookswitch functionality has to be programmed or a footpedal has to be connected to allow correct operation o...

Page 45: ...AIT NO FUNCTION CODE Extension is Dial COB entitled facility class mark 36 Facility code for camp on busy facility number 62 has to be downloaded Facility available via softkey menu BREAK IN INTRUDE NO FUNCTION CODE Extension is Break in entitled facility class mark 02 Facility code for break in facility number 63 has to be downloaded Facility available via softkey menu MICROPHONE BLOCK ENABLE MIC...

Page 46: ...unction key menu user group 2 Preparing the download information for speed dialling is done by executing the following two OM commands CHFKDA 2 13 0 0931945880635 1 CHFKDA 2 13 1 0931867990214 3 2 In this example we will assume that you wish allocate the follow me facility to an ErgoLine D330 D340 user Look in Table 4 for the facility codes and facility numbers required for follow me These are act...

Page 47: ...y executing the following OM command CHFKDA 2 12 0 3 1 The follow me facility will now be available under key 12 You must have also downloaded the facility codes as described in paragraph 2 for the facility to work correctly 4 Finally let us assume that you wish to fix the group ring facility to yes such that it cannot be over written by the user Look in Table 2 4 for the facility number required ...

Page 48: ...l key data prio code led code soft ring 10 0 0 1 9 3 LP 10 1 0 1 10 10 2 0 7 1 1 Group park 10 3 0 1 1 1 PP Note that the LED codes represent the group member rank See under LED code in appendix 2 of the OM commands manual DITFKM 12050 dnr bspt menu key lev key data pr code led code soft ring xlated 12050 95 8 0 0 12050 1 65 3 YES LP 12050 95 8 1 0 12051 1 65 YES CALL PICKUP 12050 95 8 2 0 120967 ...

Page 49: ...Draft I ETS 300245 TABLE 2 4 AUDIO INTERFACE PIN CONFIGURATION SIGNAL PIN DESCRIPTION X_OUT 1 Analogue Output X_IN 2 Analogue Input GNDA 3 Ground Analogue N C 4 N C 5 N C 6 Static Interface The ErgoLine D340 has an optional Static interface which supplies an output control line for accessories such as an second bell or a door lamp It also supplies a single input channel for foot switch operation T...

Page 50: ...n RJ11 Input Level 0 0 9V Input Level 1 3 7V Input Impedance 10 kΩ pull up Output Impedance 1 5 kΩ 10 Impedance 5V STAT 100 Ω TABLE 2 6 STATIC INTERFACE PIN CONFIGURATION SIGNAL PIN DESCRIPTION 5V STAT 1 5V supply voltage Busy 2 Busy indication Door 3 Door opener FS 4 Foot switch GND 5 Earth Ring 6 Second bell ...

Page 51: ...V 24 option requires an external power supply to be fitted Installing the V 24 Data Interface To install a Data Interface in the ErgoLine terminal proceed as follows WARNING Do not open the ErgoLine terminal when either the line or external power supply are connected 1 Turn the terminal upside down 2 Remove the line cord if connected 3 Remove the DSS DSS This is attached by two screws in the base ...

Page 52: ...inal unit FIGURE 2 6 V 24 INTERFACE CONNECTOR PIN LAYOUT TABLE 2 7 V 24 PIN CONFIGURATION PIN CIRCUIT MNEMONIC DESCRIPTION TO FROM DCE 1 N C 2 103 TD Transmitted data to 3 104 RD Received data from 4 105 RTS Request to send to 5 106 RFS Ready for sending from 6 107 DSR Data set ready from 7 102 GND Signal ground common return 8 109 DCD Data carrier detect from 9 N C 10 N C 11 N C 12 N C 13 N C 14 ...

Page 53: ...stablished by dialling from the ErgoLine D340 keypad only Messages from the ErgoLine terminal will not be transmitted to the attached V 24 equipment and cannot be seen 2 DTE Keyboard The call can be established from both the keyboard of the V 24 device and from the keyboard of the ErgoLine D340 An incoming call will automatically be answered if the attached V 24 equipment is powered off or is swit...

Page 54: ...0 2400 Asynchronous V 110 4800 Asynchronous V 110 9600 Asynchronous V 110 19200 Asynchronous V 110 38400 Asynchronous V 110 48000 Synchronous X 30 54000 Synchronous X 30 64000 Synchronous X 30 The data word length can be set to 7 or 8 bits Odd even or no parity can be specified and the number of stop bits can be 1 or 2 The following table lists these options The settings must match the settings of...

Page 55: ...5bis Commands and Messages The V 25bis commands are sent from the V 24 equipment and answered with a corresponding message The ErgoLine D340 telephone discriminates between the operational state command mode and the data transfer rate Initially the command mode is active so commands can be given After a connection is established the state changes to the data transfer state In this state no command...

Page 56: ...on you can change back to the Command Mode with an escape sequence see Table 2 13 The commands available in the ErgoLine D340 terminal are a subset of the Hayes 1200 Smart Modem commands TABLE 2 13 HAYES COMMANDS NOT ALL HAYES COMMANDS ARE USED BUT THE FOLLOWING WILL BE ACCEPTED AT Command prefix must be given before all the following commands excluding A A Answer a data call A Repeat last command...

Page 57: ...e received within 0 5 seconds otherwise is invalid TABLE 2 14 REGISTER SOME OF THE REGISTER USED IN THE HAYES MODEM ARE NOT APPLIED IN THE ERGOLINE D340 WHEN NOT USED NOT IMPLEMENTED OR NOT MENTIONED REGISTERS ARE ACCESSED THE VALUE 0 WILL ALWAYS BE RETURNED ALL PROGRAMMED VALUES BETWEEN 0 AND 255 DECIMAL WILL BE ACCEPTED S0 Value of S1 before a call is automatically answered The value 0 prevents ...

Page 58: ...f a second Note S6 to S11 are not applicable to ISDN Digital terminals TABLE 2 15 RESULT CODES NOT ALL OF THE HAYES RESULT CODES ARE USED RESULT CODES ARE SENT AS REACTIONS TO COMMANDS OR MESSAGES FROM THE SWITCH IF AND WHEN THE RESULT CODES ARE EXPRESSED DEPENDS UPON THE APPLIED V COMMANDS V0 V1 AND THE X COMMANDS X0 X1 X3 0 OK Command executed 1 CONNECT Connected at 0 300 bit s 2 RING Incoming c...

Page 59: ...driver will be provided on 3 5 inch floppy disk enabling TAPI compliant applications to be used via the interface The TAPI driver is compatible with Windows 3 1 Windows 3 11 and Windows 95 To install the software connect the ErgoLine terminal to your PC via the PC Interface using a one to one cable Install the software on the PC as follows Windows 95 1 Insert the floppy disk into the disk drive 2 ...

Page 60: ... ErgoLine terminal upside down 2 Remove the line cord if connected 3 Remove the DSS DSS cover from the base of the terminal by removing the screws FIGURE 2 8 INSTALLING THE DSS OPTIONS 4 Remove the external power supply if fitted 5 Plug the DSS option into the slot in the base of the terminal or to the existing DSS 6 Fit the external power supply routing the cable in the slot in the base 7 If no f...

Page 61: ... as described previously 4 Remove the external power supply if fitted 5 Remove the handset plug and any auxiliary equipment fitted 6 Remove the base of the terminal The base is fastened to the terminal with screws one of which is located under the DSS cover 7 Remove the existing interface 8 Install the optional line interface as shown Make sure that the board is secured using the screws provided F...

Page 62: ...ing is switched off this is the default condition Other infra red office equipment may activate the infra red detector FIGURE 2 10 ASCII KEYBOARD Power The ASCII keypad is powered by two AAA batteries The batteries are installed as follows 1 Open the battery cover on the rear of the keypad 2 The batteries are installed as shown Make sure the batteries are installed in the correct polarity position...

Page 63: ...ne terminals Those keys are Exit Backspace Cursor Keys OK LNR Shift and the Softkeys Refer to the User Guide for details Channel Selection The ASCII Keypad can communicate with the ErgoLine terminal over one of three channels When selecting a channel take note of the channels being used by other ErgoLine terminals and ASCII Keypads working nearby Select a channel which will not interfere with the ...

Page 64: ...se two keys are not downloadable but are programmable on both first and second levels The function keys are located at the bottom left hand side of the ASCII keypad and are annotated as M1 and M2 Figure 2 14 shows details of the function key numbering FIGURE 2 14 ASCII KEYPAD FUNCTION KEY NUMBERING THE FORMAT USED TO DESCRIBE THE NUMBERING IS AS FOLLOWS UI USER INTERFACE MARKING ON THE TERMINAL PR...

Page 65: ...RY FEATURES Toggle List Set Phone Speeddial No Function Group Facility ringer softring call wait beep autom answering autom answering for 1h one key call setup store divert calls callers list do not disturb night mode incoming intercom microphone for intercom status monitoring TAPI phone Loudring f 3 softr speeddial nr Divert all calls call back divers on busy do not disturb night mode DTMF messag...

Page 66: ...r is off on off hook key for voice PFM direct password notice autom answering for 1h footpedal second bell light doorlamp when busy light doorlamp manually dooropener X input instead of mic handset without hookswitch headset TAPI speech via accessory push to talk TAPI speech via phone absent for most calls absent for group calls incoming intercom softring status monitoring show absent present stat...

Page 67: ...assword the following steps must be taken to reset the password to the default 1 Enter the service password again to enter Service mode 2 Go to the password option in the Set phone menu and enter the default password 3 Verify the default password and exit service mode The Lock password is now returned to default Unlock the terminal the moment the password is not known If the terminal is locked and...

Page 68: ...ErgoLine D330 D340 Customer Engineer Manual Page 3 4 ...

Page 69: ...aintenance codes for a test via the keyboard All tests must be done manually It is not possible to perform tests automatically Selecting a Test by Entering the Code 1 Press the following soft keys in sequence FEATURES SETPHONE SETMODE 2 Enter the Service Engineer s password 12687 3 When the display returns to idle press the following keys in sequence SHIFT HOLD Scroll right ErgoLine D340 Scroll do...

Page 70: ...ays the version number of the V24 data module where fitted Display Test Code 11 The display will show the complete dot matrix for approx 3 seconds and then clear Keyboard Test Code 12 Press each key in turn to display the key code on the LCD Refer to tables of key codes in the Function Key Downloading section LED Test all LEDs on Code 131 This test switches on all LEDs The test code must then be r...

Page 71: ...s User settings can be removed and replaced using the maintenance tool ErgoLoad See ErgoLoad package for operating instructions If the EEPROM is erased while connected to the iSPBX the set will be downloaded with all switch settings Note It is also possible to erase the EEPROM by holding down keys 3 and 5 while removing and re inserting the line cord note if mains power is also connected it should...

Page 72: ...PC interface Code 62 tests Y signal 1 on PC interface Code 63 sends a signal from the PC interface at 1200 baud Code 64 tests X interface activates X interface mirrored mode Code 651 tests static interface signal 0 Code 661 tests static interface signal 1 Code 671 tests V24 Code 681 tests line interface info_0 Code 691 tests line interface info_1 Code 701 tests B channel loopback only when 2 B cha...

Page 73: ...D330 D340 see Table 4 1 These codes are displayed on the left hand side and can be used as an indication when tracing a fault TABLE 4 1 CALL PROGRESS CODES CODES MEANING Accept Facility registered Answer Answer Busy Number busy Connect Transferred Congest Congestion Error Procedure error Incompt Incompatible party Reject Facility rejected ...

Page 74: ...ErgoLine D330 D340 Customer Engineer Manual Page 4 6 ...

Page 75: ...features ErgoLine D310 User Features 12 key numeric keypad 4 fixed function keys last number redial loudspeaker loudspeaker volume control ringer volume and ringer pitch control listen in or loud hearing on hook dialling one keystroke call set up optional key beep message waiting lamp Keys fixed function keys loudspeaker including LED programming key last number redial key hold key 3 programmable ...

Page 76: ...rol one keystroke call set up headset mode off line number preparation optional key beep message waiting lamp Keys fixed function keys loudspeaker including LED microphone mute including LED programming key shift key including LED last number redial key hold key 4 programmable keys which can be programmed at 2 levels 12 key numeric keypad Interfaces Line interfaces 4 wire S0 interface 2 wire Upn i...

Page 77: ...age waiting LED yes yes Callers base not available not available Answer back message receive not available not available Answer back message send not available not available Personal directory not available not available Dial by name no no Alphabet on keypad yes yes Memo handling no no User guidance via display no no Width 205 mm 205 mm Depth 190 mm 190 mm Height 72 mm 72 mm Colours available Dark...

Page 78: ...ErgoLine D310 320 Customer Engineer Manual Page 5 4 PHYSICAL LAYOUT See related userguide DESCRIPTION OF FUNCTIONS See related userguide ...

Page 79: ...gram below Pin Outs Pin Signal S0 Signal UPN 1 n c n c 2 n c n c 3 Transmit n c 4 Receive a wire pos 5 Receive b wire neg 6 Transmit n c 7 n c n c 8 n c n c Terminal Line Cord D310 4W On the wall plug end the terminal line cord normal length 6 m terminates with an eight way plug See diagram above The terminal end of the terminal line cord ends with a 6 way plug See diagram below Pin Outs Pin Signa...

Page 80: ...y the terminal at the S0 bus see the section entitled Endgerät Auswahl Ziffer EAZ below UPN interface The ErgoLine D310 and D320 can be connected to the switch via the DLX U UPN interface This is a two wire digital interface which uses ping pong signalling Do not mistake this interface with the echo cancelling proprietary Philips U interface This interface is capable of supporting the connection o...

Page 81: ... D330 D340 section of this manual Note however that the ErgoLine D310 and D320 cannot be connected to a DLC C or DLC D via a PNT1 Both twisted pairs must be terminated preferable in the wall socket with a 100 Ω resistor Note 1 When using a cable with cable characteristics different from the ones listed in Table 5 1 the lengths of cable required will be different Note 2 An intermediate MDF in the c...

Page 82: ...programmed as follows 1 place the handset on hook 2 press PROGRAM key 3 press 9 4 press PROGRAM key 5 EAZ 1and EAZ 2 are displayed 6 enter a character to change the setting for EAZ 1 This character can be a digit 0 to 9 or As soon as the first digit EAZ 1 is entered the second digit EAZ 2 is cleared 7 press PROGRAM key to select this setting when EAZ 2 does not need to be defined 8 if EAZ 2 is to ...

Page 83: ...Z 1 D320 should be set as or 2 2 is the default value of the PABX For EAZ 2 D320 no value needs to be specified A 4 wire terminal connected via the S0 interface normally requires that the EAZ D310 or EAZ 1 D320 of the first terminal be set to 2 and the EAZ D310 or EAZ 1 D320 of the second terminal be set to 3 Connecting 2 terminals in this way is called co location Co location is only possible wit...

Page 84: ... terminal by unauthorised users Locking of EAZ press PROGRAM key press 159 press PROGRAM key press 1 to lock EAZ programming press PROGRAM key It is now not possible to change the EAZ Unlocking of EAZ press PROGRAM key press 159 press PROGRAM key press 0 to unlock EAZ programming press PROGRAM key Locking of all programming press PROGRAM key press 159 press PROGRAM key press 9 to lock all programm...

Page 85: ...elf test halts and the phone will not try to go in service 3 The EEPROM is verified If satisfactory the message waiting LED begins flashing otherwise the self test halts 4 For factory self test the terminal settings and memory keys revert to their defaults if the EEPROM check succeeds For installer self test they are retained 5 The D310 2 Up interface is looped back internally and tested If a faul...

Page 86: ... test the terminal attempts a normal start up The self test performs the following functions in sequence For tests 1 through 5 a full stop character is appended to the display for each test completed This indicates progress of self test to the user Refer to Figure 5 2 for the names and locations of the keys 1 The micro controller ROM is verified with a checksum If an error occurs then the self tes...

Page 87: ... is detected in the sequence a short beep is emitted If an incorrect key is pressed then an error tone is emitted A pause of more than 5 seconds between keys results in the same error tone being emitted On completion all of the LEDs are extinguished 10 The user must then replace the handset At this point the ringer is sounded with continuous ring at medium volume and using bi tone ring until the u...

Page 88: ...ErgoLine D310 320 Customer Engineer Manual Page 5 14 ...

Reviews: