background image


EN      3  


1


Get started 

TV tour 

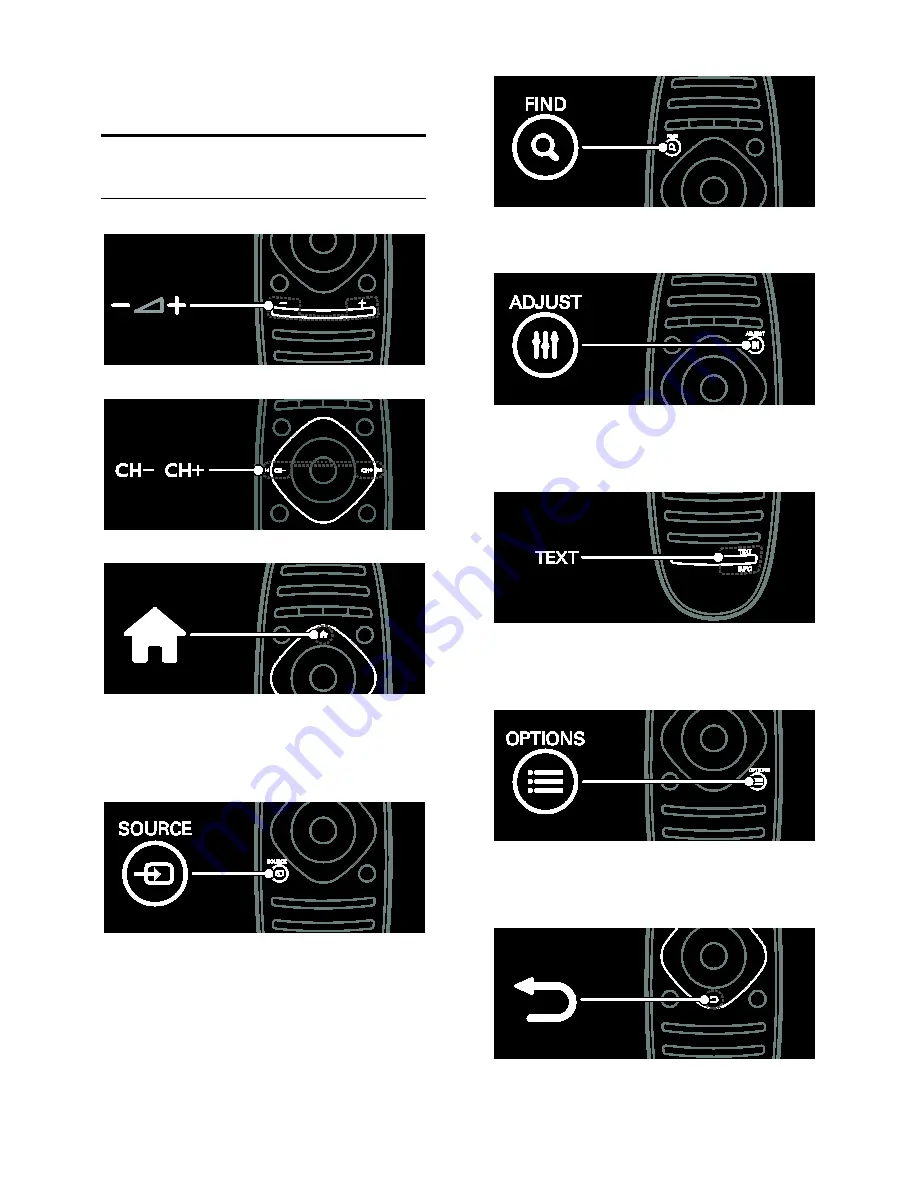
Remote control 


To adjust the volume. 


To switch TV channels. 


To open or close the 

Home menu

In the Home menu, access connected 

devices, picture and sound settings, and 

other useful features. 


To open or close the 

Source menu

In the Source menu, access connected 

devices. 


To open or close the 

Find menu

.  

In the Find menu, access the channel list. 


To open or close the 

Adjust menu

In the Adjust menu, access a range of 

frequently used settings. 


To open or close the 

Text menu

In the Text menu, access teletext for news 

and information.  


To open or close the 

Options menu

Options menus offer convenient settings for 

TV channels or programmes. 


To return to the previous menu page or to 

exit from a TV function.  

Summary of Contents for DesignLine 32PDL7906M

Page 1: ...EN User Manual Register your product and get support at www philips com welcome 32PDL7906M 42PDL7906M ...

Page 2: ...enea 32 Set universal access 32 Use EasyLink 33 4 Set up your TV 37 Settings assistant 37 Picture and sound 37 Channels 38 Menu language 41 Other settings 42 Update software 42 Reinstall the TV 43 5 Connect your TV 44 About cables 44 Connect devices 45 Connect more devices 51 Computers and the Internet 53 Common interface 56 6 Troubleshooting 57 Contact Philips 57 General TV 57 TV channel 57 Pictu...

Page 3: ...e menu access connected devices To open or close the Find menu In the Find menu access the channel list To open or close the Adjust menu In the Adjust menu access a range of frequently used settings To open or close the Text menu In the Text menu access teletext for news and information To open or close the Options menu Options menus offer convenient settings for TV channels or programmes To retur...

Page 4: ...V tour Connect devices For the best picture and sound quality connect a DVD Blu ray disc player or game console through HDMI TM To watch a non EasyLink compliant device add it to the Home menu 1 Press Add your devices 2 Follow the onscreen instructions Note If you are prompted to select the TV connection select the connector that this device uses See Connect your TV Connect devices Page 45 for inf...

Page 5: ... the HD video clip from the Home menu Press Setup Watch demos Watch Demo is on the second page of the setup menu For more information about the availability of HD channels in your country contact your Philips dealer or visit www philips com support Ambilight Available on certain models only Ambilight gives a more relaxed viewing experience It automatically adjusts the colour and brightness of the ...

Page 6: ...remote control or batteries near naked flames or other heat sources including direct sunlight To prevent the spread of fire keep candles or other flames away from the TV remote control and batteries at all times Risk of short circuit or fire Never expose the remote control or batteries to rain water or excessive heat Avoid force coming onto power plugs Loose power plugs can cause arcing or fire Ri...

Page 7: ...sk of hearing damage Avoid using earphones or headphones at high volumes or for prolonged periods of time Low temperatures If the TV is transported in temperatures below 5 C or 41 F unpack the TV and wait until the TV temperature matches room temperature before connecting the TV to the power outlet Screen care Risk of damage to the TV screen Never touch push rub or strike the screen with any objec...

Page 8: ... only want to listen to audio from the TV you can turn off the TV display Other functions continue to operate normally Light sensor The built in ambient light sensor lowers the brightness of the TV screen when the surrounding light darkens Low standby power The advanced power circuitry brings down the power consumption of the TV to an extremely low level without losing out on the constant standby ...

Page 9: ...unt or wall mount To apply the best settings for your TV select wall mount or stand mount 1 In the Preferences menu select TV placement 2 Select On a TV stand or Wall mounted then press OK Wall mount Warning Follow all instructions provided with the TV mount Koninklijke Philips Electronics N V bears no responsibility for improper TV mounting that results in accident injury or damage Before you mou...

Page 10: ... Help menu and the TV menu by pressing the Yellow button Online support If you can t find what you need in the onscreen Help consult our online support at www philips com support Follow the website instructions to select your language then enter your product model number At our support website you can also find answers to frequently asked questions download a printable PDF version of this user man...

Page 11: ...o launch an activity in the Home menu Confirm an entry or selection 4 CH Switch to the next or previous channel 5 Power Switch the TV on or off Indicators 1 Ambient sensor remote control sensor Remote control 1 Standby Switch the TV on or to standby 2 Play buttons Control video or music play 3 Colour buttons Select tasks or options Not supported in MHEG mode ...

Page 12: ...s The product remote control may contain a coin type battery which can be swallowed Keep the battery out of reach of children at all times Caution The battery contains perchlorate material handle it with care For information see www dtsc ca gov hazardouswaste perchlorat e If your remote control signal is weak replace the batteries 1 Open the battery cover 2 Remove the old batteries from the batter...

Page 13: ...te There is a short delay before the TV responds Tip If you cannot find your remote control and want to switch on the TV from standby press CH on the front of the TV Though your TV consumes very little energy in standby it does use some energy If you are not going to use the TV for an extended period of time switch it off to cut off the power Switch TV to standby Press on the remote control The re...

Page 14: ...ch TV press FIND The channel list is displayed Create a channel list You can create a channel list that contains only your favourite channels 1 Press FIND 2 Select the channel and press OPTIONS 3 Select Mark as favourite or Unmark as favourite then press OK Select a channels list 1 In the channel list press OPTIONS 2 Select Select list Favourites to display channels in the favourite list or All to...

Page 15: ... Select one of these settings then press OK Set reminder Set programme reminders Clear reminder Clear programme reminders Change day Select the day to display More info Display programme information Search by genre Search TV programmes by genre Scheduled reminders List programme reminders Update Programme guide Update the latest programme information Use smart picture settings Select your preferre...

Page 16: ...evice Notes Before you watch a connected device you must add its icon to the Home menu See Connect your TV Connect device Page 45 If you connect an HDMI CEC compliant device to the TV through an HDMI connector and switch it on the device is automatically added to the Home menu 1 Connect and switch on the device 2 Press 3 Select Add your devices then press OK 4 Follow the onscreen instructions Sele...

Page 17: ... a track Press EXIT to exit the content browser Press OPTIONS to access or exit the following music options Stop Stop audio play Repeat Repeat a track or an album Play once Play the track once Shuffle on Shuffle off Enable or disable random play of tracks View picture Press the Navigation buttons to select a picture then press OK To pause or stop play press OK To skip to the previous or next file ...

Page 18: ...ct the 3D format manually Select a suitable 3D format If the TV shows a double picture but the 3D effect is not seen with the 3D glasses you will need to select a suitable 3D viewing format To set the TV in 3D press ADJUST Select 3D format and press OK then select 3D Side by side or 3D Top bottom according to the double picture positions Note Some 3D formats are not supported The TV does not suppo...

Page 19: ...ht Colour Select a predefined colour Custom colour Set your own Ambilight colour To access this option set Ambilight Colour Custom Separation Adjust the difference in colour levels on each side of the TV Turn off this feature for a dynamic and uniform Ambilight colour TV switch off Select how Ambilight switches off when the TV is switched off Lounge light mood Select a lounge light mode The lounge...

Page 20: ...layer on your computer 2 Select Library Media Sharing The first time you select Media Sharing a pop up screen appears Tick the Share my media box and click OK A device marked as Unknown Device appears in the Media Sharing screen If the unknown device does not appear after a minute or so make sure that your PC firewall is not blocking the connection 3 From the Media Sharing screen select the unknow...

Page 21: ...ss OK If the network installation starts follow the onscreen instructions 5 If the content browser is displayed select a file then press OK The file starts to play 6 Press the Play buttons on the remote control to control play View pictures To play a picture slideshow select a photo then press OK To pause or stop playback press OK again To play the previous or next file press or Press OPTIONS to a...

Page 22: ...lips select Register then press OK 4 Confirm the onscreen message A prompt asks if you want to lock adult services 5 To lock adult services select Lock then press OK To leave adult services unlocked select Leave unlocked then press OK 6 To lock enter a 4 digit code then press OK 7 Re enter the 4 digit code then press OK The Net TV start page is displayed Access Net TV Applications Apps The first p...

Page 23: ...s OPTIONS and select Security info Rent online video With this TV you can rent a video from an online video store 1 Open a video store You may need to register or enter your login 2 Select a video 3 Make the online payment 4 Download a video To rent and download a video you need a high speed Internet connection to the TV Read more about network connections in Connect your TV Computers and the Inte...

Page 24: ...s payment terms To enter a number code PIN use the Numeric buttons on the remote control To enter an email address select the text field on the page and press OK Select a character on the keyboard and press OK to enter Download the video When you have paid you can download the video on to the video memory During the download you can continue to watch a TV programme until the TV notifies you that t...

Page 25: ...rt See Use your TV Use Multimedia Home Platform Auto start Page 25 Select application If the application you want to access does not load the channel might have two or more MHP applications Disable Auto start and select the application you want to access 1 While you are watching the channel press OPTIONS 2 Press Navigation buttons to select MHP applications then press OK A menu is displayed 3 Sele...

Page 26: ...bbTV pages To navigate the HbbTV pages you can use the navigation buttons colour buttons number buttons and the back button While you watch videos within HbbTV pages you can use play pause and stop buttons HbbTV text Some broadcasters offer HbbTV Text a new version of Text Depending on the broadcaster you might need an Internet connection to view HbbTV Text You can use the same remote control butt...

Page 27: ...on This will corrupt your recordings Before you can pause or record a broadcast you must format the connected USB hard disk device 1 Connect the USB hard disk to one of the USB connectors on the side of the TV Do not connect another USB device in the other USB connection when you are formatting the USB hard disk 2 Switch on the device and the TV 3 When the TV is tuned to a digital TV channel press...

Page 28: ...mme guide to start and manage recordings If the TV Recording button is not present check if the programme guide data is set to be updated through the network Select Setup TV settings Preferences Programme guide From network Record now To record the programme you are watching press and select Programme guide With the current TV programme highlighted press OPTIONS and select Record programme The USB...

Page 29: ...mme guide list and press OK Depending on the status of this programme you can start watching it schedule its recording play back the recording or delete the recording from this page View Teletext Select a page 1 Select a channel that has teletext feature then press TEXT 2 Select a page in one of the following ways Enter the page number with the Numeric buttons Press or to view the next or previous...

Page 30: ... 2 5 Teletext 2 5 offers more colours and better graphics than normal teletext If Teletext 2 5 is broadcast by a channel it is switched on by default To switch Teletext 2 5 on or off 1 Press 2 Select Setup TV settings Preferences 3 Select Text 2 5 On or Off then press OK Set locks and timers Clock You can display a clock on the TV screen The clock displays the time that is broadcast by your TV ser...

Page 31: ...nu select Channel lock 2 Enter the child lock code with the Numeric buttons The Channel lock menu appears 3 Select channels to lock or unlock Parental rating Some digital broadcasters rate their programmes according to age You can set your TV to display only programmes with age ratings lower than your child s age 1 Press 2 Select Setup Channel settings or Satellite settings 3 Select Child lock Par...

Page 32: ...her picture as the wallpaper Note Loading a new picture overrides the existing picture 1 Connect the USB storage device to the TV 2 Press 3 Select Browse USB then press OK 4 Select a picture then press OPTIONS 5 Select Set as Scenea then press OK 6 Select Yes then press OK 7 Press any button to exit Scenea Set Scenea lounge light When the TV is in standby you can switch on Ambilight and create a l...

Page 33: ...tion buttons to move the slider up or down then press OK 3 Press EXIT to exit Audio feedback for the visually impaired This feature enables audio feedback when buttons are pressed on the remote control or TV 1 In the Universal access menu press the blue button to select Key beep 2 Press the green button to turn on audio feedback or press the red button to turn it off 3 Press EXIT to exit Use EasyL...

Page 34: ... you need To benefit from Philips EasyLink advanced control features make sure that you do the following Connect at least two HDMI CEC compliant devices through HDMI Configure each HDMI CEC compliant device properly Switch on EasyLink Switch on To switch on or off EasyLink Note If you do not intend to use Philips Easylink switch it off 1 Press 2 Select Setup TV settings EasyLink 3 Select On or Off...

Page 35: ...st menu to switch the TV audio 1 While you watch TV press ADJUST 2 Select Speakers then press OK 3 Select one of the following then press OK TV On by default Stream TV audio through the TV and the connected HDMI CEC audio device until the connected device switches to system audio control TV audio is then streamed through the connected device Amplifier Stream audio through the connected HDMI CEC de...

Page 36: ...evice through the TV speakers even when the TV is in standby 1 Press ADJUST to receive audio from the connected Philips EasyLink device If available audio only mode is enabled 2 Accept the prompt on the TV to turn off the TV screen 3 Control the audio playback with the TV remote control ...

Page 37: ...l Precise HD Access advanced settings including HD Natural Motion Clear LCD Super resolution Dynamic contrast Dynamic backlight MPEG artefact reduction Colour enhancement Gamma PC mode Allow picture settings to be changed when a PC is connected to the TV through HDMI If enabled you can select Picture format Unscaled which provides maximum detail for display of PC content Light sensor Adjust settin...

Page 38: ...ngs remain the same 1 While you watch TV press 2 Select Setup TV settings Factory settings then press OK TV settings are reset to default Channels Reorder and rename Reorder channels After the channels are installed you can reorder the channel list to your preference 1 While you watch TV press FIND The channel list is displayed 2 Select the channel to reorder and press OPTIONS 3 Select Reorder the...

Page 39: ...p Channel settings or Satellite settings 3 Select Channel installation Channel update message 4 Select Off then press OK To disable automatic updates In the Channel installation menu select Automatic channel update Off Automatic install When the TV was switched on for the first time a full installation of channels was performed You can run this full installation again to set your language country ...

Page 40: ...uttons to enter the channel frequency 5 Select Search then press OK 6 When the correct channel is located select Store then press OK 7 Press EXIT to exit Notes If the reception is poor reposition your antenna and repeat the procedure If you receive the channel with DVB C select Automatic in Symbol rate mode unless your cable provider supplies you with a specific symbol rate value Install satellite...

Page 41: ...hannels installed on it to start the initial installation Select the language and country The country setting must be the same as that of the TV whose channel list you want to copy Skip the search for channels 2 Connect the USB storage device containing the channel list to the TV 3 Press 4 Select Setup TV settings Preferences Channel list copy Copy to TV then press OK The channel list is copied to...

Page 42: ...rd drive 1 Press 2 Select Setup Update software then press OK The update assistant starts 3 Follow the onscreen instructions to start the update Note The update assistant directs you to the Philips support website Refer to the installation instructions on the website to complete the update Update from the Internet To update the TV software directly from the Internet connect the TV to the Internet ...

Page 43: ...r in the USB storage device 9 Disconnect the USB storage device from the PC Update Help Do not switch off the TV or remove the USB storage device during the update If a power failure occurs during the update do not remove the USB storage device from the TV The TV continues to update as soon as power is restored If an error occurs during the update retry the procedure If the error reoccurs contact ...

Page 44: ...tors use a SCART cinch adapter to connect the device to a SCART connector on the TV HDMI An HDMI connection has the best picture and sound quality An HDMI cable combines video and audio signals Use HDMI for high definition HD TV signals and to enable EasyLink An HDMI Audio Return Channel ARC connector allows output of TV audio to an HDMI ARC compliant device Do not use an HDMI cable longer than 5 ...

Page 45: ... signals but cannot handle high definition HD TV signals VGA Use this connection to display PC content on the TV For video and sound use the VGA and AUDIO IN connectors Connect devices Overview You can connect your devices to the TV with any of the following options After connection press Add your devices ...

Page 46: ...player with an HDMI cable to the TV Connect the disc player with a component cable Y Pb Pr and an audio L R cable to the TV TV receiver Connect the satellite or digital TV receiver with an antenna cable to the TV SAT is available on certain models only ...

Page 47: ...e or digital TV receiver with an HDMI cable to the TV Connect the satellite or digital TV receiver with a SCART cable to the TV Connect the satellite or digital TV receiver with a component cable Y Pb Pr and an audio L R cable to the TV ...

Page 48: ...ect the recorder with a component cable Y Pb Pr and an audio L R cable to the TV Game console The most practical connectors for a game console are on the side of the TV However you can also use the connectors at the back of the TV For the best gaming experience set the TV to game mode 1 Press ADJUST 2 Select Smart picture Game then press OK 3 Press EXIT to exit ...

Page 49: ...he TV Connect the game console with a component cable Y Pb Pr and an audio L R cable to the TV Home theatre system Connect the home theatre with an HDMI cable and an optical or coaxial audio cable to the TV Optical audio output is available on certain models only ...

Page 50: ...nnect the home theatre with a SCART cable to the TV Connect the home theatre with a component cable Y Pb Pr and an audio L R cable to the TV Digital camera Connect the digital camera with a USB cable to the TV ...

Page 51: ... the digital camera with an HDMI cable to the TV Connect the digital camcorder with a component cable Y Pb Pr and an audio L R cable to the TV Connect more devices External hard disk Connect the external hard disk with a USB cable to the TV ...

Page 52: ...EN 52 Computer Connect the computer with an HDMI cable to the TV Connect the computer with a DVI HDMI cable to the TV Connect the computer with a VGA cable and an audio cable to the TV ...

Page 53: ...d b A computer with one of these operating systems Microsoft Windows XP Microsoft Windows Vista Mac OSX or Linux To connect your TV to computers you also need media server software that is set to share files with your TV See Use your TV Browse PC through DLNA Page 20 To connect your TV to the Internet you also need a high speed connection to the Internet Note This DLNA1 5 network feature supports ...

Page 54: ...uter Return to the TV in 2 minutes select WPS and press OK The TV connects to your network This takes about 2 minutes Complete the installation Most new wireless routers have the WPS system and carry the WPS logo The WPS system uses WPA security encryption and cannot be combined with devices on your network that use the WEP security encryption If you still need this WEP device in your network inst...

Page 55: ...nted on the CD ROM envelope 4 Click the Download now button to download the free Wi Fi MediaConnect software 5 Once downloaded start the file Wi Fi MediaConnect_setup exe Follow the instructions on your PC TV network name If you have more than one TV in your home network you can rename this TV To rename this TV in the network press Setup Network settings and select the TV network name To enter the...

Page 56: ...s CI CI allows service providers to offer premium HD digital programmes with a high level of copy protection Refer to the documentation from your service operator on how to insert a smart card into the Conditional Access Module 1 Switch off the TV 2 Follow the directions printed on the CAM and insert the CAM into the Common Interface CI slot on the side of the TV 3 Push the CAM in as far as it wil...

Page 57: ...ower outlet Wait until the TV cools down before you reconnect the power cable If the blinking reoccurs contact Philips Consumer Care You forgot the code to unlock the child lock feature Enter 8888 The TV menu is in the wrong language Change the TV menu to your preferred language For more information see Set up your TV Menu language Page 41 When you are turning the TV on off or to standby you hear ...

Page 58: ... fit the screen correctly Check the signal output of the device The picture from broadcasts is scrambled You may need a Conditional Access Module to access content Check with your service operator An e sticker banner displaying information appears on the TV display The TV is in Shop mode To remove the e sticker set the TV to Home mode then restart the TV Position the TV Location Page 10 The comput...

Page 59: ...connected USB USB device content is not displayed Make sure that the USB storage device is set to Mass Storage Class compliant as described in the storage device s documentation Make sure that the USB storage device is compatible with the TV Make sure that the audio and picture file formats are supported by the TV Audio and picture files do not play or display smoothly The transfer performance of ...

Page 60: ...ment Pixel Precise HD 400Hz Perfect Motion Rate PMR Picture Display HD Natural Motion Ambilight Ambilight Spectra 2 3D 3D TV Sound Output power RMS 24 W Incredible Surround Clear Sound Dynamic Bass Enhancement Mono Stereo NICAM Display resolutions Computer formats HDMI Resolution refresh rate 640 x 480 60 Hz 800 x 600 60 Hz 1024 x 768 60 Hz 1280 x 1024 60 Hz 1360 x 768 60 Hz 1600 x 1200 60 Hz 1920...

Page 61: ...y for Microsoft Windows Nero MediaHome DiXiM for Microsoft Windows XP Macrovision Network Media Server for Microsoft Windows Fuppes for Linux uShare for Linux Connectivity Rear EXT 1 SCART RGB CVBS Component and Audio Y Pb Pr Audio L R Service port SERV U Headphones stereo 3 5mm mini jack SAT F pin Satellite Available on certain models only Bottom Ethernet LAN RJ 45 DIGITAL AUDIO OUT Optical HDMI ...

Page 62: ...ecifications are subject to change without notice Legend for TV dimensions The legend used to indicate the TV dimensions is as follows 81 cm 32 inch TV 107 cm 42 inch TV Take a note of the legend that corresponds to your TV Then go to the next page to view the dimensions Use your TV legend to note the weight of the TV without the stand Use your TV legend to note the weight of the TV with stand ...

Page 63: ...e your TV legend to note the dimensions of your TV with and without the stand Use your TV legend to note the thickness of your TV with the stand Use your TV legend to note the thickness of your TV without the stand PF ...

Page 64: ...EN 64 Help version UMv 3139 137 04731 20110525 ...

Page 65: ...terface 56 computer play files 21 computer see PC 53 Conditional Access Module 56 connect device 45 connect PC 52 connect USB 17 connectors 4 contact information on Internet 10 contact Philips 10 controls 11 D demo 42 devices add 16 devices watch 16 digital channels 40 digital channels subtitles 31 digital radio 14 dimensions 62 display 60 display resolution 60 DLNA 20 E EasyLink controls 34 EasyL...

Page 66: ...ure format 37 picture settings 37 Pixel Plus link 35 placement stand or wall mount 9 position the TV 9 power 60 R recording USB 28 recycle 8 register product 10 reinstall TV 43 remote control 11 remote control batteries 12 remote control onscreen 34 remote control overview 11 rename channels 38 reorder channels 38 S safety 6 Scenea enable 32 Scenea see screen saver 32 screen saver 32 settings assi...

Page 67: ...eletext enlarge 29 teletext language 29 teletext search 30 teletext subpages 30 U universal access enable 32 universal access hearing impaired 32 universal access visually impaired 33 USB recording 28 V visually impaired 33 volume 11 W wall mount 9 wallpaper 32 Wi Fi MediaConnect 55 ...

Page 68: ... well within the Electro Magnetic Field EMF standards applicable at the time of producing the products Philips is committed to develop produce and market products that cause no adverse health effects Philips confirms that if its products are handled properly for their intended use they are safe to use according to scientific evidence available today Notice 2011 Koninklijke Philips Electronics N V ...

Page 69: ...in the development of international EMF and safety standards enabling Philips to anticipate further developments in standardisation for early integration in its products EMC regulation In order to maintain conformity to the Electro Magnetic Compatibility EMC directive 2004 108 EC the mains plug on this product must not be detached from the mains cord If the apparatus does not recover in DLNA Net T...

Page 70: ...V switchover in the UK Digital UK provides im partial information on what people need to do to prepare for the move to digital and when they need to do it How the switchover affects your TV equipment Your new TV has a digital tuner built in which means it is ready to receive the Freeview signal by simply plugging it into your aerial socket check if you can get digital TV through your aerial now or...

Page 71: ...for channels and press OK 4 Select Reinstall channels and press OK 5 Select your country UK and press OK 6 Select Antenna DVB T and press OK 7 Select Start and press OK The installation can take several minutes When the installation is complete press OK Your TV is now retuned If you are missing any channels it may be that they are not available in your area or that your aerial needs upgrading When...

Page 72: ...rmation Latvia 80002794 local Lithuania 880030483 local Luxemburg Luxembourg 080026550 Ortsgespräch Appel local Magyarország 06 80 018 189 Ingyenes hívás Nederland 0800 023 0076 Gratis nummer Norge 22 70 81 11 Lokalsamtale Österreich 0800 180 016 Polska 00800 3111 318 Portugal 0800 780 902 Chamada Grátis Россия 495 961 1111 8800 200 0880 бесплатный звонок по России România 0800 894910 Apel gratuit...

Page 73: ... well within the Electro Magnetic Field EMF standards applicable at the time of producing the products Philips is committed to develop produce and market products that cause no adverse health effects Philips confirms that if its products are handled properly for their intended use they are safe to use according to scientific evidence available today Notice 2011 Koninklijke Philips Electronics N V ...

Page 74: ...in the development of international EMF and safety standards enabling Philips to anticipate further developments in standardisation for early integration in its products EMC regulation In order to maintain conformity to the Electro Magnetic Compatibility EMC directive 2004 108 EC the mains plug on this product must not be detached from the mains cord If the apparatus does not recover in DLNA Net T...

Page 75: ...V switchover in the UK Digital UK provides im partial information on what people need to do to prepare for the move to digital and when they need to do it How the switchover affects your TV equipment Your new TV has a digital tuner built in which means it is ready to receive the Freeview signal by simply plugging it into your aerial socket check if you can get digital TV through your aerial now or...

Page 76: ...for channels and press OK 4 Select Reinstall channels and press OK 5 Select your country UK and press OK 6 Select Antenna DVB T and press OK 7 Select Start and press OK The installation can take several minutes When the installation is complete press OK Your TV is now retuned If you are missing any channels it may be that they are not available in your area or that your aerial needs upgrading When...

Page 77: ...rmation Latvia 80002794 local Lithuania 880030483 local Luxemburg Luxembourg 080026550 Ortsgespräch Appel local Magyarország 06 80 018 189 Ingyenes hívás Nederland 0800 023 0076 Gratis nummer Norge 22 70 81 11 Lokalsamtale Österreich 0800 180 016 Polska 00800 3111 318 Portugal 0800 780 902 Chamada Grátis Россия 495 961 1111 8800 200 0880 бесплатный звонок по России România 0800 894910 Apel gratuit...

Page 78: ... 2011 Koninklijke Philips Electronics N V All rights reserved Document order number 313913704731 ...

Reviews: