background image

BDL6531E  LCD

9


On-Screen Display 


Description of the On Screen Display


What is the On-Screen Display?


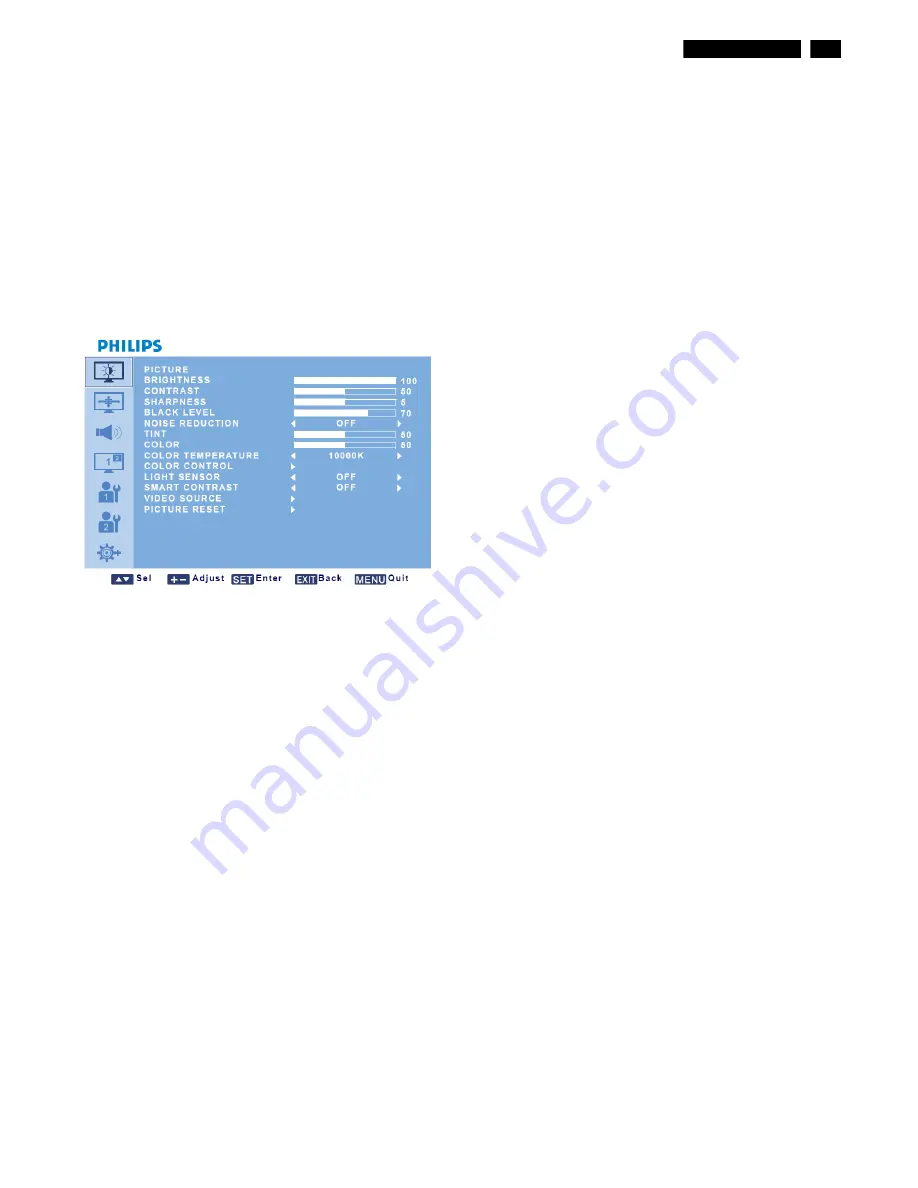
On-Screen Display (OSD) is a feature in all Philips LCD monitors. It allows an end user to adjust screen performance or 

select functions of the monitors directly through an on-screen instruction window. A user friendly on screen display 

interface is shown as below:


Picture Menu 


BRIGHTNESS  

Adjust the overall image brightness by changing the intensity of the LCD 
panel’s backlight. Use the 

PLUS

/

MINUS 

button to adjust. 


CONTRAST  

Adjust to sharpen the picture quality. The black portions of the picture 
become richer and the whites become brighter.   
Use the 

PLUS

/

MINUS 

button to adjust. 


SHARPNESS  

Adjust to improve detail. Use the 

PLUS

/

MINUS 

button to adjust     


BLACK LEVEL   

Adjust to change the image brightness.   
Use the 

PLUS

/

MINUS 

button to adjust. 


NOISE REDUCTION   
Note: For VIDEO, S-VIDEO, COMPONENT and HDMI inputs with 
interlaced video only. 

Adjust to remove the noise in the image - thereby enhancing the detail of 
your images.   
You can select a suitable noise reduction level. Use the 

PLUS

/

MINUS 

button to make selection 

 
TINT  
Note: For VIDEO, S-VIDEO, COMPONENT, and HDMI inputs only. 

Adjust to change the color tint of the image.   
Use the 

PLUS

/

MINUS 

button to adjust. Press the 

PLUS 

button and the 

flesh tone color turns slightly green. Press the 

MINUS 

button and the 

flesh tone color turns slightly purple 

 
COLOR  
Note: For VIDEO, S-VIDEO, COMPONENT, and HDMI inputs only. 

Adjusts to increase or decrease the intensity of colors in the image.   
Press the 

PLUS 

button to increase color intensity, or press the 

MINUS 

button to decrease it.     
 

COLOR TEMPERATURE   

Select a color temperature for the image. The image has a reddish tint 
with a lower color temperature, whilst a higher color temperature gives off 
a more bluish tint.. 
Use the 

PLUS

/

MINUS 

button to make selection. 


COLOR CONTROL 

Note: This function is only available when COLOR 
TEMPERATURE is set to USER. 

With this function you can 

adjust the color tones of the image precisely by changing the R 
(Red), G (Green) and B (Blue) settings independently.   
Press the 

SET/PLUS 

button to open the submenu.   

Press the 

UP

/

DOWN 

button to select 

R

or 

B

, and press the 

PLUS

/

MINUS 

button to adjust. 

 
LIGHT SENSOR   

Choose to enable or disable the ambient light sensor. Once enabled, the 
image brightness will be adjusted automatically when the ambient lighting 
conditions change.   
Use the 

PLUS

/

MINUS 

button to make selection. 


SMART CONTRAST 

Turned on, this function helps enhance image contrast when displaying 
dark scenes.   
Use the 

PLUS

/

MINUS 

button to make selection. 


VIDEO SOURCE   

Select a video input source.   
Press the 

SET/PLUS 

button to open the submenu, and then press the 

UP

/

DOWN 

button to toggle between 

• 

HDMI                 

• 

DVI-D  

• 

VGA                   

• 

COMPONENT 

• 

S-VIDEO      

• 

VIDEO 


PICTURE RESET   

Reset all settings in the 

PICTURE 

menu.  

Press the 

SET/PLUS 

button to open the submenu, and then press the 

UP

/

DOWN 

button to make selection. Select 

YES 

and press the 

SET 

button to restore settings to factory preset values. Press the 

EXIT 

button 

to cancel and return to the previous menu. 


Summary of Contents for BDL6531E/00

Page 1: ...9 Repair tips 122 123 Repair Flow chart 124 129 Safety Test Requirments 130 Spare arts List 120 Recommended P Failure Mode Of Panel SAFETY NOTICE 65 inch FHD LCD PUBLIC DISPLAY REFER TO BACK COVER FOR IMPORTANT SAFETY GUIDELINES ANY PERSON ATTEMPTING TO SERVICE THIS CHASSIS MUST FAMILIARIZE HIMSELF WITH THE CHASSIS AND BE AWARE OF THE NECESSARY SAFETY PRECAUTIONS TO BE USED WHEN SERVICING ELECTRON...

Page 2: ...the safety symbol on the schematics or exploded views Use of substitute replacement parts which do not have the same specified safety characteristics may create shock fire or other hazards Under no circumstances should the original design be modified or altered without written permission from Philips Philips assumes no liability express or implied arising out of any unauthorized modification of de...

Page 3: ...pport up to 5x5 Yes Remote control lock in OSD Yes Front panel keypad lock Yes Scheduling Yes IR Pass Yes HDMI Overscan Yes Auto Adjustment Yes Power Requirement Built in AC power board Power Supply By pass AC plug in for external BOX PC Power Cable Detachable AC power cord Power Supply Voltage AC power adaptor 90 264V AC 50 60Hz Power Consumption Power ON mode 1 W Standby mode 1 W Off mode TBD W ...

Page 4: ... Location for the Smart Insert for integration of a small form factor PC and M4 screws Maximum load 2kg 8 Carrying handle Use these handles when carrying the display by hand 9 Cable retainer installation holes Install the cable retainer using these holes Input Output Terminals 1 AC IN 10 A Connects the supplied power cord to the wall outlet 2 AC OUT 5 0 A Connects to the AC IN socket of another BD...

Page 5: ...ection and then press the PLUS or MINUS button to adjust the value BRIGHTNESS button Press to open the BRIGHTNESS OSD selection and then press the PLUS or MINUS button to adjust the value DISPLAY button To turn on off the setting information displayed on the upper right corner of the screen MENU button To turn the OSD menu on off UP button To move the highlight bar up to adjust the selected item w...

Page 6: ...2 Connect the red R and white L audio jacks of the device to the AUDIO IN AUDIO2 or AUDIO3 jacks of the display USING VIDEO INPUT 1 Connect the Video connector of the external device to the VIDEO IN input of the display Use the supplied BNC to RCA adapter if necessary 2 Connect the red R and white L audio jacks of the device to the AUDIO IN AUDIO2 or AUDIO3 jacks of the display USING HDMI INPUT Co...

Page 7: ...audio device to the AUDIO OUT R L jacks of the display CONNECTING ANOTHER BDL6531E DISPLAY You can interconnect multiple BDL6531E displays to create a daisy chain configuration for applications such as a TV wall Note The number of displays that can be used in a daisy chain configuration will depend on the resolution of the input signal being used Connect the VGA OUT connector of the display to the...

Page 8: ...the screen The zoom mode is not correctly set Use the ZOOM MODE or CUSTOM ZOOM function in the SCREEN menu to fine tune display geometry and time frequency parameter Can hear sound but no picture Improperly connected source signal cable Make sure that both video inputs and sound inputs are correctly connected Can see picture but no sound is heard 1 Improperly connected source signal cable 2 Volume...

Page 9: ...COMPONENT and HDMI inputs only Adjusts to increase or decrease the intensity of colors in the image Press the PLUS button to increase color intensity or press the MINUS button to decrease it COLOR TEMPERATURE Select a color temperature for the image The image has a reddish tint with a lower color temperature whilst a higher color temperature gives off a more bluish tint Use the PLUS MINUS button t...

Page 10: ...The picture is reproduced in 4 3 format and a black band is displayed on either side of the picture DYNAMIC Fill the entire screen by stretching 4 3 pictures non proportionally CUSTOM Choose to apply the custom zoom settings in the CUSTOM ZOOM submenu REAL This mode displays the image pixel by pixel on the screen without scaling the original image size CUSTOM ZOOM Note this item is only available ...

Page 11: ...e submenu and then press the UP DOWN button to make selection Select YES and press the SET button to restore settings to factory preset values Press the EXIT button to cancel and then return to the previous menu PIP MENU Note for COMPONENT VGA DVI D and HDMI inputs only PIP SIZE Select the size of the sub picture in the PIP Picture in Picture mode Use the PLUS MINUS button to toggle between LARGE ...

Page 12: ...STEM Select the color system depending on the input video format Use the PLUS MINUS button to toggle between AUTO PAL 4 43 PAL 3 58 SECAM NTSC 4 43 NTSC 3 58 CONFIGURATION RESET Reset all settings in the CONFIGURATION 1 menu Press the SET PLUS button to open the submenu and then press the UP DOWN button to make selection Select YES and press the SET button to restore settings to factory preset val...

Page 13: ...ormat 30 fps Once this function is enabled it is recommended that you set the SCAN CONVERSION function to PROGRESSIVE OFF disable the film mode frame conversion function This mode is suitable for TV broadcasting and VCR signals IR CONTROL Select the operation mode of the remote control when multiple BDL6531E monitors are connected via the RS 232C connection Press the SET PLUS button to open the su...

Page 14: ...e schedule settings will take effect To set up more schedule items repeat the steps above except that a different schedule item should be selected schedule item 2 2 through 7 7 in step 2 Note Seven scheduling options are available so that you can choose between different video input modes for different schedules during the week For example VGA input on a Monday HDMI on Tuesday to Friday S VIDEO fo...

Page 15: ...ferent ways There are three categories of pixel defects and several types of sub pixel defects within each category Dot definition What is a defective Dot One or more defective adjacent sub pixel is defined as one dot The number of defective sub pixels is not relevant to define a defective dot This means that a defective dot can consist of one two or three defective sub pixels which can be dark or...

Page 16: ...assemble layout 4 Prepare the implement equipments material as bellow 1 Working table 2 Electric screw driver 2 3 Manual screw driver 1 4 Hex screw driver 5 Glove 6 Cleaning cloth 7 ESD protection Item picture Operation Tool Notes 1 Disassemble the shielding cover Æ 21 M4 screws Electric screw drive 2 2 Disassemble the Upper BKT Æ 3 M4 screws Electric screw drive 2 3 1 Disassemble the PCBA Chassis...

Page 17: ...emble Handle from back cover x4 Æ 8 M8 screws Electric screw drive 2 6 Disassemble L R cover from display back Æ 16 M4 screws Electric screw drive 2 7 1 Tear off five acetic tapes 2 Disassemble the Lift Inverter single wire 3 Disassemble the Right Inverter dual wire 4 Disassemble the LVDSwire Electric screw drive 2 ...

Page 18: ... wires from chassis Æ 1 M4 screws Electric screw drive 2 13 1 Take off speaker module from PCBA module Æ 4 M3 screws 2 Take off Fans from PCBA module Æ 4 M4 screws 3 Take off the LVDS Audio Power and Color wires Electric screw drive 2 14 1 Take off AC switch BD from PCBA module Æ4 M3 screws 2 Take off Color BD from PCBA module Æ4 M3 screws Electric screw drive 2 1 1 2 2 ...

Page 19: ... 15 1 Disassemble Audio BD Æ4 M3 screws 5 T3 screws Electric screw drive 2 16 2 Disassemble Main BD Æ6 M3 screws 1 T3 screws 10 Hex screws Electric screw drive 2 Hex screw drive 17 2 Disassemble Power BD Æ12 M3 screws Electric screw drive 2 ...

Page 20: ... 6500 K Color Temperature to 5800 K Screen Uniformity Fig 7 1 Optical measurement point 1 Timing SDTV480P 60Hz YPbPr source 2 DEFAULT the unit and select the ANSI BRIGHTNESS GRID pattern 3 Change the unit to MAX MAX for Contrast Black level Color temperature default setting 9300 K 4 Surface luminance is luminance value at point 1 across the LCD surface 50cm from the surface with all pixels display...

Page 21: ...r temperature 9300qK 9300qK Red drive Green drive Blue drive 110 140 110 140 Red offset Green offset Blue offset 110 140 110 140 Color temp item factory OSD CVBS1 CVBS2 S VIDEO VGA YPbPr DVI HDMI Color temperature 6500qK 6500qK Red drive Green drive Blue drive 110 140 110 140 Red offset Green offset Blue offset 110 140 110 140 Color temp item factory OSD CVBS1 CVBS2 S VIDEO VGA YPbPr DVI HDMI Colo...

Page 22: ...ve resolution of the display or display engine is 720 physical lines in wide aspect ratio Video Interfaces The display device accepts HD input via Analog YPbPr HD ready displays support analog YPbPr as a HD input format to allow full compatibility with today s HD video sources in the market Support of the YPbPr signal should be through common industry standard connectors directly on the HD ready d...

Page 23: ...z CVT AddDMT PCRES28 1280 x 800 60 Hz 49 7 kHz 79 500 MHz CVT PCRES32 1280 x 960 60 Hz 60 0 kHz 108 000 MHz VESA Standard VDMTPROP PCRES35 1280 x 1024 60 Hz 64 0 kHz 108 000 MHz VESA Standard VDMTREV PCRES39 1360 x 768 60 Hz 47 7 kHz 85 500 MHz VESA Standard AddDMT PCRES41 1366 x 768 60 Hz 47 7 kHz 85 500 MHz VESA Standard AddDMT PCRES53 1600 x 1200 60 Hz 75 0 kHz 162 000 MHz VESA Standard VDMTREV...

Page 24: ...d with 0V 0 730Vp p black white level signal to obtain adequate dynamic range for video signal output level deviation White balance adjustment and inspection shall be carried out using 0 700Vp p level signal Measurement condition Measurement point Center of screen Measurement distances 50cm Measurement Angle 90 Measurement equipment Color Analyzer CA210 or Equivalent Signal Generator VG828 or Equi...

Page 25: ...ol RS232 Cable P N Description 5K 0R505 501 CABLE D SUB 9 9P UL20276 11M EDID Writing Tool USB Cable and Jig BD P N Description 5K L1E03 501 Service Tool Cable VOARD CABLE USB 2 0A B B PVC 1 8M 5E 0RC38 001 Service Tool Board VOARD PCBA JIG BD MI WP42SF0 ...

Page 26: ...26 BDL6531E LCD Service tool Software FW writing tool Pixelworks ImageProcessor SDK FlashUpgrader EDID writing tool RTD_CustomerTool_V1 2 ...

Page 27: ...main EEPROM from the old board onto the new board if circuit board have been replaced in this case the DDC data does not need to be re programmed Additional information Additional information about DDC Display Data Channel may be obtained from Video Electronics Standards Association VESA Extended Display Identification Data EDID information may be also obtained from VESA Configuration and procedur...

Page 28: ...28 BDL6531E LCD DDC Instructions 3 Follow the installed steps and press NEXT to Install Driver 4 When setup has finished restart computer ...

Page 29: ...pment Use USB cable connect to PC and Tool Board Use VGA cable connect to Tool Board and Display 6 Plug power cord into Display and run DebugTool_V6 2 file Display PC or NB VGA cable for EDID writing need to be removed pin5 to disable EDID write protect OK Fail ...

Page 30: ...30 BDL6531E LCD DDC Instructions 7 Update EDID select EDID Update Communication select USB ISP Type select Serial Flash For EDID Updated ...

Page 31: ...BDL6531E LCD 31 DDC Instructions 8 EDID upload VGA EDID length select and then press to select EDID file and then press to write EDID into display 128B for VGA To write EDID Open EDID file ...

Page 32: ...31E LCD DDC Instructions Power off status and LED Red 9 EDID upload DVI EDID length select and then press to select EDID file and then press to write EDID into display 128B for DVI Open EDID file To write EDID ...

Page 33: ...Power off status and LED Red 10 EDID upload HDMI EDID length select and then press to select EDID file and then press to write EDID into display 11 EDID upload finished and successful as below 256B for VGA Open EDID file To write EDID ...

Page 34: ...34 BDL6531E LCD DDC Instructions Serial Number Definition ...

Page 35: ...4 B 11 0 0 0 A 2 0 2 0 2 0 2 0 2 0 2 0 0 0 0 0 0 0 F C 0 0 5 0 4 8 4 C 2 0 4 2 4 4 4 C 3 6 3 5 3 3 3 1 4 5 0 A 0 0 E 3 HDMI DDC 0 0 F F F F F F F F F F F F 0 0 4 1 0 C 0 9 D 2 0 0 0 0 0 0 0 0 0 1 1 4 0 1 0 3 8 0 8 E 5 0 7 8 E A D 2 5 8 A 3 5 4 4 A 9 9 2 6 0 F 4 7 4 A A D 4 A 0 0 8 1 8 0 8 1 4 0 A 9 4 0 8 1 0 0 0 1 0 1 0 1 0 1 0 1 0 1 0 1 0 1 0 2 3 A 8 0 1 8 7 1 3 8 2 D 4 0 5 8 2 C 4 5 0 0 9 4 2 3 ...

Page 36: ...232 cable connect between PC Notebook with tool board f RS232 is RXD and TXD interlaced line f Personal computer or Notebook f Download tool program Pixelworks ImageProcessor SDK FlashUpgrader 1 2 Firmware files 2 Procedure 1 Open firmware program files 2 Choose FlashUpgrar exe files ...

Page 37: ...lashUpgrader picture The Connection COM Port in accordance with user by oneself PC NB choose The Notify On Completion in accordance with user by oneself PC NB choose 4 The RS232 Download cable insert RS232 INPUT pin 5 Press Flash key of Pixelworks ImageProcess or SDK FlashUpgrader ...

Page 38: ...38 BDL6531E LCD Firmware Upgrade for CPU 6 The key change to cancel after Press Flash key 7 The Power code cable insert 8 The pixelworks ImageProcess or SDK FlashUpgrader program download start ...

Page 39: ...BDL6531E LCD 39 Firmware Upgrade for CPU 9 The firmware download will finish after about 5 minutes 10 Please press 確定 Download program finish 11 Please pull out Power code RS232 Download cable ...

Page 40: ...Foreign material inside polarizer It shows liner or dot shape Concentric circle formed Bottom back light of LCD is brighter than normal Back light un uniformity Backlight has foreign material Black or white color liner or circular type Quick reference for failure mode of LCD panel this page presents problems that could be made by LCD panel It is not necessary to repair circuit board Simply follow ...

Page 41: ...BDL6531E LCD 41 Wiring Diagram Power wire system Main AC 100 220V B30 J1 J2 B30 B40 B40 B40 B40 B40 B40 J25 ...

Page 42: ...42 BDL6531E LCD Wiring Diagram Signal wire system Main BD Audio BD Keypad BD J2 J20 J11 J1 J21 IR BD IR Trans BD J3 J2 1 J34 J13 J17 For Fan Module ...

Page 43: ...BDL6531E LCD 43 Block Diagram ...

Page 44: ...44 BDL6531E LCD Block Diagram ...

Page 45: ...2P 3 1HDMI_D0P 3 H D MI _R S T 7 11 TX 1 7 D V I_D0N 4 D VI_R P W R 5V 4 HD D C _S C L 7 HD MI_HP DE T 10 H 1 _H P D 3 D V I _H P D E T 4 H 2 _ R P W R 5V 3 H 2 D D C _S C L 3 L S DA 11 LS C L 11 DVI I NPUT HDMI 1 I NPUT HDMI 2 I NPUT HDMI OUTPUTPUT add R 500 ohm I 2C Pul l hi gh C 393 1 0UF K C 94 0 1U K C 86 0 1U K U24 S II9185AC TU R 1X0 41 R 1X0 42 AV C C 33 43 R 1X1 44 R 1X1 45 AG ND 46 R 1X2...

Page 46: ...1 2 3 4 8 7 6 5 C 398 10P J R 190 1 0 K J C 107 0 1U K R 179 33 C 110 0 1U K T P57 C 125 0 1U K R 467 9 1K C 131 0 1U K T P58 C 100 0 1U K R 194 22 J C 395 NC _ 1U K C 103 0 1U K T P505 R 191 1 0 K J C 109 0 1U K R 469 3 3 C 126 0 1U K SiI 9125 U25A S IL9125CT U Q 13 140 Q 12 141 Q 11 144 Q 10 1 Q 9 2 Q 8 3 Q 7 7 Q 6 8 Q 5 9 Q 4 10 Q 3 13 Q 2 14 Q 1 15 Q 0 16 Q 23 126 Q 22 127 Q 21 128 Q 20 129 Q ...

Page 47: ... NC1 9 CO M1 10 T P290 C183 0 047U K R 479 22 J C176 0 047U K T P281 R 398 0 R N25 22 1 2 3 4 8 7 6 5 T P226 R 224 75 J T P291 HS C1 3DM7504001 GND G1 GND G2 T P116 R 397 0 T P282 C177 0 047U K C198 0 1U K C189 0 1U K R 563 22 J R 572 4 7K An a l o g In p u t Po r t U30B PW328B 30L S MUXIN1 U3 S MUXIN2 T 1 BMUXIN0 V5 BMUXIN1 V3 BMUXIN2 U1 R AI1 Y 1 R AI2 AC2 GAI1 Y 3 GAI2 AD1 GAI3 AF1 BAI1 AB3 BAI...

Page 48: ...A7 18 A8 8 A9 7 A10 6 A11 5 A12 4 A13 3 A14 2 A15 1 A16 48 A17 17 A18 16 A19 9 DQ0 29 DQ1 31 DQ2 33 DQ3 35 DQ4 38 DQ5 40 DQ6 42 DQ7 44 DQ8 30 DQ9 32 DQ10 34 DQ11 36 DQ12 39 DQ13 41 DQ14 43 DQ15 45 C E 26 O E 28 WE 11 R E S E T 12 BY T E 47 R Y BY 15 P3V3 37 G ND 27 G ND 46 NC 10 NC 13 WP 14 R 294 100 R 296 100 TP128 R 276 47 J R 280 N C _ 3 3K R 373 2K D11 _NC LL4148 A K R 244 1 0 K NC D17 LL4148 ...

Page 49: ...5 C222 0 1U K R N19 22 1 2 3 4 8 7 6 5 C223 0 1U K C218 0 1U K C214 0 1U K R N9 22 1 2 3 4 8 7 6 5 R N16 22 1 2 3 4 8 7 6 5 R N21 22 1 2 3 4 8 7 6 5 R N10 22 1 2 3 4 8 7 6 5 C226 0 1U K C228 0 1U K R 311 22 J R N14 22 1 2 3 4 8 7 6 5 C216 0 1U K R N12 22 1 2 3 4 8 7 6 5 C215 0 1U K C219 0 1U K R N11 22 1 2 3 4 8 7 6 5 C213 0 1U K C224 0 1U K R N8 22 1 2 3 4 8 7 6 5 R 312 22 J U37 M13S 128168A 5T G...

Page 50: ... 33V DD6 L5 33V DD7 L6 33V DD8 M5 33V DD9 M6 33V DD10 AA10 33V DD11 AA11 33V DD12 AA12 33V DD13 AA16 33V DD14 AA17 33V DD15 AA18 33V DD16 AB 10 33V DD17 AB 11 33V S S 1 K 10 33V S S 2 K 11 33V S S 3 K 12 33V S S 4 K 13 33V S S 5 K 14 33V S S 6 K 15 33V S S 7 L10 33V S S 8 M10 33V S S 9 N10 33V S S 10 P 10 33V S S 11 R 10 33V S S 12 T 10 33V S S 13 U10 33V S S 14 U11 33V S S 15 U12 33V S S 16 U13 3...

Page 51: ...L51 Z120 C340 0 1U K C361 0 1U K T P 249 C338 10P NC C343 0 1U K R 354 10K C342 0 1U K R 357 4 7K R 360 10K C373 10UF K U42 M12L64164A 7T G NC DQ 0 2 VDDQ 3 DQ 1 4 DQ 2 5 VS S Q 6 DQ 3 7 DQ 4 8 VDDQ 9 DQ 5 10 DQ 6 11 VS S Q 12 DQ 7 13 VDD 14 LDQ M 15 WE 16 CAS 17 R AS 18 CS 19 BA0 20 BA1 21 A10 AP 22 A0 23 A1 24 A2 25 A3 26 VDD 27 VDD 1 VS S 54 DQ 15 53 VS S Q 52 DQ 14 51 DQ 13 50 VDDQ 49 DQ 12 48...

Page 52: ...Scalar Diagram C B A 52 BDL6531E LCD ...

Page 53: ...Scalar Diagram C B A BDL6531E LCD 53 ...

Page 54: ...54 BDL6531E LCD Power Diagram C B A ...

Page 55: ...BDL6531E LCD 55 Power Diagram C B A ...

Page 56: ...56 BDL6531E LCD Power Diagram C B A ...

Page 57: ...2 V1 15V 150PF 1 2 TP7 C7 0 1U K C2 0 1U K V6 15V 150PF 1 2 OP OP4 V8 15V 150PF 1 2 C1 0 1U K H 1 V7 15V 150P F 1 2 OP OP1 SW 7 SKRPA B E 010 1 2 3 4 C6 0 1U K TP2 V4 15V 150PF 1 2 SW 4 SKRPA B E 010 1 2 3 4 SW 1 SKRPA B E 010 1 2 3 4 V5 15V 150PF 1 2 H 2 C9 0 1U K TP6 OP OP2 C3 0 1U K H 3 TP4 C5 0 1U K SW 5 S K R P ABE010 1 2 3 4 OP OP5 R2 68 F V3 15V 150PF 1 2 OP OP3 TP10 H 4 TP3 C8 0 1U K TP1 R...

Page 58: ...Control Diagram C B A 58 BDL6531E LCD ...

Page 59: ...BDL6531E LCD 59 General Product Specification Issued by Technical Marketing Manager Larry Yang Product Identification 65 BDL LCD DISPLAY BDL6531E 00 ...

Page 60: ...MANCE 32 3 1 LCD MODULE CHARACTERISTICS 32 3 2 FRONT OF SCREEN PERFORMANCE 33 4 FUNCTIONAL REQUIREMENTS 34 4 1 POWER 34 4 2 PICTURE 34 4 2 1 Wide Screen Signalling Bit WSSB picture size 34 4 2 2 Picture format 34 4 2 3 Picture in Graphics 34 4 3 AUDIO 35 4 3 1 Sound related requirements 35 4 4 PICTURE SHIFTING 35 4 5 PC PICTURE AUTO ADJUSTMENT FUNCTION D SUB INPUT 35 4 6 ESP ENERGY SAVING PROGRAMM...

Page 61: ...RELIABILITY ENVIRONMENT 45 8 1 MTBF PREDICTION 45 8 2 DEMONSTRATION MTBF 45 8 3 TEMPERATURE 45 8 4 HUMIDITY 45 8 5 ALTITUDE 45 8 6 AIR PRESSURE 45 8 7 ENVIRONMENTAL TEST 45 9 REGULATORY COMPLIANCE 46 9 1 WORLDWIDE REGULATORY 46 9 2 EMC REQUIREMENTS 48 9 4 ROHS 48 9 5 WEEE 48 9 6 ONGOING REGULATORY 48 10 DQE TEST ITEMS TEMPLATE 48 10 1SYSTEM FLOW CHART 49 10 2SPECIFICATION INPUT AND UPDATE 49 10 3D...

Page 62: ...62 BDL6531E LCD General Product Specification DOCUMENT REVISION HISTORY Revision no Date Description V1 0 2010 12 07 Release for MP V1 1 2011 01 31 Spec modification ...

Page 63: ...x 4 codes MSB byte 12 D2 LSB byte 11 09 4 maximum resolution 1920 x 1080 5 Horizontal Frequency Range 31 75 KHz 6 Vertical Frequency Range 50 85Hz 7 Monitor Name 13 characteries max PHL BDL6531E 1 1 General Product Features Screen of 16 9 aspect ratio 65 Full HD LCD color display Universal power supply PC analog 15pin D sub input output Supports PC mode via D sub DVI and HDMI connector Multi syste...

Page 64: ...nc only or polarity terminated with 2 2kΩ impedance z HDMI input TMDS channel Carries video data Signaling method According to DVI 1 0 specification Single link Type A HDMI Video pixel rate 25 MHz to 165 MHz Type A DDC channel Allows source to interrogate capabilities of sink I C signaling with 100 kHz clock E EDID data structure according to EIA CEA 861B and VESA Enhanced EDID z VGA analog RGB le...

Page 65: ... 10 4 93 PCRES23 1280 x 768 60 Hz 47 8 kHz 79 500 MHz CVT AddDMT 3 Apr 2003 PCRES28 1280 x 800 60 Hz 49 7 kHz 79 500 MHz CVT 1 May 2007 PCRES32 1280 x 960 60 Hz 60 0 kHz 108 000 MHz VESA Standard VDMTPROP 3 1 96 PCRES35 1280 x 1024 60 Hz 64 0 kHz 108 000 MHz VESA Standard VDMTREV 12 18 96 PCRES39 1360 x 768 60 Hz 47 7 kHz 85 500 MHz VESA Standard AddDMT 2003 4 3 PCRES41 1366 x 768 60 Hz 47 7 kHz 8...

Page 66: ...isplay or display engine is 720 physical lines in wide aspect ratio Video Interfaces The display device accepts HD input via Analog YPbPr HD ready displays support analog YPbPr as a HD input format to allow full compatibility with today s HD video sources in the market Support of the YPbPr signal should be through common industry standard connectors directly on the HD ready display or through an a...

Page 67: ...ed with input impedance of 10kΩ z Speaker output Back firing speakers 2 x 12 Wrms with T H D 10 z No signal input While no signal at external inputs screen will display warning message 2 3 DDC channel E EDID data structure according to VESA Enhanced EDID 1 3 and EIA CEA 861B for HDMI Allows source to interrogate capabilities of the Display AV inputs Separate EDID for VGA input and HDMI input 2 3 1...

Page 68: ...0 01 14 01 03 80 8E 50 78 EA D2 58 A3 54 4A 99 26 0F 47 4A AD 4A 00 81 80 81 40 A9 40 81 00 01 01 01 01 01 01 01 01 02 3A 80 18 71 38 2D 40 58 2C 45 00 94 23 53 00 00 1E 00 00 00 FF 00 52 41 4B 30 39 30 31 30 30 30 30 31 0A 00 00 00 FD 00 32 4C 1F 4B 11 00 0A 20 20 20 20 20 20 00 00 00 FC 00 50 48 4C 20 42 44 4C 36 35 35 31 56 0A 01 D5 02 03 22 F1 4F 90 1F 05 14 04 13 11 12 01 02 03 06 07 15 15 23...

Page 69: ...to keep the display upright as the monitor is moved between its portrait and landscape positions The following DDC CI commands should be supported via command line No Commands 1 Set Brightness 2 Set Contrast 3 Set Red Gain 4 Set Green Gain 5 Set Blue Gain 6 Get Brightness 7 Get Contrast 8 Get Red Gain 9 Get Green Gain 10 Get Blue Gain 2 4 Service mode Detailed technical specification refers to Ser...

Page 70: ... digital clock are detected z Standby The Display enters AV standby mode when it s switched off by RC Standby Power key or SLEEP TIMER function is activated or no AV signal input for 15 seconds z Recovery from Standby Power function recovers when RC Power is pressed 2 6 User Control Interface Controlled via top control keypads or remote control or RS 232 2 6 1 Hidden controls It can t be easily ac...

Page 71: ...ey 2 6 2 Front controls LED indicator 4 States LED Status Power Status LED behavior Normal on Blue Standby Amber RC command Blue blinking LED Active Switch off Amber LED Not active Normal on Standby RC command Switch off Blank RC sensor Receiver for Display control transmitter for ITV data cloning Operation Angle RC operational distance 0 for H V 10m 30 for H V 10m 45 for H only 10m ...

Page 72: ...72 BDL6531E LCD General Product Specification Remote Control Philips protocol Philips protocol is used for remote control communication ...

Page 73: ...BDL6531E LCD 73 General Product Specification ...

Page 74: ...74 BDL6531E LCD General Product Specification ...

Page 75: ...0x1E SMART 0x1D SIZE 0x29 PIP ON OFF 0x24 PIP INPUT 0x25 PIP CHANGE 0x26 CONTRAST 0x27 BRIGHTNESS 0x28 MENU 0x20 UP 0x15 DOWN 0x14 SET 0x23 PLUS 0x22 MINUS 0x21 EXIT 0x1F DISPLAY 0x19 AUTO ADJUST 0x1C MUTE 0x1B VOL UP 0x17 VOL DOWN 0x16 All RC buttons generate RC commands All those commands should be interpreted into the correct actions ...

Page 76: ...76 BDL6531E LCD General Product Specification 2 6 3 OSD MENU 9 languages English German Spanish French Italian Spanish Russian Polish Turkish Simplified Chinese PICTURE MENU OVERVIEW ...

Page 77: ...BDL6531E LCD 77 General Product Specification SCREEN MENU ...

Page 78: ...78 BDL6531E LCD General Product Specification ...

Page 79: ...BDL6531E LCD 79 General Product Specification AUDIO MENU ...

Page 80: ...80 BDL6531E LCD General Product Specification PIP PICTURE IN PICTURE MENU ...

Page 81: ...BDL6531E LCD 81 General Product Specification CONFIGURATION 1 MENU ...

Page 82: ...82 BDL6531E LCD General Product Specification ...

Page 83: ...BDL6531E LCD 83 General Product Specification CONFIGURATION 2 MENU ...

Page 84: ...84 BDL6531E LCD General Product Specification ADVANCED OPTION MENU ...

Page 85: ...BDL6531E LCD 85 General Product Specification ...

Page 86: ...86 BDL6531E LCD General Product Specification ...

Page 87: ...BDL6531E LCD 87 General Product Specification ...

Page 88: ...88 BDL6531E LCD General Product Specification ...

Page 89: ... line PC input 15 pins VGA D Sub Female connector with lime green 3 5mm Mini jack audio stereo connector VGA D Sub connector pin assignment Pin Signal Assignment Pin Signal Assignment 1 Red video 2 Green video 3 Blue video 4 GND 5 GND 6 Red GND 7 Green GND 8 Blue GND 9 5V Supply from PC for DDC circuit 10 Sync GND 11 GND 12 DDC serial data 13 H sync 14 V sync 15 DDC serial clock ...

Page 90: ...udio output 12w at 8ohm cinch audio stereo connector for stereo audio Speaker output 12w at 8ohm stereo output snap type connectors RS232 DB9 RS232 male type connector 3 VISUAL PERFORMANCE 3 1 LCD Module Characteristics Vendor First Panel AUO Panel Type Number P645HW04 Module Dimensions mm 1508 0mm H x 878 0mm V x 60 0mm D Display Area H x V 1428 48 H x 803 52 V Aspect Ratio 16 9 Pixel Format 1920...

Page 91: ...ightness at 50 and contrast at 50 The color temperature at the screen center should be CCT 9300º K 10000º K 6500º K 5800 º K x 0 283 0 015 0 278 0 015 0 313 0 015 0 326 0 015 y 0 297 0 015 0 291 0 015 0 329 0 015 0 342 0 015 z Picture centering H V 0 5 for 480i p 576i p 720p 1080i p z Over scan 3 top 3 bottom for Display 480i 576i 3 left 3 right for Display 480i 576i 3 top 3 bottom for 480p 576p 7...

Page 92: ... ON STANDBY Display goes to STANDBY when mains is applied When POWER ON ON Display goes to On state when mains is applied When POWER ON LAST STATUS Display goes to Last status ON or STANDBY depending of the previous state of Display before power off 4 2 Picture Picture control handles the initialization of the video parameters and the recall of the video personal preferences Some video parameters ...

Page 93: ... in prevention_m 4 5 PC Picture Auto Adjustment Function D Sub input Perfect Front Of Screen after auto adjustment Perfect FOS Full Screen w o flash unstable status at any picture When a new VGA source is detected then automatically an auto adjustment should be performed The Auto button on the remote control will act as a manual button for auto adjustment 4 6 ESP Energy Saving Programmability Limi...

Page 94: ...gently 4 9 Smart Power This function allows you to choose a certain level of power saving condition OFF to set the system in normal power condition MEDIUM to set the system in medium level power saving status HIGH to set the system in high level power saving status Smart Power Setting Display Brightness High 50 Medium 75 Off 100 Smart Power requirements Smart Power Level Power RS232 DATA 1 OSD Off...

Page 95: ...re listed Switch Default Position AC Power Switch OFF Speaker Switch Internal speaker 5 3 Last Status A variable can be classified as last status variable This means if the variable is changed it may take up to 3 seconds before the variable is stored in NVM This automatic storage mechanism is not operational when the Display is in Factory mode 5 4 Life time indication show on OSD menu to be define...

Page 96: ...2 Remote Control Remote Control Type number EURT57B093 Batteries included Type number R03 B500 01S 6 3 DFU CD RO EDFU and SICP DFU English German Spanish French Italian Russian Polish Turkish Simplified Chinese on CD 6 4 Quick User Guide Quick Start Guide DFU English German Spanish French Italian Russian Polish Turkish Simplified Chinese 6 5 Warranty card N A 6 6 Others Saddle ...

Page 97: ...BDL6531E LCD 97 General Product Specification 7 MECHANICAL 7 1 Cosmetic Qisda ID 7 2 Mechanical Data Files Provide mechanical drawings with key dimensions ...

Page 98: ...98 BDL6531E LCD General Product Specification 7 3 Location of Philips Logo ...

Page 99: ...cons 7 5 Color for Resin Paint Black 30 gloss front Silver brush gloss decoration part Stealth Black in mould back cover 7 6 Resins RoHS requirements WEEE requirements PC ABS China Rohs required sales in China only 7 7 Paint Used RoHS requirements WEEE requirements ...

Page 100: ... 10 Texture Glossing of Housing The texture area and texture no should follow Philips make up sheet The exterior surfaces shall have a uniform texture Philips must approve the mold texturing Detail document for texture refer to UN D249 The gloss value of texture area 20 gloss units No plastic parts 7 11 Base Tilt Swivel Range Tilt N A per commercial spec request Swivel Range 0 Base detach Should b...

Page 101: ...nd wrapping shall be sufficient to protect the product against damage or loss during shipment from the supplier to the destination specified in the purchase order All packaging materials are subject to test and evaluation per XTN 0009 UAN D636 Packaging unit should be protected by corner protector on 4 corners don t use surrounding cardboard 7 16 1 Transportation packages The overall test sequence...

Page 102: ... only for China India UAN D 1534 02 Un packaging test Fragility test optionally UAN D 1534 01 Drop onto a face IEC 60068 2 31 test Ec Vibration test IEC 60068 2 6 test Fc Vibration test screen size 56cm only for China India GB 9384 97 7 17 Pallet Container Loading Air shipment 3 Sea container 20 pallet slip sheet 21 Sea container 40 pallet slip sheet 49 Sea container 40 High Cube pallet slip sheet...

Page 103: ...ements 0 to 40 degree Storage 20 to 60 ºC Shipping 40 to 65 ºC 8 4 Humidity Operating non condensing 20 to 80 Storage non condensing 5 to 95 Shipping non condensing 5 to 95 8 5 Altitude Operating 0 to 4500m Storage 0 to 9000m Shipping 0 to 9000m 8 6 Air pressure Operating 795 to 1013 mbar Storage 300 to 1013 mbar Shipping 300 to 1013 mbar 8 7 Environmental test Cold test 25 degree 96 hours Damp he...

Page 104: ...erence of all countries CB Report certificate Supplier Sa European Low Voltage Directives 2006 95 EC Declaration of Conformity MMD E European Electromagnetic Compatibility Directive 2004 108 EC EN55022 2006 A1 2007 EN55024 1998 A1 2001 A2 20 03 EN61000 3 2 2006 EN61000 3 3 1995 A1 2001 A2 2005 EN 55013 2001 A1 2003 A2 2006 for A V EN 55020 2007 EMC CE test report Supplier EUROPE O EUP Directive 20...

Page 105: ...er China RoHs China O SJ T 11364 2006 Supplier Sa Safety E Electromagnetic Compatibility O Other which including recycling energy saving ergonomics GreenMark X X Ray Remark 1 Supplier to provide all approbation documents samples before CR 2 Supplier to pay approbation samples and transportation cost 3 Supplier to pay Switzerland approbation cost and provide EN62311 report 4 AC DC adaptor have to m...

Page 106: ...g Regulatory There s a possibility that other regulatory certificates will be required during the life of the product It is the responsibility of the supplier to provide related documentation 10 DQE Test Items Template Product Release Test DQE DQA The objective of Design Quality Assurance process is to define the activities to be taken by concerning within the Product Creation Process to manage th...

Page 107: ...updated in each product creation milestone DQE engineers will be responsible to make product quality and reliability definition based on the product characteristics and requirements 10 3 Design quality evaluation capability qualification During the product creating process the DQE has to support to regulate the supplier design quality and reliability evaluation capability to ensure the supplier is...

Page 108: ... 1 3 Luminance uniformity v 2 v 1 1 1 4 Luminance transition v 1 v 1 1 1 5 Contrast ratio v 1 v 1 1 1 6 Luminance full white v 1 v 1 1 1 7 Dimming range v 1 1 1 8 Contrast vs viewing angles v 1 1 1 9 Luminance variation curve v 1 1 1 10 Peak white luminance No need 1 2 Colour 1 2 1 Colour Temperature v 1 v 1 1 2 2 Chromaticity v 1 v 1 1 2 3 Chromaticity uniformity v 1 v 1 1 2 4 Colour saturation v...

Page 109: ... need 1 3 20 Interlacing No need 1 3 21 Contouring PDP v N A v N A 1 4 Resolution 1 4 1 Display resolution v 1 v 1 1 4 2 Sharpness Smearing v 1 v 1 1 4 3 Overshoot Undershoot Ring v 1 v 1 1 4 4 Focus v 1 v 1 1 4 5 Readability v 1 v 1 1 4 6 Moire Mura v 1 v 1 1 4 7 Response time v 1 v 1 1 4 8 Video bandwidth 1 4 9 Video sag 1 4 10 Video black level stability PDP v N A v N A 1 4 11 Video spurious re...

Page 110: ... delay of Luma v N A 3 10 Amplitude and Group delay of chroma v N A 3 11 Frequency stability vs AFC v N A 3 12 Local oscillator leakage v N A 3 13 Maximum usable multiple RF input signal v N A 3 14 selectivity v N A 3 15 Cross modulation v N A 3 16 Cross luminance v N A 3 17 V chip Closed captions and Extended data service v N A 3 18 Remote transmitter frequency stability v 1 3 19 Remote transmitt...

Page 111: ...nt v 1 4 17 Mains Harmonic Power factor v 1 v 1 4 18 Earth leakage current v 1 v 1 4 19 Inverter CCFL strike voltage and time v 1 5 Software and OSD Tests 5 1 Power Management Function v 1 v 1 5 2 Key pad Remote control Function v 1 v 1 5 3 Video Mode Detection All Mode v 1 v 1 5 4 Picture Performance All Mode v 1 v 1 5 5 New Modes storge function v 1 v 1 5 6 Video mode operation frequency Range v...

Page 112: ...bility tests 6 1 Component derating v 1 6 2 Thermal stress v v 1 6 3 Capacitor stress check v 1 6 4 Capacitor life calculation v 1 6 5 DPMS cycling v 1 v 1 6 6 Power DPMS cycling v 1 6 7 Power off on interval v 1 6 8 Mode cycling OSD check v 1 6 9 MTBF Prediction v v 1 6 10 MTBF demo v 3 v 2 6 11 Acoustic noise v 1 v 1 6 12 Father Mother v 1 6 13 EHT 6 14 X ray protection 6 15 Flash over 6 16 Mech...

Page 113: ... tilt over v N A 8 10 6 Bump test for set 7kg v N A 8 10 7 Wobbling test mainbody vs standbase v N A 8 10 8 Stand loading strength v 1 8 10 9 Hinge cycling test foldable set v N A 8 10 10 Stand base feet assembly moving and feet contact v N A 8 10 11 Wall mount VESA spacing v 1 8 10 12 Cosmetic and appreance assembly v N A v N A 8 10 13 Impact test glass element v N A 8 10 14 Fragmentation glass e...

Page 114: ...4 kHz 65 000 MHz VESA Guidelines VG901101A 9 10 91 PCRES18 1024 x 768 75 Hz 60 0 kHz 78 750 MHz VESA Standard VDMT75HZ 10 4 93 PCRES23 1280 x 768 60 Hz 47 8 kHz 79 500 MHz CVT AddDMT 3 Apr 2003 PCRES28 1280 x 800 60 Hz 49 7 kHz 79 500 MHz CVT 1 May 2007 PCRES32 1280 x 960 60 Hz 60 0 kHz 108 000 MHz VESA Standard VDMTPROP 3 1 96 PCRES35 1280 x 1024 60 Hz 64 0 kHz 108 000 MHz VESA Standard VDMTREV 1...

Page 115: ...Hz 79 500 MHz CVT 1 May 2007 PCRES32 1280 x 960 60 Hz 60 0 kHz 108 000 MHz VESA Standard VDMTPROP 3 1 96 PCRES35 1280 x 1024 60 Hz 64 0 kHz 108 000 MHz VESA Standard VDMTREV 12 18 96 PCRES39 1360 x 768 60 Hz 47 7 kHz 85 500 MHz VESA Standard AddDMT 2003 4 3 PCRES41 1366 x 768 60 Hz 47 7 kHz 85 500 MHz VESA Standard AddDMT 2007 11 30 PCRES53 1600 x 1200 60 Hz 75 0 kHz 162 000 MHz VESA Standard VDMT...

Page 116: ...ort for Remote Management via RS232 in R RS232 D sub 9 pin Serial Port for Remote Management via RS232 out for LoopThrough R RS232 D sub 9 pin Compliance to broadcast standards for reception and or video playback playback DVD VCR STB Video play back support for various video coding standards R PAL SECAM NTSC Wide Screen Signalling support 16 9 4 3 R WSS z Pictures Motion Test z RS232 SCIP and Cont...

Page 117: ...ign quality and reliability review is required whenever a new product is starting to be created from supplier in either electrical or mechanical parts During design and evaluation phase detailed design quality and reliability reviews are required from EVT stage to DVT and PVT stage respectively 10 5 2 Quality and Reliability evaluation and testing report Supplier should provide product quality and...

Page 118: ...on the reports and activities of design quality and reliability evaluation in product creation process which is performed by supplier If necessary supplier needs to provide third party verification and certification report The third party must be approved by MMD 10 7 Design change review and confirmation All design changes after product release shall follow the engineering change notes ECN procedu...

Page 119: ...Exploded View BDL6531E BDL6531E LCD 119 ...

Page 120: ...K 12W8OHM 400MM L14050 0041 2C 409U0 041 V V V Model Packing Styling B D L 6 5 3 1 E 9 3 C h i n a B D L 6 5 3 1 E 0 0 E U B D L 6 5 3 1 E 0 0 N A F T A Model Packing Styling location Description PCM code Philips 12NC AUO AUO AUO 101 CUSHION TOP RIGHT 4G 1CR07 001 V 101 CUSHION TOP RIGHT 4G 1CR02 001 V V 102 CUSHION TOP CENTRAL 4G 1CR10 001 V 102 CUSHION TOP CENTRAL 4G 1CR05 001 V V 100 CUSHION TO...

Page 121: ...5D 0RC07 011 PCBA PWR BD 300W UP3003 01AG 3 CS 5J0WF 001 PACK SKD MAIN BD EP65SF0 4 9B 0VE02 QBU SKD ASSY KEY BD WP08SF0 5 9B 0WF05 012 SKD PCBA AUDIO BD EP65SF0 6 9B 0WF03 011 SKD PCBA IR BD EP65SF0 7 9B 0WF04 011 SKD TRANSFER BD EP65SF0 8 9B 0WF05 001 SKD POWER SWITCH BD EP65SF0 9 9B 1CRA2 001 SKD COLOR BD EP65SF1 ...

Page 122: ...soldering iron s heat applied to each terminal see Fig 1 B Remove the excess solder on the solder lands by means of litz wire or a solder sucker see Fig 1C While holding the SMD with a pair of tweezers take it off gently using the soldering iron s heat applied to each terminal see Fig 1 B Remove the excess solder on the solder lands by means of litz wire or a solder sucker see Fig 1C 1 3 Caution o...

Page 123: ...be heated up for some hours around 90 for drying Take attention for ESD protection 5 Rework on BGA Ball Grid Array ICs General Although LF BGA assembly yields are very high there may still be a requirement for component rework By rework we mean the process of removing the component from the PWB and replacing it with a new component If an LF BGA is removed from a P WB the solder balls of the compon...

Page 124: ...ck keypad board NG or OK No Back light on 1 Check wire cable connection between main board and keypad 2 Check VCC Power 5V in No Yes OSD image ok Function ok No Check J24 LVDS cable connection board and main board No Check every PCBA board function Yes Yes Check wire cable connection between back light and power board No Input signal display Check input cable Audio ok No 1 Check audio input cable ...

Page 125: ...picture No Power button operation is normal Yes Keypad LED is ON Yes Check POWER ON control pin is High No Check GPIO status Yes Check LCD12V and LVDS power sequence No Check GPIO status Check power is correctly Check input source and path is ready Yes ...

Page 126: ...n19 is high Yes No Yes No No 1 Check RS232 cable pin2 pin3 is cross type or normal type 2 Cross type must plug in to substratum of J22 3 Normal type must plug in to upper stratum of J22 Check control pin RS232_SHDN status default high 1 Check control pin RS232_TXEN status default high 2 Check R213 or R214 is mouted 1 Check U28 soldering or to change a new chip Yes ...

Page 127: ...measure audio board U1 output waveform 1K Hz sinewave Check mute pin AUDIO_VOL_ON is high or low Yes Yes To measure audio board U1 output waveform Yes Check GPIO control pin R277 R278 status Check GPIO control pin R492 status Check audio board U1 soldering or change another chip No No No Check audio board U6 Power AMP soldering or change another chip No Yes ...

Page 128: ... No PC input No DVI input No HDMI input No S Video input No CVBS1 input No CVBS2 input 1 Check J10 pin14 and R412 2 Check U18 U20 R124 R134 1 Check P5V P2V5 P3V3 P1V8 2 Check J25 PWRBD_ON and LCD_BRT_CTRL Signal 1 Check J8 soldering 2 Check U8 U10 U20 R124 R134 1 Check J31 soldering 2 Check L2 L3 R1 R3 1 Check J31 soldering 2 Check L1 R2 R483 1 Check J30 soldering 2 Check L4 R9 R490 ...

Page 129: ... operation normal DVI or HDMI picture display abnormal Check C96 is mounted N C is normal IR function fail Check cable or change another IR board Detect ambient light function fail Check cable or change another IR board Scheduling function fail Check Y4 waveform or U35 is operation normal DVI repeat output no signal Check U21 operation normal ...

Page 130: ...iPot and Ground Continuity tested as follows Condition Hi Pot Test for products where the mains input is 220V AC Hi Pot Test for products where the mains input is 110V AC Ground Continuity Test requirement Test voltage 2820VDC 2000VAC 1700VDC 1200VAC Test time 3 seconds 1 seconds Trip current Tester Set at 100uA for Max limit Set at 0 1uA for Min limit 5mA Ramp time Tester Set at 2 seconds ʳ Test ...

Reviews: