background image

42

EN

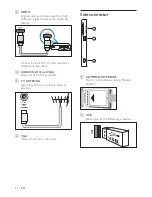
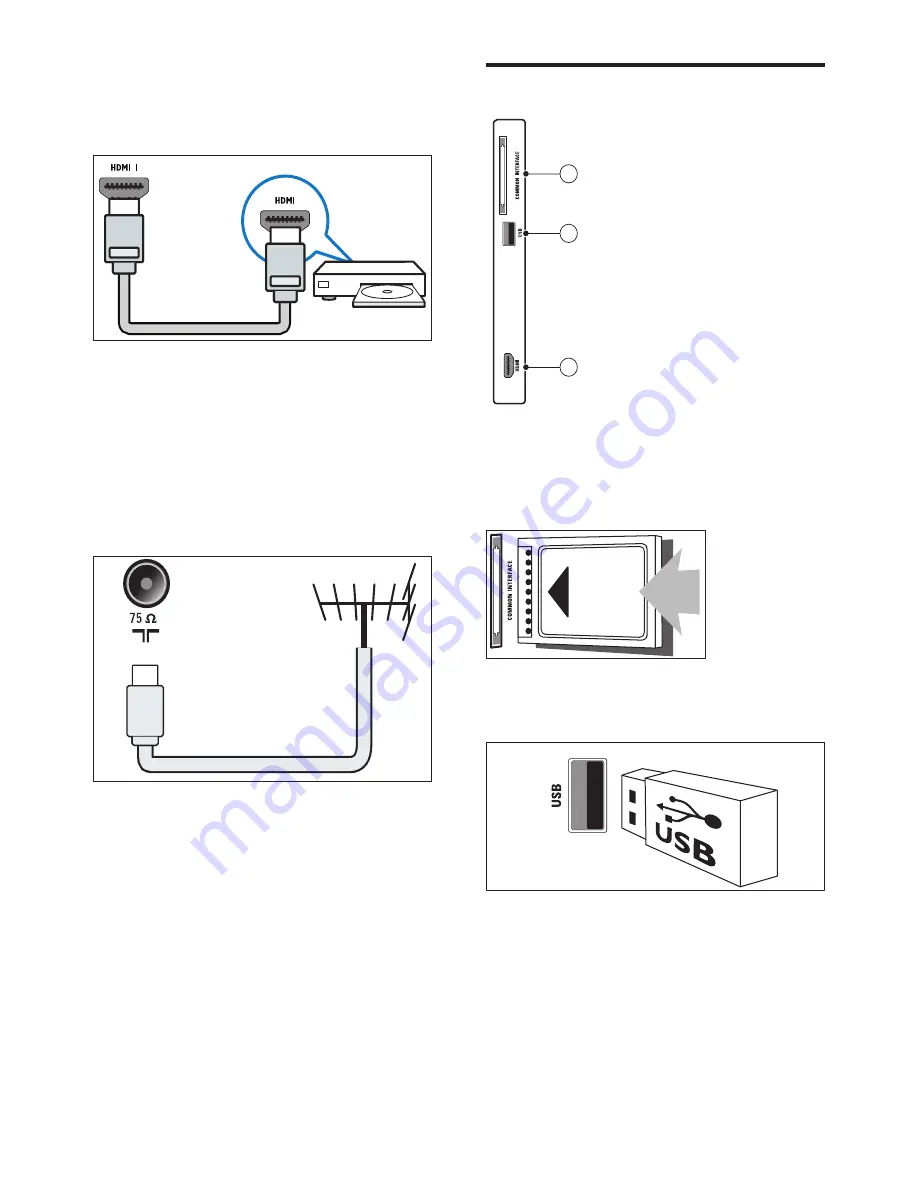
Side connector

1

2

3


a

  COMMON INTERFACE

Slot for a Conditional Access Module 

(CAM).


b

 USB

Data input from USB storage devices.


c

  HDMI 1

Digital audio and video input from high-

definition digital devices such as Blu-ray 

players.


Connections via DVI or VGA require an 

additional audio cable.

d

  AUDIO IN (DVI and VGA)

Audio input from a computer.

e


TV ANTENNA

Signal input from an antenna, cable or 

satellite.

TV ANTENNA


f

 VGA

Video input from a computer.

Summary of Contents for 26HFL4372D

Page 1: ...22HFL4372D 10 26HFL4372D 10 32HFL4372D 10 42HFL4372D 10 EN User Manual Register your product and get support at www philips com welcome ...

Page 2: ...6661 5644 Ortsgespräch Appel local Nederland 0900 8407 0 10 Per minuut Norge 2270 8111 Lokalsamtale Polska 022 3491504 połączenie lokalne Portugal 800 780 903 Chamada local România 031 810 71 25 0800 89 49 10 Apel local Россия Moscow 495 961 1111 Outside Moscow 8 800 200 0880 Местный звонок Србија 381 114 440 841 Lokalni poziv Slovensko 0800 004537 Bezplatný hovor Slovenija 00386 12 80 95 00 lokal...

Page 3: ...nstall theTV 28 7a Professional mode instruction 29 Introduction 29 Benefits of Professional mode 29 Professional Setup Remote control 22AV8573 optional 29 Professional mode options 30 Setup settings 32 7b Guest mode instruction 39 Introduction 39 PrimeSuite Remote Control 39 Activate the television 40 8 Connect devices 41 Back connector 41 Side connector 42 Connect a computer 43 Use a Conditional...

Page 4: ...our letter please email to the email address above 1 Notice 2010 Koninklijke Philips Electronics N V All rights reserved Specifications are subject to change without notice Trademarks are the property of Koninklijke Philips Electronics N V or their respective owners Philips reserves the right to change products at any time without being obliged to adjust earlier supplies accordingly The material i...

Page 5: ...ith all applicable legal requirements and to stay well within the EMF standards applicable at the time of producing the products Philips is committed to develop produce and market products that cause no adverse health effects Philips confirms that if its products are handled properly for their intended use they are safe to use according to scientific evidence available today Philips plays an activ...

Page 6: ...r 10 cm around the TV for ventilation Ensure curtains or other objects never cover the ventilation slots on the TV Risk of damage to the TV Before you connect the TV to the power outlet ensure that the power voltage matches the value printed on the back of the TV Never connect the TV to the power outlet if the voltage is different 2 Important Read and understand all instructions before you use you...

Page 7: ...To disconnect the TV power cord easily from the power outlet ensure that you have full access to the power cord at all times When you disconnect the power cord always pull the plug never the cable Disconnect the TV from the power outlet and antenna before lightning storms During lightning storms never touch any part of the TV power cord or antenna cable Risk of hearing damage Avoid using earphones...

Page 8: ...o launch an activity in the home menu c P CH Switches to the next or previous channel In the home menu press these buttons to move vertically d Power Switches the TV on or off 3 TV overview This section gives you an overview of commonly usedTV controls and functions Please read section 3 to 6 to set the basic consumer menu first then follow the instructions in section 7 to set the Professional mod...

Page 9: ...n the home menu press these buttons to move horizontally b MENU Accesses the home menu Press again to launch an activity in the home menu c P CH Switches to the next or previous channel In the home menu press these buttons to move vertically d Power Switches the TV on or off ...

Page 10: ...d to what is on screen g OK Confirms an entry or selection h Navigation buttons Navigates menus and selects items i INFO Displays program information when available If the information spans multiple pages press OPTIONS to go to the next page j Theme TV To activate Theme TV function k P Programme Switches to the next or previous channel When the TV menu is on this functions as Page Up Down l 0 9 Nu...

Page 11: ...cts tasks or options When Professional mode is On press to operate Multi remote control function Red button DEMO To select the red option access digital Interactive TV services or watch TV demonstration clips Green button To select the green option or the Eco settings Yellow button To select the yellow option or the Help menu Blue button Audio Descriptor For RF Digital TV only UK only Enables audi...

Page 12: ... devices then press OK Follow the instructions on screen to add the device to the home menu To remove a device from the home menu select the item press and select Remove this device Press OK Basic TV menus Home The home menu gives you easy access to connected devices picture and sound settings and other useful features 1 Press 2 Select an item in the home menu then press OK to access the menu 3 To...

Page 13: ... picture and sound settings TV settings Advanced picture and sound settings Search for channels or Search for satellite Guides you through antenna or satellite if available channel installation Channel settings or Satellite settings Advanced channel settings Update software Guides you through an update of the TV software Software settings Advanced TV update settings Watch demos Demos of special fe...

Page 14: ...hannels Press P on the remote control or P CH on the side of the TV Press then select Channel list to use the channel list 4 Use your product This section helps you perform basicTV operations Switch your TV on off or to standby To switch on If the standby indicator is off press POWER at the side of the TV If the standby indicator is red press Standby On on the remote control Tip The front LED indi...

Page 15: ...o the previously viewed channel Enter a channel number using the Numeric buttons To view analogue or digital channels only Filter the channel list to access analogue or digital channels only 1 In the channel list press 2 Select Select list Analogue or Digital then press OK Depending on your selection only digital or analogue channels become available Adjust TV volume To increase or decrease volume...

Page 16: ...ddles or puzzles Cycle subpages Cycles through subpages automatically if subpages are available Language Switches to a different language group to display a language correctly when that language uses a different character set 3 Press to exit the options menu Select a teletext language Some digital TV broadcasters have several teletext languages available You can set your primary and secondary lang...

Page 17: ...to display channels in a favourite list or All to display all channels 3 Press OK to confirm your choice Select subpages A teletext page number can hold several subpages These subpages are shown on a bar next to the main page number When available on a teletext page press or to select subpages Search teletext 1 When in teletext press OK to highlight the first word or number 2 Press the Navigation ...

Page 18: ... code with the Numeric buttons Tip If you forget your code enter 8888 to override any existing codes Use EPG Overview The Electronic Programme Guide EPG is an on screen guide available for digital channels EPG allows you to View the information of current programme being broadcast View the information of the next upcoming programme Note EPG is not available in some countries and also dependent on ...

Page 19: ...ort on the side of your TV 1 Press 2 Select Browse USB then press OK View slideshow Press the Navigation buttons to select a picture then press OK To pause or stop playback press OK again To jump to the previous or next file press or Press to exit content browser Press to access or exit the following settings Show info Displays the file information Stop Stops slideshow Rotate Rotates the file Repe...

Page 20: ...dcast if available 1 While watching TV press 2 Select Channel list then press OK 3 In the channel list press 4 Select TV Radio Radio then press OK Use Scenea Activate Scenea You can use Scenea to display a picture as wallpaper on your TV Make sure that the location of your TV is set to Home mode 1 Press 2 Select Scenea then press OK The default or pre loaded picture is displayed Note If the sleep ...

Page 21: ...rsal access in the Preferences menu 1 Press 2 Select Setup TV settings Preferences Universal access On then press OK Visually impaired Some digital TV channels broadcast special audio adapted for people who are visually impaired The normal audio is mixed with extra commentary To switch on visually impaired audio if available 1 While watching TV press 2 Select Universal access and press the green b...

Page 22: ...d settings including Perfect Natural Motion Advanced sharpness Dynamic contrast Dynamic backlight MPEG artefact reduction Colour enhancement Gamma 6 Set up the TV Change picture and sound settings Settings assistant Use the settings assistant to guide you through the best picture and sound settings 1 Press 2 Press to select Setup Quick picture and sound settings then press OK 3 Select Start then p...

Page 23: ...istortion Movie expand 16 9 Not for HD and PC mode Scales 4 3 format to 16 9 Wide screen Scales 4 3 format to 16 9 Unscaled For HD and PC mode only and in selected models only Allows maximum sharpness Some distortion may be present due to the broadcaster s systems Set your PC resolution to wide screen mode for best results PC mode Enables picture settings adjustment when a PC is connected to the T...

Page 24: ...press OK 3 Select one of the following picture settings Smart sound Accesses pre defined smart sound settings Reset Resets to factory default settings Bass Adjusts the bass level Treble Adjusts the treble level Surround Enables spatial sound Headphones volume Adjusts headphone volume Auto volume leveling Automatically reduces sudden volume changes for example when switching channels Balance Adjust...

Page 25: ... press OK 6 Once complete press the Navigation buttons to select Done To clear the entry select Clear To cancel select Cancel 7 Press OK to confirm your choice 8 Press to exit Hide channels Hide channels from the channel list to prevent unauthorised access 1 While watching TV press 2 Select Channel list then press OK 3 In the channel list select the channel to hide press 4 Select Hide channel then...

Page 26: ...these channels Access DVB C or DVB T channels This TV contains specific tuning algorithms supporting local cable operators This can impact DVB T tuning Please refer to attachment in case no or less channels are found Automatic update To set the TV to update digital TV channels automatically leave the TV in standby mode Once a day the TV updates earlier found channels and stores new channels Empty ...

Page 27: ...and then press OK 3 Press or to fine tune the channel 4 When the correct channel frequency is selected select Done and then press OK 5 Select Store current channel to store the fine tuned channel under the current channel or select Store as new channel to store under a new channel number Install analogue channels This section describes how to search and store analogue TV channels manually Step 1 S...

Page 28: ...languages Digital TV channels may stream several audio subtitle and teletext languages with a broadcast Set preferred languages when multiple languages are available 1 Press 2 Select Setup Channel settings or Satellite settings Language 3 Select one of the following settings then press OK Primary audio Secondary audio Selects the available audio language for digital channels Primary subtitles Seco...

Page 29: ... default the clock mode is set to Automatic syncing the TV clock to Coordinated Universal Time UTC If your TV cannot receive UTC transmissions set the clock mode to Manual Country dependent applies UTC and gives you the option of setting Daylight saving 1 While watching TV press 2 Select Setup TV settings Preferences Clock Auto clock mode 3 Select Automatic Manual or Country dependent then press O...

Page 30: ...t software is displayed TV USB update Before performing this procedure be sure to Set aside some time to complete the entire update Have available a USB flash drive with at least 256 MB of storage space Have access to a computer with a USB port and internet access 1 Press 2 Select Setup Update software then press OK The update assistant starts Follow the on screen instructions to complete the upda...

Page 31: ...e and sound settings This ensures that TVs are always set up correctly A switch on volume and channel can be selected After switching on the TV will always start on the specified volume level and channel The maximum volume level of the TV can be limited in order to prevent disturbance to other guest Channels can be blanked Video only The TV local buttons VOLUME P CH and Home can be locked Screen i...

Page 32: ...t 20sec 25sec 30sec Control settings Local keyboard lock Off On Remote control lock Off On OSD display Off On High security mode Off On Browse USB Off On Auto scart AV Power On Scart Off Easylink break in Off On Easylink control Off On Auto USB Off On Enable CI slot Off On EnableTeletext Off On Enable MHEG Off On Enable EPG Off On Enable Subtitle Off On Power settings Power on On Standby Low power...

Page 33: ...se key Speaker settings TV Speaker Enable Off On Independent Main Speaker Mute Off On Default Main Speaker Volume 0 60 Slider 15 Factory default Action TV setup Channel setup EnterTV Channel Setup Action Store Settings Smart Clone USB toTV Action TV to USB Action RF Download SW types SSB Firmware SSB NVM Standby Firmware ThemeTV All Program Info Frequency Medium Service ID ONID NID TSID Symbol Rat...

Page 34: ...on This helps to personalize the hotel experience for guests The Welcome message can consist of 2 lines of text with each line containing a maximum of 20 alphanumeric characters Use Navigation buttons on the remote control to compose the Welcome message Note Welcome message is always disabled if you select BDS Mode Setting OSD display Off Display message Select to show the welcome message at power...

Page 35: ...or disables HDMI CEC standby feature in Professional mode Off Not able to switch on the TV by external HDMI CEC devices On Able to switch on the TV by external HDMI CEC devices Easylink control Enables or disables HDMI CEC one touch play feature in Professional mode Off Disables TV functionality to control external HDMI CEC devices On Enables TV functionality to control external HDMI CEC devices A...

Page 36: ...the setting can be changed in the guest setup mode On The TV will start with Standard Smart Picture setting and Smart Picture setup is not selectable in the guest setup mode Clock settings Display Standby Define the brightness level for the Clock LCD backlight if the TV is in Standby mode Set Off 1 2 3 4 5 Display On Define the brightness level for the Clock LCD backlight if the TV is in On mode S...

Page 37: ...bled On Show ThemeTV on the display after pressing the Theme TV button on the RC Startup Show ThemeTV on startup and able to show ThemeTV by pressing the Theme TV button on the RC VSecure VSecure is the hospitality content scrambling method used by the Philips Hospitality TVs With its internal VSecure Authorization key a VSecure Unprotect key can be generated If this VSecure Unprotect key is store...

Page 38: ... erase the key s Speaker settings This function defines the simultaneously working of the integrated speakers and the headphone bathroom speakers TV Speaker Enable Off The main speakers are muted The RC can control the volume and mute of the headphone bathroom speaker On The main speakers are active and the behavior of the headphone bathroom speaker is defined by the Independent Main Speaker Mute ...

Page 39: ...t channel to be presented in the Chanel Grid Navigate to the channel to be adjusted Press OK Move the current channel to the preferred location using the arrow keys Press OK to accept Insert Channel will be inserted in the Channel Grid order Swap Both selected channels will swap their location in the Channel Grid order Make next changes or press Options to exit Show hidden channels Presents the hi...

Page 40: ...ne Place a USB Memory stick in the USB side I O connector Layer 1 Layer 2 Layer 3 Smart Clone USB toTV Press OK or TV will read and store Cloning data from USB stick RF Download Instead of using USB memory device to do cloning tbd and firmware update this upgrading is also possible using the RF infrastructure This is covered by Philips Hospitality RF Download and allows a simultaneous upgrade of a...

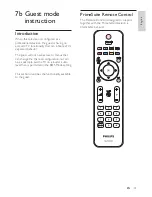
Page 41: ... expected behavior The guest will not have access to menus that can change the channel configuration nor can he as example put theTV on a louder audio level then is permitted in the BDS Mode setting This section describes the functionality available to the guest PrimeSuite Remote Control The Remote Control is designed to support together with the PrimeSuite television a predictable behavior ...

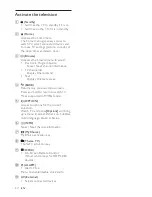
Page 42: ...el list Display Channel Grid Text Display Teletext service d BACK Returns to a previous menu screen Press and hold to return to watch TV Not supported in MHEG mode e OPTION Access to options for the current selection Watch TV and press Options will bring up a menu to select What s on Subtitles Audio language Dual I II Status f INFO Now Next channel information g MyChoice MyChoice activation key h ...

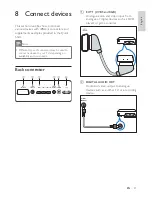
Page 43: ...o connect a device to your TV depending on availability and your needs Back connector EXT 1 RGB CVBS HDMI 3 HDMI 2 HDMI 1 ARC DIGITAL AUDIO OUT ANTENNA 75 AUDIO IN DVI VGA VGA a EXT 1 CVBS and RGB Analogue audio and video input from analogue or digital devices such as DVD players or game consoles b DIGITAL AUDIO OUT Audio and video output to analogue devices such as another TV or a recording devic...

Page 44: ...evices c HDMI 1 Digital audio and video input from high definition digital devices such as Blu ray players Connections via DVI or VGA require an additional audio cable d AUDIO IN DVI and VGA Audio input from a computer e TV ANTENNA Signal input from an antenna cable or satellite TV ANTENNA f VGA Video input from a computer ...

Page 45: ...udio and video input from high definition digital devices such as Blu ray players Connect a computer Before you connect a computer to the TV Set the screen refresh rate on your computer to 60Hz Select a supported screen resolution on your computer Connect a computer with one of the following connectors Note Connections via DVI or VGA require an additional audio cable HDMI cable ...

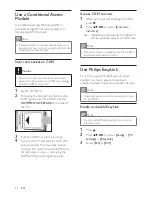
Page 46: ...TV settings EasyLink 3 Select On or Off Use a Conditional Access Module A Conditional Access Module CAM is provided by digitalTV service operators to decode digitalTV channels Note If required refer to documentation from your operator on how to insert a smart card into the Conditional Access Module Insert and activate a CAM Caution Be sure to follow the instructions described below Wrong insertion...

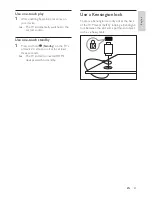
Page 47: ...ne touch standby 1 Press and hold Standby on the TV s or device s remote control for at least three seconds TheTV and all connected HDMI devices switch to standby Use a Kensington lock There is a Kensington security slot at the back of theTV Prevent theft by looping a Kensington lock between the slot and a permanent object such as a heavy table ...

Page 48: ...xceed 128 characters Tuner Reception Transmission Aerial input 75ohm coaxial IEC75 DVB DVB Terrestrial DVB T MPEG4 only in some models TV system DVB COFDM 2K 8K PAL I B G D K SECAM B G D K L L Video playback NTSC SECAM PAL Tuner Bands Hyperband S channel UHF VHF Remote control Type RC 6 Batteries 2 x AAA LR03 type Power Mains power 220 240V 50 60Hz Standby power 0 5 W Ambient temperature 5 to 40 d...

Page 49: ...n TV start up time is slow Select Fast mode in Low power standby menu TV channel issues Previously installed channels do not appear in the channel list Check that the correct channel list is selected No digital channels were found during the installation Check that the TV supports DVB T or DVB C in your country See the listed countries on the back of the TV Picture issues The TV is on but there is...

Page 50: ...isplay content from a HDMI device If the TV does not recognise the HDMI device and no picture is displayed try switching the source from one device to another and back again If there are intermittent sound disruptions check that output settings from the HDMI device are correct If a HDMI to DVI adaptor or HDMI to DVI cable is used check that an additional audio cable is connected to AUDIO L R or AU...

Page 51: ...49 E ng li s h EN 11 Attachment A This section describes commonly encountered issues when installing DVB T channels DVB T installation issues ...

Page 52: ...43 Consumer setup 35 Country 28 D Decoder 27 Demo 27 Digital channels CAM 45 Test digital reception 30 E EasyLink Disable 46 Enable 46 HDMI CEC in 37 One touch play 46 One touch standby 46 System audio control 46 ECO Green 6 EPG 19 E sticker 27 F Factory settings 27 H HDMI Connect devices 41 HDMI CEC in 37 Troubleshooting 51 Home mode 26 I Install channels Automatic 28 Manual 29 K Kensington lock ...

Page 53: ...Options 33 PBS mode 35 Store settings 40 R Radio 25 Remote control Guest Remote control 8 Multi remote control 39 Professional Setup Remote control 31 RC lock 37 S Selectable AV 38 Skip scrambled signals 39 Smart card 45 Smart power 35 Software version 26 Sound settings 16 Source list 11 Store 40 Subtitle 23 T teletext 17 Teletext 11 Timer 21 Troubleshooting 50 U Universal access 17 USB Disconnect...

Reviews: