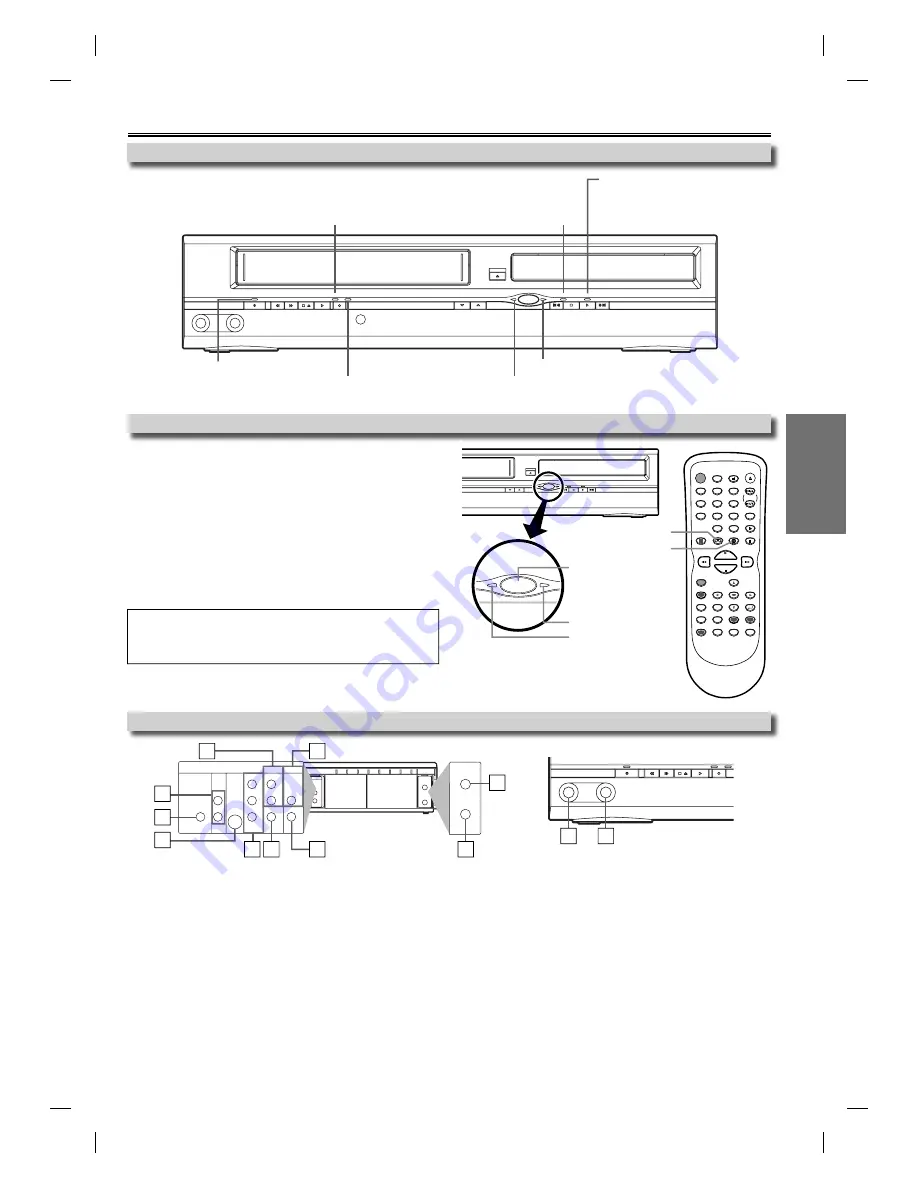
background image

EN

– 9 –

Setup

6: VIDEO IN jack

  Connect a cable coming from the video out jack of a camcorder, another 

VCR or an audio-visual source (laser disc player, video disc player, etc.) 
here.

7: DVD/VCR VIDEO OUT jack

  Connect the supplied video cable here through the video in jack of a 

television.

8: COMPONENT VIDEO OUT jacks

  Connect optional COMPONENT VIDEO cables here through the COMPO-

NENT VIDEO in jacks of a television. (DVD only)

9: S-VIDEO OUT jack

  Connect an optional S-VIDEO cable here through the S-VIDEO in jack of a 

television. (DVD only)

10: DIGITAL AUDIO OUT COAXIAL jack

  Connect an optional coaxial digital audio cable here through the coaxial 

digital audio in jack of a decoder or audio receiver. (DVD only)

Function Overview

You must first select which component you wish to operate with 

[SOURCE]

, as this product is a combination of a VCR and a DVD 

player.

CHANNEL

OPEN/
CLOSE

VCR

DVD

PREV

SOURCE

STOP

PLAY

NEXT

DISC IN

PLAY

VCR

DVD

SOURCE

DVD button

VCR button

STANDBY-ON

DISPLAY

VCR

DVD

PAUSE

SLOW

VCR/TV

SKIP/CH.

PLAY

STOP

RECORD

MENU

SETUP

TOP MENU

MODE

ZOOM

SUBTITLE

T-SET

ANGLE

ENTER

RETURN

SEARCH

MODE

REPEAT

A-B

OPEN/CLOSE

    /EJECT

SPEED

AUDIO

CLEAR/

C. RESET

1

2

3

4

5

6

7

8

9

0

+10

SOURCE button

DVD SOURCE light

VCR SOURCE light

VCR MODE 

Press 

[VCR]

 on the remote control.

(Verify that the VCR SOURCE light is lit.)

DVD MODE 

Press 

[DVD]

 on the remote control.

(Verify that the DVD SOURCE light is lit.)

Hint

• Pressing only 

[SOURCE]

 on the front panel DOES NOT switch the mode 

of the remote control. You MUST select the correct mode on the remote 
control.

VCR / DVD Switching

Front Panel Indicator

VIDEO

AUDIO

STANDBY-ON

REW

F.FWD STOP/EJECT

PLAY

RECORD

CHANNEL

OPEN/

CLOSE

VCR

DVD

PREV

SOURCE

STOP

PLAY

NEXT

DISC IN

PLAY

REC

TIMER

IR

Lights up when the inserted disc 
is being played back.
Blinks when an unacceptable 
disc is inserted.

Lights up when the Timer Recording or 
an OTR recording has been set.

Lights up during a recording.
Blinks when a recording is paused.

Lights up when power is on.

Lights up when this unit is in the DVD mode.

Lights up when this unit is in the VCR mode.

Front & Rear Terminals

DIGITAL

AUDIO OUT

COAXIAL

ANT-OUT

ANT-IN

AUDIO

OUT

DVD

VCR

DVD/VCR

S-VIDEO

OUT

COMPONENT

VIDEO OUT

AUDIO IN

VIDEO IN

AUDIO OUT

VIDEO OUT

L

L

Y

R

R

C

B

C

R

ANT-OUT

ANT-IN

DIGITAL

AUDIO OUT

COAXIAL

AUDIO

OUT

DVD

DVD/VCR

VCR

S-VIDEO

OUT

COMPONENT

VIDEO OUT

AUDIO OUT

VIDEO OUT

AUDIO IN

VIDEO IN

L

Y

C

B

C

R

L

R

R

VIDEO

AUDIO

STANDBY-ON

REW

F.FWD STOP/EJECT

PLAY

RECORD

REC

TIMER

[Rear Panel]

[Front Panel]

1: DVD AUDIO OUT (analog) jacks

  Connect the supplied audio cable here through the audio in jacks of a 

television or other audio equipment. (DVD only)

2: DVD/VCR AUDIO OUT jacks

  Connect the supplied audio cable here through the audio in jacks of a 

television or other audio equipment.

3: AUDIO IN jack

  Connect audio cable coming from the audio out jack of a camcorder, 

another VCR or an audio source here.

4: ANT-IN jack

  Connect your antenna or cable box here.

5: ANT-OUT jack

  Connect the supplied RF cable to the antenna input jack of a 

television.

3

2

10

9

1

8 7

6

3

4

5

Lights up when the disc is inserted.

6

E8C1UCD_EN.indd   9

E8C1UCD_EN.indd   9

2007/04/03   9:48:59

2007/04/03   9:48:59

Summary of Contents for Philco CDV210HH8

Page 1: ...System 6 Connection to a TV 7 Preparation for Use 8 Turn on the Unit for the First Time 8 To Add or Delete Channels 8 Clock Setup 8 Function Overview 9 Front Panel Indicator 9 VCR DVD Switching 9 Fro...

Page 2: ...ustomer Use Read carefully the information located at the back of this unit and enter below the Model No and the Serial No Retain this information for future reference Model No ____________________ Se...

Page 3: ...system is connected to the video product be sure the antenna or cable system is grounded so as to provide some protection against voltage surges and built up static charges Article 810 of the Nationa...

Page 4: ...port line found on the cover of this manual to locate an authorized service center Cleaning the Cabinet Use a soft cloth slightly moistened with a mild detergent solution Do not use a solution contain...

Page 5: ...onditions characteristics of the recorder or special properties of discs 6 You can play back discs which bear the marks above If you use non standardized discs this unit may not play them back Even if...

Page 6: ...channel will change to chan nel 4 from channel 3 and you will see a playback picture When a picture does not appear on the TV screen repeat step 4 6 Press STOP C to stop playback RF Output Channel Con...

Page 7: ...Y CB CR AUDIO OUT Analog VIDEO OUT TV Method 1 Good picture Basic Audio Method 2 Method 3 Better picture Best picture S VIDEO OUT COMPONENT VIDEO OUT Video cable supplied Audio cable supplied S Video...

Page 8: ...o you connect the cable from the cable box or the satellite box to the unit s ANT IN jack Hint To go back one step press s during steps 2 to 7 Your clock setting will be lost if either there is a powe...

Page 9: ...rol You MUST select the correct mode on the remote control VCR DVD Switching Front Panel Indicator VIDEO AUDIO STANDBY ON REW F FWD STOP EJECT PLAY RECORD CHANNEL OPEN CLOSE VCR DVD PREV SOURCE STOP P...

Page 10: ...activate the remote control in DVD mode To select the DVD output mode To activate the remote control in DVD mode ENTER To move the cursor and deter mine its position To move the cursor and deter mine...

Page 11: ...minute for SP mode 2 minutes for LP mode and 3 minutes for SLP mode To rewind To fast forward Hint for Index Search Time Search These functions are not available during recording Press STOP C to stop...

Page 12: ...5 minutes to prevent damage to the tape and the video head Recording OTR One Touch Recording M E N U TIMER PROGRAMMING B AUTO REPEAT ON CHANNEL SET UP CLOCK SET LANGUAGE SELECT Auto Repeat Hint To can...

Page 13: ...time for the recording press SUBTITLE T SET so that TIMER indicator light turns off Press VCR TV to choose the VCR position Select either VCR or DVD mode then continue with the other features as descr...

Page 14: ...it To use the input jacks on the back of this unit select L1 position by pressing 0 0 1 on the remote control or CHANNEL K L on this unit To use the input jacks on the front of this unit select L2 pos...

Page 15: ...frame each time PAUSE F is pressed in the pause mode To continue playback press PLAY B Hint Slow forward speed is different depending on the disc Approximate speed is 1 1 32 2 1 16 3 1 8 4 1 4 and 5 1...

Page 16: ...ile name7 8 file name8 3 3 3 3 3 3 3 3 MP3 is a method of compressing files You can copy MP3 files on CD R RWs from the compu ter and play the files on this unit DV DVD Insert an MP3 format disc then...

Page 17: ...file name3 3 3 3 001 013 00 00 43 00 03 36 NORMAL file name1 1 folder1 2 folder2 3 folder3 1 file name1 2 file name2 3 file name3 3 3 3 elapsed time of the current track elapsed time of the current tr...

Page 18: ...to set random playback Hint To erase all programs at once select ALL CLEAR and press ENTER or press CLEAR C RESET at step 2 If the title chapter folder track number is incorrect the programmed number...

Page 19: ...orded on the scene Some discs will only allow you to change the subtitle from the disc menu Refer to the manual accompanying the discs for details Press twice once for CD and MP3 Hint Virtual Surround...

Page 20: ...SAMPLING DOLBY DIGITAL ON OFF DISPLAY_TV ASPECT TV ASPECT STILL MODE 4 3 LETTER BOX 4 3 PAN SCAN 16 9 WIDE LANGUAGE_AUDIO AUDIO SUBTITLE DISC MENU PLAYER MENU ORIGINAL ENGLISH FRENCH SPANISH GERMAN IT...

Page 21: ...may appear on the top and bottom of the screen Select 4 3 PAN SCAN for a full height picture with both sides adjusted Select 16 9 WIDE if a wide screen TV is connected to this unit 4 5 To exit the men...

Page 22: ...requires accompanying par ent or adult guardian 5 PGR Parental Guidance Recommended 4 PG13 Unsuitable for children under 13 3 PG Parental Guidance suggested 2 G General Audience 1 KID SAFE Suitable f...

Page 23: ...ame channel on the TV Fine tune your TV TV programs cannot be seen normally Re check the ANT IN and ANT OUT connections See the front page and page 6 Press VCR Press VCR on the remote control to activ...

Page 24: ...ation faulty installation improper maintenance commercial use such as hotel rental or office use of this product or damage which results from fire flood lightning or other acts of God THIS WARRANTY DO...

Page 25: ...ontrol Verify that the DVD SOURCE light is lit No Please wait for a few minutes After scanning The tuner stops on the lowest memorized channel You can select only the channels memorized in this unit b...

Page 26: ...e control in DVD mode ENTER To move the cursor and deter mine its position To move the cursor and deter mine its position To select an item on the VCR Menu To advance to the next VCR Menu To go back o...

Reviews: