


7
●
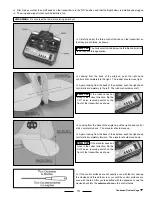
With the transmitter turned on and the flight battery installed, carefully extend the transmitter antenna completely.
●
Double-check that the throttle control stick is pulled completely back, then press the red motor arming switch on the side of the
fuselage once.
●
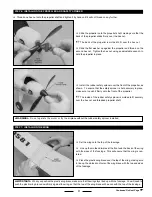
Carefully grasp the fuselage directly beneath the center of the wing with your thumb and forefingers. While holding the transmitter
in your other hand, push the throttle control stick forward to check that the motor powers up. Now, pull the stick completely back.
●
If there is any wind, turn to face it. While holding the throttle control stick completely forward (the propeller will spin very fast), hold
the airplane just above shoulder level and gently toss the airplane straight ahead and level. Allow the airplane to fly straight and
continue to hold the throttle control stick completely forward so that the airplane climbs.
If the airplane begins losing altitude after launching, pull back gently (only a small amount) on the right-hand
control stick (elevator). This will cause the airplane to gently pitch up and climb. The airplane may start to bank right or left after
launching, too. If this happens, gently move the right-hand control stick (rudder) right or left to level the wing.
HAND LAuNCHING THe J-3 CuB 370 RTF
FLYING THe J-3 CuB 370 RTF
PRO TIP
Continued On Next Page
☛
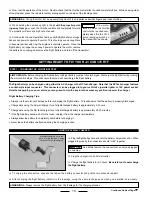
TAKING OFF THe J-3 CuB 370 RTF
PRO TIP
✦
IMPORTANT
✦
The J-3 Cub 370 RTF can take off from the ground, provided the surface is smooth and hard, such as asphalt,
concrete or hard-packed dirt. The airplane can also take off from tightly mowed grass. If there is no suitable place to take off from
the ground, you should hand-launch the airplane, following the procedures in the section below.
●
With the transmitter turned on and the flight battery installed, carefully extend the transmitter antenna completely.
●
Double-check that the throttle control stick is pulled completely back, then press the red motor arming switch on the side of the
fuselage once.
●
Set the airplane on the ground, making sure that the airplane is pointing directly into the wind. Slowly push the throttle control stick
forward until the motor is running at full power. The airplane will quickly begin to accelerate.
As the motor is powered up and the airplane accelerates, the airplane will have a tendency to pull toward the left.
This is normal and is caused by the torque from the spinning propeller. Gently move and hold the right-hand control stick (rudder)
to the right to keep the nose of the airplane pointing straight ahead.
●
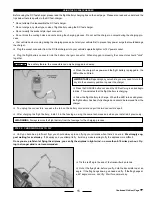
As the airplane continues to accelerate faster, the tail of the airplane will begin to lift off the ground and the airplane will now be
rolling down the runway on its main landing gear. At this point, the airplane is ready to take off. To take off, gently pull back on the
right-hand control stick (elevator) and the airplane will lift off the ground. Continue to hold the right-hand control stick back gently so
that the airplane continues to climb. After the airplane lifts off, you can move the rudder back to center.
✦
WARNING
✦
Be careful not to climb too steeply after takeoff or the airplane might slow down too much and stall.
PRO TIP
●
Once the airplane is in the air, keep the motor running and allow the airplane to continue to climb. After reaching about 80 - 100 feet
of altitude you should start making shallow turns, moving the right-hand control stick right or left, to keep the airplane near you.
We recommend trying to keep the airplane near you while flying. The airplane is small, so if it gets too far away, it
will be difficult for you to see. This will make it more difficult to learn to fly the airplane and could result in complete visual loss of
the airplane.
●
Now that the airplane has climbed to a safe altitude you can begin to learn the basics of flight. General flying should be done with
the motor at full power. You control the altitude of the airplane by moving the right-hand control stick either forward or back. Moving
the stick forward will cause the airplane to pitch down and lose altitude, and moving the control stick back will cause the airplane to
pitch up and gain altitude. These control inputs should be done gently, so you don't overcontrol the airplane.