background image

Network Scanner fi-6000NS Associated Servers Setup Guide 

37

File Server (Creating Shared Folder)

4

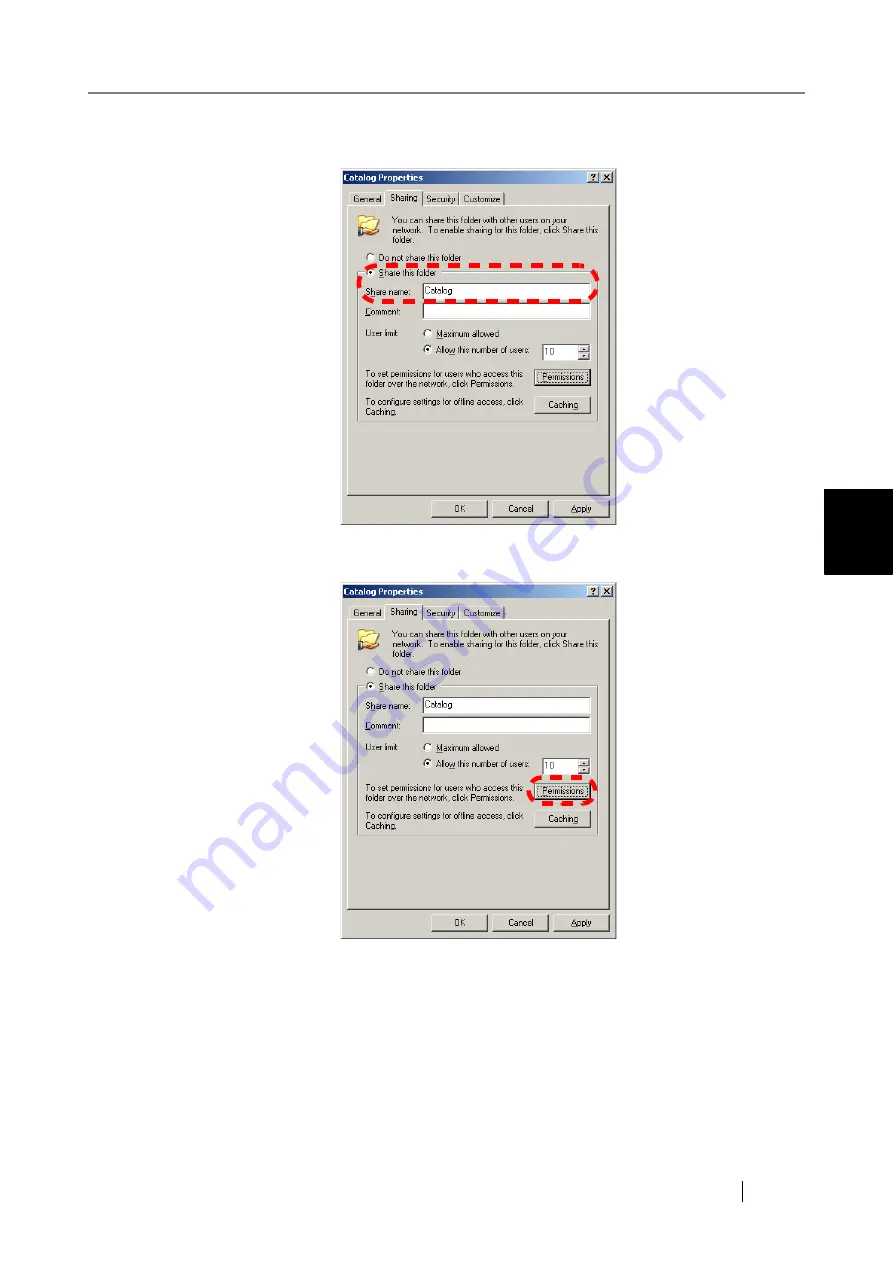
2. On the [Sharing] tab, select "Share this folder", and specify the folder name to share 

in the "Share name" input field.

3. Click the [Permissions] button.

The "Permissions" dialog box appears.

Summary of Contents for fi-6000NS

Page 1: ...P3PC 1971 03ENZ0 Network Scanner fi 6000NS Associated Servers Setup Guide...

Page 2: ......

Page 3: ...Trademarks are Indicated in This Manual The following abbreviations are used to describe the respective terms in this manual Where there is no distinction between the different versions of the above o...

Page 4: ...Manual This manual uses the following symbols in the explanations in addition to the warning indications About Maintenance The user must not perform repairs on this scanner Contact your FUJITSU scann...

Page 5: ...Active Directory 8 2 4 Setting Active Directory 16 2 4 1 Creating OU Organization Unit 16 2 4 2 Creating User Account 18 2 4 3 Changing User Account Properties 21 Chapter 3 Mail Server 23 3 1 Authent...

Page 6: ...alling WINS Server 44 6 2 Setting Properties of DNS Zone 45 6 2 1 Setting Properties of Forward Lookup Zone 45 6 2 2 Setting Properties of Reverse Lookup Zone 47 Chapter 7 DHCP Server 49 7 1 Installin...

Page 7: ...Network Scanner fi 6000NS Associated Servers Setup Guide vii Chapter 9 Fax Server 63 9 1 Installing RightFax 64 9 2 E mail Gateway Settings 65...

Page 8: ...viii...

Page 9: ...1 Network Scanner fi 6000NS Associated Servers Setup Guide 1 Chapter 1 System Configuration 1 1 Server Environment 2 1 2 Scanner Requirements 3...

Page 10: ...o Chapter 2 LDAP Server Active Directory Configuration page 5 Sending the scanned data by fax Refer to Chapter 3 Mail Server page 23 and Chapter 9 Fax Server page 63 Saving the scanned data to a netwo...

Page 11: ...s Shared Folder Print Server Windows 2000 Server 1 Printer Driver 3 Windows Server 2003 2 Printer Driver 3 WINS Server Windows 2000 Server 1 WINS Windows Server 2003 2 WINS DHCP Server Windows 2000 Se...

Page 12: ...4...

Page 13: ...display an e mail address book A DNS server must be set in order to use Active Directory Therefore if the system has no DNS server or the existing DNS server is not used for the system the DNS server...

Page 14: ...o Save in Used to User Name LDAP server Set the user name Password LDAP server Set the password E mail Address LDAP server Set the e mail address Setting Used to Server Name IP Address Set an LDAP ser...

Page 15: ...1 When the scanner receives a user login request the scanner binds to the LDAP server using the user name and password specified at the time of the request 2 To check if the user name specified at th...

Page 16: ...appears 2 Specify DCPROMO for the Open input field 3 Click the OK button The Active Directory Installation Wizard screen appears HINT Check the following before installing Active Directory Check that...

Page 17: ...tory Network Scanner fi 6000NS Associated Servers Setup Guide 9 LDAP Server Active Directory Configuration 2 4 Click the Next button 5 Click the Next button 6 Select Domain Controller for a new domain...

Page 18: ...10 7 Select Domain in a new forest to set the location of a new domain to be created and click the Next button 8 Specify Full DNS name for new domain and click the Next button...

Page 19: ...ork Scanner fi 6000NS Associated Servers Setup Guide 11 LDAP Server Active Directory Configuration 2 9 Specify Domain NetBIOS name and click the Next button 10 Specify the database of Active Directory...

Page 20: ...12 11 Specify where to store the log in the Log folder input field and click the Next but ton 12 Specify the folder shared as system volume in the Folder location input field and click the Next button...

Page 21: ...DNS server can interact with Active Directory In order to install the DNS server and configure it automatically select Install and configure the DNS server on this computer and set this computer to us...

Page 22: ...assword input fields and click the Next button Each information you specified is displayed on the screen 16 Confirm the displayed information and click the Next button Installing Active Directory and...

Page 23: ...000NS Associated Servers Setup Guide 15 LDAP Server Active Directory Configuration 2 17 Click the Finish button The message appears 18 Follow the message to restart your computer Your computer starts...

Page 24: ...on to classify the objects such as user computer and group Setting OU allows you to specify an entry of the LDAP server as a search target for this scanner The procedure for creating an OU is as follo...

Page 25: ...Directory Network Scanner fi 6000NS Associated Servers Setup Guide 17 LDAP Server Active Directory Configuration 2 3 Specify an OU name to be created and click the OK button The specified OU name is...

Page 26: ...user account for and select New User The New Object User dialog box appears ATTENTION Set the search base DN in the scanner in accordance with the attributes of the LDAP database to be used for creati...

Page 27: ...anner fi 6000NS Associated Servers Setup Guide 19 LDAP Server Active Directory Configuration 2 3 Specify the user account information to be created and click the Next button The dialog box to specify...

Page 28: ...st change password at next logon checkbox and click the Next button The confirmation screen appears 6 Confirm the specified information and click the Finish button The icon of the created user account...

Page 29: ...s An e mail address needs to be set before using e mail address book etc The procedure for chang ing properties of user account is as follows 1 Select Start Administrative Tools Active Directory Users...

Page 30: ...22 3 Specify E mail in the General tab and click the OK button The E mail address is set for the user account...

Page 31: ...Windows Server 2003 as an example ATTENTION The settings described in this chapter are also needed for sending a fax with this scanner For Windows 2000 Server the POP3 service is not supported 3 1 Aut...

Page 32: ...the environment of the POP3 service User authentication described in this document A Available Not available Authentication method for user account How server works Active Directory Domain Controller...

Page 33: ...the following settings Adding the Components of POP3 Service and SMTP Server Creating Mailbox 3 2 1 Adding the Components of POP3 Service and SMTP Server The following shows the procedure for adding...

Page 34: ...ctory Integrated for instance 5 Specify E mail domain name In Active Directory domain environment specifying the same name as Active Directory for E mail domain name is recommended Specify example com...

Page 35: ...ing a mailbox for the domain allows you to send receive e mails The procedure for creating a mailbox is as follows 1 Select Start All Programs Administrative Tools POP3 Service The POP3 Service screen...

Page 36: ...on A mailbox is created and the message appears 5 Click the OK button Creating mailbox is completed HINT If there is a user account associated with mailbox clear the Create asso ciated user for this m...

Page 37: ...g settings Access Control Connection Control 3 3 1 Access Control Access control settings define the behavior of the SMTP server whether user name and password are required or how the user authenticat...

Page 38: ...30 3 Click the Authentication button in the Access tab The Authentication dialog box appears...

Page 39: ...s access will be accepted User authentication function is set HINT If the Anonymous access checkbox is cleared SMTP AUTH will be enabled by requesting user authentication on sending e mails If the Bas...

Page 40: ...ask or domain The following shows the procedure to permit connections from multiple computers by specifying subnet mask 1 Select Start Administrative Tools Internet Information Services IIS Manager Th...

Page 41: ...ork Scanner fi 6000NS Associated Servers Setup Guide 33 Mail Server 3 3 Click the Connection button in the Access tab The Connection dialog box appears 4 Select Only the list below and click the Add b...

Page 42: ...34 5 Select Group of computers and specify Subnet address and Subnet mask 6 Click the OK button Computers with the specified subnet mask are permitted to connect to the SMTP server...

Page 43: ...Setup Guide 35 Chapter 4 File Server Creating Shared Folder The file server settings are for creating and publishing a shared folder on the disk of the server This chapter describes the file server se...

Page 44: ...re for creating a shared folder with Windows Explorer is as follows 1 Launch Windows Explorer and right click the folder to share and select Sharing and Security The properties screen of the selected...

Page 45: ...ervers Setup Guide 37 File Server Creating Shared Folder 4 2 On the Sharing tab select Share this folder and specify the folder name to share in the Share name input field 3 Click the Permissions butt...

Page 46: ...ne in Group or user names Select the Allow checkbox of Change in the Permissions for Everyone 5 Click the OK button This returns you to the properties screen of the folder 6 Click the OK button The sh...

Page 47: ...5 Network Scanner fi 6000NS Associated Servers Setup Guide 39 Chapter 5 Print Server 5 1 Summary 40 5 2 Printer Performance 41 5 3 Printer Settings 42...

Page 48: ...Therefore it is recommended to add printers for which printing properties have been set on the print server To connect the scanner to a print server login as the administrator select Network Settings...

Page 49: ...nt errors to be easily checked via a LCD control panel or similar 5 2 2 Compatible Printers The following printers are known to be compatible with this scanner For the latest information updates conta...

Page 50: ...printing function the properties data spedified for the printer on the print server is downloaded and used by the scanner The propeties downloaded to the scanner are displayed in the print properties...

Page 51: ...WINS server responds to NetBIOS name queries submitted by clients returning the IP address of a queried name if it is listed in the server database In addition when a DNS name resolution fails the qu...

Page 52: ...s Configure Your Server Wiz ard The Configure Your Server Wizard screen appears 2 Follow the instructions on the screen and click the Next button until Server Role appears 3 Select WINS server and cli...

Page 53: ...ty must be set Here describes the following settings Setting Properties of Forward Lookup Zone Setting Properties of Reverse Lookup Zone 6 2 1 Setting Properties of Forward Lookup Zone The procedure f...

Page 54: ...forward lookup checkbox in the WINS tab 4 Specify an IP address of WINS server for IP address and click the Add button The IP address is added to the list 5 Click the OK button Properties of the forw...

Page 55: ...erver 6 6 2 2 Setting Properties of Reverse Lookup Zone The procedure for setting properties of a reverse lookup zone is as follows 1 Select Start Administrative Tools DNS The dnsmgmt screen appears 2...

Page 56: ...48 3 Select the Use WINS R lookup checkbox in the WINS R tab 4 Specify a domain name for Domain to append to returned name 5 Click the OK button Properties of the reverse lookup zone are set...

Page 57: ...server automatically assigns an IP address for this scanner and other client PCs This chapter describes the DHCP server settings using Windows Server 2003 as an example 7 1 Installing DHCP Server 50 7...

Page 58: ...erver A DHCP server can be installed manually or using the configuration wizard of Windows Server 2003 as well After the installation a range of IP addresses assigned to clients and other TCP IP param...

Page 59: ...nent and creating a scope 1 Select Start All Programs Administrative Tools Configure Your Server Wiz ard The Configure Your Server Wizard screen appears 2 Follow the instructions on the screen and cli...

Page 60: ...52 5 Specify Name and Description and then click the Next button 6 Specify a start value in Start IP address and end value in End IP address for the range assigned to clients and click the Next button...

Page 61: ...n range and click the Add button The range specified here is a range of IP addresses that the DHCP is not allowed to assign automatically This is the range from Start IP address to End IP address spec...

Page 62: ...and click the Next button You can choose whether to specify TCP IP parameters other than IP addresses and subnet mask assigned by the DHCP 11 Specify a default gateway and click the Add button The IP...

Page 63: ...he IP address of the DNS server used for that DNS domain To specify by host name enter the Active Directory domain name for Parent domain and the host name of the DNS server for Server name then click...

Page 64: ...ame input the host name of the WINS server for Server name and click the Resolve button The IP address of the WINS server is input in the IP address on the right 17 Click the Add button The IP address...

Page 65: ...a Scope Network Scanner fi 6000NS Associated Servers Setup Guide 57 DHCP Server 7 19 Select Yes I want to activate this scope now and click the Next button Installing DHCP server and creating scope a...

Page 66: ...cess It must be authorized in the Active Directory domain environment The procedure for authorizing the DHCP server is as follows 1 Select Start Administrative Tools DHCP The DHCP screen appears 2 Rig...

Page 67: ...TP Server An NTP server is a server used when a client queries time through network This chapter shows an example of how to build an NTP server on Redhat Enterprise Linux 8 1 Installing NTP Package 60...

Page 68: ...to use the NTP server function on Redhat Enterprise Linux the ntp package must be installed Name ntp Version 4 2 0 a 20050816 Service Name ntpd Daemon Program usr sbin ntpd Configuration files etc nt...

Page 69: ...Associated Servers Setup Guide 61 NTP Server 8 8 2 Automatic Launch of Service After installing the ntp package the service is not launched automatically for security reasons Therefore set the service...

Page 70: ...tion with higher level NTP servers continuously Make the basic settings for ntpd since full time connection environment allows the ntpd to request to the higher level NTP servers at any time The follo...

Page 71: ...the receive mail server POP3 on a regular basis and detects the sent mail the data is analyzed and sent by fax Thus SMTP server and POP3 service must be set before using RightFax with this scanner Fo...

Page 72: ...by fax For e mail routing the scanner uses a method for specifying a fax number in the e mail address description area It is not necessary for customers to be aware of the description area Using this...

Page 73: ...l Gateways 1 Run the E mail Gateway configuration program Run the E mail Gateway configuration program in one of the following ways If you did not add an e mail gateway during the RightFax server inst...

Page 74: ...g with notification Outbound with Notifications Sending with notification Outbound without Notifications Sending without notification When sending an e mail is sent by fax When receiving a fax or imag...

Page 75: ...ociated Servers Setup Guide 67 Fax Server 9 3 Startup the E mail Gateway service For the service list on the bottom right of the RightFax Enterprise Fax Manager win dow right click RightFax E mail Gat...

Page 76: ...w E mail Gateway page 65 For more details refer to 3 6 6 Setting the e Mail Server in the Network Scanner fi 6000NS Operator s Guide Set the fax server e mail address Enter the value set in FROM messa...

Page 77: ...l are subject to change without notice z PFU LIMITED is not liable whatsoever for any damages resulting from use of this scanner and procedures described in this manual profit due to defects and any c...

Reviews: