6 1-800-732-2677
www.petsafe.net 7
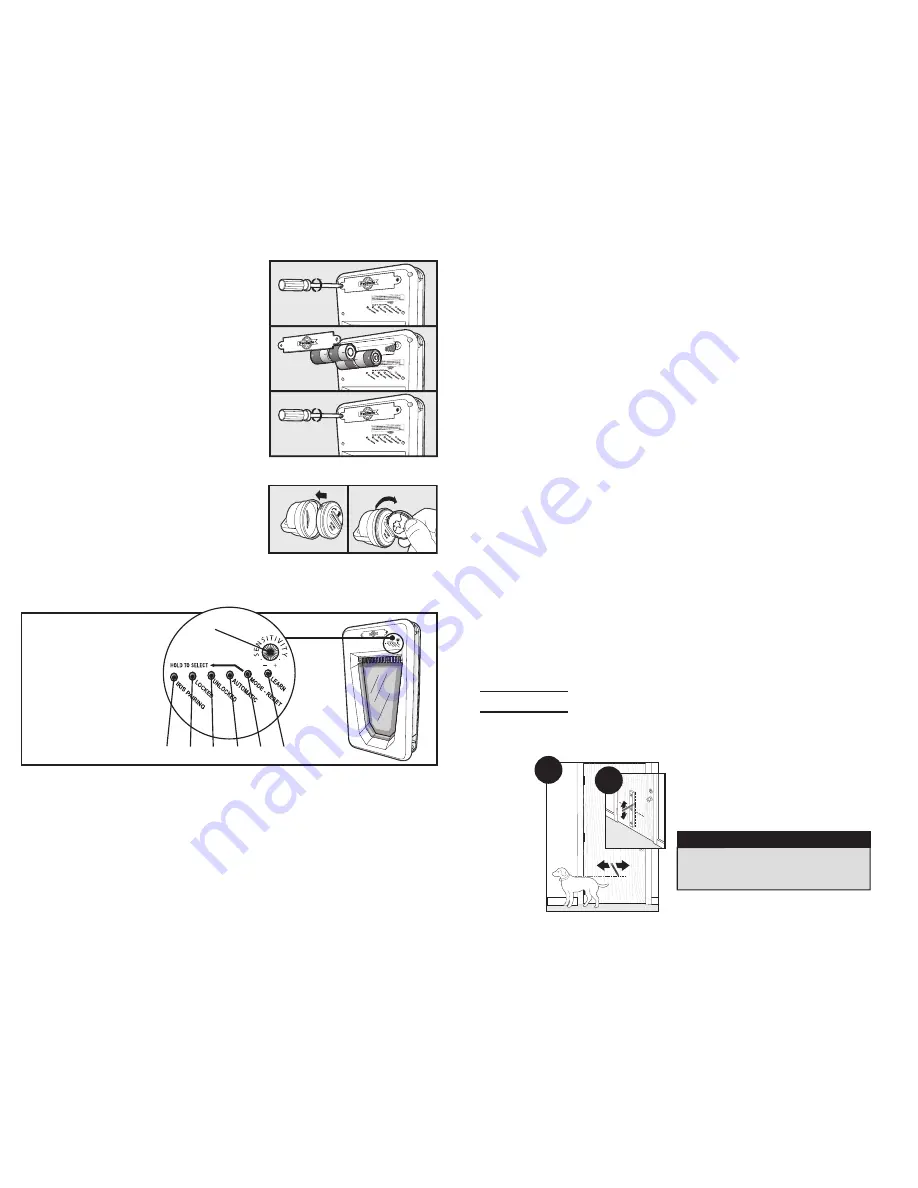
A. Place Batteries in the SmartDoor
™
1. With a Phillips screwdriver, remove the two Battery
Compartment Cover screws.
2. Remove the Battery Compartment Cover.
3. Refer to the inside of the Battery Compartment
Cover for the proper orientation of the four D-Cell
(LR20) batteries.
4. Replace the Battery Compartment Cover and re-
install the two screws.
5. When the batteries are placed in the Electronic
SmartDoor
™
the red light will illuminate for
two seconds and the flap will move into the
locked position, unless the flap is already in the
locked position.
NOTE:
The door must be in the upright position for
the flap to center properly and operate correctly.
B. Place Battery in the SmartKey
™
1. Place the PetSafe
®
RFA-67 battery into the bottom of
the SmartKey
™
.
2. Using a coin, rotate one-quarter turn clockwise to
secure the PetSafe
®
RFA-67 battery.
NOTE:
The SmartKey
™
has a red light that will flash
when the PetSafe
®
RFA-67 battery is low; the battery
should be replaced as soon as possible.
C. Check Operational Modes Before Installation
Operational Indicators
IRIS
PA
IRIN
G
IRIS SmartDoor
™
A. Sensitivity Knob
B. IRIS Pairing Mode
Blue Indicator
C. Locked or Low Battery
Red Indicator
D. Unlocked or Learn
Mode Green Indicator
E. Automatic or Error
Mode Yellow Indicator
F. Mode-Reset
Selection Button
G. Learn Mode Button
B C D E F G
A
• To check if operational settings are working properly, hold down the MODE-RESET button
until each operational mode has cycled through once to allow red, green and yellow lights to
illuminate one at a time.
Operational Modes
LOCKED MODE – Does not allow entry or exit for any pet. The SmartDoor
™
ships from the
factory in LOCKED MODE and when batteries are placed in the SmartDoor
™
, it will enter
LOCKED MODE. To set: hold the MODE-RESET button until red light illuminates and release
when selected.
UNLOCKED MODE – Allows entry and exit for all pets. To set: hold the MODE-RESET button
until the green light illuminates and release when selected.
AUTOMATIC MODE – Allows entry and exit for a pet wearing a programmed SmartKey
™
.
To set: hold the MODE-RESET button until the yellow light illuminates and release when
selected. Five SmartKeys
™
can be programmed to one SmartDoor
™
for selective entry and exit
during AUTOMATIC MODE.
NOTE:
If at any time the red light remains illuminated, replace with a set of fresh batteries. If
that does not reset the red light, please call our Customer Care Center for additional help.
If any part of step C was unsuccessful, please call our Customer Care Center for additional help.
D. Check SmartDoor
™
Location Before Installation
DO NOT REMOVE SENSITIVITY STICKER BEFORE INSTALLING THE SMARTDOOR
™
.
Prior to installation, it is recommended to check that the SmartDoor
™
will operate properly in the
intended location or application to guard against possible severe radio-frequency interference.
Household appliances and common electronic products should be located at least two feet (60 cm)
away from the SmartDoor
™
’s location. Radio-frequency interference detected from other household
appliances or common electronic products will negatively affect the ability of the SmartDoor
™
to
receive a SmartKey
™
signal. Typical appliances and products to consider are laptop computers,
wireless telephones, microwaves, televisions, garage door openers, hand-held electronic devices
(such as cell phones, game stations and remote controls).
The sticker placed over the sensitivity knob should not be removed until after installation, as the
factory default sensitivity setting is positioned at the optimal level for most installations.
It is recommended to install SmartDoor
™
in a location where direct wind is not a factor. Operating
Temperature Range: -5˚ F to 180˚ F (-20.5˚ C to 82˚ C). Operating Humidity Range: 0 to 99.9%.
• To check if SmartDoor
™
’s radio-frequency technology will operate properly in desired location
and application, place SmartDoor
™
directly in front of and against the door or application in the
upright position. After performing steps A-C, now set the SmartDoor
™
in AUTOMATIC mode and
hold the SmartKey
™
directly in front of the SmartDoor
™
. The SmartDoor
™
flap should unlock in
about three seconds. Remember, the SmartKey
™
included in the kit is already programmed to
the SmartDoor
™
.
NOTE:
If there are existing SmartKeys
™
in the household, remove all (RFA-67)
batteries while performing step D except the SmartKey
™
included with the SmartDoor
™
.
If the SmartDoor
™
does not unlock, move the SmartDoor
™
to another location and follow steps A-D
once more. If the SmartDoor
™
’s location test above was unsuccessful, please call our Customer
Care Center for additional help.
When steps A-D are completed and all are successful, your SmartDoor
™
is ready for installation.
INSTALL
Installing Your SmartDoor
™
Step
1
Determine Pet Door Location
1A
1B
1A Measure and mark your pet’s shoulder
height on the door.
1B Determine location for the pet door. Draw
a vertical center line through the shoulder
height line using a level.
NOTICE
If homeowner’s door or other application is
not level, the pet door must be marked level to
swing properly.


