background image

77

3

Ta
king

 Pict

ures

You can take pictures in natural colors by adjusting the white balance 
according to the light conditions at the time of shooting.

1

Use the four-way controller (

23

) to select [White 

Balance] in the [

A

 Rec. Mode] menu.

2

Press the four-way controller (

5

).

The [White Balance] screen appears.

3

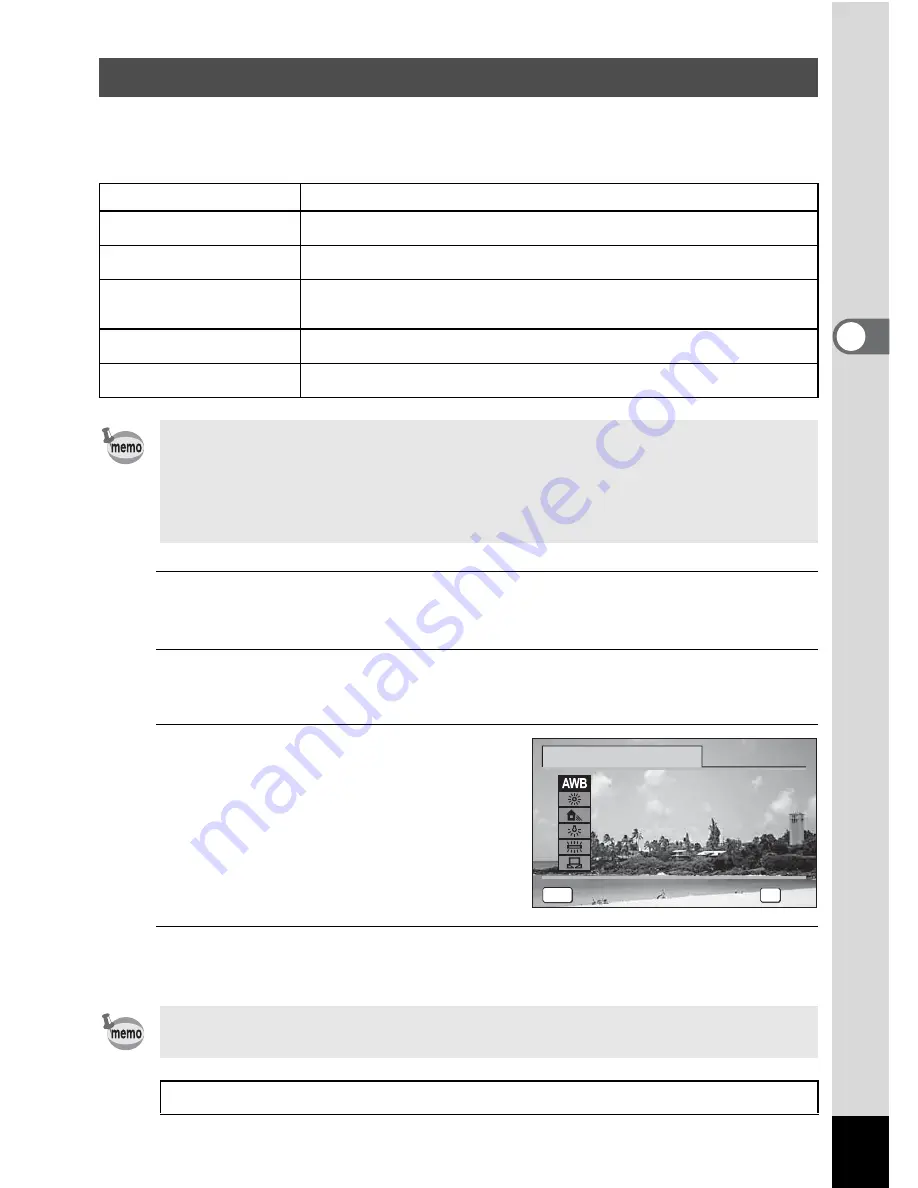
Use the four-way controller 
(

23

) to change the setting.

You can check the result of selected 
white balance setting on the preview 
image each time you press the four-
way controller (

23

).

4

Press the 

4

 button.

The setting is saved.

Adjusting the White Balance

F

Auto

The camera adjusts the white balance automatically.

G

Daylight

Use this mode when taking pictures outside in sunlight.

H

Shade

Use this mode when taking pictures outside in the shade.

I

Tungsten Light

Use this mode when taking pictures under electric or other 
tungsten light.

J

Fluores. Light

Use this mode when taking pictures under fluorescent light.

K

Manual

Use this mode when adjusting the white balance manually.

• Set another white balance setting if you are not satisfied with the color 

balance of pictures taken with the [White Balance] set to 

F

.

• Depending on the selected shooting mode, the white balance setting 

may not be changed. Refer to “Functions Available for Each Shooting 
Mode” (p.148) for details.

If you change the [White Balance] setting frequently, you can save time 
by assigning it to the Green button (p.83).

Saving the White Balance setting 

1

p.87

OK

OK

OK

OK

Auto

Auto

Auto

Cancel

Cancel

Cancel

MENU

White Balance

Summary of Contents for Optio LS 465

Page 1: ...Digital Camera Operating Manual To ensure the best performance from your camera please read the Operating Manual before using the camera...

Page 2: ...d Windows are registered trademarks of Microsoft Corporation in the United States and other countries Windows Vista is either a registered trademark or trademark of Microsoft Corporation in the United...

Page 3: ...light may appear on the screen display This phenomenon is referred to as smear and is not a malfunction of the camera There is a possibility that the illustrations and the screen display in this manu...

Page 4: ...r the flash with clothes when discharging the flash Discoloration may occur Some portions of the camera heat up during use There is a risk of low temperature burns when holding such portions for long...

Page 5: ...the plug may cause a fire Caution Do not place or drop heavy objects on the power adapter Doing so may damage the adapter Should the power adapter be damaged consult a PENTAX Service Center Do not to...

Page 6: ...areas thoroughly with water Precautions for D LI108 Battery Usage BATTERY MAY EXPLODE OR FIRE IF MISTREATED DO NOT DISASSEMBLE OR DISPOSE OF IN FIRE DO NOT CHARGE EXCEPT SPECIFIED CHARGING CONDITION...

Page 7: ...the battery a day before use or on the day of use is recommended Do not subject the camera to high temperatures or high humidity Do not leave the camera in a vehicle as the temperature can get very hi...

Page 8: ...damage the lens Do not store the camera with preservatives or chemicals Storage in high temperatures and high humidity can cause mold to grow on the camera Remove the camera from its case and store i...

Page 9: ...SD Memory Card during formatting as this may damage the card and render it unusable The data on the SD Memory Card may be deleted in the following circumstances We do not accept any liability for data...

Page 10: ...1 Installing an SD Memory Card 34 Turning the Camera On and Off 36 Initial Settings 37 Setting the Display Language 37 Setting the Date and Time 40 Common Operations 42 Understanding the Button Functi...

Page 11: ...y 78 Switching the Face Detection Function 79 Setting the Image Sharpness Sharpness 80 Setting the Color Saturation Saturation 81 Setting the Image Contrast Contrast 81 Setting the Date Imprint Functi...

Page 12: ...ng All Images 122 Settings 123 Camera Settings 123 Changing the W Setting Menu 123 Formatting the Memory 123 Changing the Sound Settings 124 Changing the Date and Time 125 Setting the World Time 127 C...

Page 13: ...ements 140 Installing the Software 141 Using MediaImpression on Windows 144 Using MediaImpression on Macintosh 146 Appendix 148 Functions Available for Each Shooting Mode 148 Messages 150 Troubleshoot...

Page 14: ...Manual are explained below 1 indicates the reference page number for an explanation of the related operation indicates information that is useful to know indicates precautions to be taken when operati...

Page 15: ...us ways of capturing images and how to set the relevant functions 4 Playing Back and Deleting Images This chapter explains how to view still pictures and movies on the camera or on a TV screen and how...

Page 16: ...ons Simply by choosing the appropriate icon you can select the shooting mode p 57 and choose the optimal settings for the situation or the playback mode p 93 p 105 and enjoy the various playback and e...

Page 17: ...to create attractive framed shots p 66 You can also add frames to pictures you have taken Adjust the position of the subject in the picture or reduce or enlarge the picture size to match the frame sha...

Page 18: ...ing back and editing images without having to connect the camera to your computer The camera is all you need to take and edit still pictures and movies p 105 Advanced Movie Recording Functions A Multi...

Page 19: ...Camera Optio LS465 Strap O ST116 Software CD ROM S SW127 USB cable I USB116 Alternative Skins 10 types Lens Ring O LR2 installed on camera Rechargeable lithium ion battery D LI108 Power adapter D PA11...

Page 20: ...18 Front Names of Parts Flash Lens Self timer lamp Battery card cover Microphone Tripod socket Speaker PC AV terminal...

Page 21: ...he Button Functions p 42 p 45 for an explanation of the function of each button Display Strap lug Power switch Shutter release button Zoom button 4 button Green i button Four way controller 3 button S...

Page 22: ...y No Info and Histogram Info Monitor Indications Display in A Mode When the shooting mode is set to 9 Green mode the monitor display is as shown on the right You cannot change the information on the d...

Page 23: ...gital zoom Intelligent Zoom icon p 63 A2 Battery level indicator p 33 A3 Face Detection mode p 59 A12 Focus Mode p 73 A4 Date Imprint setting p 81 A13 Drive Mode p 71 A5 EV Compensation p 76 A14 Flash...

Page 24: ...ions may not appear depending on the shooting mode The display shows the shooting information of the image in playback mode The display changes in the following sequence each time you press the 4 butt...

Page 25: ...tion is performed for two seconds When no operation is performed for two seconds in Normal Display or Histogram Info only Edit disappears Captured date and time p 89 appear instead of B2 to B4 for two...

Page 26: ...and lets you decide if you need to adjust the exposure and take a picture again Understanding Brightness If the brightness is correct the graph peaks in the middle If the image is underexposed the pe...

Page 27: ...e is overexposed the part to the right is cut off bright portions Understanding Contrast The graph peaks gradually for images in which contrast is balanced The graph peaks on both sides but sinks in t...

Page 28: ...tarted Gettin g Starte d Attaching the Strap Attach the strap supplied with the camera 1 Pass the narrow end of the strap through the strap lug 2 Pass the other end of the strap through the loop and p...

Page 29: ...ed sheet and put it on the front of the camera to dress up 1 Remove the lens ring Put the camera on a flat surface and detach the lens ring following the direction of arrow 1 2 Remove the front panel...

Page 30: ...Put the camera on a flat surface fit the lens ring to the camera in its designated position snap the lens ring along the groove Be sure to attach the front panel when you use the camera When attaching...

Page 31: ...d cover in the direction indicated by the arrow 1 and flip the cover open 2 2 Push the battery lock lever in the direction of the arrow 3 and insert the battery so that the PENTAX logo is facing the l...

Page 32: ...le lithium ion battery D LI108 Use of any other type of battery may damage the camera and cause a malfunction Insert the battery correctly If the battery is incorrectly oriented malfunction may result...

Page 33: ...towards the 4 mark on the camera and connect the cable to the PC AV terminal 3 Connect the other end of the USB cable to the power adapter 4 Plug the power adapter into the power outlet The self time...

Page 34: ...e reached the end of its service life If the self timer lamp does not light or blinks even after being charged the battery may be faulty The time required to fully charge the battery is about 130 minu...

Page 35: ...battery level by the indicator on the display Screen Display Battery Status green Adequate power remains green Battery is running low yellow Battery is running very low red Battery is exhausted Batter...

Page 36: ...the selected number of recorded pixels Choose the appropriate number of recorded pixels for still pictures on the A Rec Mode menu Refer to Selecting the Number of Recorded Pixels p 75 for details Choo...

Page 37: ...socket so that the label is facing the lens side of the camera Push the card in until it clicks Data may not be recorded correctly if the card is not inserted all the way To remove the SD Memory Card...

Page 38: ...e power switch again The display turns off the lens closes and the camera turns off The SD Memory Card is checked when the camera turns on and the memory status is displayed Taking Still Pictures 1p 5...

Page 39: ...n the selected language If the desired settings for Hometown and DST Daylight Saving Time appear proceed to Step 9 Proceed to Step 3 if the desired settings do not appear The language date and time ca...

Page 40: ...ng screen is canceled and the camera is set to still picture capture mode 2 Press the 3 button The A Rec Mode menu appears 3 Press the four way controller 5 twice The W Setting menu appears 4 Use the...

Page 41: ...the four way controller 3 to select Settings complete 10 Press the 4 button The Date Adjustment screen appears Next set the date and time The video output format NTSC PAL is set to the format of the...

Page 42: ...returns to Date Format 6 Press the four way controller 3 The frame moves to Date 7 Press the four way controller 5 The frame moves to the month 8 Use the four way controller 23 to change the month Ch...

Page 43: ...d switch to the capture mode by pressing the 3 button In this case the Initial Setting screen will appear again the next time you turn the camera on The language date time Hometown city and DST settin...

Page 44: ...ressed halfway in still picture capture mode except in 3 and s modes Takes a still picture when pressed down fully p 55 3 Zoom button Changes the area captured by the camera p 63 Switches to the A Rec...

Page 45: ...plays the Capture Mode Palette p 57 4 Changes the flash mode p 70 5 Changes the focus mode p 73 7 4 button Changes the information on the display p 20 8 Green button Switches to the 9 Green mode p 61...

Page 46: ...evious display when pressed towards the right y p 91 Enlarges the image when pressed towards the right y during single image display Returns to the previous display when pressed towards the left f p 9...

Page 47: ...ay p 22 Returns to single image display during six twelve image display or zoom display p 91 p 97 Changes to twelve image display of the selected folder during folder display p 92 Changes to single im...

Page 48: ...The camera switches to Q mode 1 Press the Q button or the shutter release button halfway The camera switches to A mode Switching Between A Mode and Q Mode To Switch from A Mode to Q Mode To Switch fr...

Page 49: ...lay the A Rec Mode menu Press the 3 button in Q mode to display the W Setting menu Use the four way controller 45 or zoom button to switch between the menus Operating the Menus Available button operat...

Page 50: ...four way controller 23 is pressed 6 Press the 4 button or the four way controller 4 The setting is saved and then the camera is ready for setting the other functions To exit the setting operation pres...

Page 51: ...he screen shown in Step 3 reappears To Save the Setting and Start Taking Pictures When the W Setting menu is displayed from Q mode you can switch to A mode by pressing the Q button To Save the Setting...

Page 52: ...ivity For setting the sensitivity p 78 EV Compensation For adjusting the overall brightness of the picture p 76 Face Detection For spotting the faces in your shot and automatically adjusting the focus...

Page 53: ...orded Pixels For choosing the number of recorded pixels for movies p 86 Movie SR For choosing whether or not to use the Movie Shake Reduction function p 86 A Rec Mode Menu 1 Rec Mode 1 3 MENU Exit EV...

Page 54: ...ted to a computer via the USB cable p 137 Video Out For setting the output format to AV equipment p 131 Wallpaper For changing the background of the menu screen p 131 Brightness Level For changing the...

Page 55: ...te Adjustment World Time 01 01 2012 English Date USB Connection MSC W Setting Menu 2 Setting 2 3 MENU Exit Auto Power Off Video Out Wallpaper Power Saving Brightness Level 5sec 3min Reset NTSC Off W S...

Page 56: ...The focus frame in the middle of the display indicates the zone of automatic focusing When the camera detects a person s face the Face Detection function is activated and the face detection frame appe...

Page 57: ...e shutter release button fully The picture is taken The flash discharges automatically depending on the light conditions The captured image appears on the display Instant Review p 57 and is saved to t...

Page 58: ...the Shutter Release Button Poor focusing conditions The camera may not be able to focus under the following conditions In these cases lock the focus on an object the same distance away as the subject...

Page 59: ...the four way controller 3 in A mode The Capture Mode Palette appears 2 Use the four way controller 2345 to choose a shooting mode When an icon is selected in the Capture Mode Palette the guide for th...

Page 60: ...lly changes to d Flash On Red eye c Portrait For capturing portraits Reproduces a healthy and bright skin tone d Natural Skin Tone For images of people Enhances skin tones while smoothing blemishes K...

Page 61: ...s text in an easy to read manner Text contrast can be adjusted 1p 67 o Miniature Filter For capturing an image with the subject looks like miniature objects 1p 68 p HDR Filter For capturing an image w...

Page 62: ...to capture status When the camera detects a person s face the Face Detection function is activated and the face detection frame appears p 59 3 Press the shutter release button halfway The selected sh...

Page 63: ...at the correct distance 5 Press the shutter release button fully The picture is taken In 9 Green mode you can enjoy easy picture taking using standard settings regardless of the settings in the A Rec...

Page 64: ...Drive Mode 9 Standard Face Detection On Focus Mode Standard Digital Zoom O On Information Display Normal Sharpness G Normal Recorded Pixels m Saturation G Normal White Balance F Auto Contrast G Normal...

Page 65: ...zoom switches to digital zoom Once the button is released and pressed again the camera switches to digital zoom The zoom bar is displayed as follows 1 You can zoom in to a maximum of 5 optically 2 Th...

Page 66: ...d to use a tripod or other support to prevent camera shake when taking pictures at high zoom Pictures taken in the digital zoom range appear grainier than pictures taken in the optical zoom range Inte...

Page 67: ...r way controller 2345 to select H Pet from the Capture Mode Palette 2 Press the 4 button The H mode selection screen appears 3 Use the four way controller 23 to select H K K L M or M There are two typ...

Page 68: ...troller 2345 to select N Frame Composite from the Capture Mode Palette 2 Press the 4 button The 12 frame display of the frame selection screen appears 3 Use the four way controller 2345 to choose the...

Page 69: ...f small print 1 Use the four way controller 2345 to select c Text from the Capture Mode Palette The number of recorded pixels is fixed at h for the 4 3 aspect ratio and h for the 16 9 aspect ratio Fra...

Page 70: ...ns green when the camera focuses on the subject at the correct distance 6 Press the shutter release button fully The picture is taken In o Miniature p HDR Filter mode you can take impressive pictures...

Page 71: ...the face detection frame appears p 59 5 Press the shutter release button halfway The focus frame on the display turns green when the camera focuses on the subject at the correct distance 6 Press the s...

Page 72: ...is prohibited b Flash On The flash discharges regardless of the brightness d Flash On Red eye This mode reduces the phenomenon of red eyes caused by the light from the flash being reflected in the su...

Page 73: ...ng red eyes If the subject s eyes appear red despite such precautions they can be corrected by the red eye compensation function p 112 Saving the Flash Mode setting 1p 87 Selecting the Drive Mode g Se...

Page 74: ...y while the self timer is running to stop the countdown and press fully to restart the countdown Z cannot be selected while the 9 Green mode settings remain as the default However it can be selected i...

Page 75: ...er release button is pressed halfway r Super Macro This mode is used when the distance to the subject is approx 5 cm to 20 cm 2 in to 8 in The camera is focused on the subject in the autofocus area wh...

Page 76: ...saved and the camera returns to capture status You can change the autofocus area Focusing Area 1 Use the four way controller 23 to select Focusing Area in the A Rec Mode menu 2 Press the four way cont...

Page 77: ...sage The default setting is o 1 Use the four way controller 23 to select Recorded Pixels in the A Rec Mode menu 2 Press the four way controller 5 A pull down menu appears 3 Use the four way controller...

Page 78: ...pixels in 9 Green mode is fixed at m The number of recorded pixels in N Frame Composite mode is fixed at h for the 4 3 aspect ratio and h for the 16 9 aspect ratio The number of recorded pixels in o M...

Page 79: ...n taking pictures outside in sunlight H Shade Use this mode when taking pictures outside in the shade I Tungsten Light Use this mode when taking pictures under electric or other tungsten light J Fluor...

Page 80: ...ivity to suit the brightness of the surroundings 1 Use the four way controller 23 to select Sensitivity in the A Rec Mode menu 2 Press the four way controller 5 A pull down menu appears 3 Use the four...

Page 81: ...6400 the number of recorded pixels is fixed at f for the 4 3 aspect ratio and 1 for the 16 9 aspect ratio In 9 Green mode only Auto sensitivity 64 800 is available In c Digital SR mode only Auto sensi...

Page 82: ...in Focusing Area When Face Detection is set to Smile the shutter may not be released automatically because the Smile Capture function may not work in some situations such as when the detected face is...

Page 83: ...y controller 23 to select Contrast in the A Rec Mode menu 2 Use the four way controller 45 to change the contrast level F Low G Normal H High You can choose whether to imprint the date and or time whe...

Page 84: ...and the images to be printed already have the date and or time imprinted the imprinted dates and or times may overlap O appears on the display in A mode when Date Imprint is set The date and or time...

Page 85: ...ton in A mode The function assigned to the Green button is called up 2 Use the four way controller 45 to change the setting and press the 4 button The camera returns to capture status To Assign a Func...

Page 86: ...subject and compensates the exposure Recording starts You can continue recording until the built in memory or the SD Memory Card is full or the size of the recorded movie reaches 2 GB The following i...

Page 87: ...ntroller 23 to select an item and change its setting 4 Press the 3 button after changing the setting The A mode screen reappears The setting is saved and the camera returns to capture status Playing B...

Page 88: ...the 4 button The setting is saved You can correct camera shake while you are recording a movie with the Movie SR Movie Shake Reduction function 1 Use the four way controller 23 to select Movie SR in...

Page 89: ...lts when the camera is turned off The table below also shows whether the Memory default setting for each item is O or P Item Description Default Setting Page Flash Mode The flash mode set with the fou...

Page 90: ...the four way controller 23 to select Memory in the A Rec Mode menu 2 Press the four way controller 5 The Memory screen appears 3 Use the four way controller 23 to choose an item 4 Use the four way con...

Page 91: ...ppears Press the i button while the image is displayed to display the Delete screen Press the four way controller 2 to select Delete and press the 4 button Playing Back Still Pictures To Delete the Di...

Page 92: ...Playback stops Playing Back a Movie Zoom button towards the right y Increases the volume Zoom button towards the left f Reduces the volume Four way controller 2 Pauses playback Four way controller 5 F...

Page 93: ...ller 24 while the image 1 is selected will display the previous page Similarly if you choose the image 2 and press the four way controller 35 the next page appears The icons that appear on the images...

Page 94: ...splay Calendar Display Four way controller 2345 Moves the frame Zoom button towards the right y 4 button Displaysthe images in the selected folder in twelve image display 3 button Returns to twelve im...

Page 95: ...of faces in the image for well proportioned portraits p 107 o Miniature Filter Processes the subjects in the images to look like miniature objects p 108 p HDR Filter Processes image into HDR like imag...

Page 96: ...the 4 button again 6 Press any button other than the 4 button The slideshow stops n Resize Changes Recorded Pixels to make the file size smaller p 105 o Cropping For cropping images to the size you l...

Page 97: ...r way controller 23 to choose the screen effect and press the 4 button 7 Use the four way controller 23 to select Sound Effect 8 Use the four way controller 45 to select O or P Except when the Screen...

Page 98: ...is saved The slideshow will continue until you press any button other than the 4 button Movies will be played through to the end before the next picture is played back regardless of the interval setti...

Page 99: ...magnification continuously You can use the guide mark that appears at the bottom left of the screen to check which portion of the image is magnified Available operations while an image is magnified 3...

Page 100: ...se the four way controller 23 to select Delete 4 Press the 4 button The image is deleted You can delete several images selected from the six twelve image display at once 1 In Q mode press the zoom but...

Page 101: ...lly want to delete it or not The display returns to six twelve image display when you release the button However protected images cannot be displayed in single image display 4 Press the i button A con...

Page 102: ...four way controller 45 to choose the image you want to protect 2 Use the four way controller 2345 to select Z Protect from the Playback Mode Palette 3 Press the 4 button The screen for selecting Singl...

Page 103: ...Use the four way controller 23 to select Protect To cancel the protection of the image select Unprotect in Step 6 Y appears on the protected images during playback To Protect All Images Protect 100 0...

Page 104: ...en shown in Step 1 reappears 5 Use the four way controller 23 to select Cancel and press the 4 button The Playback Mode Palette reappears Protected images will be deleted when the SD Memory Card built...

Page 105: ...he AV cable to the video input terminal and audio input terminal of the AV equipment When using stereo sound equipment insert the sound terminal into the L white terminal 4 Turn the AV equipment on Wh...

Page 106: ...f this happens change the video output format setting p 131 The camera display turns off and the volume cannot be adjusted by pressing the zoom button while the camera is connected to AV equipment Whe...

Page 107: ...elect n Resize from the Playback Mode Palette 3 Press the 4 button The screen for choosing the number of recorded pixels appears 4 Use the four way controller 45 to select the number of recorded pixel...

Page 108: ...size of cropped image is shown with a green frame on the screen The cropped image cannot be larger than this cropping frame size 4 Choose the cropping area Change the size and or position of the crop...

Page 109: ...er from the Playback Mode Palette 3 Press the 4 button After a face detection frame for a face that can be corrected is displayed the correction screen appears 4 Use the four way controller 45 to chan...

Page 110: ...in the following situations When the size of face taken in relation to an image is too large or too small When a face is not in the center of an image Processing Images with the Miniature HDR Filter o...

Page 111: ...ur way controller 23 to select Overwrite or Save as 7 Press the 4 button The camera returns to Q mode and the processed image is displayed Processes the image so that the top of the image is blurred a...

Page 112: ...into one that has the look of a sepia photograph Toy Camera Processes the image that looks as though it was shot with a toy camera Retro Processes the image into one that has the look of an old photo...

Page 113: ...filter effect appears 5 Use the four way controller 45 to choose the color The color filter changes in the following sequence each time the four way controller 5 is pressed 6 Press the 4 button A conf...

Page 114: ...th the filter is saved You can correct images where the flash has caused the subject to appear with red eyes 1 In Q mode use the four way controller 45 to choose the image you want to correct 2 Use th...

Page 115: ...e are three frames already stored in the camera 1 In Q mode use the four way controller 45 to choose the image to which you want to add a frame 2 Use the four way controller 2345 to select N Frame Com...

Page 116: ...s saved as a new image and the following confirmation dialog does not appear 8 Use the four way controller 23 to select Overwrite or Save as 9 Press the 4 button The processed image will be saved with...

Page 117: ...g the camera to a computer 2 When the device detection window opens click Cancel 3 Insert the CD ROM into the CD DVD drive 4 When the installer window opens click EXIT 5 Copy the desired files from th...

Page 118: ...on 4 Select Save as Still Image on the movie editing selection screen 5 Press the 4 button The screen appears for selecting a frame to be saved as a still picture To Use a New Frame Extract the downlo...

Page 119: ...appears 6 Use the four way controller 2345 to determine the dividing position 2 Plays or pauses the movie 3 Stops the movie and returns to the first frame 4 Reverses the movie frame by frame 5 Forwar...

Page 120: ...to select p Image Copy from the Playback Mode Palette 2 Press the 4 button The copying method selection screen appears Subsequent steps vary depending on your selection All the images in the built in...

Page 121: ...u want to copy 6 Press the 4 button The selected image is copied to the built in memory To copy other images repeat Steps 3 to 6 Select Cancel to exit the copy operation To Copy Files from the SD Memo...

Page 122: ...he DPOF setting method selection screen appears About printing The following options are available for printing images taken with this camera 1 Use a printing service 2 Use your printer with an SD Mem...

Page 123: ...d To continue setting the DPOF print order data repeat Steps 5 to 7 8 Press the 4 button The settings are saved and the screen shown in Step 3 reappears Depending on the printer or printing equipment...

Page 124: ...ettings specified for all the images are saved and the DPOF setting method selection screen reappears To cancel DPOF settings set the number of copies to 00 in Step 6 and press the 4 button Printing A...

Page 125: ...ras or digital devices Changing the W Setting Menu Switching Between A Mode and Q Mode 1p 46 Formatting the Memory Do not remove the SD Memory Card during formatting as this may damage the card and re...

Page 126: ...ration sounds and change the type of sound 1 Use the four way controller 23 to select Sound in the W Setting menu 2 Press the four way controller 5 The Sound screen appears Subsequent steps vary depen...

Page 127: ...y controller 23 to select the sound type Choose from 1 2 3 or Off 6 Press the 4 button 7 Set Shutter Sound Operation Sound and Self timer Sound in the same way as in Steps 3 to 6 8 Press the 3 button...

Page 128: ...ess the four way controller 3 The frame moves to Date 9 Press the four way controller 5 The frame moves to one of the following items depending on the date format set in Step 4 Month for mm dd yy Day...

Page 129: ...ation city using the World Time function you can display the Destination date and time when taking pictures in a different time zone 1 Use the four way controller 23 to select World Time in the W Sett...

Page 130: ...select O On or P Off Select O if the Destination city uses daylight saving time 8 Press the 4 button The settings are saved and the World Time screen reappears 9 Press the 3 button twice The camera r...

Page 131: ...mode When X Destination is selected in Step 5 the X icon appears on the display to indicate that the Destination date and time are displayed in A mode You can change the language in which the menus er...

Page 132: ...four way controller 5 A pull down menu appears Changing the Naming System of the Folder PENTX xxxPENTX where xxx is the 3 digit folder number Date xxx_mmdd 3 digit folder number_month day xxx_ddmm 3...

Page 133: ...ect a video output format Choose the video output format to match the input format of the AV equipment 4 Press the 4 button The setting is saved You can change the background of the menu screen 1 Use...

Page 134: ...select the wallpaper image After the selection press the 4 button to save the setting You can adjust the brightness of the display 1 Use the four way controller 23 to select Brightness Level in the W...

Page 135: ...in 30sec 15sec 5sec or Off 4 Press the 4 button The setting is saved You can set the camera to turn off automatically when no operation is performed for a fixed time 1 Use the four way controller 23 t...

Page 136: ...ne of your own images compatible images only 1 Use the four way controller 2345 to select R Start up Screen from the Playback Mode Palette 2 Press the 4 button The image selection screen appears 3 Use...

Page 137: ...oller 23 to select Pixel Mapping 4 Press the 4 button Defective pixels are mapped and corrected Once the start up screen has been set it will not be deleted even if the original image is deleted or th...

Page 138: ...a settings to their defaults Refer to Default Settings p 154 for the reset settings 1 Use the four way controller 23 to select Reset in the W Setting menu 2 Press the four way controller 5 The Reset s...

Page 139: ...a memory device Also indicates a standard for controlling USB devices with this driver By simply connecting a device that supports USB Mass Storage Class you can copy read and write files from a compu...

Page 140: ...ra to the computer using the USB cable Face the mark on the USB cable towards the 4 mark on the camera and connect the cable to the PC AV terminal 4 Turn your camera on The camera is recognized by the...

Page 141: ...E on the desktop to the trash If the SD Memory Card has a volume label drag the icon of that name to the trash 2 Disconnect the USB cable from the Macintosh and your camera The self timer lamp blinks...

Page 142: ...era on a computer You can edit movies when using the MediaImpression for Windows System Requirements The following lists the minimum system requirements for playing back and editing movies Operation i...

Page 143: ...9 10 4 10 5 10 6 10 7 The OS must be preinstalled and updated to the latest version CPU PowerPC G4 800 MHz processor or equivalent CPU Intel Core Duo or higher processor recommended Memory 512 MB or m...

Page 144: ...Setup Language screen and click OK The setup screen appears Follow the on screen guidance and install the software 7 Select the file format to use and click Next All files in the checked format will...

Page 145: ...e CD ROM icon 4 Double click the Pentax Software Installer icon The installation screen appears 5 Click MediaImpression 2 1 for PENTAX The setup screen appears Follow the on screen guidance and instal...

Page 146: ...the displayed country or region and then follow the instructions to register your product Only customers in countries and regions displayed on the software installation screen can register their produ...

Page 147: ...images while pressing the Ctrl key 5 Click Import A message appears when transfer is complete An arrow mark appears on the transferred images When the AutoPlay screen does not appear 1 Double click th...

Page 148: ...diaImpression 2 1 for PENTAX starts and the start page appears 3 Click Import The Import screen appears 4 Select an image to transfer To select multiple images choose the images while pressing the Com...

Page 149: ...n a message appears after transfer is complete click Done If the images from the camera are not displayed in the Import screen select NO NAME or the volume label name in Get Media from You can find mo...

Page 150: ...Infinity z z z z A Rec Mode menu Recorded Pixels z z 5 z z White Balance 9 z 9 z 9 Focusing Area 10 z 10 z z Sensitivity z z 11 z z EV Compensation 13 z 13 z z Face Detection z 14 z 15 z z 14 Sharpnes...

Page 151: ...74 z 11 12 z z 11 Sensitivity p 78 z z z z z z EV Compensation p 76 z 16 z z z z z Face Detection p 79 z z z z Sharpness p 80 z z z z Saturation p 81 z z z z Contrast p 81 z z z z z 18 Date Imprint p...

Page 152: ...y Card you have inserted is unformatted or has been formatted on a computer or other device and is not compatible with this camera Format the SD Memory Card in the camera p 123 Card is locked The SD M...

Page 153: ...han five seconds to display an image due to image processing or when the SD Memory Card or the built in memory is being formatted No image to be processed Displayed when there are no images This image...

Page 154: ...Power Saving function is activated the display automatically darkens after a certain amount of time Press any button to return to the normal brightness level Select Off in Power Saving in the W Settin...

Page 155: ...the display If it is difficult to do so first lock the focus on the desired subject focus lock and then move the camera to recompose The flash does not discharge The flash mode is set to a Set to Auto...

Page 156: ...camera is turned off The last memory setting depends on the Memory setting p 87 N A Reset Setting Yes The setting returns to the default setting with the Reset function p 136 No The setting is saved...

Page 157: ...ion P Off Yes Yes Digital Zoom O On Yes Yes DISPLAY P Off Yes Yes File No O On Yes Yes Green Button Green Mode Yes Yes p 82 Sharpness G Normal Yes Yes p 80 Saturation G Normal Yes Yes p 81 Contrast G...

Page 158: ...Time Select Time W Hometown Yes Yes p 127 Destination City According to the initial setting Yes No Destination DST P Off Yes No Hometown City According to the initial setting Yes No Hometown DST P Of...

Page 159: ...p 108 HDR Filter p 108 Digital Filter B W No p 110 Frame Composite Default 1 Yes Yes p 113 Red eye Compensation p 112 Movie Editing Save as Still Image p 116 Divide Movies Resize Recorded Pixels Depen...

Page 160: ...m button Zoom Position Full wide angle No p 63 Four way controller 2 Drive Mode 9 Standard Yes p 71 3 Shooting Mode b Auto Picture Yes Yes p 57 4 Flash Mode Auto Yes p 70 5 Focus Mode Standard Yes p 7...

Page 161: ...le PAL New York NTSC Delhi PAL Halifax NTSC Colombo PAL Central and South America Mexico City NTSC Kathmandu PAL Lima NTSC Dacca PAL Santiago NTSC East Asia Yangon NTSC Caracas NTSC Bangkok PAL Buenos...

Page 162: ...ith an asterisk are the same as those supplied with the camera Power supply Rechargeable lithium ion battery D LI108 Power adapter D PA116 Battery charger D BC108 Cable USB cable I USB116 AV cable I A...

Page 163: ...atio and 1 for the 16 9 aspect ratio in Digital SR Miniature Filter Burst Shooting mode or when the sensitivity is set to 3200 or 6400 Movie M 1280 720 30 fps G 640 480 30 fps recorded pixels frame ra...

Page 164: ...ed on our standard shooting conditions and may vary depending on the subject shooting conditions and type of the SD Memory Card used If other data such as still images are recorded recording time beco...

Page 165: ...an Focus or Infinity Face Detection AF is available only while the camera detects the subject s face Focus Lock By half pressing the shutter release button Exposure Control Metering System Multi segme...

Page 166: ...pproximate number of shots recorded during CIPA compliant testing with display on flash used for 50 of the shots and 23 degrees centigrade Actual performance may vary according to operating conditions...

Page 167: ...facturer If there is no representative of the manufacturer in your country send the equipment to the manufacturer with postage prepaid In this case it will take a considerable length of time before th...

Page 168: ...rs in some countries can supersede this warranty policy Therefore we recommend that you review the warranty card supplied with your product at the time of purchase or contact the PENTAX distributor in...

Page 169: ...l interference to radio communications However there is no guarantee that interference will not occur in a particular installation If this equipment does cause harmful interference to radio or televis...

Page 170: ...liant with the standards Records maintained continue to reflect the equipment being produced can be expected to be within the variation accepted due to quantity production and testing on the statistic...

Page 171: ...o inappropriate waste handling If a chemical symbol is added beneath the symbol shown above in accordance with the Battery Directive this indicates that a heavy metal Hg Mercury Cd Cadmium Pb Lead is...

Page 172: ...Memo...

Page 173: ...l Skin Tone 58 K Food 58 c Digital SR 58 R Kids 58 H Pet 65 Sport 58 Q Surf Snow 58 S Fireworks 58 N Frame Composite 66 113 B Party 59 U Candlelight 59 c Text 67 o Miniature 68 108 p HDR 68 108 A Alte...

Page 174: ...sure setting 76 Extract Color filter 110 F Face Detection 59 79 File number 87 Filters 68 108 110 Fireworks Mode 58 Flash Mode 70 Flash Off a 70 Flash On Red eye d 70 Flash On b 70 Flower Mode 58 Fluo...

Page 175: ...Mode 59 Pet Mode 65 Photo processing lab 120 Picture Transfer Protocol 137 Pixel Mapping 135 Playback 89 90 Playback Mode 136 Playback Mode Palette 93 157 Playing back movies 90 Portrait Mode 58 Powe...

Page 176: ...79 Soft filter 110 Sound settings 124 Sound types 125 Specifications 161 Sport Mode 58 Standard 73 Start up screen 134 Strap 26 Sunset Mode 58 Super Macro r 73 Surf Snow Mode 58 System requirements 1...

Page 177: ...Memo...

Page 178: ...Memo...

Page 179: ...Memo...

Page 180: ...AX RICOH IMAGING DEUTSCHLAND GmbH Julius Vosseler Strasse 104 22527 Hamburg GERMANY http www pentax de PENTAX RICOH IMAGING UK LTD PENTAX House Heron Drive Langley Slough Berks SL3 8PN U K http www pe...

Reviews: