background image

Part Number: 818K0100

©2011 Pella Corporation 

INSTALLATION INSTRUCTION - INSTRUCCIONES DE INSTALACION
WOOD HINGED PATIO DOOR – (INCLUDES – STANDARD, 
PERFORMANCE UPGRADE AND HURRICANESHEILD® IMPACT 
RESISTANT IN-SWING, OUT-SWING)

Important Safety Information:

Pella

®

 HurricaneShield

®

 Products have been tested in accordance with the large missile impact 

testing requirements have been certifi ed to meet those requirements. Check with the individual 
(building owner, architect, contractor, installer and/or consumer) responsible for the project in 
addition to local building code offi cials to determine if these products comply with local codes. 
Pella HurricaneShield Products are neither hurricane proof nor are they shatter proof. Severe wind 
and rain may produce temporary conditions which exceed product performance standards. When 
these units are subjected to intense storms or extreme conditions, which exceed the intended 
design pressures, air, water and fl ying debris infi ltration may occur.

These instructions were developed and tested for use with typical wood frame wall construction 
in a wall system designed to manage water. 

These instructions are not to be used with any 

other construction method.

 Installation instructions for use with other construction methods, 

multiple units or bow and bay windows, may be obtained from Pella Corporation or a local Pella 
retailer, or by visiting 

http://www.pella.com

.

 Building designs, construction methods, building 

materials, and site conditions unique to your project may require an installation method different 
from these instructions and additional care. Determining the appropriate installation method is the 
responsibility of you, your architect, or construction professional.

IMPORTANT NOTICE:

 To achieve maximum door performance, the performance upgrade 

installation may be required. Additional performance information may be obtained from your 
Pella retailer of 

www.pella.com.

 All HurricaneShield doors are required to use the Performance 

Upgrade Installation steps contained within this instruction. 

Always read the Pella

®

 Limited Warranty before purchasing or installing Pella 

products. By installing this product, you are acknowledging that this Limited 

Warranty is part of the terms of the sale. Failure to comply with all Pella installation and 
maintenance instructions may void your Pella product warranty. See Limited Warranty for 
complete details at 

http://warranty.pella.com.

REMEMBER TO USE APPROPRIATE PERSONAL PROTECTIVE EQUIPMENT.

Instrucciones enspañol en el reverso.

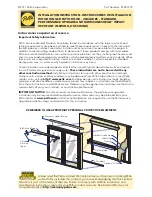
Optional Sill Pan

Water Resistive Barrier

Sheathing

Framing

Flashing Tape 

Sill Support

Corner 
Flashing 
Tapes

Top Flashing Tape

Aluminum Head Flashing

Summary of Contents for 818K0100

Page 1: ...her construction methods multiple units or bow and bay windows may be obtained from Pella Corporation or a local Pella retailer or by visiting http www pella com Building designs construction methods...

Page 2: ...ers 2 Phillips with 8 shaft and small at blade T20 Torx Wrench Drill Drill bits 13 64 and 1 8 and masonry bit for concrete applications INSTALLATION CLIP OPTION 6 or 8 installation clips 6 x 5 8 corro...

Page 3: ...Apply sill ashing tape 1 Cut a piece of ashing tape 12 longer than the opening width Apply at the bottom of the opening as shown 1E so it overhangs 1 to the exterior Note The tape is cut 12 longer tha...
Page 4: ...g tape to the width of the opening Install to the anges of the sill pan and overlap the tape from step 1N by 1 If needed add a second or third piece of ashing tape until the sill pan is covered to the...

Page 5: ...ons for Performance Upgrade and HurricaneShield product requires additional clip installation or screw installation Clip installation prep is included in Step 2B Screw installation steps are included...

Page 6: ...of sealant Place the rst bead of sealant 1 2 from the base of the interior sill pan lip This bead should also continue up the corner of the sill pan at each end sealing the vertical joints of the sil...

Page 7: ...ly open the door s and remove all shipping spacers Note Be sure to remove the spacers from the bottom edge of the door panel Use the construction handle to operate both the active and passive door pan...

Page 8: ...the open screw hole Make sure the screw passes through the shims and into the structural framing M Check door operation Open and close the door to check for proper operation Make sure the door will l...

Page 9: ...oximately 8 from the top of the door frame head Insert a 8 x 3 screw provided into the pilot hole making sure it passes through the shim and into the rough opening framing Note This step does not appl...

Page 10: ...rough opening in the locations shown On hinge jambs clearance hole locations are centered between hinges Hinge Jambs See 5A In Swing diagram upper right Fixed and Lock jambs diagram for placement of t...

Page 11: ...nufacturers s recommendations NOTE Not required on In swing Fixed doors Out Swing SILL HEAD Drill 1 8 diameter pilot holes through the clearance hole in the frame 5C 10 x 3 1 2 corrosion resistant woo...

Page 12: ...into the space between the door and the rough opening and apply a 1 deep bead of foam This will allow room for expansion of the foam and will minimize squeeze out Apply sealant across the interior sur...

Page 13: ...s with window and door materials and voids Limited Warranty For additional information on nishing see the Pella Owner s Manual or go to www pella com EXTERIOR FINISHING Wood doors require painting imm...

Page 14: ...management of moisture within the wall systems The determination of the suitability of all building components including the use of Pella products as well as the design and installation of ashing and...

Page 15: ...This page left blank intentionally...

Page 16: ...This page left blank intentionally...

Reviews: