40
41
Note: the instrument backlight will turn off automatically in 10 seconds to save power.
OFF:
Switch the battery lock to “OFF (white)” and the instrument display will turn off. Check
that the system is off.
Note: for increased safety, turn the lamps on every time you turn on the system. It is
recommended to ride the bike with lamps on.
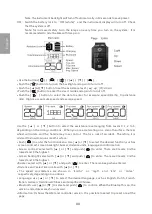
• Use the buttons
▲
▼
[ ] / [ ] / [ ] / [ ] / [ ] / [ ]
• Push the
button to turn on the backlight and again to turn it off.
[ ]
• Push the
button to set the assistance level;
: up;
: down.
[
▲
] or [
▼
]
[
▲
]
[
▼
]
• Push the
button to enter the smart mode and again to turn it off.
[ ]
• Push the
button to select the data to enter; for example, speed (km/hr), trip distance
[ ]
(km), trip time, maximum speed and average speed.
Use the
or
button to select the assistance level ranging from Levels 0, 1, 2 to 3,
[
▲
]
[
▼
]
depending on the riding conditions. When you are accelerating on a smooth surface, the rear
wheel will rotate and the handle may lose control. That is a risk of accident. Therefore, it is
advised to slow down on smooth surface.
• Push [ ] to enter the function menu. Use [ ▲ ] or [ ▼ ] to select the desired function, such as
screen contrast, screen backlight, buzzer, distance units, language and information.
• Screen contrast: select with
or
and push
to enter. There are 9 levels; 0 is the
[
▲
]
[
▼
]
[ ]
lowest and 9 the highest.
• Screen backlight: select with
or
and push
to enter. There are 9 levels; 0 is the
[
▲
]
[
▼
]
[ ]
lowest and 9 the highest.
• Buzzer: select with
or
and push
to enter. There is a beep when entered.
[
▲
]
[
▼
]
[ ]
• Distance unit: select km or mile with
or
.
[
▲
]
[
▼
]
• The speed and distance are shown in “km/hr ” or “mph” and “km” or “miles,”
respectively, depending on countries.
• Language: use [ ▲ ] or [ ▼ ] to select the desired language, such as English, Dutch, French,
Italian, German, traditional Chinese and simplified Chinese.
• Bluetooth: use [
▲
] or [
▼
] to select and push [ ] to confirm. When the Bluetooth is on, the
version and address are shown as well.
•Information: It shows the HMI and controller version. It is possible to select trip reset or exit the
page.
E
n
g
lis
h
E
n
g
lis
h
• Battery power indication: This provides the information of how much is left in your battery when
the system is on. The battery sign on the screen will tell you how much power is left. When you
see a full battery and the word FULL, the battery is 100% charged. The following illustration
shows how much power is left.
• Battery charging: The charging icon is shown on screen when the battery is connected to the
charger.
Control of Front and Rear Lamps
The use of the e-bike gauge while riding the bike will cause distraction in traffic, compromise
your control on the e-bike and possibly result in accident.
Use these gauge only when the traffic allows it. If this is not possible, just park the bike
somewhere safe before dealing with the gauge. The gauge support on the e-bike is designed
exclusively for this purpose and does not work on other products. Its adjustment requires
appropriate tools. Make sure that the gauge sits squarely and securely in the support.
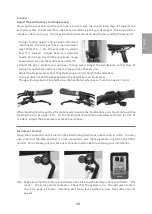
Notes for Kickstand
The stand is not designed to support human weight. Do not sit on the e-bike while it is parked on
the stand. When the e-bike is not in use, put it on the stand or it will fall down, which leads to the
risk of accident and injury. Lift the stand when pushing or riding the bike.The e-bike may fall
down and become damaged if parked on a downward slope or soft ground. Park the e-bike on
solid ground whenever it is possible.
Keep an eye on the stand. If you are pushing the bike backwards while the stand is extended, the
pedals will rotate backwards and get caught with the stand. To prevent this, lift the stand before
moving the bike forwards or backwards.
81~95%
61~80%
41~60%
21~40%
10~20%
1~9%Battery is flashing
96~100%
FULL
0%Charge immediately

