background image

Page 19

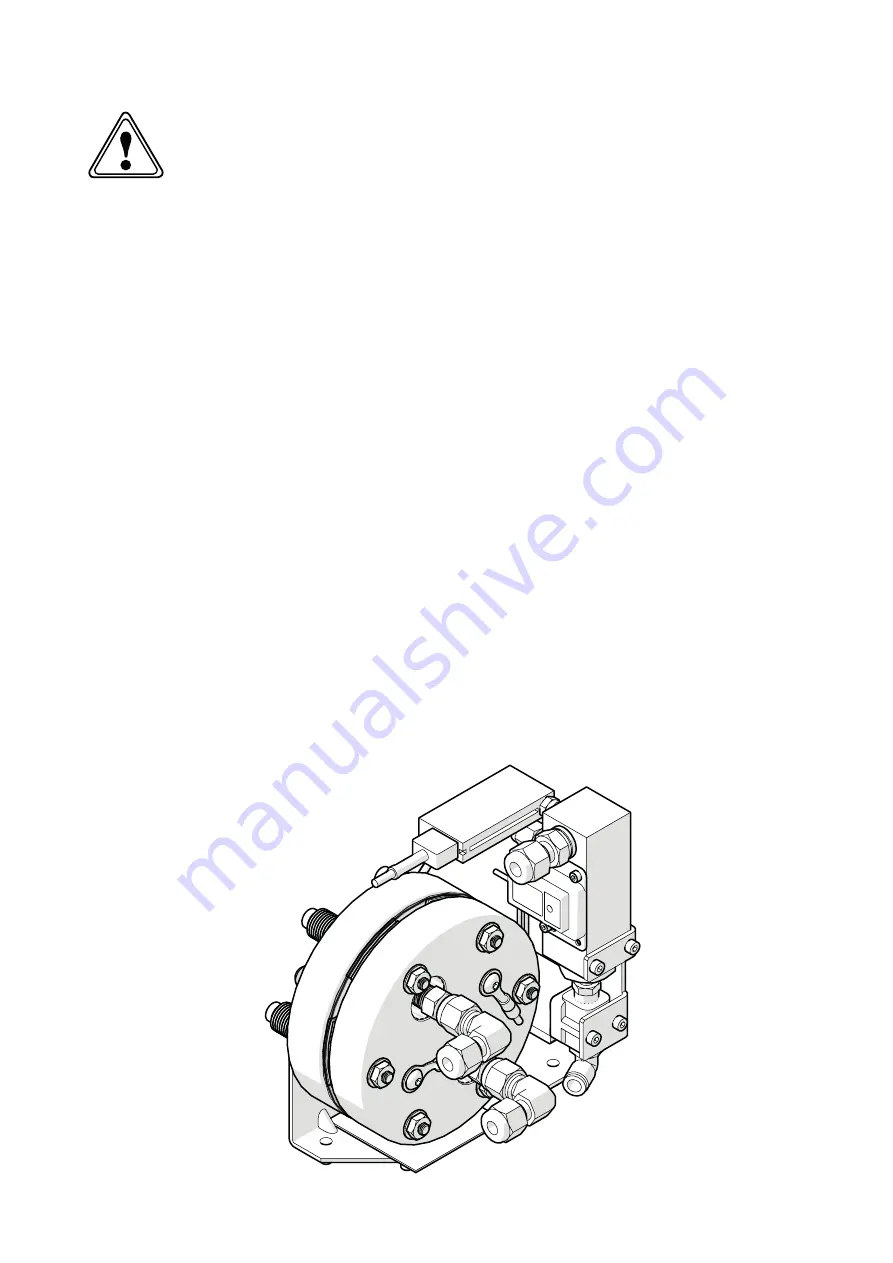
Cell Replacement

Ensure that Generator is in a Safely Isolated Condition.

1.  First remove the DI cartridge and drain the water from the generator, using the drain 

connection on the rear of the generator. Connect to an empty tank of at least 3 litres 
to ensure the tank can hold all the water from the generator.

2.  Now disconnect the power cables from the electrolyser cell.

3.  Remove the 4x M5 Nyloc nuts from the underside of the generator, retain for later 

use,, and disconnect the tubing connected to the cell. 

4.  Disconnect the separation tank valve, separation tank sensor and pressure switch 

connection on the electrical panel.

5.  Remove the old cell and fit a new cell to the bracket, using a 1/8" Allen key. Then 

fit the sub assembly to the generator, ensuring the M5 Nyloc nuts are securely 
tightened. Refit the positive and negative power supply cables ensuring that they 
are securely tightened.

6.  Finally, reconnect all water and gas hoses as per the schematic provided later in this 

manual.

7.  Reconnect the separation tank valve and sensor as well as the pressure transducer.

8.  Install a fresh DI cartridge prior to returning the generator to a safe state of repair

WARNING

Summary of Contents for Precision Hydrogen SL

Page 1: ...Precision Hydrogen SL Service Manual Copyright Peak Scientific Instruments Ltd 2020 Precision Hydrogen SL Service Manual Rev 2 RSID 3518 EN 03 08 2020...

Page 2: ...nt 8 Molecular Seive 10 Technical Specification 12 Precision Hydrogen SL 12 Service Requirements 13 Service Schedule 13 Replacement Parts 13 Principle of Operation 14 Product Overview 15 Electrical Pa...

Page 3: ...u can skip to the relevant information Users can refer to the contents page to find the relevant information Please review each of the following sections carefully Thank you for selecting Peak Scienti...

Page 4: ...ted conditions are fully understood or met A CAUTION notice denotes a hazard It calls attention to an operating procedure process or similar which if not correctly performed or adhered to could cause...

Page 5: ...by pressing and holding the front button for at least three seconds This will cause the generator to cease hydrogen production illuminate the water tank blue and exhaust any stored hydrogen through t...

Page 6: ...Temperature Over 220 C Vapour Pressure 25 C 17mm CFH 20 C Water Viscosity 25 C N A Solubility in Water Negligible Specific Gravity 25 C 1 1 1 3 pH 25 C 7 9 5 in aqueous slurry Eye Protection Safety Gl...

Page 7: ...tions If irritation persists move patient to fresh air Ingestion If resin has been confined to the mouth administer 250 ml of water as a mouthwash Avoid swallowing This product is considered non hazar...

Page 8: ...Odourless Explosion Limits N A Decomposition Temperature Over 155 C Vapour Pressure 25 C 17mm CFH 20 C Water Viscosity 25 C N A Solubility in Water less 1 0 in weight pH 25 C 2 10 at 5 w w in water E...

Page 9: ...Remove from source of exposure Ingestion Wash out mouth with water If large amount swallowed or symptoms develop obtain medical attention Toxicological Data The lethal dose for humans for synthetic a...

Page 10: ...r Odourless Explosion Limits N A Decomposition Temperature N A Vapour Pressure 25 C N A Viscosity 25 C N A Solubility in Water Insoluble pH 25 C N A Eye Protection Safety Glasses BS2092C Storage All c...

Page 11: ...Remove from source of exposure Ingestion Wash out mouth with water If large amount swallowed or symptoms develop obtain medical attention Toxicological Data The lethal dose for humans for synthetic a...

Page 12: ...6 9 bar Electrical Requirements Voltage 100 240VAC 10 Frequency 50 60 Hz Current 6A Max Input Connection C14 Connection Power Cord Supplied C13 socket to local connection 10A minimum Pollution Degree...

Page 13: ...entific com ordering Precision Hydrogen SL 200cc 12 Month Kit 24 Months Precision Hydrogen SL 100cc 24 Month Kit Precision Hydrogen SL 200cc 24 Month Kit Note Only Peak approved components should be u...

Page 14: ...round the external electrical circuit These protons and electrons then recombine at the cathode of the electrolyser again with the aid of a precious metal catalyst to produce the hydrogen gas The high...

Page 15: ...Page 15 Product Overview Hydrogen Cell Electrical Panel Deioniser Column Pressure Regulator Water Tank Hydrogen Output Water Drain Power Inlet Switch Desiccant Column...

Page 16: ...shock accessing the electrical panel without safely isolating the generator should only be carried out by trained service personnel For instructions on how to replace the PCB Assembly please refer to...

Page 17: ...ESET PB whilst still holding DB USER PB and MB USER PB Hold both pushbuttons for about 5 seconds until PSU On LED blink once indicating SL100 model has been set successfully To confirm power cycle gen...

Page 18: ...the pump from its bracket 4 Disconnect the old pump from the system tubing 5 Use fresh tubing provided to fit to the new pump 6 Fit the new pump to the support bracket by clipping it into place 7 Re...

Page 19: ...ing connected to the cell 4 Disconnect the separation tank valve separation tank sensor and pressure switch connection on the electrical panel 5 Remove the old cell and fit a new cell to the bracket u...

Page 20: ...o an empty tank of at least 3 litres to ensure the tank can hold all the water from the generator 2 Disconnect the tubing connected to the pump 3 Disconnect the electrical connection at the pump 4 Unc...

Page 21: ...s put in by lowering into the recess and twisting 90 clockwise to lock in position 1 Depressurise the generator and disconnect power To replace the column lift the hinged lid back then remove the deio...

Page 22: ...side of the generator The column should be replaced when all of the silica gel has visibly darkened 1 To replace the column depressurise the generator and disconnect power Lift the hinged lid back th...

Page 23: ...Page 23 1 The cap can then be replaced ensuring not to over tighten the cap and the hinged lid can be closed...

Page 24: ...Page 24 Pneumatic Diagram Standard PEAK SCIENTIFIC INSTRUMENTS Ltd 2013...

Page 25: ...LEAD ENGINEER DRAWING No DCL THIRD ANGLE PROJECTION C REV WD PRECISION SL PRECISION SL ELECTRICAL DIAGRAM MREAVY KRZEZWICKI ICAMERON 20 11 2019 20 11 2019 1 A SHEET 1 OF 5 BOARD M U DAUTHER BOARD PEA...

Page 26: ...L MATERIALS SHALL BE COMPLIANT WITH THE RoHS DIRECTIVE FOUNTAIN CRESCENT INCHINNAN BUSINESS PARK RENFREWSHIRE PA4 9RE TEL 44 0 141 812 8100 FAX 44 0 141 812 8200 www peakscientific com APPROVED BY DET...

Page 27: ...BUSINESS PARK RENFREWSHIRE PA4 9RE TEL 44 0 141 812 8100 FAX 44 0 141 812 8200 www peakscientific com APPROVED BY DETAILED BY DATE DATE DRAWING TITLE PROJECT LEAD ENGINEER DRAWING No DCL THIRD ANGLE P...

Page 28: ...AD ENGINEER DRAWING No DCL THIRD ANGLE PROJECTION C REV WD PRECISION SL PRECISION SL ELECTRICAL DIAGRAM MREAVY KRZEZWICKI ICAMERON 20 11 2019 20 11 2019 1 A SHEET 4 OF 5 1A UPDATE SCHEMATIC TO LATEST...

Page 29: ...N CRESCENT INCHINNAN BUSINESS PARK RENFREWSHIRE PA4 9RE TEL 44 0 141 812 8100 FAX 44 0 141 812 8200 www peakscientific com APPROVED BY DETAILED BY DATE DATE DRAWING TITLE PROJECT LEAD ENGINEER DRAWING...

Page 30: ...e cloth prior to use Cleaning should only be undertaken with the power switched off and the power cord removed from the rear of the generator Under no circumstances should any solvents or abrasive cle...

Page 31: ...rator fails to produce pressure during start up or normal operation Ensure there are no leaks in the system Check that there are no faults in the wiring valve or cell Check desiccant column has been r...

Page 32: ...ervice to our customers With Peak Protected your laboratory s productivity becomes our top priority To discuss Peak Protected generator cover and payment options speak to your local Peak Representativ...

Reviews: