10
Step 5: Entering the Desired Legend:
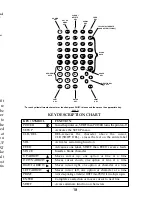
The printer features a 2 line by 16 character LCD display.
If the legend that you desire is greater than 16 characters
long or greater than 2 lines high then you will not be
able to view the entire legend at one time. Enter the
desired
legend via the keypad. Once you have completed
the current line, press the ENTER Key to move the
cursor to the start of the next line. It is not necessary to
hit the ENTER Key on the last line of text. Use of the
automatic legend repeat (See page 11) and serialization
(See page 14) features can
significantly reduce the time
required to produce labels. If during legend entry an error is
made, position the cursor over the incorrect character and
press the CLR/DEL Key to delete that character. Press and
release the SHIFT Key prior to pressing the CLR/DEL Key to
clear the entire legend.
Step 6: Printing Your Labels
To print a copy of the currently selected label press the
PRINT Key. This will print one set of the current selected
labels. Pressing and releasing the SHIFT Key prior to
pressing the PRINT Key will allow you to print multiple
copies of the currently selected label. Multiple copies can
also be selected in the SETUP menu. Pressing the PRINT Key
during a print job will stop the print job.
SECTION 2:
Using the
Quik-Key
TM
Fast Label Formatting System:
Step 1: Turning the Printer On:
See SECTION 1: Using the SETUP Menu, Step 1.
Step 2: Loading the Labels:
See SECTION 1: Using the SETUP Menu, Step 2.
21
9. Press and release the SHIFT Key then press the
POWER Key to turn the printer off.
10. The printer will automatically turn itself off after being
idle for 5 minutes to conserve battery power. This
feature can be disabled by using the
Quik-Key
TM
code “Y”.
11. Press and release the SHIFT Key, then press and
release the PRINT Key to print multiple copies.
12. When saving a label file, it is recommended to include
the 4 digit label code in the file name. This will help
you to have the proper labels loaded the next time you
recall that label file.
Summary of Contents for Pan-Quik LS3E
Page 3: ......
Page 5: ......
Page 9: ......
Page 11: ......
Page 13: ...o l y s r 4 d a e e e e t e e P o ...
Page 15: ......
Page 17: ...s f N r n r e e o e f ...
Page 19: ...e s l o g n d e n E ...
Page 21: ......
Page 23: ... s e e d e o e n e s d d o e d o e n y ...
Page 25: ...d d l n h t o o e e s o e ...
Page 27: ...d l y o f r e e n e e g g n e e d e ...
Page 29: ......


