


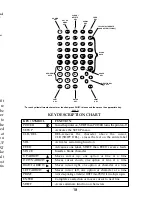


KEY DESCRIPTION CHART
KEY / SYMBOL
FUNCTION
POWER
Turns the printer on, SHIFT then POWER turns the printer off
SETUP
Activates the SETUP menu.
CLR/DEL
DEL-removes the character above the cursor,
CLR (SHIFT DEL) - erases the text on the entire label
SRL
Activates serializing function
FEED
Advances one label, SHIFT then FEED reverse feeds
SPACE
Inserts a blank character
UP ARROW
Moves cursor up, one option or line at a time
DOWN ARROW
Moves cursor down, one option or line at a time
RIGHT ARROW
Moves cursor right, one option or character at a time
LEFT ARROW
Moves cursor left, one option or character at a time
Activates printing of label(s), SHIFT then PRINT for multiple copies.
ENTER
Completes a selection or moves cursor to next line.
SHIFT
Access alternate function or characters
(C)omponent (W)iremarker
(T)erminal (R)otated
(S)pecial
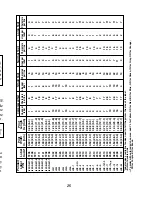
TEXT FONT
Letter Quality
Letter Quality Letter Quality Standard
TEXT SIZE
Normal
Large
Large
Normal
TEXT CASE
Upper
Upper
Upper
Upper
PRINT DENSITY
Normal
Normal
Normal
Normal
HOR. POSITION
Center
Center
Center
Center
VER. POSITION
Bottom
Center
Center
Center
LABEL FORMAT
Wiremarker
Terminal Component Component
UNDERLINE
No
No
No
No
TEXT ORIENTATION
Normal
Normal
Rotated
Normal
*See CHANGING CUSTOM FORMATTING OPTIONS below to change any
of these settings.
Step 4: Entering the Desired Legend:
See SECTION 1: Using the SETUP Menu, Step 5.
Step 5: Printing Your Labels:
See SECTION 1: Using the SETUP Menu, Step 6.
CHANGING CUSTOM FORMATTING OPTIONS:
Each of the 5 custom formatting options can be customized to fit
the specific needs of the user and can result in quicker and more
consistent label production. Custom formatting options may be
viewed or changed through use of the SETUP menu. At printer
power-up enter the custom formatting option that you desire to
review (See Section 3, Step 3.) Press the SETUP Key to enter the
SETUP menu. Each feature and option activated for the selected
custom formatting option will be displayed with an * beside that
option. If a change is desired, then move to the options that you
want to set and press the ENTER Key. Prior to exiting the SETUP
menu, select #7 OTHER OPTIONS and select the SET FORMAT
options screen that corresponds to the format that you would like
to save your changes under. Press the ENTER Key. Default
settings were selected by Panduit to represent the most
commonly completed tasks of users and are included in on this
above for reference.
13
SETUP
A
˜
B
C
Ø
D
Ω
E
Å
J
Ñ
I
Ç
H
Ü
G
Ö
F
Ä
K
Æ
P
+
U
.
1
4
7
SHIFT
2
5
8
0
3
6
9
ENTER
V
,
Q
–
R
±
W
:
X´
SPACE
Y
*
Z
/
S
=
T
#
L
[
M
]
N
2
O
˚
CLR
DEL
SRL
FEED
POWER
KEY
SET UP
MENU
KEY
CLEAR /
DELETE
KEY
SERIAL
KEY
FEED
KEY
YELLOW ALTERNATE
CHARACTER (TYPICAL)
ALPHA
KEYS
SPACE
KEY
DIRECTIONAL
KEYS
KEY
ENTER
KEY
SHIFT
KEY
NUMERIC
KEYS
** To reach yellow alternate character or function, press SHIFT, release and then press the appropriate key.
{
{
FIGURE 4
18
**To reach yellow alternate character or function, press SHIFT, release and then press the appropriate key.
Letter Quality
Normal
Upper
Normal
Center
Center
Component
No
Normal
Summary of Contents for Pan-Quik LS3E
Page 3: ......
Page 5: ......
Page 9: ......
Page 11: ......
Page 13: ...o l y s r 4 d a e e e e t e e P o ...
Page 15: ......
Page 17: ...s f N r n r e e o e f ...
Page 19: ...e s l o g n d e n E ...
Page 21: ......
Page 23: ... s e e d e o e n e s d d o e d o e n y ...
Page 25: ...d d l n h t o o e e s o e ...
Page 27: ...d l y o f r e e n e e g g n e e d e ...
Page 29: ......


