background image

11


3 Parameter menus 


3-1 Introduction  

This section describes the programmable parameters, provides barcodes for programming.   

The scanner is shipped with the factory default settings as described in this chapter. These factory-default-

settings values are stored in flash memory and are preserved even when the scanner is powered down. 

Changes to the factory default values can be stored as custom defaults. These values are also stored in 

flash memory and are preserved even when the scanner is powered down.   

There are two methods to change the parameter values as described following.  

 Scan the appropriate barcodes as the example shown in 

3-2 Example: configure scanner

. The new 

values replace the existing memory values.    

 Referring to 

7 Return default parameters & firmware version 

, scan the Write to customer’s default 

setting (%%WCDF) barcode to set the new values as custom defaults. The factory default or custom 

default parameter values can be recalled by scanning the manufacture default setting (%%%DEF) 

barcode, or the Rest

ore customer’s default setting (%%RSDF) barcode.  


Summary of Contents for MD2000

Page 1: ...MD2000 Laser Barcode Scanner User Manual Version MD2000_UM_EN_V1 1 5 ...

Page 2: ...r is on a licensed basis 2 The right is reserved to make changes to any software or product to improve reliability function or design 3 The material in this manual is subject to change without notice 4 A standard packing includes a scanner a USB cable and a CD or a user manual Accessories include a stand a 5V adaptor and a RS 232 cable 5 The Auto detection is an optional accessory 6 Different firm...

Page 3: ...i ...

Page 4: ...mensions 5 2 3 Parts of the scanner 6 2 4 Introduction to installation 7 2 4 1 Installation RS 232 7 2 4 2 Installation USB 7 2 4 3 Remove the interface cable 8 2 5 Assembling the stand 8 2 6 Scanning 9 2 7 Auto detection 9 3 Parameter menus 11 3 1 Introduction 11 3 2 Example configure scanner 12 3 3 RS232 interface 14 3 4 USB interface 17 3 5 Scan trigger mode some global settings 2 0 3 6 Indicat...

Page 5: ...3 23 UK Plessey 60 3 24 China Post 62 3 25 Telepen 63 3 26 GS1 DataBar GS1 DataBar Truncated 6 5 3 27 GS1 DataBar Limited 66 3 28 GS1 DataBar Expanded 67 3 29 G1 G4 FN1 substitution string setting 68 3 30 G1 G4 string position Code ID position 7 1 3 31 String transmission 72 4 Barcode representing non printable character 74 5 ASCII table 75 6 Test chart 76 7 Return default parameters firmware vers...

Page 6: ...iv ...

Page 7: ...128 ISBT 128 Code 93 Code 11 USD 8 MSI Plessey UK Plessey China Post Telepen GS1 DataBar formerly RSS variants Indicator Beeper LED Interface supported RS 232 USB Keyboard USB virtual COM Operating mode Hand held Auto detection Optional accessory Dimensions Height Width Depth 76 mm 66 5 mm 168 mm Weight 121 g without cable Cable Straight 2 0 m Connector type RJ 45 phone jack connector Case materia...

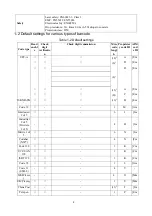
Page 8: ...abl e Check digit verificatio n Check digit transmission Min code lengt h Proprietar y code ID AIM cod e ID UPC A 12 2 A Em 8 2 D Em 8 2 D Em 13 2 A Em 8 2 C Em ISBN ISSN 1 13 2 B Em Code 39 1 M Am Interleaved 2 of 5 6 I Im Industrial 2 of 5 Discrete 2 of 5 4 H Im Matrix 2 of 5 6 X Im Codabar NW7 4 N Fm Code 128 1 K Cm UCC EAN 128 1 K Cm ISBT 128 1 K Cm Code 93 1 L Gm Code 11 USD 8 4 V MSI Plesse ...

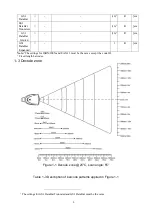
Page 9: ... 1 R em Note 1 The settings for ISBN ISSN and EAN 13 must be the same except the code ID 2 Fixed length barcodes 1 3 Decode zone Figure 1 1 Decode zone 25 C scan angle 55 Table 1 3 Description of barcode patterns applied in Figure 1 1 1 The settings for GS1 DataBar Truncated and GS1 DataBar must be the same ...

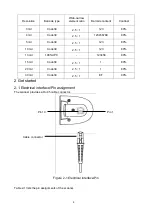
Page 10: ... 1 123 80 10 mil Code39 2 5 1 123 80 13 mil 100 UPC 123456 80 15 mil Code39 2 5 1 1 80 20 mil Code39 2 5 1 1 80 30 mil Code39 2 5 1 EF 80 2 Get started 2 1 Electrical interface Pin assignment The scanner provides a RJ 45 cable connector Table 2 1 lists the pin assignments of the scanner Figure 2 1 Electrical interface Pin Pin 10 Pin 1 Cable connector ...

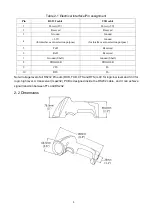
Page 11: ...for interface auto selection purpose 5 TxD Reserved 6 RxD Reserved 7 Ground Shell Ground Shell 8 TRIGGER TRIGGER 9 CTS D 10 RTS D Note Voltage level of all RS232 Pin outs RXD TXD CTS and RTS is 0V for logic low level and 3 3V for logic high level A transceiver max232 PCB is designed inside the RS232 cable and it can achieve signal transition between TTL and RS232 2 2 Dimensions ...

Page 12: ...6 Figure 2 2 Dimensions 2 3 Parts of the scanner Figure 2 3 Parts of the scanner LED Beeper Exit window Trigger Release hole of the cable Cable interface port ...

Page 13: ...o secure the connector to the port 3 If the host does not have power supply on PIN 9 connect the external power supply DC 5V adapter to the RS 232 cable Figure 2 4 Installation RS 232 2 4 2 Installation USB The scanner attaches directly to a USB host and is powered by it No additional power supply is required 1 Refer to Figure 2 5 connect the USB interface cable to the bottom of the scanner 2 Plug...

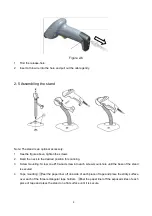
Page 14: ...e desired position for scanning 3 Screw mounting Screw one 10 wood screw into each screw mount hole until the base of the stand is secured 4 Tape mounting Peel the paper liner off one side of each piece of tape and place the sticky surface over each of the three rectangular tape holders Peel the paper liner off the exposed sides of each piece of tape and press the stand on a flat surface until it ...

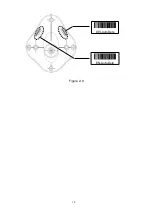
Page 15: ...ser light is off the present bar code must be removed to active next scanning Figure 2 8 The scanner offers 2 methods to enable disable Auto detection quickly Method 1 Scan the barcode EN AutoDete on the stand to enable Auto detection Scan the barcode DIS AutoDete on the stand to disable Auto detection Note The Scanning mode will switch to momentary See Figure 2 9 Method 2 Scan the barcode SWAM to...

Page 16: ...10 Figure 2 9 DIS AutoDete EN AutoDete ...

Page 17: ...tored in flash memory and are preserved even when the scanner is powered down There are two methods to change the parameter values as described following Scan the appropriate barcodes as the example shown in 3 2 Example configure scanner The new values replace the existing memory values Referring to 7 Return default parameters firmware version scan the Write to customer s default setting WCDF barc...

Page 18: ...uration are a Scan the SETUP barcode on the parameter setting part b Enter the option mode by scanning the Parameter name barcode c To the right of the option barcode the necessary alphanumeric inputs are listed Scan these alphanumeric entries see 9 Configuration alphanumeric value barcode individually as Para Value d Scan the END barcode listed on the bottom of each parameter setting part Notes t...

Page 19: ...re or software handshaking protocol RTS CTS If the scanner requests to send the barcode data to host computer it will issue the RTS signal first wait for the CTS signal from the host computer and then perform the normal data communication If there is no replied CTS signal from the host computer after the Response delay ...

Page 20: ...o host Note If Decode data packet format is set to Raw the scanner will not wait for ACK NAK after transmitting decoded data completely Response delay This delay is the time that the scanner waits for a handshaking acknowledgment NAK or ACK from the host Inter character delay This delay is the time that the scanner transfer the each character interval Host character delay This delay is the time th...

Page 21: ...600 05 19200 06 38400 07 57600 08 115200 09 Parity None 00 Odd 01 SETUP Multiple scan setting Single scan setting Option barcode Option Alpha value Even 02 Data bit 8 bits 00 Stop bit 1 bit 00 2 bits 01 Host character delay 01 99 10ms 01 99 20 ...

Page 22: ... packet format if the Packeted see 3 3 RS232 Interface The scanner also follows the Flow RS232 Interface flow control if it is set ACK NAK Note After changing USB Device Types the scanner will restart automatically Keyboard layout The scanner supports different national keyboard layouts Inter character delay This delay is inserted after each data character transmitted Numeric key Alphabetic key Th...

Page 23: ...ayout USA 00 Turkish F 01 Turkish Q 02 French 03 Italian 04 Spanish 05 Slovak 06 Denmark 07 Japanese 08 German 09 Belgian 10 Russian 11 Inter character delay 0 ms 00 5 ms 01 10 ms 02 SETUP Multiple scan setting Single scan setting Option barcode Option Alpha value ...

Page 24: ...18 20 ms 03 40 ms 04 60 ms 05 Numeric key Alphabetic key 00 Numeric keypad 01 Alt keypad 02 END ...

Page 25: ...e laser light stops scanning the present object must be removed to enable Auto detection Note Restoring the default settings by the host command or scanning the barcode that will not affect the scanning mode settings Standby duration The duration time for a single scanning attempt Same barcode delay time If a barcode has been scanned and output once successfully the laser beam must be off or moved...

Page 26: ...You may refer to 3 29 G1 G4 FN1 substitution string setting and 3 30 G1 G4 string position Code ID position Example Group 1 set 01 or 10 Group 2 and 4 set 24 or 42 All valid settings include 00 01 02 03 04 10 11 12 13 14 20 21 22 23 24 30 31 32 33 34 40 41 42 43 and 44 Setting value Description 00 None 01 10 11 Only insert Group 1 02 20 22 Only insert Group 2 03 30 33 Only insert Group 3 04 40 44 ...

Page 27: ...When Stand by duration is elapsed the scanner will enters normal sleep state Any external interrupt can wake up the scanner It is not necessary to send a command WAKEUP 0x00 before sending any other commands Enable When Stand by duration is elapsed the scanner will enters sleep state deeply and the supply current will drop to be 0 9mA And at this case it is necessary to send a command WAKEUP 0x00 ...

Page 28: ...s 00 None 00 FF16 00 0A Double confirm 00 09 00 None 00 09 00 Global max code length 04 99 04 99 99 Global min code length 01 99 01 99 04 Global G1 G4 string selection 00 44 00 44 SETUP Multiple scan setting Single scan setting Option barcode Option Alpha value 00 None 00 Element amendment Disable 00 Enable 01 ...

Page 29: ...er optimization Disable 00 Enable 01 Scan angle Wide 56 00 Narrow 40 01 Auto sleep delayNote 2 1 second 00 5 seconds 01 10 seconds 02 30 seconds 03 1 minute 04 3 minutes 05 10 minutes 06 30 minutes 07 SETUP Multiple scan setting Single scan setting Option barcode Option Alpha value 1 hour 08 3 hours 09 ...

Page 30: ...alert signal Beeper beeping and LED flashing LED indication When the scanner decodes successfully the LED will glitter Beeper indication After each successful reading the scanner will beep to indicate a good barcode reading and its beep tone duration is adjustable Beep tone duration This parameter can be adjusted for a good reading upon favorite usage Volume of beeper This parameter can be adjuste...

Page 31: ...ha value Power on alert Disable 00 Enable 01 LED indication Disable 00 Enable 01 Beeper indication Disable 00 Enable 01 Beep tone duration 01 09 25 ms 01 09 03 Volume of beeper Low 00 Middle 01 High 02 Frequency of beeper 2 7KHz 00 2 5KHz 01 2 3KHz 02 END 3 7 UPC A Read Format ...

Page 32: ...uncation Expansion Truncate leading zeros The leading 0 digits of UPC A data characters can be truncated when the feature is enabled Expand to EAN 13 It extends to 13 digits with a 0 leading digit when the feature is enabled Truncate system character The system character of UPC A data can be truncated when the feature is enabled Add country code The country code 0 for USA can be added when the fea...

Page 33: ...0 FF16 A Insert group selection 00 44 00 None 00 44 00 Supplement digits None 00 2 digits 01 5 digits 02 2 or 5 digits 03 Truncation Expansion None 00 Truncate leading zeros 01 Expand to EAN 13 02 Truncate system character 03 Add country code 04 Ink Spreading Canceling Disable 00 Enable 01 END 3 8 UPC E Read ...

Page 34: ...o EAN 13 It extends to 13 digits with 0 digits when the feature is set to be enabled Example Barcode 01236547 Output 0012360000057 Expand to UPC A It extends to 12 digits when the feature is set to be enabled Example Barcode 01236547 Output 012360000057 Truncate system character The system character 0 of UPC E data can be truncated when this feature is enabled Add country code The country code 0 f...

Page 35: ...00 44 00 Supplement digits None 00 2 digits 01 5 digits 02 2 or 5 digits 03 Truncation Expansion None 00 Truncate leading zeros 01 Expand to EAN 13 02 Expand to UPC A 03 Truncate system character 04 Add country code 05 END 3 9 UPC E1 Read Format System character 1 Data digits 6 digits Check digits Check digit verification The check digit verification is optional ...

Page 36: ...2365000097 Expand to UPC A It extends to 12 digits when the feature is set to be enabled Example Barcode 11236597 Output 112365000097 Truncate system character The system character 1 of UPC E1 data can be truncated when the feature is enabled Add country code The country code 0 for USA can be added when the feature is enabled SETUP Multiple scan setting Single scan setting Option barcode Option Al...

Page 37: ...02 Expand to UPC A 03 Truncate system character 04 Add country code 05 END 3 10 EAN 13 ISBN ISSN Read Format Data digits 12 digits Check digit Check digit verification The check digit verification is optional Check digit transmission By setting Enable check digit will be transmitted EAN 13 code ID setting Refer to Code ID setting of 3 7 UPC A Insert group selection Refer to Insert group selection ...

Page 38: ... Canceling If enabled the scanner can more easily read the EAN 13 barcode printed with ink spreading But it may cause the scanner to decode some well printed EAN 13 barcode wrongly Please ask the advice from the support engineer of the manufacturer before applying this function ISBN ISSN code ID setting Refer to Code ID setting of 3 7 UPC A SETUP Multiple scan setting Single scan setting Option ba...

Page 39: ...Canceling Disable 00 Enable 01 ISBN ISSN code ID setting 00 FF16 ASCII 00 FF16 B END 3 11 EAN 8 Read Format Data digits 7 digits Check digit Check digit verification The check digit verification is optional Check digit trans By setting Enable check digit will be transmitted Code ID setting of UPC A Code ID setting Refer to Insert group selection 3 7 UPC A Supplement digits Format 3 7 Refer to Inse...

Page 40: ...34 Truncation Expansion Data digits 7 digits Check digit Supplement Digits 2 or 5 Refer to Truncation Expansion of 3 7 UPC A ...

Page 41: ... Check digit verification Disable 00 Enable 01 Check digit trans Disable 00 Enable 01 Code ID setting 00 FF16 ASCII 00 FF16 C Insert group selection 00 44 00 None 00 44 00 Supplement digits None 00 2 digits 01 5 digits 02 2 or 5 digits 03 Truncation Expansion None 00 Truncate leading zero 01 Expand to EAN 13 02 ...

Page 42: ...er to Insert group selection 3 7 UPC A Start End transmission The start character and end character of Code 39 are s You can transmit all data digits including two s as data character By setting Enable can be recognized as data character Convert Code 39 to Code 32 Code 32 is a variant of Code 39 used by the Italian pharmaceutical industry Note that Code 39 must be enabled in order for this paramet...

Page 43: ...Max code length 00 99 00 99 99 Min code length 00 99 00 99 01 Code ID setting 00 FF16 ASCII 00 FF16 M Insert group selection 00 44 00 None 00 44 00 Format Standard 00 Full ASCII 01 Start End transmission Disable 00 Enable 01 SETUP Multiple scan setting Single scan setting Option barcode Option Alpha value ...

Page 44: ...e 39 is forced Enable Note 2 If Code 39 is set Disable Trioptic Code 39 is forced Disable 3 13 Interleaved 2 of 5 Read Format Data digits variable Check digit optional Check digit verification The check digit verification is optional Check digit transmission By setting Enable check digit will be transmitted Max Min code length Refer to Max Min code length of 3 12 Code 39 Code ID setting Refer to C...

Page 45: ...able 00 Enable 01 Check digit verification Disable 00 USS 01 OPCC 02 Check digit transmission Disable 00 Enable 01 Max code length 00 99 00 99 99 Min code length 00 99 00 99 06 Code ID setting 00 FF16 ASCII 00 FF16 I Insert group selection 00 44 00 None 00 44 00 END 3 14 Industrial 2 of 5 Read ...

Page 46: ...r to Code ID setting of 3 7 UPC A Insert group selection Refer to Insert group selection of 3 7 UPC A SETUP Multiple scan setting Single scan setting Option barcode Option Alpha value Read Disable 00 Enable 01 Max code length 00 99 00 99 99 Min code length 00 99 00 99 04 Code ID setting 00 FF16 ASCII 00 FF16 H Insert group selection 00 44 00 None 00 44 00 END 3 15 Matrix 2 of 5 Read Format ...

Page 47: ... verification is optional Check digit transmission By setting Enable check digit will be transmitted Max Min code length Refer to Max Min code length of 3 12 Code 39 Code ID setting Refer to Code ID setting of 3 7 UPC A Insert group selection Refer to Insert group selection of 3 7 UPC A ...

Page 48: ... Disable 00 Enable 01 Check digit verification Disable 00 Enable 01 Check digit transmission Disable 00 Enable 01 Max code length 00 99 00 99 99 Min code length 00 99 00 99 06 Code ID setting 00 FF16 ASCII 00 FF16 X Insert group selection 00 44 00 None 00 44 00 END 3 16 Codabar Read Format ...

Page 49: ...tion of 3 7 UPC A Start End type Codabar has four pairs of Start End pattern you may select one pair to match your application Start End transmission By setting Enable the start and end character of a Codabar barcode will be transmitted Start End character equality By setting Enable the start and end character of a Codabar barcode must be the same SETUP Multiple scan setting Single scan setting Op...

Page 50: ...th 00 99 00 99 04 Code ID setting 00 FF16 ASCII 00 FF16 N Insert group selection 00 44 00 None 00 44 00 Start End type ABCD ABCD 00 abcd abcd 01 ABCD TN E 02 abcd tn e 03 Start End transmission Disable 00 Enable 01 Start End character equality Disable 00 Enable 01 END 3 17 Code 128 Read Format ...

Page 51: ... check digit will be transmitted Max Min code length Refer to Max Min code length of 3 12 Code 39 Code ID setting Refer to Code ID setting of 3 7 UPC A Insert group selection Refer to Insert group selection of 3 7 UPC A Truncate leading zeros The leading 0 digits or all 0 digits of Code 128 barcode characters can be truncated when the feature is enabled ...

Page 52: ...heck digit verification Disable 00 Enable 01 Check digit transmission Disable 00 Reserved 01 Max code length 00 99 00 99 99 Min code length 00 99 00 99 01 Code ID setting 00 FF16 ASCII 00 FF16 K Insert group selection 00 44 00 None 00 44 00 Truncate leading zeros Disable 00 All leading 0 s 01 Only the first 0 02 ...

Page 53: ...n By setting Enable check digit will be transmitted Max Min code length Refer to Max Min code length of 3 12 Code 39 Code ID setting Refer to Code ID setting of 3 7 UPC A Insert group selection Refer to Insert group selection of 3 7 UPC A Truncate leading zeros The leading 0 digits or all 0 digits of UCC EAN 128 barcode characters can be truncated when the feature is enabled ...

Page 54: ...heck digit verification Disable 00 Enable 01 Check digit transmission Disable 00 Reserved 01 Max code length 00 99 00 99 99 Min code length 00 99 00 99 01 Code ID setting 00 FF16 ASCII 00 FF16 K Insert group selection 00 44 00 None 00 44 00 Truncate leading zeros Disable 00 All leading 0 s 01 Only the first 0 02 ...

Page 55: ...fication The check digit verification is optional Check digit transmission By setting Enable check digit will be transmitted Max Min code length Refer to Max Min code length of 3 12 Code 39 Code ID setting Refer to Code ID setting of 3 7 UPC A Insert group selection Refer to Insert group selection of 3 7 UPC A ...

Page 56: ...heck digit verification Disable 00 Enable 01 Check digit transmission Disable 00 Reserved 01 Max code length 00 99 00 99 99 Min code length 00 99 00 99 01 Code ID setting 00 FF16 ASCII 00 FF16 K Insert group selection 00 44 00 None 00 44 00 END 3 20 Code 93 Read Format Data digits variable 2 check digits optional ...

Page 57: ...onal Check digit transmission By setting Enable check digit will be transmitted Max Min code length Refer to Max Min code length of 3 12 Code 39 Code ID setting Refer to Code ID setting of 3 7 UPC A Insert group selection Refer to Insert group selection of 3 7 UPC A ...

Page 58: ...ck digit verification Disable 00 Enable 01 Check digit transmission Disable 00 Enable 01 Max code length 00 99 00 99 99 Min code length 00 99 00 99 01 Code ID setting 00 FF16 ASCII 00 FF16 L Insert group selection 00 44 00 None 00 44 00 END 3 21 Code 11 Read Format Data digits variable 1 or 2 check digits optional ...

Page 59: ... By setting Enable 1 or 2 check digits will be transmitted upon the selected check digit verification method Max Min code length Refer to Max Min code length of 3 12 Code 39 Code ID setting Refer to Code ID setting of 3 7 UPC A Insert group selection Refer to Insert group selection of 3 7 UPC A ...

Page 60: ...e 00 Enable 01 Check digit verification Disable 00 One digit 01 Two digits 02 Check digit transmission Disable 00 Enable 01 Max code length 00 99 00 99 99 Min code length 00 99 00 99 04 Code ID setting 00 FF16 ASCII 00 FF16 V Insert group selection 00 44 00 None 00 44 00 END 3 22 MSI Plessey Read ...

Page 61: ...d 11 10 1 or 2 check digits will be calculated as the sum module 10 or 11 of the data digits Check digit transmission By setting Enable 1 or 2 check digits will be transmitted upon the selected check digit verification method Max Min code length Refer to Max Min code length of 3 12 Code 39 Code ID setting Refer to Code ID setting of 3 7 UPC A Insert group selection Refer to Insert group selection ...

Page 62: ...nable 01 Check digit verification Disable 00 1 digit Mod 10 01 2 digits Mod 10 10 02 2 digits Mod 11 10 03 Check digit transmission Disable 00 Enable 01 Max code length 00 99 00 99 99 Min code length 00 99 00 99 04 Code ID setting 00 FF16 ASCII 00 FF16 O Insert group selection 00 44 00 None 00 44 00 END ...

Page 63: ...ck digit 1 and check digit 2 will be calculated as the sum module 10 or 11 of the data digits Check digit transmission By setting Enable check digit will be transmitted Max Min code length Refer to Max Min code length of 3 12 Code 39 Code ID setting Refer to Code ID setting of 3 7 UPC A Insert group selection Refer to Insert group selection of 3 7 UPC A ...

Page 64: ...Disable 00 Enable 01 Check digit verification Disable 00 Enable 01 Check digit transmission Disable 00 Enable 01 Max code length 00 99 00 99 99 Min code length 00 99 00 99 01 Code ID setting 00 FF16 ASCII 00 FF16 U Insert group selection 00 44 00 None 00 44 00 END 3 24 China Post Read Format ...

Page 65: ...UPC A SETUP Multiple scan setting Single scan setting Option barcode Option Alpha value Read Disable 00 Enable 01 Max code length 00 99 00 99 11 Min code length 00 99 00 99 11 Code ID setting 00 FF16 ASCII 00 FF16 T Insert group selection 00 44 00 None 00 44 00 END 11 Data digits Refer to Max Min code length of 3 7 Refer to Insert group selection of ...

Page 66: ...length 3 12 Code 39 Code ID setting Refer to Code ID setting of selection 3 7 UPC A Insertion group Encode character set type Two options Same Telepen symbol with different option is associated with different data output Alphanumeric Supports both letters and numbers within the data source Numeric Supports only numbers within the data source and ignores all letters Refer to Max Min code length of ...

Page 67: ...e 00 Enable 01 Check digit verification Disable 00 Enable 01 Check digit transmission Disable 00 Enable 01 Max code length 00 99 00 99 00 Min code length 00 99 00 99 01 Code ID setting 00 FF16 00 FF16 P Insertion group selection 00 66 00 66 00 Encode character set type Alphanumeric 00 Numeric 01 END ...

Page 68: ...onversion UCC EAN 128 Refer to Code ID transmission of 3 31 String transmission Cm will be identified as AIM ID UPC A or EAN 13 Barcode beginning with a single zero as the first digit has the leading 010 stripped and the barcode reported as EAN 13 Barcode beginning with two or more zeros but not six zeros has the leading 0100 stripped and the barcode reported as UPC A SETUP Multiple scan setting S...

Page 69: ...63 END ...

Page 70: ... 7 UPC A Conversion Refer to Conversion of 3 26 GS1 DataBar GS1 DataBar Truncated SETUP Multiple scan setting Single scan setting Option barcode Option Alpha value Read Disable 00 Enable 01 Code ID setting 00 FF16 ASCII 00 FF16 R Insert group selection 00 44 00 None 00 44 00 Conversion None 00 UCC EAN 128 01 UPC A or EAN 13 02 END 3 28 GS1 DataBar Expanded Read Format ...

Page 71: ... transmission Cm will be identified as AIM ID SETUP Multiple scan setting Single scan setting Option bar code Option Alpha value Read Disable 00 Enable 01 Max code length 00 99 00 99 99 Min code length 00 99 00 99 01 Code ID setting 00 FF16 ASCII 00 FF16 R Insert group selection 00 44 00 None 00 44 00 Conversion None 00 UCC EAN 128 01 END 3 29 G1 G4 FN1 substitution string setting Format of barcod...

Page 72: ...CII table to find the value of 24 2 Scan SETUP and Prefix string setting barcode 3 Scan 2 and 4 barcode 4 Scan END barcode 5 Refer to 3 31 String transmission set Prefix transmission to be Enable Scanning steps Scan the following barcodes in order Insert G1 G2 G3 G4 string setting The scanner offers 4 positions and 4 character strings to insert among the barcode data string Example Set G1 string t...

Page 73: ...3 34 44 35 Steps 1 Set FN1 substitution string to be ABCD 2 Refer to 3 31 String transmission enable FN1 substitution transmission In this example because the interface of the scanner is RS232 so set 8209 to 02 Scanning steps Scan the following barcodes in order SETUP Multiple scan setting Single scan setting Option bar code Option Alpha value Prefix string setting 0 22 characters Default None 00 ...

Page 74: ...ition Code ID position Format of barcode data transmission Prefix Code name Preamble Code ID Code length Code data Code ID Postamble Suffix Insert G1 G2 G3 G4 string position The scanner offers 4 positions to insert strings among the symbol In case of the insertion position is greater than the length of the symbol the insertion of string is not effective Code ID position It is allowed to select di...

Page 75: ...be appended before the data transmitted Postamble transmission By setting Enable postamble will be appended after the data is transmitted Code ID transmission Code ID can be transmitted in the format of either Proprietary ID or AIM ID Refer to 1 2 Default settings for various types of barcode Code length transmission The length of code data string can be transmitted before the code data when Enabl...

Page 76: ... Disable 00 Enable 01 Code name transmission Disable 00 Enable 01 Preamble transmission Disable 00 Enable 01 SETUP Multiple scan setting Single scan setting Option bar code Option Alpha value Postamble transmission Disable 00 Enable 01 Code ID transmission Disable 00 Proprietary ID 01 AIM ID 02 Code length transmission Disable 00 Enable 01 ...

Page 77: ...acter Notes to make the following barcode 1 According to different barcode printing software the method of printing following barcode is different 2 If using CODESOFT software firstly read the information through Help Index Code128 Special input syntax For example if we wish to make F1 barcode select code128 then select CODE A type and input DOC1 as data Up Down Left Right Page Up Page Down Backsp...

Page 78: ...72 Delete F1 F2 F3 F4 F5 F6 F7 F8 F9 F10 Esc F11 F12 5 ASCII table Notes The 2nd and the 3rd columns above are used for keyboard wedge only ...

Page 79: ...73 6 Test chart A908765439 UPC A UPC E UPC E1 EAN 13 ISBN ISSN EAN 8 Code 39 Code 32 ...

Page 80: ...74 Code 128 UCC EAN 128 ISBT 128 Trioptic Code 39 Default setting Disable Interleaved 2 of 5 Industrial 2 of 5 Default setting Disable Matrix 2 of 5 Codabar ...

Page 81: ...5 Test chart continue Code 93 Code 11 Default setting Disable MSI Plessey Default setting Disable UK Plessey China Post Telepen GS1 DataBar GS1 DataBar Truncated GS1 DataBar Limited GS1 DataBar Expanded ...

Page 82: ...ing mode remains unchanged Restore customer defaults Restore the customer default settings to current settings If failed restore the factory default settings But Scanning mode remains unchanged Firmware version list If you wish to display the firmware version scan the barcode above If the interface is RS232 or USB virtual COM and Decode data format is set to packet the firmware version will be pac...

Page 83: ... to enable Auto detection scan the barcode above Disable Auto detection If you wish to disable Auto detection scan the barcode above Note The Scanning mode will switch to momentary 9 Configuration alphanumeric value barcode as Para value ...

Page 84: ...78 To finish parameter setting please scan the bar code below ...

Reviews: