background image


1

2

3


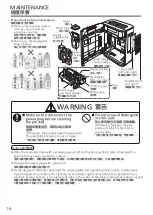
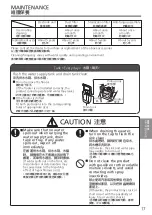
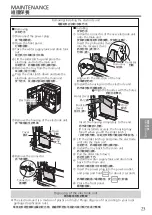
Check whether the mesh of the 

anti-fungus assembly is damaged.

Check whether the housing of 

the anti-fungus assembly is dirty.

維護保養

防霉組件 <約每月

1

次>

除菌過濾網組件 <約每月

1

次>

MAINTENANCE

防霉劑有其特殊的氣味

對人體無害

防霉劑伴隨使用會變小

並不影響防霉性能

外殼

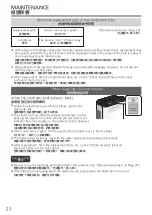
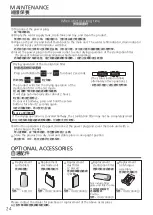
更換防霉組件的參考時間

更換期限

條件

5

1

每天

12

小時運轉時

更換後請在前面板內側的“(點檢記錄)”標籤上填寫更換
日期等

請勿用刷子刷洗或分解

確認防霉組件的網是否破損

確認防霉組件的外殼是否有髒漬

如果已有髒漬

請用柔軟的布

擦拭乾淨

如果破損

請更換

防霉劑

(自選配件

24

頁)

用水清洗

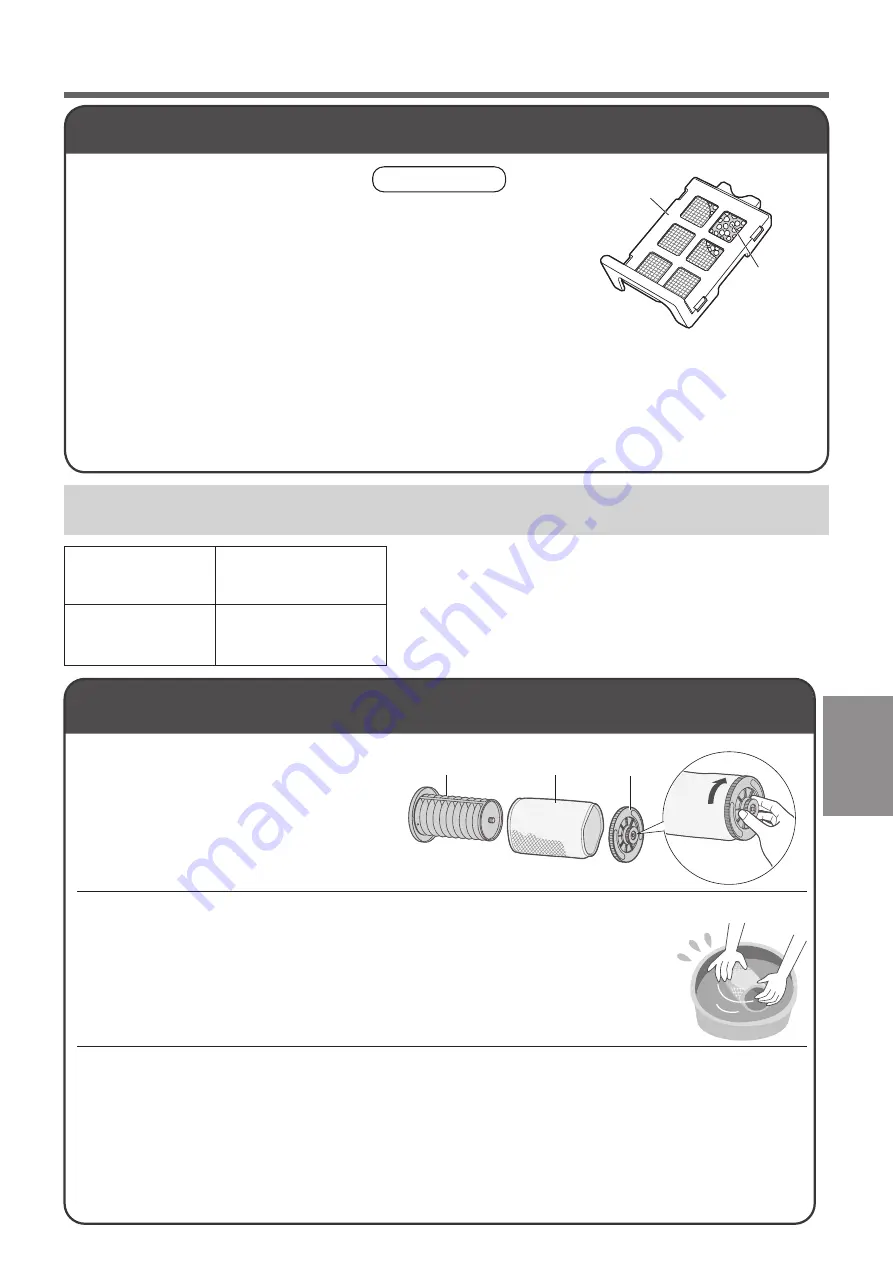
過濾網壓板

打開

不要逆轉

過濾網框架

從過濾網框架上依次拆下過濾網
壓板

除菌過濾網

將除菌過濾網插入過濾網框架

請勿在除菌過濾網和過濾網壓板及過濾網框架之間留下空隙

或壓住兩端的圓形部分

(否則會導致性能下降)

將過濾網壓板安裝到過濾網框架上

除菌過濾網

拆卸

清洗

用清水或溫水按壓清洗除菌過濾網

用水清洗過濾網框架和過濾網壓板

請勿用刷子刷洗或用洗衣機清洗

請勿使用乾燥機乾燥

(可能導致縮小)

安裝

Do not leave a gap between the sterilization filter and the filter plate as well as 

the filter frame, nor press the round parts of both ends. 

(Otherwise, performance degradation may be caused.)

Install the filter plate onto the filter frame.

Insert the sterilization filter into the filter frame.

Install

Wash

Do not reverse it

Open

Wash the filter frame and filter plate with water

Do not dry it with a drier. (Doing this may cause shrinkage)

Do not scrub it with a brush or wash it with a washing machine.

Disassemble

Sterilization filter assembly <About once a month>

After replacement, fill in the replacement date, etc. 

on the "(Check records)" label on the inner surface 

of the front panel.

(Optional accessories:  Page 24)

The product runs 

12 hours a day.

Filter frame

Filter plate

Conditions

Replacement cycle

Reference replacement cycle of the anti-fungus assembly

Anti-fungus 

agent

Housing

The anti-fungus agent has its own special 

smell, harmless to humans.

The anti-fungus agent will be 

small along with the use. This 

is not a problem with the 

anti-fungus performance.

If dirty, wipe it clean with 

a soft cloth.

If damaged, replace it.

Do not scrub it with a brush, 

nor disassemble it.

Wash it with water.

Anti-fungus assembly <About once a month>


防霉組件中有時會出現粉末

並不影響使用

The anti-fungus assembly 

may have powder sometimes. 

This is normal and not a 

problem with use.

提示事項

Notice

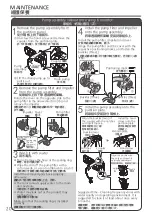
Press and wash sterilization filter wish clean/warm water.

sterilization filter

21


MAINTENANCE

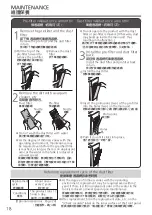
Remove the filter plate and 

sterilization filter from the 

filter frame.  

About once 

every 5 years

Summary of Contents for Ziaino F-JPT70H

Page 1: ...e SAFETY PRECAUTIONS section P 2 6 before use Failure to comply with instructions could result in injury or property damage Please retain this booklet for future reference CONTENTS SAFETY PRECAUTIONS 2 6 7 7 8 SETTING REQUIREMENTS OPERATING REQUIREMENTS 8 10 EACH PARTS IDENTIFICATION OPERATION 11 13 WATER SUPPLY DRAINAGE METHOD 13 15 ADDING A SALT TABLET 15 24 24 27 WHEN REPLACING THE ELECTRODE UN...

Page 2: ...害 請務必遵守安全注意事項 This symbol indicates an action that must not be performed This symbol indicates an action that must be performed The following symbols differentiate the levels of danger or injury that may result if the product is not used correctly as instructed The following symbols are used to indicate the type of instructions that need to be followed The symbols given below are examples Those th...

Page 3: ...hat customers with implanted medical pacemakers keep their pacemaker implantation sites away from the opening and closing part of the front panel water supply tank drain tank and tray of this product Otherwise the magnets on the product may negatively affect the pacemaker Otherwise electric shock may occur Do not place cups etc on the main unit 禁止用濕手接觸電源插頭 否則可能會導致觸電 禁止弄濕機體 禁止在機體上放置水杯等 否則產品可能會短路 導致...

Page 4: ...則可能會導致動物 不適 植物風乾 禁止放置於油或可燃性氣體可能 出現洩漏的場所使用 否則可能因產品吸入而 導致起火或冒煙 否則產品可能會翻倒 導致受傷 水 灑出會導致火災 觸電 沾濕傢俱等 有小孩的家庭要多加注意 Otherwise a fire or smoke may occur due to ignition in the product Families with children should pay more attention Otherwise it may cause discomfort to the animals and dry out the plant Do not use the product in the place where oil or inflammable gas may be leaked Do not sit on or lean again...

Page 5: ...not clean the product with gasoline or other volatile mixture solvents and avoid contacting with spray insecticides Do not drink the water in the water supply tank drain tank or tray or feed animals or water plants with it Do not use a punctured or damaged water supply tank drain tank or tray Do not add chemicals air fresheners essential oils etc into the water supply tank or tray Otherwise dirt m...

Page 6: ...the product and disconnect the power plug take out the tank and pour water out of the water supply tank drain tank and tray Otherwise the product may slip out injury may occur Hold the left and right handles but not the louver operation part cover and the front panel to carry the product If water spills out on the floor etc discoloration or deterioration may be caused due to the bleaching effect o...

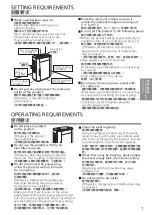
Page 7: ...may be caused as sterilization is not available Make sure that there is water in the water supply tank and keep the power plug inserted since the cleaning operation Page 13 will start automatically once the product stops working Do not use the product with the air inlet filter removed Do not disconnect the power plug unless the product will not be in use for a long time Do not place any object on ...

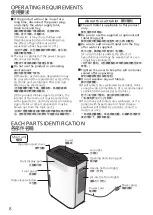
Page 8: ...hlorous acid is weakened while the power is off There is no problem if the power plug is disconnected briefly The salt tablet is applicable to this product only Tighten the cover to keep the salt container sealed after unpacking Do not swallow any salt tablets Be sure to use the supplied or optional salt tablet Page 24 If no salt tablet is added the effect of hypochlorous acid may be weakened or e...

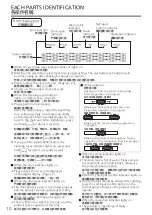
Page 9: ... 開按鈕 電極復位按鈕 指示燈 清潔復位按鈕 指示燈 Control panel Digital display Safety lock button indicator Cleaning reset button indicator Electrode reset button indicator Electrolytic strength button indicator Air volume button indicator Front display part Floater inside Floater inside Sterilization filter assembly Anti fungus assembly inside Electrode unit inside Dust filter left and right Pre filter left and right ...

Page 10: ...product cannot operate at this time The front panel is open or not closed properly and the product cannot operate at this time After the maintenance install the dust filter tray pump assembly anti fungus assembly and sterilization filter assembly Pages 16 22 back to the main unit After installation press and hold for about 3 seconds If you perform maintenance before the cleaning reset indicator li...

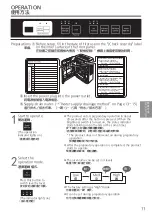
Page 11: ...t air during preparatory operation The product enters preparatory operation in about 20 seconds after the button is pressed When the brightness switch is turned on the status indicator starts blinking on both ends at the same time Press this button to switch level by level Supply drain water Water supply drainage method on Page 13 15 The indicator lights on 使 用 方 法 OPERATION Approx once every five...

Page 12: ...ction by adjusting the louver by hand The louver is adjustable in 3 levels About 90 The purpose is to prevent misoperation You can select the amount of the hypochlorous acid to be produced If you are not satisfied with the brightness press this button to turn off the status indicator Then other indicators will dim With this setting if you press any button other than the product will sound BI BI an...

Page 13: ...IBI 5 times and stop operating The water refill indicator and drain indicator are blinking Water level window Used to check the remaining amount of water in the water supply tank If you remove the water supply tank still with water the drain indicator will blink after about 5 seconds After the drain indicator blinks please empty the drain tank otherwise the product cannot operate Water refill Drai...

Page 14: ...ous bacterium is difficult to breed Do not use the following water Otherwise the tank deformation may be caused Water from a water purifier alkaline ion water mineral water Hot water above 40 or water mixed with detergents Water mixed with chemicals air fresheners and essential oils Otherwise the tank may be damaged and the furniture appliances etc may be wet Page 6 Otherwise mildew and miscellane...

Page 15: ...h the sink clean Tray Drain tank Drain outlet Close the front panel Press the salt input confirm button The salt input confirm indicator lights off Be sure to close the front panel properly Once the power plug is inserted into the power outlet the product starts to drain water Be sure to use the supplied or optional salt tablet Page 24 If no salt tablet is added the effect of hypochlorous acid may...

Page 16: ...f dirtiness varies with the water quality and operating environment maintenance may be required even before the cleaning reset indicator lights on or before the specified time is reached as long as there is an unpleasant odor or the water in the tank is reduced at a slower speed Water supply tank Floater inside Floater inside Sterilization filter assembly Anti fungus assembly inside Electrode unit...

Page 17: ...o water spills out when carrying the water supply tank drain tank or tray If any water spills out wipe it off immediately Otherwise the sink and water pipe may oxidize to form rust When draining the water turn on the tap to flush the sink clean Do not clean the product with gasoline or other volatile mixture solvents and avoid contacting with spray insecticides Otherwise the product may crack or s...

Page 18: ... an unpleasant odor or the water in the tank is reduced a slower speed upon maintenance The product runs 12 hours a day Conditions About once every 2 years Replacement cycle Reference replacement cycle of the dust filter Holes Protrusions Install the dust filter Install the pre filter and dust filter back Install the dust filter and pre filter back in turn Do not operate the product with the dust ...

Page 19: ... the sterilization filter assembly into the recess of the tray Insert the partition panel along the groove Install the partition panel sterilization filter assembly and anti fungus assembly onto the tray Wipe the dirt with a swab or use a toothbrush to scrub it Remove the incrustation and any other dirt with a soft cloth moistened in water Empty the tray and flush thoroughly 浮子 別扣 水盤 孔 水盤 孔 水盤 突出部...

Page 20: ...pump filter impeller and cover Install the pump filter and impeller onto the pump assembly Make sure that the sealing ring is installed correctly Water may leak out or the product may malfunction Install the removed parts back properly otherwise Wipe the dirt off the pump filter with a cotton swab or use a toothbrush to scrub it Do not remove the hose or the sealing ring Wash it with water 葉輪 蓋子 蓋...

Page 21: ... with a drier Doing this may cause shrinkage Do not scrub it with a brush or wash it with a washing machine Disassemble Sterilization filter assembly About once a month After replacement fill in the replacement date etc on the Check records label on the inner surface of the front panel Optional accessories Page 24 The product runs 12 hours a day Filter frame Filter plate Conditions Replacement cyc...

Page 22: ...ill become steady on after blinking for about one month When the electrode reset indicator becomes steady on the product cannot operate 當電極復位指示燈閃爍時 當電極復位指示燈閃爍時 請予以更換 When the electrode reset indicator blinks replace the electrode unit When the electrode reset indicator blinks When replacing the electrode unit After replacement fill in the replacement date etc on the Check records label on the inne...

Page 23: ...e tray back to the main unit Lift the slider latch up and place the electrode unit into the main unit If not installed securely the housing may fall off when you lift the slider latch Insert the housing completely to the end Close Buckles two Holes two Align the buckles with the holes Install the housing onto the electrode unit Align with the direction of the line Protrusions Recesses Insert the p...

Page 24: ...ce in an upright position After the operation is stopped disconnect the power plug and cover the main unit with a plastic bag or the like If the drying operation is canceled halfway the sterilization filter may not be completely dried The status indicator blinks alternately at two positions It will stop automatically after about 2 hours To cancel it halfway press and hold these two buttons for abo...

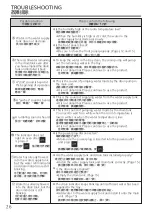
Page 25: ...15頁 因為次亞鹽素酸分解了污垢和臭氣 不喜歡氯 消毒 的氣味時請將電解強度調到 低 第12頁 確認已向水盤內放入1粒鹽粒後再按確認鹽粒按鈕 第15頁 即使等上20秒鐘仍完全不吹風時 請聯繫經銷商 可能發生的狀況 出風量少 出風口吹出的風有臭味 供水水箱水量不減少 不吹風 發出氯 消毒 的氣味 按下 後約20秒鐘為預備運轉時間 第12頁 Remove the incrustation and dust Page 21 Is the pre filter or the dust filter air inlet clogged with dust or the like Water in the water supply tank dose not decrease Are the tray and sterilization filter dirty or are you not usin...

Page 26: ...s blinking until sufficient water has been supplied to the tray Water has already flowed into the drain tank but the drain indicator is still blinking Empty the drain tank Page 15 Is the drain tank emptied Are the water supply tank and drain tank installed properly Water has already flowed into the water supply tank but the water refill indicator and drain indicator are still blinking Make sure th...

Page 27: ...d be sure to close the front panel properly Pages 15 and 19 The tray is not set securely Reinsert the power plug Clean the drain tank Page 17 The drain tank is dirty Reinsert the power plug Lower the electrode unit Page 19 Refer to TROUBLESHOOTING Page 27 The slider latch electrode unit is at the top position Reinsert the power plug Clear any foreign objects around the electrode unit Foreign matte...

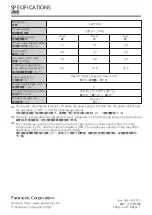
Page 28: ...water is obtained in an environment where the room temperature is 20 and the relative humidity is 30 The continuous operation time may differ depending on the room temperature and humidity The noise is A weighted sound pressure level measured in a total silencing laboratory environment The power consumption is about 1 W when the power plug is inserted into the power outlet and the operation is Off...

Reviews: