background image

76

Appendix

Display Setup Menu of Camera

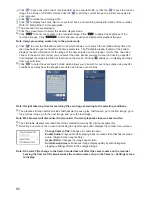
You can operate the camera setup menu by calling up it from the recorder.
While in the PTZ mode, select the “Device Menu” from the Advanced PTZ menu, and select “On” from the On 

or Off menu. The camera setup menu displays on the PTZ camera screen.
You can operate the camera setup menu by using the following buttons.

p

p

To move the cursor:

 Arrow Buttons (Up / Down)

p

p

To change the selected parameter:

 Arrow Buttons (Left / Right)

p

p

To determine the selected parameter / To display the submenu:

 Play/Pause Button (  button)

p

p

To return to the previous menu:

 [RET] button

Note:  To display the special menu of the camera setup menu, press and hold the   button for three 

seconds or longer after moving the cursor to “SPECIAL” on the camera setup menu. 

To reset the settings of the camera setup menu to the default settings, press and hold the   

button for 10 seconds or longer after moving the cursor to “CAMERA RESET” on special menu 

of the camera setup menu.

Web Browser

Using Web Browser allows you to access a remote recorder, monitor live video images and search recorded 

video using Internet Explorer web browser anytime from virtually anywhere.
Computer system requirements for using the Web Browser are:

p

p

OS:  Microsoft

®

 Windows

®

 XP x86 (32-bit) (Service Pack 3), Microsoft

®

 Windows

®

 Vista x86 (32-bit) 

(Service Pack 1), Microsoft

®

 Windows

®

 7 x86 (32-bit)

p

p

CPU: Intel Pentium 

III

 (Celeron) 600 MHz or faster

p

p

Memory: 128 MB or higher

p

p

Monitor: 1024 

 768 pixels or more, 24-bit True color or better

p

p

Web browser: Windows

®

 Internet Explorer

®

 7.0 or later

Start Internet Explorer on your local PC. You can run the Web Browser by entering the following information in 

the address fi eld.


– “http://IP address:port number” (The recorder IP address and the Web Browser port number (default: 

12088) set in the Network setup screen (Web Browser tab))

Note:  You will need to get the appropriate IP address for the recorder you want to connect to and the 

Web Browser port number from your network administrator.
Web Browser only works with Microsoft Internet Explorer and will NOT work with other browsers.

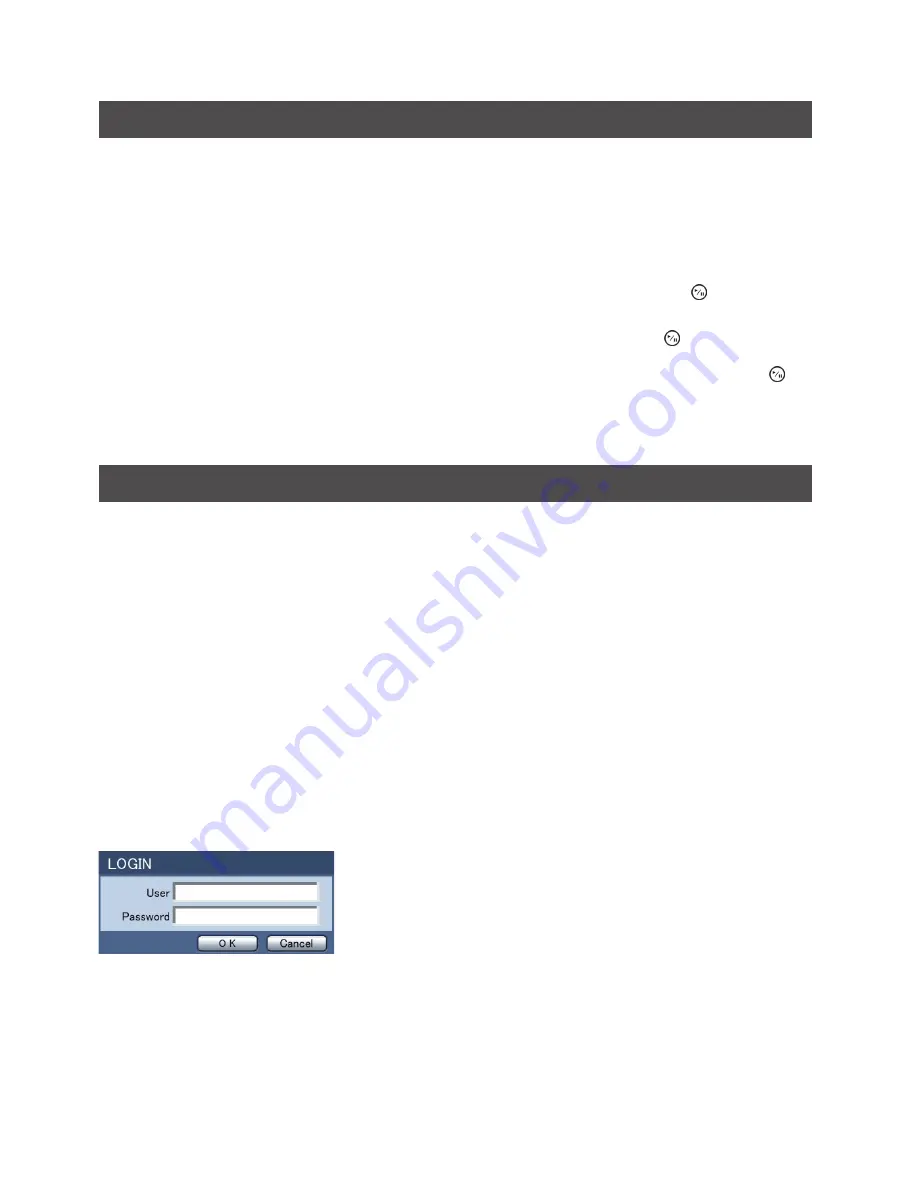
Entering “User” and “Password” and clicking the [OK] button logs in 

using the selected mode.

Note:  The maximum number of accessible users to the recorder simultaneously is the following: 

Watch:  4 users (including 1 Audio user)

Search:  2 users

Status:  2 users

Summary of Contents for WJ-HL208/G

Page 1: ...te this product please read these instructions carefully and save this manual for future use The model number is abbreviated in some descriptions in this manual Operating Instructions Digital Disk Recorder Model No WJ HL208A G WJ HL208A G ...

Page 2: ......

Page 3: ...sulta conforme ai seguenti standard o altri documenti normativi conformi alle disposizioni delle direttive 2006 95 CE e 2004 108 CE Vi erklærer oss alene ansvarlige for at produktet som denne erklæringen gjelder for er i overensstemmelse med følgende normer eller andre normgivende dokumenter som følger bestemmelsene i direktivene 2006 95 EC og 2004 108 EC WARNING This is a class A product In a dom...

Page 4: ... FAILURE OR PROBLEM OF THE PRODUCT 5 ANY PROBLEM CONSEQUENTIAL INCONVENIENCE OR LOSS OR DAMAGE ARISING OUT OF THE SYSTEM COMBINED BY THE DEVICES OF THIRD PARTY 6 ANY CLAIM OR ACTION FOR DAMAGES BROUGHT BY ANY PERSON OR ORGANIZATION BEING A PHOTOGENIC SUBJECT DUE TO VIOLATION OF PRIVACY WITH THE RESULT OF THAT SURVEILLANCECAMERA S PICTURE INCLUDING SAVED DATA FOR SOME REASON BECOMES PUBLIC OR IS US...

Page 5: ...se this apparatus near water 6 Clean only with dry cloth 7 Do not block any ventilation openings Install in accordance with the manufacturer s instructions 8 Do not install near any heat sources such as radiators heat registers stoves or other apparatus including amplifiers that produce heat 9 Do not defeat the safety purpose of the polarized or grounding type plug A polarized plug has two blades ...

Page 6: ...are vulnerable to vibration Handle them with care It is possible to damage them if they are moved while their motors are still running p p Do not move them just after turning the power off for around 30 seconds p p The lifetime of hard disk drives is limited by use Write errors may occur frequently after around 20 000 hours of operation and the head and motor deterioration may occur after around 3...

Page 7: ...s regarding the source code Handle this product with care Do not strike or shake as this may damage this product Do not strike or give a strong shock to this product It may cause damage or allow water to enter this product Precautions for installation This product is designed for indoor use Avoid the following locations for installation p p Locations exposed to direct sunlight p p Places subject t...

Page 8: ...ain power supply How to mount the power cord Insert the power cord to the limit on the recorder Be sure to connect the power cord via any of the following breaking devices p p Connect the power cord via a power supply control unit p p Install the product near a power outlet and connect the power cord via the power plug p p Connect the power cord to the breaker with contact gap of 3 0 mm or more of...

Page 9: ...ontrols 19 1 Camera Buttons 1 to 8 19 2 HDD Indicator 19 3 Alarm Indicator 19 4 Link Indicator 20 5 Copy Indicator 20 6 Operate Indicator 20 7 Mouse Copy Port 20 8 Arrow Buttons 20 9 Play Pause Button 20 Menu PTZ Button 20 Playback Edit Group Button 21 Next Group Sequence Button 21 Multiscreen Spot Button 21 EL Zoom Return Button 21 Copy Preset View Button 21 Alarm Preset Set Button 21 A Panic But...

Page 10: ...up Mode 58 EL Zoom Mode 58 PTZ Mode 58 Event Monitoring 59 Covert Camera 60 Spot Monitoring 60 Status Monitoring 61 Recording Video 62 Panic Recording 62 Recording Audio 63 Playing Recorded Video 63 Searching Video 64 Search Menu 65 Event Log Search 67 Record Table Search 68 Motion Search 70 Text In Search 71 Bookmarks 73 Clip Copy 73 Appendix 76 Display Setup Menu of Camera 76 Web Browser 76 Web ...

Page 11: ...3 Figure 28 Record Settings Advanced Mode setup screen 34 Figure 29 Default Schedule Advanced Mode screen 35 Figure 30 Record Pre Event setup screen 35 Figure 31 Event Motion setup screen 36 Figure 32 Motion Detection Sensitivity screen 36 Figure 33 Motion Detection Zone screen 36 Figure 34 Motion Detection Zone menu 36 Figure 35 Motion Detection Min Blocks screen 37 Figure 36 Daytime Setup screen...

Page 12: ...t menu 59 Figure 73 Advanced PTZ menu 59 Figure 74 PTZ panel 59 Figure 75 Sequence menu 60 Figure 76 Event Status Event Status screen 61 Figure 77 Event Status Storage screen 62 Figure 78 Select Playback Camera menu 63 Figure 79 Compact View Record Table 64 Figure 80 Search menu 64 Figure 81 Go to the Date Time screen 65 Figure 82 Event Log Search screen 67 Figure 83 Event Log Search Option screen...

Page 13: ...the most advanced VCR The recorder converts analog PAL video to digital images and records them on a hard disk drive Using a hard disk drive allows you to access recorded video almost instantaneously there is no need to rewind tape The technology also allows you to view recorded video while the recorder continues recording video Digitally recorded video has several advantages over analog video rec...

Page 14: ...order Flash Drive Alarm Output Flashing Light Siren Network 1 2 Web Browser Mouse Sensors 1 8 Spot Monitor Main Monitor VGA Cameras 1 8 Audio Input 1 4 Audio Output Powered speaker Amplifier Figure 1 Typical installation ...

Page 15: ...all the recorder Refer to the installation manuals for the other items that make up part of your system Figure 2 Recorder rear panel 1 Video Input Connector 2 Video Output Connector 3 Audio Input Output Connector 4 Maintenance eSATA Port 5 Alarm Input Output Terminal 6 RS485 Terminal 7 RS232 Terminal 8 Factory Reset Switch 9 Monitor Output Connector Network Port Power Inlet Your recorder can be us...

Page 16: ...rom a microphone 4 Maintenance eSATA Port Use this port to perform maintenance operations Do not use for normal operation 5 Alarm Input Output Terminal Note To make connections on the Alarm Terminal Strip press and hold the button and insert the wire in the hole below the button After releasing the button tug gently on the wire to make certain it is connected To disconnect a wire press and hold th...

Page 17: ... signals Connect RX TX and RX TX of the control system to the A and B respectively of the recorder See Chapter 3 Configuration and the PTZ cameras manual for configuring the RS485 connection Connector Pin Outs Master Unit Slaver Unit A g To g TX RX B g To g TX RX 7 RS232 Terminal Connect the text in device 8 Factory Reset Switch The recorder has a Factory Reset Switch to the right of the RS232 ter...

Page 18: ...er for remote monitoring searching configuration and software upgrades See Chapter 3 Configuration for configuring the Ethernet connections Important The network connector is not designed to be connected directly with cable or wire intended for outdoor use Power Inlet Connect the provided AC power cord to the recorder and then to a wall outlet WARNING ROUTE POWER CORDS SO THAT THEY ARE NOT A TRIPP...

Page 19: ...owing describes each button and control Take a few minutes to review the descriptions You will use these to initially set up your recorder and for daily operations Note You can also use a USB mouse not supplied to navigate through the screens and menus much like you would on a computer 1 Camera Buttons 1 to 8 Pressing the individual camera buttons will cause the selected camera to display full scr...

Page 20: ...ttons changes the PIP screen size In the playback mode pressing the button plays video backward at high speed Pressing the button again toggles the playback speed from and The screen displays and respectively Pressing the button plays video forward at high speed Pressing the button again toggles the playback speed from and The screen displays and respectively When in the pause mode pressing the bu...

Page 21: ...e number Pressing and holding the SEQUENCE button for three seconds or longer displays live channels sequentially Multiscreen Spot Button Pressing the MULTISCREEN button toggles between different display formats The available formats are PIP 2x2 1 5 1 7 and 3x3 2x2 1 5 1 7 and 3x3 on a Spot Monitor Pressing and holding the SPOT button for three seconds or longer allows you to select which cameras ...

Page 22: ...ve the mouse pointer on the right edge of the screen and then select Login in the Live Monitoring menu to enter the setup screens The Login screen appears Figure 4 Login screen Select a User and enter the password by pressing the appropriate combination of Camera number buttons and then the button Enter the password default 1234 when logging in the ADMIN user default for the first time If you do n...

Page 23: ...ual Keyboard screen Use the arrow keys to highlight the character you want in the name or title and press the button That character appears in the title bar and the cursor moves to the next position Pressing toggles between the upper and lower case keyboards backspaces and deletes entered characters Pressing toggles between different keyboard layouts You can use up to 31 characters including space...

Page 24: ...utton The Upgrade screen appears The screen displays the upgrade package file names that are available The rui indicates that the file is for software upgrades and ofi indicates that the file is for optical drive firmware upgrades Figure 9 Upgrade screen Select the desired file and press the button Highlighting the Install button and pressing the button will install the selected software package H...

Page 25: ... the recorder settings by importing saved settings the time related settings Date Time Time Zone and Daylight Saving Time will NOT be changed Important The USB device must be FAT16 or FAT32 format Highlight Show System Log and press the button to display the System Log Figure 12 System Log screen The System Log screen lists system activities up to 5 000 from the latest that have occurred along wit...

Page 26: ...r not you want to shut the system down Figure 14 Shutdown screen After selecting Shutdown and pressing the button a screen will appear telling you when it is safe to disconnect power Date Time Figure 15 System Date Time setup screen Highlight the first box beside Date and press the button The individual sections of the date will highlight Use the Up and Down arrow buttons to change the number Use ...

Page 27: ... appears that you can use to enter the IP address or domain name of the time server Note You can use the domain name instead of IP address if you already set up the DNS Server when setting up the LAN Highlight the box beside Interval and press the button Set the time interval for synchronization from 30 minutes to 1 day at various time intervals Last Sync Time displays the last time the recorder w...

Page 28: ...roup or User cannot be deleted Highlight the and press the button You will be asked to confirm that you want to delete the User or Group To delete the User currently logged into the recorder on a local system or a PC running RAS log the user out of the system first and then delete the user To add a Group highlight the Group box and press the button A virtual keyboard appears allowing you to enter ...

Page 29: ...a User highlight the User box and press the button A virtual keyboard appears allowing you to enter the User Name You can use up to 15 characters including spaces in the user name Enter the name and assign the User to a Group and password You can use camera buttons 1 to 9 on the front panel to assign the password The password can be up to 8 digits You will be asked to confirm the password Note In ...

Page 30: ...ata on the selected device highlight Clear and press the button You will be asked whether or not you want to delete the data Figure 23 Internal 1 Storage Information screen Important Do NOT disconnect the USB cable or the power from the device while copying video clips If the USB cable is disconnected while copying video clips archived data might be lost System Event Figure 24 System System Event ...

Page 31: ...80 to 99 Highlight the Settings box beside Disk Bad and press the button Select percentage level of bad disk sectors at which you want the recorder to trigger an alert Percentage levels range from 10 to 90 Highlight the Settings box beside Disk Temperature and press the button Select the temperature of hard disk drive at which you want the recorder to trigger an alert if the temperature exceeds th...

Page 32: ...e lapse recording from 1 to 99 days The Limit Time Lapse Recording feature will function when the storage device has enough space to record video data longer than the preset period When this feature is On the recorder records over the oldest time lapse video once all available storage has been used in the Overwrite mode so more event video can be saved Selecting Never will disable the Limit Time L...

Page 33: ...etween On and Off In the Schedule On mode the recorder records video based on the schedule established in the Schedule screen When turning Schedule recording Off you will be asked to confirm your decision and displays at the top left corner of each camera screen Panic recording will function even when Schedule is turned off displays during panic recording Highlight the Schedule Mode box and press ...

Page 34: ... button to select which cameras will be recorded Simple Mode Only Highlight the box under the Settings heading and press the button to define the recording settings Figure 28 Record Settings Advanced Mode setup screen You can set the ips Quality and Resolution ips Quality Resolution and Dwell for Advanced Mode setup of the recording for any modes you set up in the Mode column If you do not set the...

Page 35: ... pressing the button allows you to set the length of time you would like to record for the associated event Advanced Mode Only Pre Event Figure 30 Record Pre Event setup screen When the recorder is in the Event Record mode it is possible to have it record images before the event occurs The Pre Event screen allows you to define how to handle pre event recording If you do not have Event set up in th...

Page 36: ...ou can set up motion zones one block at a time in groups of 8 individual block groups A block group is positioned within the image area using the Up and Down arrow buttons and individual blocks within the block groups are selected or cleared using the camera buttons Figure 33 Motion Detection Zone screen Press the button to display the menu screen The menu on the setup screen has the following fun...

Page 37: ...nts occurred during the preset interval range Note The record action for motion events will not be affected by the Motion Ignoring function Highlighting Daytime Setup and pressing the button allows you to set up the Daytime range Highlight the box beside Daytime and press the button Use the Up and Down arrow buttons to set the Daytime range The recorder will consider the remaining time range as th...

Page 38: ...otify a number of different devices move PTZ cameras to preset positions and or display a camera on a SPOT monitor Highlight Use Ignoring Time and press the button to toggle between On and Off When set to On the recorder will ignore video loss events occurring during the preset period Highlighting Time Setup and pressing the button allows you to set up event ignoring time Video Blind Figure 39 Eve...

Page 39: ...oring Time and press the button to toggle between On and Off When set to On the recorder will ignore video blind events occurred during the preset period Highlighting Time Setup and press the button allows you to set up event ignoring time Text In Figure 40 Event Text In setup screen The recorder can be set to react to text input from devices This screen allows you to configure the recorder for ea...

Page 40: ... of text that you want the recorder to record You can choose from 0 to 10 Highlight the box beside Line Delimiter and press the button Use the virtual keyboard to enter the character s that the device uses to indicate the end of a line Special characters can be created using and a capital letter e g J for NL New Line M for CR Carriage Return Refer to the device manufacturer s documentation for Lin...

Page 41: ... list in the Use column Note When selecting the Covert 1 the recorder displays the camera title and status icons on the covert video When selecting the Covert 2 the recorder displays only camera title on the covert video A user who does not have Covert Camera View authority cannot view video from cameras set to Covert 1 or Covert 2 in both the live monitoring and playback modes PTZ Figure 43 Camer...

Page 42: ...ighlighting it and using the Up and Down arrow buttons to increase and decrease the number The PTZ ID number can be set from 1 to 96 Highlight the Setup box and press the button The Port Setup window appears Configure the port s setting based on the PTZ camera manufacturer s instructions Figure 45 Port Setup screen Device Setup Audio Figure 46 Device Audio setup screen The recorder can record up t...

Page 43: ...tion in those boxes The Day box allows you to select the days that the alarm schedule will be active The choices are Sun Mon Tue Wed Thu Fri Sat M F Hol and All The Range box allows you to set the time that the alarm schedule will be active in 15 minute increments from 00 00 to 24 00 The Mode box allows you to set how the alarm reacts during the scheduled time When set to On the Alarm Out is activ...

Page 44: ...ired maximum bandwidth from 100 Kbps to 1 Gbps Note When limiting the network bandwidth the remote watch image on the PC running Web Browser might not be displayed properly The recorder supports two way audio communication between a local system and Web Browser Highlighting the box beside Remote Audio Channel and pressing the button allows you to select the audio channel that sends audio to the We...

Page 45: ... You will need to get the appropriate Port Numbers for Web Browser related program Status Callback Watch and Search from your network administrator Figure 50 Port Number Setup screen Change the numbers by highlighting them and using the Up and Down arrow buttons to increase or decrease the number The factory default Port settings are p p Remote Status 8200 p p Remote Callback 8201 p p Remote Watch...

Page 46: ...screen Selecting DHCP from the Type and highlighting Save button reads the current IP address of the recorder configured by DHCP Dynamic Host Configuration Protocol network Highlight Auto Default and press the button to toggle between On and Off When it is On the recorder will obtain the IP address of the DNS server automatically Note Selecting Auto will only be enabled when the recorder is config...

Page 47: ...er or not the name you entered can be used Note The FEN Name you entered should be checked by selecting Check otherwise the FEN changes will not be saved When entering no name or a name already registered on the DVRNS server an error message displays The box beside Status displays the current information of the Rendezvous server and NAT Network Address Translation device RTSP Figure 53 Network RTS...

Page 48: ... number or start Internet Explorer on your Blackberry or other mobile devices and enter http IP address Web Browser port number Some media players might play video properly depending on network conditions RTSP service might not be supported depending on the type of media player Web Browser Figure 54 Network Web Browser setup screen Highlight Use Web Browser Service and press the button to toggle b...

Page 49: ...omputer you want contacted during an event You can enter up to five IP addresses Highlight the box beside Retry and enter the number of times you would like the recorder to try contacting the computer You can select from 1 to 10 retries Mail Figure 56 Notification Mail setup screen The recorder can be set up to send an email when an event occurs The Mail Group and Recipient can be turned On or Off...

Page 50: ...G format to an email Highlight the Mail and press the button to add a mail Recipient Highlight Use and press the button to toggle between On and Off Assign the Recipient to a Group and enter the Recipient s Display Name Highlight the box beside Address and enter the recipient s e mail address and mail server provider Figure 58 Recipient screen Highlight the box under the Attach Type heading and pr...

Page 51: ...the button to add a schedule Highlighting the boxes under the Column heading and pressing the button allows you to edit the information in those boxes The Day box allows you to select the days that the notification schedule will be active The choices are Sun Mon Tue Wed Thu Fri Sat M F Hol and All The Range box allows you to set the time that the notification schedule will be active in 15 minute i...

Page 52: ...der is not in the Overwrite mode p p Date Time The current date and time information displays p p User Name The name of the current user logged in displays p p Background Panel The background panel at the bottom of the screen displays in black p p Camera No The camera number displays at the top left corner of each camera screen p p Camera Title The camera title displays at the top left corner of e...

Page 53: ...n layouts pages so that all the cameras will be displayed You can also set up the recorder to display one camera or a group of cameras all the time while cycling through the remaining cameras in a channel window This can be done with one camera displayed full screen while displaying the channel window as a PIP picture in picture or displaying the cameras in a grid pattern with the bottom right win...

Page 54: ...can define which cameras display sequentially on the Spot Monitor when in the single screen display format Highlighting the box under the Camera and pressing the button toggles between On and Off You can adjust the display dwell time by highlighting the box under the Dwell and pressing the button You can select dwell intervals ranging from 1 to 20 seconds ...

Page 55: ...nstalled the recorder following the instructions in Chapter 2 Installation it is ready to record Live Monitoring As soon as the recorder completes its initialization process it will begin showing live video on the attached monitor and playing live audio through the attached speaker The default mode is to display all cameras at once Pressing any camera button will cause that camera to display full ...

Page 56: ...1 7 or 3x3 Note In the 1 5 or 1 7 display mode the main channel indicates the channel displayed on the large screen which is displayed in the top left You can select the camera you want to display on the main channel screen Select a channel on the screen and click the right mouse button to display the Camera Menu Selecting Go To Main swaps the selected channel with the main channel This function i...

Page 57: ...om and choosing the camera number zooms the current image of the selected camera on the screen It is the same as pressing the EL ZOOM button Selecting EL Zoom again in the Camera Menu again exits the EL Zoom mode Refer to the following EL Zoom Mode section for details p p Audio Selecting Camera Menu Audio toggles audio output On and Off p p Color Control Selecting Camera Menu Color Control and cho...

Page 58: ... camera number You can change the screen layout in this way Note The recorder will not display video if you EDIT GROUP bottom right area on 3x3 format EL Zoom Mode You can enlarge an area of the video by pressing the EL ZOOM button For a few seconds after pressing the EL ZOOM button a rectangle displays on the screen A rectangle shows the area that will be enlarged You can move the rectangle aroun...

Page 59: ...Position the mouse pointer at the bottom of the screen and the following PTZ toolbar will display Figure 74 PTZ panel Clicking on the left side exits the toolbar If you want to display the toolbar again position the mouse pointer at the bottom of the screen Change the toolbar location by clicking the empty space on the left side of the toolbar and drag it to where you want it located on the screen...

Page 60: ...ially Select Sequence again to stop sequencing on the Spot Monitor Any cameras that are Off have lost video or are set to Covert unless the user has authority to view covert cameras will be excluded from the sequence When the Spot Monitor is in the sequence mode you can set the camera s display dwell time Refer to Chapter 3 Configuration Display Screen section for details Figure 75 Sequence menu S...

Page 61: ...is detected based on the settings you made in the System Event setup screen on the System menu Panic Record will be highlighted while the recorder is in the panic recording mode Disk Almost Full will be highlighted when the recorder is not in the Overwrite mode and the level of disk usage reaches the Disk Almost Full percentage you made in the System Event setup screen on the System menu Disk Full...

Page 62: ...e recorder following the instructions in Chapter 2 Installation it is ready to record The recorder will start recording based on the settings you made in the Record setup screen See Chapter 3 Configuration Overwrite On or Overwrite Off The factory default is Overwrite On It does this by recording over the oldest video once the hard disk is full Setting the recorder to Overwrite Off causes it to st...

Page 63: ...for playback Figure 78 Select Playback Camera menu When playing video for the first time the recorder will display the most recent image When playing video subsequent times the recorder will start playing video from the last recalled image Recorded audio will be played when the recorder displays a camera with recorded audio in full screen mode Note Only the administrator and users with Covert Came...

Page 64: ...rent camera group to the next camera group and the screen displays page number You can use a mouse for convenient playback control Position the mouse pointer on the playback screen and the following Record Table Search Compact View Mode screen will display The individual controls on the toolbar perform the following functions as described below Figure 79 Compact View Record Table Go to the previou...

Page 65: ...recorded during the selected time a message appears alerting you that no image was recorded at that time The button and arrow buttons can now be used to review the surrounding video 3 Bookmark Selecting Bookmark in the Search menu adds the current playback point to the bookmark list See the following Bookmarks section for details 4 Multi Screen p p Full Screen Selecting Display Full Screen and cho...

Page 66: ...tion for details Note The Camera Menu also can be displayed by clicking the right mouse button on the screen while in the search mode Export p p A B Clip Copy Selecting Export A B Clip Copy will set the starting point of the video to be clip copied and the icon displays at the bottom left corner of the screen Selecting A B Clip Copy again will set the ending point of the video to be clip copied an...

Page 67: ...ton and change the screen mode to 3x3 You will be able to easily see the camera have recorded video during target time You can also narrow your event search by selecting the Option button and setting up the new search condition Figure 83 Event Log Search Option screen You can search video from the first to last recorded images or you can set the start and stop times and dates Highlight the box bes...

Page 68: ...elect the cameras for which you want any reports of blind video Highlight the box beside Text In and press the button You can select the text in devices which you want any reports of text input Highlight the box beside Record Channels and press the button You can select the cameras that you want to search for any reports of event recorded data The recorder will display the events not the camera ch...

Page 69: ... current record table screen select the arrows located at the end of the times by using the arrow buttons on the front panel Note If the recorder has images recorded in more than one recording mode in the same time range the recording status bar displays recording information in the following priority order Panic Ú Pre Event Ú Event Ú Time The color of the bar indicates different recording modes R...

Page 70: ...ed with the selected event on the small search screen Highlighting Close and pressing the button will extract the video associated with the Motion event and display the first image of the event Pressing the button will start playing the event video segment Pressing PLAYBACK returns to live monitoring You can also narrow your event search by selecting the Option button and setting up the new search...

Page 71: ...search for motion is nearly identical to setting up the recorder for Motion Please refer to Motion Screen in Chapter 3 Configuration for more detailed instructions on setting up the detection blocks When setting the Museum Search Zone the zone should be placed inside of the border line of the target object If the selected block is placed on the border line the sensitivity of the Museum Search may ...

Page 72: ...to toggle between On and Off When set to Off you can enter a specific Date and Time When set to On the search will be from the last recorded image When highlighting and pressing the button the bookmark list displays and the bookmark point you selected will be the ending date and time Highlight the Channel and press the button Select the text in devices that you want to search for text input Highli...

Page 73: ...cting A B Clip Copy in the Search Export menu or pressing the CLIP COPY button during playback will set the starting point of the video to be clip copied and the icon displays at the bottom left corner of the screen Selecting A B Clip Copy in the Search Export menu or pressing the CLIP COPY button again will set the ending point of the video to be clip copied by displaying the Clip Copy screen Pre...

Page 74: ... with password is not supported Please be aware that when copying video clip it may consume extremely long time in calculating for copy process It depends on the video clip size required for copy The recorder automatically assigns a file name to the video clip However you can give the video clip file a different name Highlight the box beside File Name and press the button A virtual keyboard appear...

Page 75: ...he system down clear data on the storage device or format the storage device Copying video clips might start from a point of several seconds before the start time that you have designated The time of the copied file will be set not in the time zone of the recorder but in GMT Greenwich Mean Time Important Do NOT disconnect the USB cable or the power from the external drive while copying video clips...

Page 76: ...es and search recorded video using Internet Explorer web browser anytime from virtually anywhere Computer system requirements for using the Web Browser are p p OS Microsoft Windows XP x86 32 bit Service Pack 3 Microsoft Windows Vista x86 32 bit Service Pack 1 Microsoft Windows 7 x86 32 bit p p CPU Intel Pentium III Celeron 600 MHz or faster p p Memory 128 MB or higher p p Monitor 1024 768 pixels o...

Page 77: ...rmissions Click the right mouse button on the Internet Explorer icon and select the Run as administrator option from the context menu Otherwise some functions of the Web Browser might be limited to use There might be a problem with screen display or screen update due to low image transmission speed when using the Microsoft Windows Vista or higher operating system In this situation it is recommende...

Page 78: ...rm out signals Alarm Out No Alarm Out Gray Video Loss Displays the status of video loss No Video Loss Video Loss Gray Video Blind Displays the status of video blind Video Blind No Video Blind Gray Check Alarm In Displays the function status of the alarm and recording Normal Error Gray Rec from to Displays the record period Version Displays the system version information Clicking to save event log ...

Page 79: ...e in the Watch mode does not affect the camera name on the recorder Leaving the Camera Title blank causes the camera name set up in the Camera Settings screen to display Web Search Mode Web Search Mode is a remote web search program that allows you to search recorded video on the remote recorder Note The web browser connection in the Search mode will automatically be disconnected if there is no ac...

Page 80: ...age recorded at that time on the screen Clicking allows you to display an image from a specific time Click to enter the event search mode which allows you to search for event log entries using specific conditions and play back the images associated with those event entries Note It might take long time for searching the event logs according to the selecting conditions The playback function buttons ...

Page 81: ... search menu such as Event Log Search Text In Search or Motion Search it is possible for the recorder to have two overlapping start and stop times You will be asked to select one of the overlapping start and stop times from the search time ranges as follows p p From four o clock of the first segment to five o clock of the first segment p p From four o clock of the first segment to five o clock of ...

Page 82: ...USB device is being used 21 Unsupported file system 405 Unsupported file system 22 Verify failed 500 System is busy clip copying System Log Notices Boot Up Clear All Data Shutdown Clear Disk Restart Format Disk Upgrade Disk Full Upgrade Fail Disk Config Change Power Failure Disk No serial number Time Change Disk No Removed Time Zone Change Auto Deletion Time Sync Search Begin Time Sync Fail Search...

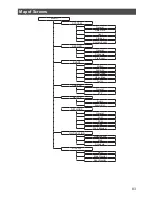
Page 83: ...e System Event RECORD General Schedule Pre Event EVENT Motion Alarm In Video Loss Video Blind Text In CAMERA General PTZ DEVICE Audio Alarm Out NETWORK General LAN FEN RTSP Web Browser NOTIFICATION Maintenance Mail Schedule DISPLAY OSD Main Monitor Spot Monitor ...

Page 84: ...write mode of the Record settings is checked p p Check the Schedule settings 32 33 The recorder has stopped recording p p If hard disk drive is full you will either need to delete video or set the recorder to the Overwrite Mode p p You can check the free space of HDD if free space tab of DISPLAY OSD settings is checked 29 32 52 The icon displays however the recorder is not recording When the recor...

Page 85: ...Check the settings of the Port Numbers 18 45 When accessing the Web Browser the following message is displayed on the information bar Pop up blocked To see this pop up or additional options click here Click the information bar and select Always Allow Pop ups from This Site The dialog window saying Allow pop ups from this site will be displayed Click the Yes button Inspect the power cord power plug...

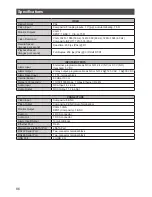
Page 86: ...hold 5 V DC Alarm Output 2 relay output programmable as NC or NO 2 A 125 V AC 1 A 30 V DC Alarm Reset Input 1 TTL terminal block Internal Buzzer 80 dB at 10 cm Network Connectivity 10 100 1000 Mbps 1 Gbps Ethernet RJ 45 Audio Input RCA Input 4 Line In Audio Output RCA Output 1 Line Out CONNECTORS Video Input Composite 8 BNC Video Output Composite 8 BNC Auto Terminating Monitor Output VGA 1 VGA SPO...

Page 87: ...city 2 TB GENERAL Dimensions W H D excluding rubber feet and projection 430 mm 88 mm 403 mm Unit Weight Approx 4 9 kg Operating Temperature 5 C to 40 C Operating Humidity 0 to 90 non condensing Power Voltage 100 V AC to 240 V AC 50 Hz 60 Hz Power Current 1 2 A to 0 6 A Specifications are subject to change without notice ...

Page 88: ...88 MEMO ...

Page 89: ......

Page 90: ...nd recycling of old products and batteries please contact your local municipality your waste disposal service or the point of sale where you purchased the items Penalties may be applicable for incorrect disposal of this waste in accordance with national legislation For business users in the European Union If you wish to discard electrical and electronic equipment please contact your dealer or supp...

Reviews: