Basic Connection
Quick Start Guide
11
Basic Connection
External equipment and cables shown are not supplied with this TV.
Please ensure that the unit is disconnected from the mains socket before attaching or disconnecting any leads.
When disconnecting the mains lead, be absolutely sure to disconnect the mains plug at the socket outlet first.
There are some restrictions on placement for viewing 3D images. For details
(p. 30, 31)
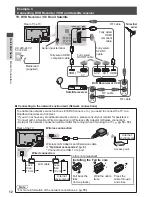
Example 1
Example 2
Connecting aerial
Connecting DVD Recorder / VCR
and Player
TV only
TV, DVD Recorder / VCR and Player
RF IN
RF OUT
Rear of the TV
Terrestrial aerial
AC 220-
240 V
50 / 60 Hz
Mains lead
(supplied)
RF cable
RF cable
DVD Recorder
or VCR
Fully wired
SCART cable
Fully wired
HDMI
compliant
cable
Player /
3D-compatible
player
Aerial input terminal
AV
HDMI
Mains Lead
Push until both side
tabs click
Make sure that
the mains lead is
securely fixed.
To remove from the TV :
tabs
Press both tabs and pull on mains connector to
release
Rear of the TV
Terrestrial aerial
AC 220-
240 V
50 / 60 Hz
Mains lead
(supplied)
RF cable
Aerial input terminal
Note
•
To watch 3D contents
(p. 30)
•
Connect to the TV’s AV1 for a DVD Recorder / VCR supporting Q-Link (p. 79).
•
For HDMI-compatible equipment, possible to connect to HDMI terminals (HDMI1 / HDMI2 / HDMI3) by
using HDMI cable (p. 85).
•
Q-Link and VIERA Link connection
(p. 77, 78)
•
Please also read the manual of the equipment being connected.
•
Keep the TV away from electronic equipment (video equipment, etc.) or equipment with an infrared
sensor. Otherwise, distortion of image / sound may occur or operation of other equipment may be
interfered.


