Auto Setup
12
Auto Setup
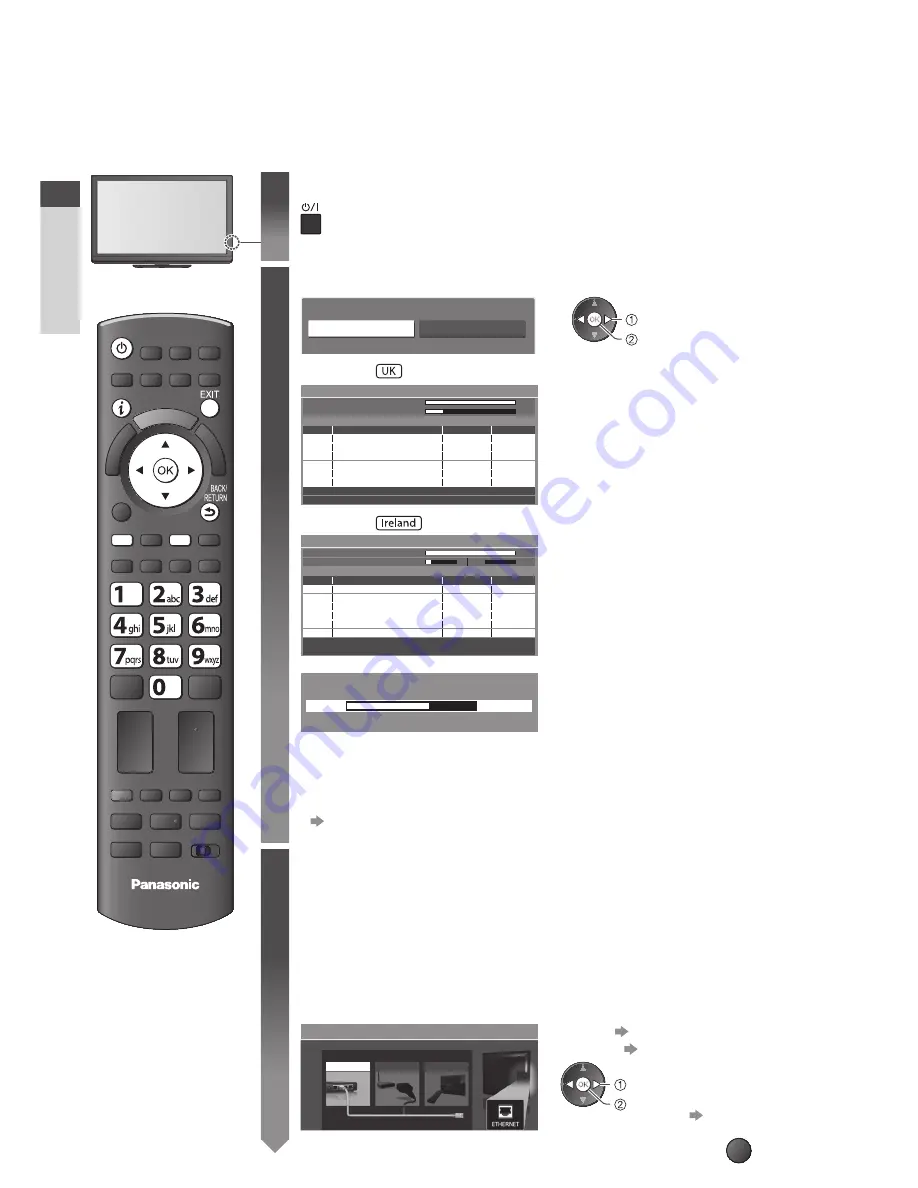
Search and store TV channels automatically.
•
These steps are not necessary if the setup has been completed by your local dealer.
•
Please complete connections (p. 10, 11) and settings (if necessary) of the connected equipment before
starting Auto Setup. For details of settings for the connected equipment, read the appropriate manual.
TV
1
Plug the TV into mains socket and switch On
•
Takes a few seconds to be displayed.
•
If the red LED shows on the TV, press the Standby On / Off switch
on the remote control for at least 1 second to turn the TV On.
2
Select your country
Country Selection
United Kingdom
Ireland
set
select
Example :
CH 21
68
CH 21
68
62
62
62
10
10
CBBC Channel
BBC Radio Wales
E4
10
62
10
Cartoon Nwk
29
-
33
-
BBC1
Searching
CH
Channel Name
Type
Free TV
Free TV
Free TV
Free TV
Analogue
Analogue
Quality
Free TV: 8
Pay TV: 0
Radio: 0
Data: 0
Analogue: 2
Auto Setup - DVB and Analogue
DVB Scan
Analogue Scan
This will take about 6 minutes.
Auto Setup will start to search for
TV channels and store them in the
numbered order as specified by the
broadcasters.
•
Actual number of channels may
differ due to channel duplication.
Example :
CH 5
69
62
62
62
10
10
CBBC Channel
BBC Radio Wales
E4
10
62
10
Cartoon Nwk
CH29
-
CH33
-
BBC1
CH 1
99
41
H: 21
Searching
CH
Channel Name
Type
Free TV
Free TV
Free TV
Free TV
Analogue
Analogue
Quality
Free TV: 8
Pay TV: 0
Radio: 0
Analogue: 2
Auto Setup - DVB and Analogue
DVB Scan
Analogue Scan
This will take about 6 minutes.
0%
100%
Sending Preset Data
Please wait!
Remote control unavailable
If Q-Link or similar technology (p. 84) compatible recorder with analogue
tuner is connected, analogue channel setting is automatically downloaded
to the recorder. (Digital channel setting is not downloaded.)
•
If downloading has failed, you can download later through the Setup Menu.
“Q-Link Download” (p. 34)
3
Setup the network connection
Setup the network connection to enable the network service functions
such as VIERA Connect, etc. (p. 16, 71).
•
To setup the wireless connection, the Wireless LAN Adaptor
(optional accessory) is required.
Please note that this TV does not support wireless public access points.
•
Ensure the network connections (p. 11) and network environment are
completed before starting setup.
Select the network type
Network Setup
Select Wired or Wireless
Wired
Wireless
Set later
[Wired]
“Wired connection” (p. 11)
[Wireless]
“Wireless connection” (p. 11)
access
select
•
To setup later on or
skip this step
Select [Set later]
or
EXIT
Quick Start Guide


