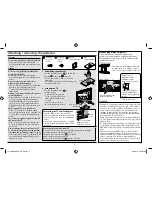
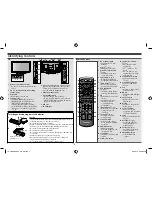
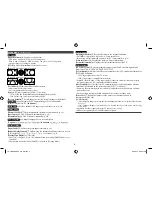

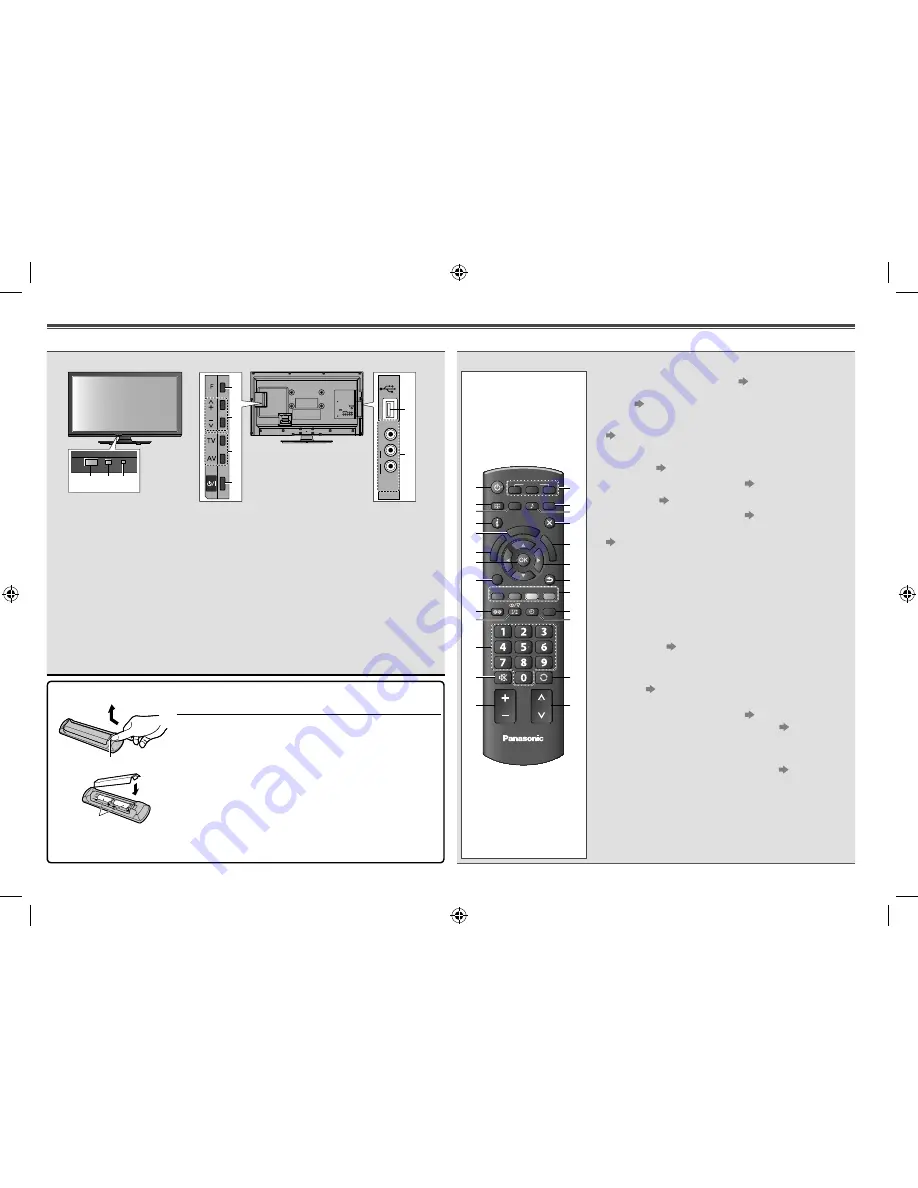
Identifying Controls
TV
USB
VIDEO
AUDIO
R
L
AV 2
IN
8
9
1
2 3
4
5
7
6
1
Remote control signal receiver
•
Do not obstruct the receiver with any
object.
2
C.A.T.S. (Contrast Automatic Tracking
System) sensor
3
Power LED
•
Red: Standby / Green: On
4
Function select
•
[Volume]/[Backlight]/[Contrast]/
[Brightness]/[Colour]/Sharpness]/
[Tint] (NTSC signal)/[Bass]
/
[Treble]
/[Balance]/[Auto Tuning]
Available when [Mode] in the Sound
Menu is set to [Music] or [Speech]
(p. 8)
5
Selects channel up/down, adjusts settings
(when using the
F
button), switches the
TV On (press either button for about
1 second when in Standby mode)
6
Changes the input mode
7
On / Standby switch
•
Switches the TV On / Standby.
•
To completely Off the TV, please switch
Off the wall socket or remove the mains
plug from the wall socket.
8
USB port
9
AV2 terminal
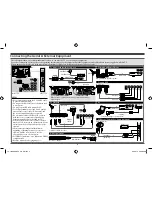
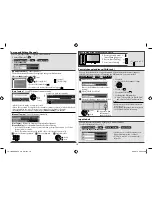
Remote Control
EXIT
INFO
OPTION
SURROUND
STILL
OFF TIMER
RETURN
P-NR SOUND PICTURE
INPUT
MUTE
LAST VIEW
TV
MENU
AV
TV
PC
ASPECT
R
G
Y
B
POWER
CH
VOL
HD
M
I
PL
AY
BA
CK
US
B
1
14
15
16
17
18
19
20
21
22
23
24
25
2
3
4
5
6
7
8
9
10
11
12
13
1
On / Standby switch
•
Switches the TV On /
Standby.
2
Aspect
(p. 6)
•
Changes aspect ratio
3
Picture Noise Reduction
(p. 8)
•
Switches picture noise
reduction setting
4
Information
(p. 6)
•
Displays channel and
programme information
5
[Main Menu]
(p. 7)
•
Press to access Picture,
Sound and Setup Menus
6
USB PLAYBACK
(p. 11)
•
Switches to USB device
viewing / listening mode
7
OK
•
Confirms selections and
choices
•
Press after selecting
channel positions
to quickly change
programme
8
[Option Menu]
(p. 6)
•
Quick access to optional
settings for picture,
sound, etc.
9
Surround
(p. 8)
•
Switches surround
sound setting
10
Sound Selection
•
Selects sound output
mode during multiplex
broadcast
11
Numeric buttons
•
Changes channel
•
When in Standby mode,
switches TV On
12
Sound Mute
•
Switches sound mute On
or Off
13
Volume Up / Down
14
Input mode selection
(p. 7)
•
PC - switches to PC
input mode
•
TV - switches to TV
mode
•
AV - switches to AV
input mode from Input
Selection list
15
Picture Mode Selection
•
Selects picture mode
(p. 8)
16
Sound Mode Selection
•
Selects sound mode
(p. 8)
17
Exit
•
Returns to the normal
viewing screen
18
HDMI
•
Switches to HDMI input
mode
19
Cursor buttons
•
Makes selections and
adjustments
20
Return
•
Returns to the previous
menu / page
21
Coloured buttons
•
Used for selection,
navigation and operation
of various functions
22
Still
•
Freeze / unfreeze picture
(p. 6)
23
Off Timer
(p. 6)
•
Set the time the TV
automatically goes to
Standby mode
24
Last View
(p. 6)
•
Switches to previously
viewed channel
25
Channel Up / Down
•
Selects channel in
sequence
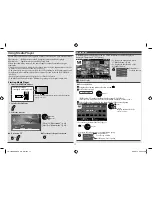
Inserting and removing remote’s batteries
1
Hook
Open
Caution
•
Incorrect installation may cause battery leakage and corrosion,
resulting in damage to the remote control.
•
Do not mix old and new batteries.
•
Replace only with same or equivalent type. Do not mix different
battery types (such as alkaline and manganese batteries).
•
Do not use rechargeable (Ni-Cd) batteries.
•
Do not burn or break up batteries.
•
Do not expose batteries to excessive heat such as sunshine, fire
or the like.
•
Make sure you dispose of batteries correctly.
•
Ensure batteries are replaced correctly, there is danger of
explosion and fire if battery is reversed.
•
Do not disassemble or modify the remote control.
2
Note the correct
polarity (+ or -)
Close
5
TH-L32XM5KMTX_fold_EN.indd 5
TH-L32XM5KMTX_fold_EN.indd 5
6/1/2012 8:26:09 AM
6/1/2012 8:26:09 AM


