Scanning
23
1
Us
ing
1
Insert the power cord into the AC
outlet and press the Power Key
.
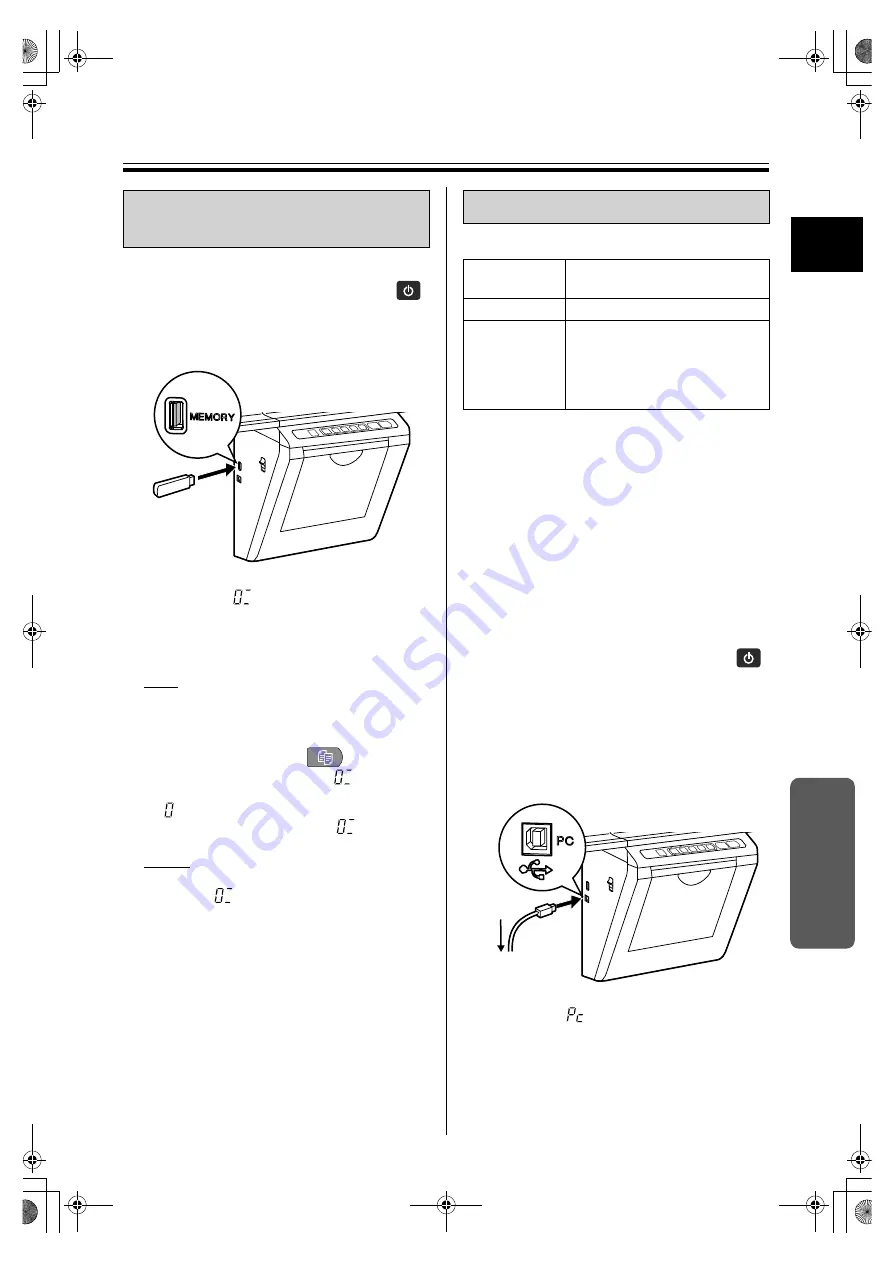
2
Connect the USB flash memory
device to USB Connector-A for USB
Flash Memory Device.
•
When the USB flash memory device is
connected, “
” will flash in the Display
Window. When the USB flash memory device
is recognized, the flashing will turn to a
continuous indication.
Note
•
You cannot use a USB flash memory device
that is equipped with certain features such as
a security function or hub function.
3
Press the Copy Key
.
•
The unit starts scanning and “
” will flash in
the Display Window.
“ ” will be displayed when scanning is
finished, and then change to “
”.
Notice
•
Do not remove the USB flash memory device
until the “
” switches from flashing to a
continuous indication.
4
Remove the USB flash memory
device from the unit.
5
Confirm that the USB flash memory
device has correctly recorded the
scanned data.
6
Erase the text and diagrams from
the screen film.
■
System Requirements
*1 This unit does not function with Hi-Speed USB 2.0.
Even if using a computer equipped with Hi-Speed
USB 2.0, this unit functions with Full Speed USB 2.0.
(This unit will not run at the rated speed of Hi-Speed
USB 2.0.)
*2 Microsoft
®
Windows
®
XP operating system (hereafter
Windows XP)
*3 Microsoft
®
Windows Vista
®
operating system
(hereafter Windows Vista)
*4 Microsoft
®
Windows
®
7 operating system (hereafter
Windows 7)
*5 Microsoft
®
Windows
®
8 operating system (hereafter
Windows 8)
■
Connecting to a computer
1
Insert the power cord into the AC
outlet and press the Power Key
.
2
Connect the electronic board to a
computer using the USB cable.
•
Electronic board: Plug the B connector
(smaller connector) into the electronic board’s
USB port.
Computer: Plug the A connector (larger
connector) into a USB port on the computer
.
•
When the electronic board is connected to the
computer, “
” will flash in the Display
Window. When the computer is recognized
properly, the flashing will turn to a continuous
indication.
•
The computer recognizes the electronic
board as a Removable Disk and the drive is
displayed in the Windows Explorer window.
Storing images on a USB
flash memory device
Scanning to a computer
Computer
IBM
®
PC/AT or compatible
machine
Interface
USB 2.0 / USB 1.1*
1
OS
Windows
®
XP*
2
(Service Pack 3 or later)
Windows Vista
®
*
3
Windows
®
7*
4
Windows
®
8*
5
Computer
UB-5335&5835&5365&5865-PNQX5932ZA-mst.book 23 ページ 2012年11月12日 月曜日 午前9時42分


