


75
Pump Down Procedure (Common to Cooling and Heating)
• Items 9 to 11 below describe the work for the shutoff valve side (rear of equipment).
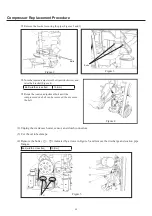
9. Fully shut off the refrigerant liquid shutoff valve
Using a wrench, fully close the refrigerant liquid shutoff valve for the outdoor unit where the pump-down is to be
performed. (Figures 16 and 17)
Figure 17
Refrigerant gas
shutoff valve
Status: fully open
Refrigerant liquid
shutoff valve
Status: fully closed
Figure 16
Fully open
Fully closed
Close - up view
Closed valve
open/close
Status
10. Fully open the refrigerant gas shutoff valve
(1) Start the pump-down in accordance with item 9
above. Then, use the gauge manifold to monitor
the refrigerant (low) pressure. The place to monitor
differs depending on the mode, so refer to Figures 1
and 2 in item 4.
• When cooling pump-down: Refrigerant gas tube
pressure port
• When heating pump-down: Refrigerant low pressure
port
(2) Once the refrigerant pressure has dropped to 0.00
MPa, the pump-down is complete. Use a wrench
or the like to fully close the refrigerant gas tube.
(Figure 18)
(3) When the refrigerant pressure drops, the micro
computer automatically stops the engine and the
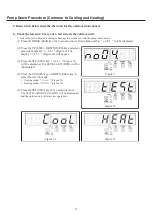
pump-down is complete.
If the engine is stopped in this way, “
” (Figure
19) is displayed on the outdoor main board.
* However, if 15 minutes have elapsed since the bypass
valve forced close setting explained in item 7 was
set, the engine stops automatically regardless of the
refrigerant pressure. In such a case “
” is
displayed.
Caution: Even if “
” is displayed and the engine is stopped, if the microcomputer is reset by an instantaneous
power failure or the like, the engine will start if an operation is input from, for example, the remote controller.
To ensure safety, be sure to implement the outdoor unit stop operation described in the next item.
If the pump-down was insuf
¿
cient even when the engine stopped automatically in (3) above, fully open
again all the closing valves that were fully closed in items 9, 10, cancel all the settings con
¿
gured in item 6,
and then perform the procedure again from item 2. (For how to cancel all the settings, refer to item 13.)
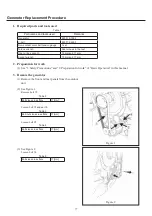
11. Disconnect the gauge manifold
Remove the gauge manifold connected to the refrigerant gas tube and refrigerant low pressure service port.
Figure 18
Refrigerant liquid
shutoff valve
Status: fully closed
Refrigerant gas
shutoff valve
Status: fully closed
Figure 19
GHP̲Main̲Parts̲Replacement.indd 75
2012/07/31 17:54:43