
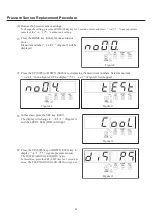


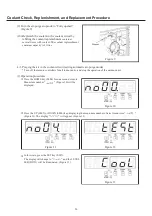

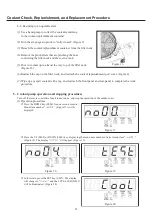
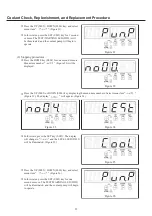


62
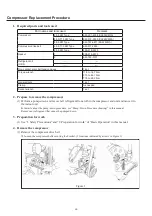
Compressor Replacement Procedure
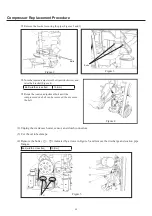
(5) Rotate the tension adjustment bolt (indicated by the arrow in Figure 4) clockwise, and lower the
compressor bracket near to its lowest point.
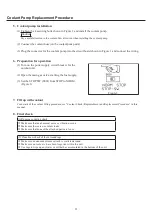
* Prepare by
¿
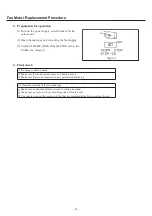
rst spreading a rag underneath the compressor.
(6) Remove the bolts securing the compressor (4
locations indicated by arrows in Figure 6).
Bolt (width across
À
at)
17 [mm]
(7) Turn the tension adjustment bolt (counterclockwise)
and raise the bracket. (Figure 4)
(8) Loosen the nuts (2) above the rubber vibration
dampers on the front. (Figure 7)
Nut size across
À
ats
19 [mm]
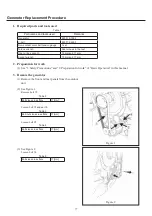
(9) Remove the center frame, compressor oil drip catcher and catcher tray, then remove the oil pump from
the unit’s base (leave hoses in place). Put a block of wood or the like against the edge of the engine’s oil
pan and jack it up until there is no load on the rubber vibration damper on the compressor. Then remove
the mounting bracket from under the rubber vibration damper and remove the damper from the engine
mount.
* Adjust the height with the jack so no signi
¿
cant load is on the rubber vibration damper.
(10) Pass a wire through the engine mount and the frame of the 2F drain pan to secure it in a raised state.
(Figure 8)
* Be sure the wire is strong enough and that the jack is stable.
(11) Pull the compressor forward and out, taking care not to hit surrounding parts. (Figure 8)
Figure 8
Wire
Engine
Jack-up point
Centre frame
Figure 7
Compressor oil drip catcher
Rubber damper
Mounting
bracket
Drip tray
Oil pump
Nuts
Figure 6
Bolts securing the compressor
GHP̲Main̲Parts̲Replacement.indd 62
2012/07/31 17:54:38


