


24
Ignition Electrical Parts Inspection and Maintenance
(9) Check the electrode gap of the sparkplug
Reference value
0.4 ~ 0.5 [mm]
Caution
c
Do not adjust the gap, because an iridium chip is used.
d
Do not insert a thickness gauge between the electrodes or clean them with a wire brush.
(10) Check that there is no looseness in the terminal part.
(11) Check for cracking, damage, or marks of electrical leaks on the insulator.
Resistance
5.25±2.25 [k
ȍ
]
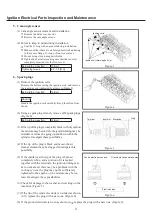
(12) Use a plug wrench to insert the plug in the
installation hole, and rotate it by hand a couple of
times. (Figure 7)
(13) Use a deep socket wrench to tighten the plug to
the speci
¿
ed torque.
Socket (width across
À
at)
16 [mm]
Tightening torque
20.0 ~ 29.0 [N·m]
(14) Install ignition coils
Install the ignition coils by tightening the bolts that
secure them (indicated by arrows in Figure 8).
Bolt (width across
À
at)
10 [mm]
Tightening torque
6.37 ~ 7.45 [N·m]
Caution
Handle the ignition coils carefully. Keep them free
from shock.
7. Preparation for operation
(1) Turn on the power supply circuit breaker for the
outdoor unit.
(2) Open the main gas valve, starting the fuel supply.
(3) Set the STOP SW (S001) from STOP to NORM.
(Figure 9)
8. Final check
(1) Running condition check
c
Make sure that no abnormal noise or vibration occurs.
d
Make sure that none of the attached parts are loose.
Figure
.7
Temporarily tighten spark plug
Plug
Figure
.7
Temporarily tighten spark plug
Plug
Figure
.8
Ignition coil
Ignition coil retaining bolts (4)
Figure
.8
Ignition coil
Ignition coil retaining bolts (4)
Figure
.9
Figure
.9
GHP̲Main̲Parts̲Replacement.indd 24
2012/07/31 17:54:24


