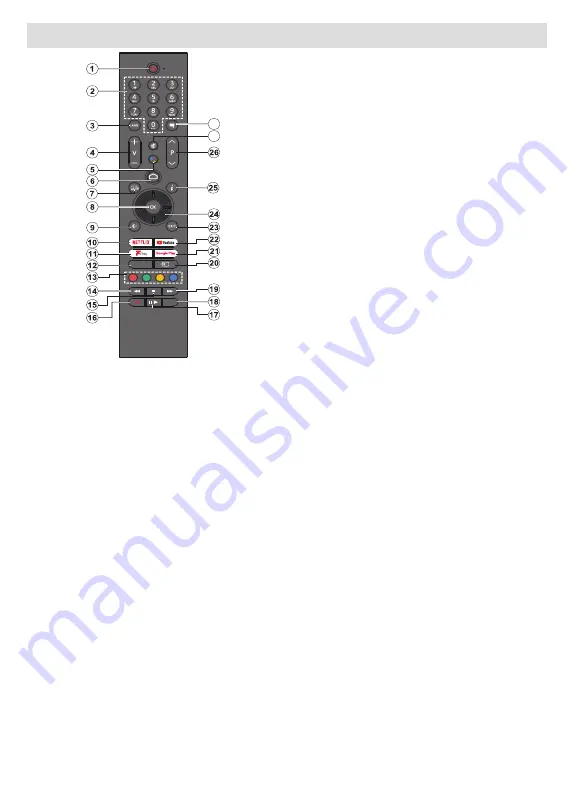
Panasonic TX-55MZ800B Operating Instructions Manual Download Page 12

English

   - 11 -

Remote Control

MENU

TEXT

27

28

Note:

 Other Panasonic devices cannot be operated with 

this remote.

Inserting the Batteries into the Remote

The remote may have a screw that secures the battery 

compartment cover onto the remote control (or this may 

be in a separate bag). Remove the screw, if the cover 

is screwed on previously. Then remove the battery 

compartment cover to reveal the battery compartment. 

Insert two 1.5V - size 

AAA

 batteries. Make sure the (+) 

and (-) signs match (observing correct polarity). Do not 

mix old and new batteries. Replace only with same or 

equivalent type. Place the cover back on. Secure the 

cover again with the screw, if any.

To pair remote with the TV

When the TV is turned on for the first time, a search 

for accessories will be performed after the initial setup 

starts. You will need to pair your remote control with 

your TV at this point.

Press and hold the 

Source

 button on the remote until 

the LED on the remote starts to blink, then release 

the 

Source

 button. That means the remote is in 

pairing mode.

Now you will wait for the TV to find your remote. Select 

the name of your remote and press 

OK 

when it appears 

on the TV screen.

When the pairing process is successful, the LED on 

the remote will go off. If the pairing process fails the 

remote will enter sleep mode after 30 seconds.

In order to pair your remote later on, you can go to 

Settings

 menu, highlight 

Bluetooth Remotes & 

Accessories

 option and press 

OK

 to start a search 

for accessories.

1.  Standby:

 Quick Standby / Standby / On

2.  Numeric buttons:

 Switches the channel in Live TV 

mode, enters a number or a letter in the text box on 

the screen

3.  Language:

 Switches among sound modes (analogue 

TV), displays and changes audio language (digital TV, 

where available)

4.  /-

5.  Microphone: 

Activates the microphone on the remote

6.  Home:

 Opens the Home Screen

7.  Guide:

 Displays the electronic programme guide in 

Live TV mode

8.  OK: 

Confirms selections, enters sub-menus, views 

channel list (in Live TV mode)

9.  Back/Return:

 Returns to previous menu screen, goes 

one step back, closes open windows, closes teletext (in 

Live TV-Teletext mode)

10. 

Netflix:

 Launches the Netflix application

11.  Freeview Play:

 Connects to the Freeview Play platform 

where you can access available catch-up TV services 

12.  Menu: 

Displays Live TV Settings menu (in Live TV 

mode), displays available setting options such as sound 

and picture

13.  Coloured Buttons:

 Follow the on-screen instructions for 

coloured button functions

14.  Rewind:

 Moves frames backwards in media such as 

movies

15.  Stop:

 Stops the media being played

16.  Record:

 Records programmes in Live TV mode

17.  Pause: 

Pauses the media being played, starts timeshift 

recording in Live TV mode

        Play:

 Starts to play selected media

18.  Text:

 Opens and closes teletext (where available in 

Live TV mode)

19.  Fast forward:

 Moves frames forward in media such 

as movies

20.  Source: 

Shows all available broadcast and content 

sources, is also used in pairing process of the remote.

21.  Google Play:

 Launches the Google Play Store appli-

cation

22.  YouTube:

 Launches the YouTube application

23.  Exit:

 Closes and exits from Live TV Settings menus, 

closes the Home Screen, exits from any running 

application or menu or OSD banner, switches to last 

set source

24.  Directional buttons:

 Navigates menus, setting options, 

moves the focus or cursor, etc. and displays the subpages 

in Live TV-Teletext mode when pressed Right or Left. 

Follow the on-screen instructions.


Note:

 Directional buttons are positioned on the circle 

around the OK button.

25.  Info:

 Displays information about on-screen content

26.  Pro/-:

 Increases/Decreases channel number 

in Live TV mode

27.  Mute:

 Completely turns off the volume of the TV

28.  Subtitles:

 Turns subtitles on and off (where available)

Standby Button

Press and hold the 

Standby 

button on the remote 

control. 

Power off

 dialogue will appear on the screen. 

Highlight 

OK

 and press the 

OK

 button. The TV will 

switch into standby mode. Press briefly and release 

to switch the TV into quick standby mode or to switch 

on the TV when in quick standby or standby mode.

Summary of Contents for TX-55MZ800B

Page 1: ...800B TX 65MZ800B LED TV You can find instructions for your TV s features in the E Manual To access the E Manual enter Settings menu select Manuals and press OK For quick access press Home Menu button...

Page 2: ...th Remotes Accessories 25 Channel List 25 Programme Guide 26 Connecting to the Internet 26 Multi Media Player 28 From USB Connection 29 USB Auto Play Feature 30 USB Recording 30 Instant Recording 30 W...

Page 3: ...t expose the TV to dripping or splashing of liquids and do not place objects filled with liquids such as vases cups etc on or over the TV e g on shelves above the TV Do not expose the TV to direct sun...

Page 4: ...urniture on which the television is placed The equipment is only suitable for mounting at heights 2 m If the existing television set is going to be retained and relocated the same considerations as ab...

Page 5: ...y using a soft cloth to remove dirt or fingerprints For stubborn dirt 1 First clean the dust from the surface 2 Dampen a soft cloth with clean water or diluted neutral detergent 1 part detergent to 10...

Page 6: ...crews for fixing the TV onto the wall hanging bracket are not supplied with the TV Assembling Removing the pedestal Preparations Take out the pedestal s and the TV from the packing case and put the TV...

Page 7: ...s supported via native and market applications HDMI USB inputs and over DVB S broadcasts When the input source is set to the related HDMI input press the Menu button and set the HDMI EDID Version opti...

Page 8: ...when next time the TV is switched on In this case OLED Compensation operation will be performed when next time the TV is switched into standby mode This operation can be performed manually using the...

Page 9: ...ndby mode the standby LED lights up To switch on the TV from standby mode either Press the Standby button on the remote control Press the centre of the joystick on the TV in To switch the TV into stan...

Page 10: ...act your dealer to purchase one if not supplied we recommend that you plug all your cables into the back of the TV before mounting on the wall Insert or remove the CI module only when the TV is SWITCH...

Page 11: ...mode To turn the TV off Standby The TV cannot be switched into standby mode via joystick To turn on the TV Press the centre of the joystick in the TV will turn on Operation with the Remote Control Pre...

Page 12: ...enters sub menus views channel list in Live TV mode 9 Back Return Returns to previous menu screen goes one step back closes open windows closes teletext in Live TV Teletext mode 10 Netflix Launches t...

Page 13: ...to continue with wired connection or change the network Highlight Change network and press OK if you want to use wireless connection instead of wired connection 6 Network Connection You will be direct...

Page 14: ...nts for Freeview Play services refer to the Freeview Play Platform section 12 Password Depending on the country selection you made in the earlier steps you may be asked to define a 4 digit password PI...

Page 15: ...k options will be available If you are going to perform a network scan make sure that you have adjusted the Frequency Symbol Rate Ksym s and Polarisation parameters under the Transponder option accura...

Page 16: ...e TV mode If the source was set to an option other than Antenna Cable Satellite or ATV previously press the Source button and set one of these options to watch live TV channels Highlight Multi Media P...

Page 17: ...Highlight a channel and press OK to make a selection Selected channel will be displayed every time the TV is turned back on from any standby mode If the Select Mode is set as Last Status the last wat...

Page 18: ...ss the Settings menu from the Home Screen or from the TV options menu in Live TV mode Network Internet You can configure your TV s network settings using the options of this menu You can also highligh...

Page 19: ...t the desired channel s on the list and press OK or the Yellow button to select unselect Then press the Blue button to delete the selected channel s Clear Channel List Delete all channels stored in th...

Page 20: ...ettings You will also be able to configure these settings before the scan If Channel Installation Mode is set to Preferred Satel lite this option may be named differently depending on the available se...

Page 21: ...into your Google account Google You can configure your data syncing preferences or remove your registered account on the TV Highlight a service listed in the Choose synced apps section and press OK to...

Page 22: ...time Language Set your language preference Keyboard Select your keyboard type and manage keyboard settings Inputs Show or hide an input terminal change the label for an input terminal and configure th...

Page 23: ...nce of mid high grey levels to cooler colour temperature Turn the Blue Stretch function on or off Game Mode Game mode is the mode which cuts down some of the picture processing algorithms to keep up w...

Page 24: ...yed when navigating or selecting an item on the TV screen Highlight this option and press OK to turn this function on or off Sound Style For easy sound adjustment you can select a preset setting User...

Page 25: ...ceeding with the formatting you may consider backing up the data on your device to your TV s internal storage or to another USB storage device using the Back up apps option Otherwise some apps may not...

Page 26: ...figure the settings for the captions You can set the language text size and style using the options of this menu Highlight Display and press OK to turn on or off the sample caption demonstration Text...

Page 27: ...ted broadcast whether this feature is supported or not In order to access the Electronic Programme Guide press the Guide button on the remote Use the directional buttons to navigate through the progra...

Page 28: ...den SSID can not be detected by other devices If you want to connect to a network with hidden SSID highlight the Add new network option under the Settings Network Internet menu on the Home Screen and...

Page 29: ...as photo frame image earlier will be displayed when photo frame feature is activated If you select the USB storage device option the first file in Recursive Parser mode will be displayed To set the ph...

Page 30: ...al between the slides Highlight an option and press OK to change the setting You can also press the Green button to set This option will not be available if the slide show is paused Rotate Rotate the...

Page 31: ...cording feature To record long duration programmes such as movies it is recommended to use USB Hard disk drives HDD s Recorded programmes are saved onto the connected USB storage device If desired you...

Page 32: ...the Settings Device Preferences Inputs menu on the Home Screen or TV options Set tings Device Preferences Inputs menu in Live TV mode Scroll down to Consumer Electronic Control CEC section Check if t...

Page 33: ...you selected should start playing on TV Notes Google Cast works on Android and iOS Make sure that your mobile device is connected to the same network as your TV The menu options and namings for Google...

Page 34: ...id system version Move the focus to the System update option and press OK You will be informed about the system status and the time at which the device was last checked for an update will be displayed...

Page 35: ...gs from Sound menu Input sources can not be selected Make sure that the device is connected to the TV Make sure that all cables are properly connected Make sure that you select the right input source...

Page 36: ...264 4096x2304 60fps 135Mbps Main and high profile up to level 5 2 FLV flv MP4 mp4 mov 3GPP 3gpp 3gp MPEG transport stream ts trp tp ASF asf WMV wmv AVI avi MKV mkv OGM ogm MPEG program stream DAT VOB...

Page 37: ...rt stream ts trp tp MPEG program stream DAT VOB MPG MPEG FLV flv WAV wav OGM ogm AC3 DD 32KHz 44 1KHz 48KHz Up to 5 1 32Kbps 640Kbps AC3 ac3 AVI avi MKV mkv mka 3GPP 3gpp 3gp MP4 mp4 mov m4a MPEG tran...

Page 38: ...537Mbps MPEG transport stream ts trp tp MP4 mp4 mov GPP 3gpp 3gp only decode DTS core LPCM 8KHz 48KHz Mono Stereo 5 1 64Kbps 1 5Mbps WAV wav AVI avi MKV mkv mka 3GPP 3gpp 3gp MP4 mp4 mov m4a MPEG tra...

Page 39: ...WebP 3840 x 2160 HEIF 4000 x 3000 Subtitle Internal File Extension Container Subtitle Codec ts trp tp TS DVB Subtitle Teletext CC EIA608 PGS mp4 MP4 VobSub PGS TX3G mkv MKV ASS SSA SRT VobSub PGS Ext...

Page 40: ...ectors by using a DVI converter cable DVI to HDMI cable not supplied you can refer to the following resolution information 56Hz 60Hz 66Hz 70Hz 72Hz 75Hz 640x480 x x 800x600 x x x 1024x768 x x x 1280x7...

Page 41: ...registration number is available on https eprel panasonic eu product Wireless LAN Transmitter Specifications Frequency Ranges Max Output Power 2400 2483 5 MHz CH1 CH13 100 mW 5150 5250 MHz CH36 CH48 2...

Page 42: ...dress and the HDMI Logos are trademarks or registered trademarks of HDMI Licens ing Administrator Inc Dolby Dolby Vision Dolby Atmos and the double D symbol are registered trademarks of Dolby Laborato...

Page 43: ...presentative Panasonic Testing Centre Panasonic Marketing Europe GmbH Winsbergring 15 22525 Hamburg Germany Web Site http www panasonic com UK Declaration of Conformity DoC Hereby Panasonic Marketing...

Page 44: ...terminal which is marked with the letter E or by the earth symbol or coloured green or green and yellow The wire which is coloured blue or black must be connected to the terminal which is marked with...

Reviews: