background image

30

Get

ting St

arted

U

seful In

formati

on

Troubleshooting

Appendix

Hardware Diagnostics

Run this utility using the default settings in the Setup Utility. 
If the Setup Utility or other settings will not allow a hardware to be executed, the hardware icon will be displayed in gray.

1

Connect the AC adaptor, and turn on the wireless switch. 

During the diagnostic check, do not remove the AC adaptor, or attach any peripheral devices.

2

Turn on or restart the computer, and press 

F2

 or 

Del

 while [Panasonic] boot screen is displayed.

The Setup Utility starts up.

If the password is requested, enter the Supervisor Password.
If you are using the computer after changing the settings from the status at the time of purchase, we recom-
mend that you make a note of the settings that are changed.

3

Press 

F9

.

At the confirmation message, select [Yes] and press 

Enter

.

4

Press 

F10

.

At the confirmation message, select [Yes] and press 

Enter

.

The computer will restart.

5

While [Panasonic] boot screen is displayed, press and hold 

Ctrl

 + 

F7

 until 

Please Wait


appears at the bottom of the display.

When the PC-Diagnostic Utility starts up, it will automatically begin the diagnostic check for all hardware components. 

If the password is requested, enter the password.
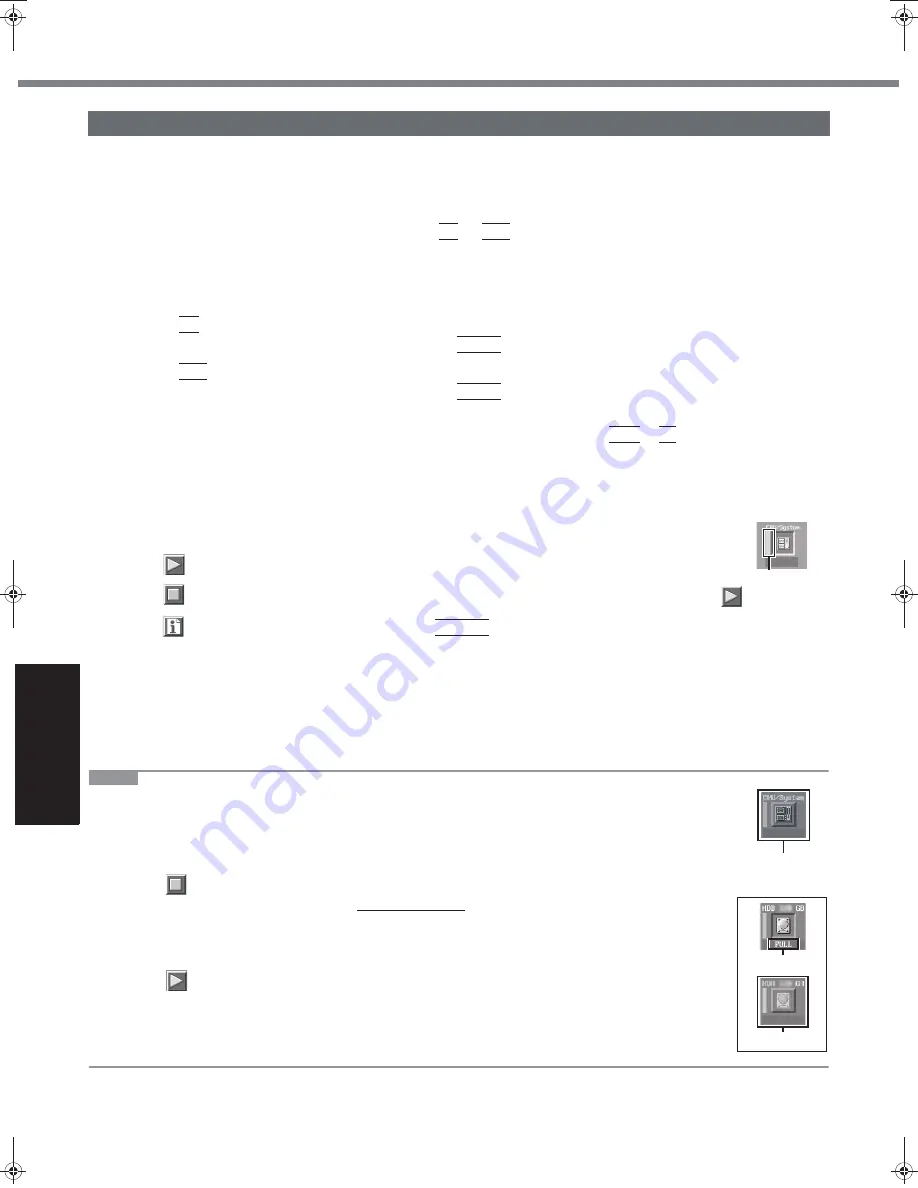
The touch pad and the internal keyboard cannot be used until alternating blue and yellow colors are displayed 
on the left side of the hardware icon (A). 
By clicking the icon, you can execute the following operations:

: Start the diagnostic check from the beginning

: Stop the diagnostic check (You cannot restart the check partway through by clicking 

)

: Display help (click the screen or press 

Space

 to return to the original diagnostic check screen)

You can check the status of the diagnostic check by the display color on the left side of the hardware icon (A). 
• Aqua: Not running diagnostic check

• Alternating blue and yellow: Currently running diagnostic check. The interval of the alternating colors differs 

depending on the type of diagnostic check currently running. 

During memory diagnostic check, the display may freeze for a long period of time. Wait until the process is 

complete. 

• Green: No problems discovered

• Red: Problems discovered

NOTE

Using the following procedure, you can run a diagnostic check on a specified hardware component, 
or run an extended diagnostic check on the hard disk, keyboard and touch pad (You do not need to 
perform the extended diagnostic check for the keyboard and touch pad in normal use.). The 
extended diagnostic check on the hard disk is more detailed, and so requires a longer period of time 
to run.

A

Click 

 to stop the diagnostic check.

B

Click the icon for the hardware that is not to be checked, so that the icon is displayed in gray (B). 
When running a check on the hard disk, keyboard or touch pad, clicking the icon once will turn on 
the extended diagnostic check (“FULL” (C) will be displayed below the icon); click again, and the 
icon will be displayed in gray (D).

C

Click 

 to start the diagnostic check.

Running the Diagnostic Check

A

e.g. hard disk

C

D

B

CPE01942ZA_T8-OI_XP_M.book  Page 30  Friday, November 21, 2008  10:31 AM

Summary of Contents for Toughbook CF-T8EWDTZ2M

Page 1: ... CF T8 series Introduction 2 Read Me First 3 Description of Parts 9 First time Operation 11 On screen Manual 16 Handling and Maintenance 17 Expanding Memory 20 Intel Active Management Technology 22 Troubleshooting Basic Error Code Message 25 Hardware Diagnostics 29 Installing Windows Vista 32 LIMITED USE LICENSE AGREEMENT 34 Specifications 35 For further information about the com puter you can ref...

Page 2: ... rights reserved No part of this manual may be repro duced in any form without the prior written permission of Panasonic Corporation No patent liability is assumed with respect to the use of the information contained herein Panasonic Corporation 2008 Disclaimer Computer specifications and manuals are subject to change without notice Panasonic Corporation assumes no liability for damage incurred di...

Page 3: ...8 EC article 9 2 Panasonic Testing Centre Panasonic Service Europe a division of Panasonic Marketing Europe GmbH Winsbergring 15 22525 Hamburg Germany 25 E 1 2 Information of Countries intended for radio application The United Kingdom The Federal Republic of Germany The Kingdom of Belgium The Swiss Confederation The Grand Duchy of Luxembourg The Republic of Lithuania The Republic of Estonia The Re...

Page 4: ...pond with the coloured markings identify ing the terminals in your plug proceed as follows The wire which is coloured GREEN and YELLOW must be con nected to the terminal in the plug which is marked by the letter E or by the safety earth symbol coloured GREEN or GREEN and YELLOW The wire which is coloured Blue must be connected to the terminal which is marked with the letter N or coloured BLACK The...

Page 5: ... consensus of the scientific community and result from deliberations of panels and committees of scientists who continually review and interpret the extensive research literature In some situations or environments the use of this prod uct may be restricted by the proprietor of the building or responsible representatives of the organization These sit uations may for example include Using this produ...

Page 6: ...oduct fire or electric shock may result If water spills in the keyboard refer to page 19 If other foreign matter has found its way inside immediately turn the power off and unplug the AC plug and remove the battery pack Then contact your technical support office Do Not Disassemble This Product There are high voltage areas inside which may give you an electric shock if you should touch them Do not ...

Page 7: ...periods of time may result in loss of hearing Use the Modem with a Regular Telephone Line Connection to an internal phone line on premise switches of a company or business office etc or to a dig ital public phone or use in a country or area not supported by the computer may result in a fire or electric shocks Do Not Connect a Telephone Line or a Network Cable Other Than the One Specified into the ...

Page 8: ... water or allow it to become wet If the battery pack will not be used for a long period of time a month or more charge or discharge use the battery pack until the remaining battery level becomes 30 to 40 and store it in a cool dry place This computer prevents overcharging of the battery by recharging only when the remaining power is less than approx 95 when Economy Mode ECO is enabled 75 of capaci...

Page 9: ...n H LED Indicator SD SDHC Memory Card status Caps lock Numeric key NumLk Scroll lock ScrLk Hard disk drive status ECO Economy Mode ECO status Reference Manual Battery Power Battery status Reference Manual Battery Power I LCD Touchscreen Reference Manual Using the Touchscreen J Security Lock You can connect a Kensington cable Refer to the instruc tion manual of the cable The security lock and cable...

Page 10: ...o input may not be pos sible or malfunctions may occur When recording in stereo using a stereo microphone Click start All Programs SoundMAX Control Panel and select Microphone and then select No Filtering in Micro phone Enhancements When using a monaural microphone with a 2 terminal plug Click start All Programs SoundMAX Control Panel and select Microphone and then select Voice Recording in Microp...

Page 11: ...erwise the battery pack may fall when you carry the computer Do not touch the terminals of the battery pack and the computer Doing so can make the terminals dirty or damaged and may cause malfunction of the battery pack and the computer Hold the side of the computer with either of your hands and then hold and lift the A part to open the display Only for model with wireless WAN Be careful not to pr...

Page 12: ...screen Closing the display Do not change the Setup Utility until completing step 5 If you do so Windows setup may not operate properly Follow the on screen instructions The computer will restart after the setup is complete To go to the next step wait until the hard disk drive indicator has turned off CAUTION Do not turn off the computer until completing the first time operation procedure When you ...

Page 13: ... c util reader lt setup exe Norwegian c util reader no setup exe Polish c util reader pl setup exe Portuguese c util reader pt setup exe Romanian c util reader ro setup exe Russian c util reader ru setup exe Slovak c util reader sk setup exe Slovenian c util reader sl setup exe Spanish c util reader p setup exe Swedish c util reader s setup exe Turkish c util reader tr setup exe Languages installe...

Page 14: ...uired contact your technical support office If the message Your computer might be at risk is displayed Select red icon on the notification area and make the appropriate settings The Windows Security Center reg ularly gives you notice so that you can make the optimum settings This is not an error message and you can use the computer However making appropriate measures is recommended to reduce the r...

Page 15: ...nnecting the AC adaptor Sliding the power switch Touching the keyboard touch pad touchscreen or external mouse Closing the display The hand strap is convenient for computing while standing To carry the computer put your hand between the computer and the hand strap to prevent it from falling and firmly hold the computer when using it When using the supplied battery pack CF VZSU51W When using the op...

Page 16: ... desktop Alternatively click start All Programs Panasonic On Line Manuals Important Tips Hard Disk Handling The Hard Disk Handling will provide you with the helpful information on how to use the hard disk To access the Hard Disk Handling Click start All Programs Panasonic On Line Manuals Hard Disk Handling NOTE When Adobe Reader update notice is displayed we recommend you follow the on screen proc...

Page 17: ...er can become hot during operation keep it away from items that are sensitive to heat This computer is designed to minimize shock to parts such as the hard disk drive but no warranty is provided against any trouble caused by shock Be extremely careful when handling the computer When carrying the computer Turn off the computer Remove all external devices cables cards and other protruding things Do ...

Page 18: ...ss WAN Bluetooth Before using wireless LAN wireless WAN Bluetooth make the appropriate security settings such as data encryption Only for model that supports TPM Computrace Software Computrace software tracks your stolen computer Computrace software is not included or installed in this computer Consult Absolute Software Corp before disposal Refer to the following URL for Computrace software for in...

Page 19: ...ailure to perform these steps may result in damage to the computer The drain system will not provide complete protection against water entering the computer 1 Immediately turn off the computer and remove the AC adaptor 2 Wipe any water droplets off of the top of the keyboard using a soft dry cloth 3 Slowly lift up the computer keeping it level and wipe any water coming out of the holes on the bott...

Page 20: ...nts insert objects other than the module or allow foreign particles to enter Doing so has been known to cause damage fire or electric shock Panasonic Corporation will bear no responsibility whatsoever for failures or damage caused by the use of non rec ommended RAM modules or by incorrect installation or removal of such RAM modules Before installing a RAM module confirm the product type and the co...

Page 21: ... and will return after locking If it is hard to press down the RAM module do not try forcibly but check the module s direction 4 Set the cover and battery pack back NOTE If the RAM module is recognized correctly the total size of this computer s memory and RAM module memory is dis played on the Information menu of the Setup Utility If the RAM module is not recognized turn off the computer and inse...

Page 22: ...rent Password and press Enter C Press Enter when the Create New Password display is shown D Press Enter when the Confirm New Password display is shown 9 Press F10 At the confirmation message select Yes and press Enter The computer will restart The following procedures are example It is different according to your environment Contact your technical sup port office A Press Ctrl P when Press CTRL P t...

Page 23: ...character is entered we recommend that you make a memo of the key you pressed and the character that was entered 1 Click start Run and input c util drivers amt MEI setup exe then click OK Follow the on screen instructions 2 If Serial Over LAN is set to ENABLED in the Intel R AMT Configuration click start Run and input c util drivers amt LMS_SOL setup exe then click OK Follow the on screen instruct...

Page 24: ...nd press Enter 4 Select Intel R AMT and press Enter 5 Select Disabled and press Enter 6 Press Esc 7 Select the Exit menu and select Save Current Values and press Enter At the confirmation message select Yes and press Enter 8 Select the Security menu and select AMT Configuration and press Enter 9 Select Reset AMT Configuration and press Enter At the confirmation message select Yes and press Enter T...

Page 25: ...ns 1 Supervisor Password or User Password set with the Setup Utility Press F9 in the Setup Utility page 28 To start the Setup Utility to return the Setup Utility settings excluding the passwords to the default values Start the Setup Utility and make the settings again You have forgotten the password Supervisor Password or User Password Contact your technical support office Administrator password I...

Page 26: ...ver power saving function Intel R Display Power Saving Tech nology of Power Saving Utility to Enabled if you do the following operations the screen becomes black for a moment but this is not a malfunction You can use it Adjust the brightness of the screen with Fn F1 Fn F2 Remove and insert the AC adaptor While you are using motion video playback software benchmark software for graphic if error scr...

Page 27: ...tor will alternately become lighter and darker Touch Pad Touchscreen The cursor does not work When using the external mouse connect it correctly Restart the computer by using the keyboard Press U and R to select Restart If the computer does not respond to keyboard commands read No response below Cannot input using the touch pad Set Touch Pad to Enabled in the Main menu of the Setup Utility The dri...

Page 28: ...Hard Disk Lock Please enter the Setup Utility and change the values correctly to permit access The hard disk access is prohibited Start the Setup Utility and select Disabled in Hard Disk Lock in the Security menu Press F2 to enter setup Write down the error details and press F2 or Del to start the Setup Utility Change the settings if nec essary Reboot and Select proper Boot device or Insert Boot M...

Page 29: ...ese are not malfunctions NOTE Only for the hard disk keyboard and touch pad you can select standard diagnostic check or extended diagnostic check When the PC Diagnostic Utility starts up it will run the standard diagnostic check We recommend that you use the touch pad for operations When not using the touch pad you can operate using the internal keyboard instead Note however that the touch pad and...

Page 30: ...on you can execute the following operations Start the diagnostic check from the beginning Stop the diagnostic check You cannot restart the check partway through by clicking Display help click the screen or press Space to return to the original diagnostic check screen You can check the status of the diagnostic check by the display color on the left side of the hardware icon A Aqua Not running diagn...

Page 31: ...s displayed the computer s hardware is operating normally Continue using the computer as it is If the computer still does not operate properly reinstall the software Supplementary Instructions for Windows XP NOTE If you run a memory diagnostic check after installing a new RAM module sold separately and the message Check Result TEST FAILED is displayed Remove the additional RAM module and run the d...

Page 32: ...rive to the computer 2 Turn on the computer and press F2 or Del while Panasonic boot screen is displayed The Setup Utility starts up If the password is requested enter the Supervisor Password 3 Write down all of the contents of the Setup Utility and press F9 At the confirmation message select Yes and press Enter 4 Press F10 At the confirmation message select Yes and press Enter The computer will r...

Page 33: ...assword is requested enter the Supervisor Password 15 Perform the first time operation for Windows Vista 16 Start the Setup Utility and change the settings as necessary 17 Perform Windows Update Information about Windows Vista To download the Operating Instructions for Windows Vista 1 Visit the following web site http pc dl panasonic co jp cgi bin itn toughbook dl01 cgi 2 At the Download Center sc...

Page 34: ...use of the Programs on the single Product which was accompanied by the Programs You shall not modify or attempt to modify the Programs E You may transfer the Programs and license them to another party only in connection with your transfer of the single Product which was accompanied by the Programs to such other party At the time of such a transfer you must also transfer all copies whether in print...

Page 35: ...m support Monaural Speaker built in Security Chip TPM TCG V1 2 compliant 10 Card Slots PC Card Slot 1 Type I or Type II Allowable current 3 3 V 400 mA 5 V 400 mA SD Memory Card Slot 11 1 RAM Module Slot 1 DDR2 SDRAM 200 pin 1 8 V SO DIMM PC2 5300 Compliant 12 2 GB 1 RAM module has been added to the RAM module slot Interface USB Ports 3 USB2 0 3 13 Modem Port RJ 11 LAN Port RJ 45 9 External Display...

Page 36: ... time becomes approximately 20 shorter than when it is disabled When using the optional battery pack CF VZSU52W operat ing time will be almost halved Pre installed Software 21 Microsoft Internet Explorer 6 Service Pack 2 DirectX 9 0c Microsoft Windows Media Player 10 Microsoft Windows Movie Maker 2 1 Microsoft NET Framework 1 1 SP1 2 0 Adobe Reader Intel PROSet Icon Enlarger Loupe Utility Touch Pa...

Page 37: ...AC adaptor is not connected to the computer power is consumed Max 0 5 W simply by having the AC adaptor plugged into an AC outlet 19 Rated power consumption 23 E 1 20 Average value May differ depending on models 21 Operations of this computer are not guaranteed except for the pre installed OS and the installed OS by using the Prod uct Recovery DVD ROM included 22 Only for model that supports TPM M...

Page 38: ...38 MEMO ...

Page 39: ...39 Operation Troubleshooting ...

Page 40: ...ional ENERGY STAR Office Equipment Program The international ENERGY STAR Office Equipment Program is an international program that promotes energy saving through the use of computers and other office equipment The program backs the development and dissem ination of products with functions that effectively reduce energy consumption It is an open system in which busi ness proprietors can participate...

Reviews: