background image

23

T

roub

leshooting

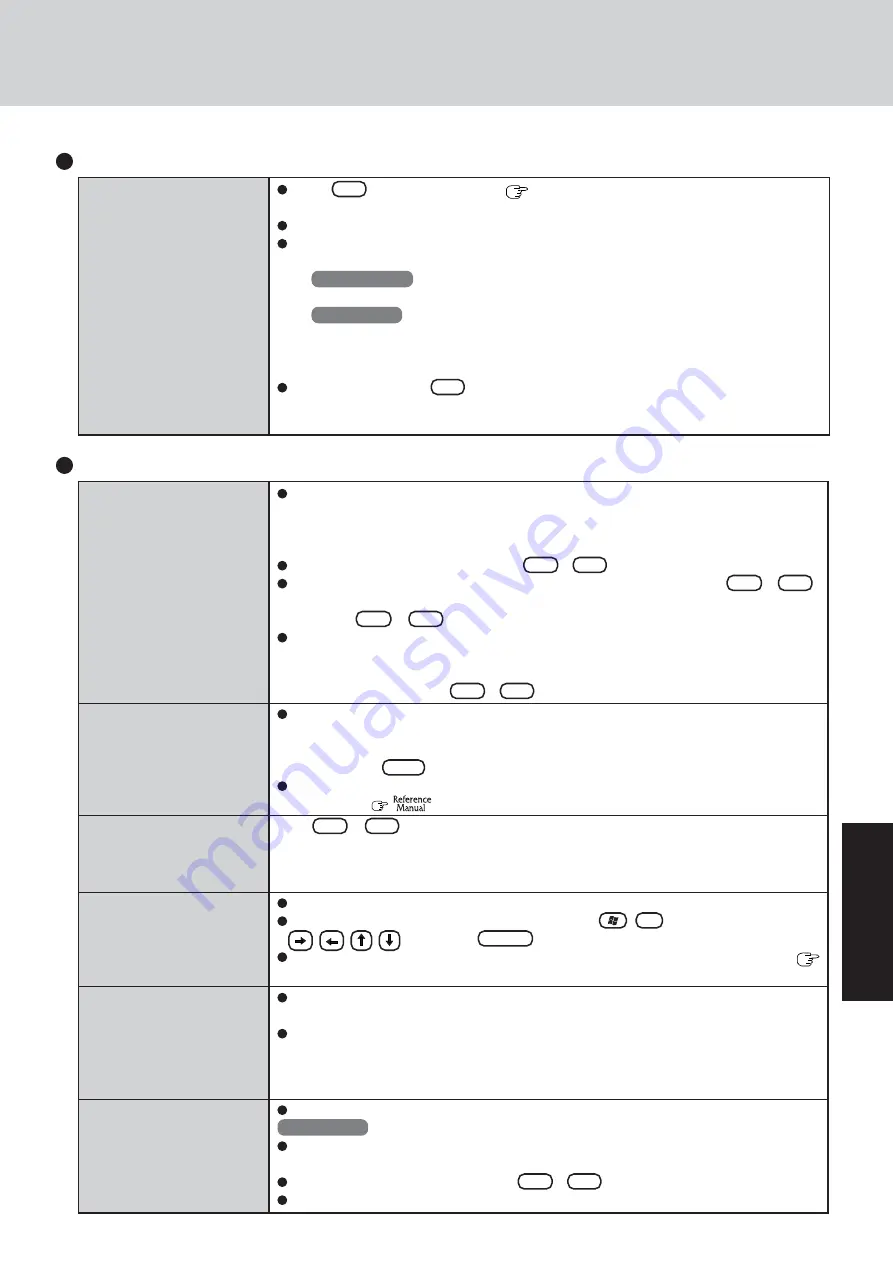
No display after powering on

The power has not been
turned off, but after a cer-
tain period of time, there is
no display

When the battery pack is
used, the screen is darker
than when the AC adaptor
is connected
The cursor cannot be con-
trolled properly

An afterimage appears (e.g.,
green, red, and blue dots
remain on the display) or
there are dots not display-
ing the correct colors

The screen becomes disor-
dered

When there is no display to an external display,

• Check your cable connection to the external display.
• Confirm your display is powered on.
• Check the settings for your external display.

Try changing the display by pressing    

Fn


  +   

F3

   .

If you want to switch the display destination repeatedly by pressing  


Fn


  +   

F3

   ,

make sure that the display destination has switched completely each time before
pressing   


Fn

   +   

F3

   again.

When displaying only through an external display, if the computer is shut down by
using the standby or hibernation function, there will be no display on the LCD unless
the external display is connected when operations are resumed.  In this case, connect the
external display or press    

Fn


  +   

F3

   .

Has the computer been set to the power-saving mode?
To resume operation of your computer from the condition the power of the display is off
(for energy conservation purposes), press any key unrelated to the direct triggering of a
selection, like


Ctrl


  .

To save power, your computer may have automatically entered the standby or hiberna-
tion mode.  (


 “Computing on the Road”)  Press the power switch.

Press


 Fn

   +   

F2


 and adjust the brightness.  Note, however, that when the brightness is

increased, the battery running time will become shorter.
Brightness can be set to separate levels for when the AC adaptor is connected and when it is
disconnected.

If you are using an external mouse, ensure that the external mouse has been connected correctly.
Restart the computer by using the keyboard (Press       , 


U


  , and select [Restart] with

                    , then press    

Enter

   ).

If the computer does not respond to keyboard commands, read “No response” (
page 25).
If an image is displayed for a prolonged period of time, an afterimage may appear.  This
is not a malfunction.  The afterimage will disappear when a different screen is displayed.
High-precision and advanced technologies are necessary in the production of color liq-
uid crystal displays (color LCDs).  Therefore, if 0.002% or less of the picture elements
either fail to light or remain constantly lit (that is, more than 99.998% of elements are
functioning properly), no defect is considered to exist.
Changing the number of colors of the display may affect the screen. Restart the computer.

Windows XP

When using Dualview, use the same display colors for the external display as those used
by the LCD.
When using Dualview, do not press 


 Fn

   +   

F3


.

Restart your computer immediately after enabling or disabling Dualview.

 Display

When the previous item is
not the cause

Press   

F9

    in the Setup Utility (

 page 21).  This will restore the Setup Utility’s

settings to their default values (except the password settings).
Try removing all peripheral devices.
Check a disk error using the following procedure.

1

Display [Local Disk (C:) Properties].

Windows 2000

Select [Local Disk(C:)] with the right button in [My Computer], and select [Properties].

Windows XP

Select [Local Disk(C:)] with the right button in [start] - [My Computer], and select [Properties].

2

Select [Tools] - [Check Now].

3

Select [Start] after selecting required items in [Check disk options].

At startup, hold down    

F8


   when [Panasonic] boot screen disappears, and release your

finger when the Windows Advanced Option Menu is displayed.  Start the computer in
Safe Mode, and confirm the details of the error.

 Starting Up (continued)

Summary of Contents for Touchbook CF-50 Series

Page 1: ...mputer Refer to page 20 on how to access the Reference Manual Reference Manual Read Me First Key Combinations Reference Manual Touch Pad Standby Hibernation Functions Security Measures Computing on th...

Page 2: ...registered trademarks of their respective own compa nies For the Model No insert the 12 digit number for example CF 50LB2TDKM located on the bottom of the computer NOTE NOTE provides a useful fact or...

Page 3: ...g call In most but not all area the sum of RENs should not exceed five 5 0 To be certain of the number of devices that may be connected to a line as determined by the total RENs contact the local tele...

Page 4: ...l entreprise locale de t l communication Le mat riel doit galement tre install en suivant une m thode accept e de raccordement L abonn ne doit pas oublier qu il est possible que la conformit aux condi...

Page 5: ...mitted by wireless devices like for example mobile phones Because this product operates within the guidelines found in radio frequency safety standards and recommendations we be lieve this product is...

Page 6: ...LAN To prevent theft of data or unauthorized access to the hard disk via a wireless LAN If you plan to use wireless LAN functions we recommend that you do so only after making the appropriate security...

Page 7: ...ture is low the operating time is shortened Only use the computer within the allowable temperature range The battery pack is a consumable item If the amount of time the computer can be run off a parti...

Page 8: ...damage should trouble occur to your computer or should you inad vertently change or erase data Use the security function for all important data Security Measures Windows 2000 This computer uses Micros...

Page 9: ...ransferring ownership of this device erase all data on the hard disk in order to prevent the theft of hard disk data Even if you delete data or initialize the hard disk through normal Windows com mand...

Page 10: ...tic bag so that its contacts are protected Do not carry the computer while the display is open or carry it by gripping the display Do not put anything e g a piece of paper between the display and keyb...

Page 11: ...m the inclusion of all parts Make sure the parts shown in the figure have been supplied If any of these items are missing or is not working properly contact Panasonic Technical Support page 40 Battery...

Page 12: ...wer cord forcefully Doing so may damage the connections Use only the specified AC adaptor with your computer Using an AC adaptor other than the one supplied might damage the battery and or the compute...

Page 13: ...me and the time zone then select Next 7 At Networking Settings select Typical settings then select Next 8 At Workgroup or Computer Domain select No this computer is not on a network or is on a network...

Page 14: ...er of the following domain is selected the following message may be displayed An invalid domain was specified Would you like to proceed for now and try joining a domain later In this case select Yes A...

Page 15: ...reset Information for Windows XP NOTE After setting up Windows you can use Icon Enlarger to change the size of the icons etc as you like To use this select on the desktop or Icon En larger in start A...

Page 16: ...nical Support page 40 CAUTION Power Switch Power Indicator 1 2 You may encounter the following situations when the computer is turned on at very low temperatures These functions are designed to preven...

Page 17: ...ase because it is conceivable that a selection dialog box will be shown do not press Space or Enter to attempt to resume from this condition as doing so may trigger a selection but instead press a key...

Page 18: ...ation Functions NOTE This procedure is for shutting down the computer without using the standby or hibernation function Standby Hibernation Functions 1 Save important data and close each application 2...

Page 19: ...ton Work Surface or Two quick taps but on the sec ond tap leaving your finger down applying pressure and moving it on the work surface While holding down the but ton moving your finger on the work sur...

Page 20: ...recommend printing pages The illustrations and display samples may not print with a high quality Windows XP When switching to a different user with the Fast User Switching function PDF files may not...

Page 21: ...settings and change the settings to the appropriate values as needed The OS is not properly installed on the floppy disk or the hard disk that you are trying to boot from If the computer cannot be bo...

Page 22: ...act Panasonic Technical Support page 40 This computer will not correctly recognize the date and time starting from the year 2100 A D Even when a password has been set in the Setup Utility Enter Passwo...

Page 23: ...ed and when it is disconnected If you are using an external mouse ensure that the external mouse has been connected correctly Restart the computer by using the keyboard Press U and select Restart with...

Page 24: ...nal display no longer displays properly When you want to display the fonts or icons at a larger size When an MPEG file is be ing played with Media Player the display destina tion cannot be switched us...

Page 25: ...normally delete the program using the following proce dure Then reinstall the program Windows 2000 Start Settings Control Panel Add Remove Programs Windows XP start Control Panel Add or Remove Program...

Page 26: ...CF 50F CD Drive 4 Place Product Recovery DVD ROM into the CD drive 5 Press F10 At the confirmation message select Yes and press Enter The computer will restart and this screen should appear 6 Press 1...

Page 27: ...out 15 minutes Recovery is complete Windows R 2000 Professional install wizard will start after reboot Please Remove the Product Recovery DVD ROM and press Ctrl Alt Del Delete to reboot 11 Restart the...

Page 28: ...enclosed software products and documentation were developed at private expense and are provided with RESTRICTED RIGHTS Use duplication or disclosure by the government is subject to restrictions as se...

Page 29: ...uvez assembler en sens inverse compiler en sens inverse ni retracer les Logiciels ni aucune de leurs copies de fa on lectronique ou m canique en tout ou en partie Vous ne pouvez utiliser copier modifi...

Page 30: ...t menu CF 50F CD Drive 3 Place the Product Recovery DVD ROM into the CD drive 4 Press F10 At the confirmation message select Yes and press Enter The computer will restart 5 Press 2 to execute 2 Erase...

Page 31: ...Settings and confirm that Transfer Mode is set to DMA if available for Device 0 and Device 1 4 Double click Secondary IDE Channel for IDE ATA ATAPI controllers and perform as the step Do not enter th...

Page 32: ...code and select OK Play now begins Confirm Region may not be displayed for some DVD Videos To confirm the current region code and the number of settings remaining right click on the WinDVD screen and...

Page 33: ...ck mark for Enable CD recording on this drive every time a new user is added Before Installing the Software Installing the Software 1 Set B s Recorder GOLD B s CLiP disc in the drive B H A setup launc...

Page 34: ...tomatically If you close the opened tray and press OK after completing a copy operation the tray will open again When creating an Audio CD using B s Recorder taking out the CD may become impossible if...

Page 35: ...r from the actual physical appearances PC Cards PC Card Slots Caps Lock Numeric key NumLk Scroll lock ScrLk CD drive status Floppy disk drive status Hard disk drive status Power status Function Keys L...

Page 36: ...k LAN Battery Power Hard Disk Drive Hard Disk Drive A lithium ion battery that is recyclable powers the product you have purchased Please call 1 800 8 BATTERY for information on how to recycle this ba...

Page 37: ...e Operating System LCD type and whether a DVD ROM drive a DVD ROM CD R RW drive or a DVD MULTI drive is included or not To check the model number Check the bottom of the computer or the box the comput...

Page 38: ...mperature Humidity Physical Dimensions W X H X D Weight CF 50F1FGUDM CF 50LB2UDDM CF 50LB2TDDM CF 50F1FGUKM CF 50LB2UDKM CF 50LB2TDKM Two Type I or Type II or one Type III 3 3 V 400 mA 5 V 400 mA 200...

Page 39: ...stem Utility Programs Setup Utility DMI Viewer Adobe Acrobat Reader Hard Disk Data Erase Utility 8 PC Information Viewer Only for the model with a wireless LAN Intel PROSet 8 The Product Recovery DVD...

Page 40: ...defects in materials and workmanship under normal use for a period of sixty 60 days from the date of delivery thereof to you as evidenced by your purchase receipt This is the only warranty Panasonic...

Page 41: ...re In the event of a defect in material or workmanship in the media during the sixty 60 day warranty period and you return it transportation costs prepaid to Panasonic Canada Inc Computer Products Mar...

Page 42: ...42 Memo...

Page 43: ...43...

Page 44: ...participate voluntarily The targeted products are office equipment such as computers displays printers facsimiles and copiers Their standards and logos are uniform among participating nations As an E...

Reviews: