background image

38

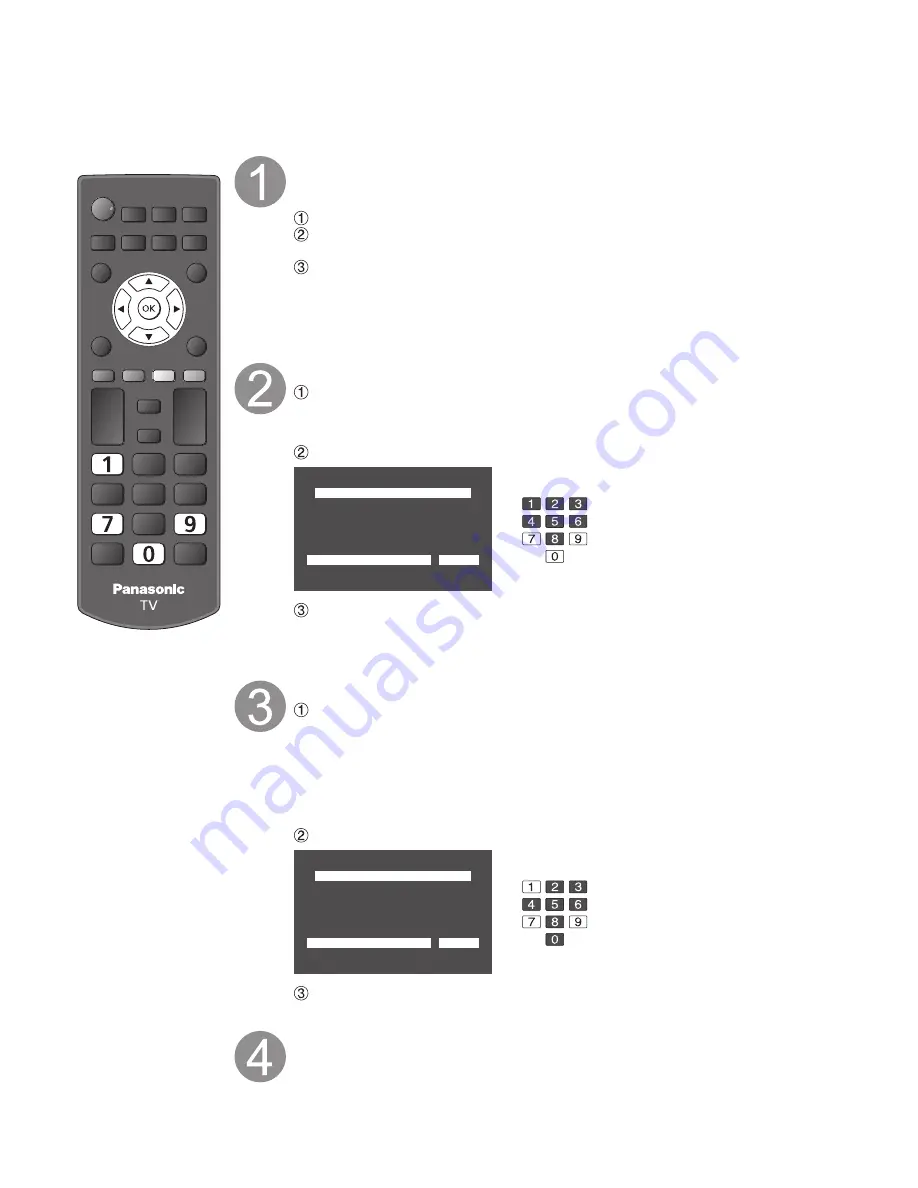
Clone the TV Setting

When installing a number of units in hotel or any facility, the data in master TV can be copied to USB 

storage and then copy to other TVs.

Prepare blank USB storage

• Create pwd file as startup file at root directory of an empty USB storage using your 

PC.

 Insert a empty USB storage to your PC.

  Right-click a blank area in a USB storage window, point to New, and then click text 

document. A new file is created by default (New Text Document.txt).

  Right-click the new text document that you just created and select rename, and 

then change the name and extension of the file to the following file name and press 

ENTER.

File name: 

hotelsys.pwd

Copy the setting data to the USB storage above

  Insert the USB storage to the master TV 

Displays the data copy screen automatically

• Insert/Remove the USB storage (p. 19)

 Input 4-digit password (7970)

7970

Input password

Data copy (Hotel)

 Follow the instructions on screen to complete copying the data

• The data folder will be automatically created at root directory of the USB storage.

Folder name: 

hotel_setup

Copy the setting data to other TV

  Insert the USB storage with clone data

Displays the data copy screen automatically

<Clone data>

• User settings (Picture/Sound and other setup)

• Hotel menu items

• Channel map (stand alone operation only)

• Welcome Image file (JPEG)

 Input 4-digit password (7971)

7971

Input password

Data copy (Hotel)

 Follow the instructions on screen to complete the cloning.

Cycle AC power after the cloning completes

Summary of Contents for TH-32LRU7

Page 1: ...r purchasing this Panasonic product Please read these instructions before operating your set and retain them for future reference The images shown in this manual are for illustrative purposes only English Model No TH 32LRU70 TH 32LRU7 TH 42LRU70 TH 42LRU7 TH 50LRU70 ...

Page 2: ...he software categorized as 3 are distributed in the hope that it will be useful but WITHOUT ANY WARRANTY without even the implied warranty of MERCHANTABILITY or FITNESS FOR A PARTICULAR PURPOSE Experience an amazing level of multimedia excitement USB Flash Memory Camcorder Personal computer Amplifier with Speaker system Cable box DVD Player Blu ray Disc player DVD Recorder Blu ray Disc recorder VC...

Page 3: ...uld result in greater energy consumption beyond levels that meet ENERGY STAR qualifications Manufactured under license from Dolby Laboratories Dolby and the double D symbol are trademarks of Dolby Laboratories Pro Idiom is a trademark of Zenith Corporation Watching TV 16 Watching content from external devices 17 Displaying PC Screen on TV 18 Using Media Player 19 Hotel Mode Setup 21 How to Use Men...

Page 4: ...he point where they exit from the apparatus 11 Only use attachments accessories specified by the manufacturer 12 Use only with the cart stand tripod bracket or table specified by the manufacturer or sold with the apparatus When a cart is used use caution when moving the cart apparatus combination to avoid injury from tip over 13 Unplug this apparatus during lightning storms or when unused for long...

Page 5: ... AND OTHER OBJECTS INCLUDING PACKAGING MATERIALS AND PLASTIC BAGS SHEETS TO PREVENT THEM FROM BEING PLAYED WITH BY YOUNG CHILDREN CREATING THE POTENTIAL RISK OF SUFFOCATION 24 WARNING To prevent the spread of fire keep candles or other open flames away from this product at all times 25 WARNING Do not place this TV in any medical institutions or locations with medical devices Radio waves from this ...

Page 6: ...ller Televisions can be heavy A minimum of two people is required for a wall or ceiling mount installation MOVING AN OLDER TELEVISION TO A NEW PLACE IN YOUR HOME Many new television buyers move their older CRT televisions into a secondary room after the purchase of a flat panel television Special care should be made in the placement of older CRT televisions ALWAYS place your older CRT television o...

Page 7: ...ket incorrect fitting or otherwise failure to follow the above instructions Accessories Optional Accessory Accessories Check you have all the items shown Accessories Batteries for the Remote Control Transmitter 2 AA Battery Simple Owner s Manual Installing the remote s batteries Open Hook Note the correct polarity or Close Caution Incorrect installation may cause battery leakage and corrosion resu...

Page 8: ...rews if 90 angle rotation is desired Tighten screws firmly G D B D 1 2 G From above Accessories Bracket TBL2AB30141 1 for 32 TBL5ZA35091 2 for 42 50 Base 1 TBL2AX00551 for 32 42 50 Neck cover 1 TBL2AA30301 for 32 42 50 Arm 1 TBL2AA30321 for 42 50 Assembly screws Screws 4 Screws 4 Security screw 1 Screws 4 Screws 4 XYN4 F15FNK size M4 15 for 32 THE5ZL002N size M4 12 for 42 50 XSS5 15FNK size M5 15 ...

Page 9: ...p away from areas of excessive heat or moisture For TH 32LRU70 TH 32LRU7 For TH 42LRU70 TH 42LRU7 TH 50LRU70 A A Install securely with assembly screws Total 4 screws Tighten screws firmly One of the screws can be replaced with a security screw if necessary For TH 32LRU70 TH 32LRU7 For TH 42LRU70 TH 42LRU7 TH 50LRU70 K Bottom plate screw hole Screw location template Insert 0 24 6 mm Slide Put the t...

Page 10: ...curely tightened If sufficient care is not taken to ensure screws are properly tightened during assembly the pedestal will not be strong enough to support the TV and it might fall over and become damaged and personal injury may result Adjust the stand to your desired angle TH 32LRU70 TH 32LRU7 a b Rotation angle 30 a b Rotation angle 60 a b Rotation angle 90 a 6 8 171 mm b 9 4 239 mm a 12 0 303 mm...

Page 11: ...I terminals COMPONENT terminals COMPOSITE terminals AUDIO OUT terminal DATA MTI terminal SERIAL terminal Ethernet terminal PC terminal USB terminal 1 No embedded b LAN TH 32LRU7 TH 42LRU7 2 For more details on the external equipment s connections please refer to the operating manuals for the equipment RF connection 2 1 ...

Page 12: ...ommittee Analog television system ATSC Advanced Television Systems Committee Digital TV Standards include digital high definition television HDTV standard definition television SDTV data broadcasting multi channel surround sound audio and interactive television Cable You need to subscribe to a cable TV service to enjoy viewing their programming You can enjoy high definition programming by subscrib...

Page 13: ... AV Equipment Side panel Back panel HDMI cable Connecting to the HDMI terminals will enable you to enjoy high definition digital images and high quality sound The HDMI connection is required for a 1080p signal To use COMPONENT terminals L R Y PB PR COMPONENT VIDEO OUT AUDIO OUT white red green blue red white red green blue red white red green blue red e g Blu ray Disc player AV Equipment To use CO...

Page 14: ...inal External controller e g Bed side controller SERIAL OUT RS232C cable To use Ethernet terminal Ethernet terminal External controller LAN cable To use PC terminal Connect a cable which matches the audio out terminal on the PC PC PC OUT AUDIO OUT Conversion adapter if necessary Audio cable RGB PC cable Connections Continued Example of connections Note Not all cables and external equipment shown i...

Page 15: ...banner p 16 Displays Options Menu for special functions when available Numeric keypad to select any channel p 16 or press to enter alphanumeric input in menus Volume up down r Sound mute On Off r Closed Caption On Off p 16 Selects Audio Mode for TV viewing p 16 Changes the input mode p 17 Exits from menu screen Selects OK Change Returns to previous menu Changes aspect ratio p 16 40 Channel up down...

Page 16: ...a digital channel Audio track 1 of 2 English Main audio English audio Analog mode Press SAP to select the desired audio mode Each press of SAP will change the audio mode Stereo SAP Mono Closed Caption Switches the Closed Caption mode On mute On Off Information recall Displays or removes the channel banner 15 30 CC SAP TV G 1080i 4 3 ABC HD Channel Station identifier Closed Caption SAP indication R...

Page 17: ...r Press INPUT repeatedly to cycle through the available inputs select enter Select the input of your choice then press OK During the selection if no action is taken for several seconds the Input select menu disappears To switch between Video and Component in AV use left and right cursor button Note The input label will be displayed on the Input select screen if the Input label is set Operate the c...

Page 18: ...sts the horizontal position V position Adjusts the vertical position Clock phase Alleviates the problem if the whole picture appears to flicker or is blurred First adjust the Dot Clock to get the best possible picture then adjust the Clock phase so that a clear picture appears It may not be possible to display a clear picture due to poor input signals Sync H V The H and V sync signals are input fr...

Page 19: ...g or removing Media player only supports USB Mass storage class devices Display the view selection in the thumbnail view Select the data to be viewed s o t o h p l l A Photos SD memory card Select RETURN OK SUB MENU Error display titles that could not be loaded etc select view View Select Rotate Single view RETURN Single view Stop Single view Slideshow Photo status Navigation Guide Displays one at...

Page 20: ...m Auto makeup Detects a face in the photo checks the luminance and then retouches the enhanced image On Off Photo size Removes the black borders that are added according to the size of the photo being displayed Normal ZOOM Burst playback Continuously plays photos that were shot On Off Display interval Set Display interval each image is displayed in the Slideshow mode Long Normal Short Repeat playb...

Page 21: ...100 Does not operate when control from TA to the TV is prohibited Max volume Sets the maximum volume level 0 100 OSD Ctrl Limits the on screen display Off Pattern1 Pattern 1 Recall and Shut off notification messages are not displayed at power on Also displayed when Pattern 1 is specified as the display command from TA Button lock Limits the TV panel button operation Off Pattern1 All Pattern 1 Only...

Page 22: ...the type of input signal Menu Item Setting 1 2 0 0 0 0 Sound mode Standard Bass Treble Equalizer A I sound Surround Volume leveler Distance to wall Preferred audio type Off Off Main Audio Menu Picture Sound Network Timer Setup Select Selects your favorite sound from preset sound modes Page up Change RETURN Page down Operation guide Selected item description Balance Help Over 1ft 30cm Menu structur...

Page 23: ... for HDMI 1080p input HDMI content type Sets content type to each HDMI input Graphics Photos Auto Off Auto Switches content type automatically depending on the HDMI signal information Photo Best setting for JPEG viewing Graphics Best setting for On Screen display of connected equipment Auto detail setting Selectable the effect on each content type in Auto mode HDMI DVI RGB range Prevents the blown...

Page 24: ...s output as PCM PCM Digital output signal is fixed to PCM ARC Audio Return Channel A function of digital audio output using HDMI cable HDMI input HDMIx in The default setting is Digital for the HDMI connection Digital input signal Digital Analog Select audio input terminal when a DVI cable is connected along with an analog audio input signal Reset to defaults Resets all Audio adjustments to factor...

Page 25: ...4 5 6 The Digital Closed Caption menu lets you configure the way you choose to view the digital captioning Digital setting Set display settings in digital programs Size Select the text size Font Select the text font Style Select the text style Raised Depressed etc Foreground Select the color of text Foreground opacity Select the opacity of text Background Select the color of text box Background op...

Page 26: ...evice Note Audio return is available only on HDMI 1 When adding new equipment reconnecting equipment or changing the setup after the connection turn the equipment on and then switch the TV on Set the input mode to HDMI1 HDMI2 or HDMI3 p 17 and make sure that the image is displayed correctly VIERA Link HDAVI Control is based on the control functions provided by HDMI and industry standard known as H...

Page 27: ... terminal then connect the camcorder to this input After connection confirm the HDAVI control functions p 28 29 HDMI mini HDMI cable HD Camcorder with VIERA Link function LUMIX with VIERA Link function Side panel Back panel If connection or setting of equipment compatible with HDAVI control is changed switch the power of this unit Off and On again while the power of all equipment is On so that the...

Page 28: ...disabled depending on the HDAVI Control version of the equipment Please check the list p 26 Press to exit from a menu screen Press to return to the previous screen Display the menu Select VIERA Link settings in Setup select next Select VIERA Link select next Select On default is On select next Select and make other settings select next VIERA LinkTM HDAVI ControlTM Continued ...

Page 29: ...ent is turned off Automatic lip sync function Minimizes lip sync delays between the picture and audio when you connect to a Panasonic theater system or Amplifier TV provided setting information The following information about the TV settings can be transmitted to each piece of equipment Recorder Home theater Player that has HDAVI Control 3 or later function connected to a TV with an HDMI cable Tra...

Page 30: ...h Editing and Setting Channels The current channel settings can be changed according to your needs and reception conditions Press to exit from a menu screen Press to return to the previous screen Display the menu Select ANTENNA Cable setup in Setup next select Select the function next select Set ...

Page 31: ...es 6 Yes 7 Yes 8 Yes 9 Yes Channel Prev page Next page select OK Select Edit R G B Y Select RETURN OK Manual program Edit Cancel Apply Caption Add 2 Yes 3 Yes 4 Yes 5 Yes 6 Yes 7 Yes 8 Yes 9 Yes Channel Prev page Next page select next Select the item to edit R G B Y Select RETURN Manual program Edit Cancel Apply Caption Add 2 Yes 3 Yes 4 Yes 5 Yes 6 Yes 7 Yes 8 Yes 9 Yes Channel Prev page Next pag...

Page 32: ...format of received signal p 40 Audio mode Select Audio mode p 16 Sleep minutes The TV can automatically turn Off at the designated time 90 minutes 60 minutes 30 minutes 15 minutes Off Parental control You can lock specified channels or shows to prevent children from watching objectionable content Make a note of your password in case you forget it If you have forgotten your password consult your lo...

Page 33: ...elect Initial input and set to USB storage Menu 1 3 Save Mode TA Ctrl Initial input USB storage Off On select OK Select Save then press OK select OK Turn the TV Off and insert the USB storage How to insert the USB storage p 19 Turn the TV On with the POWER button TV Remote or Slideshow automatically starts How to operate and details on Using Media Player p 19 20 Note This mode is available when TA...

Page 34: ...ton Mode must be On Menu 1 3 Save Mode TA Ctrl Initial input RF Off On select OK Select Welcome Image and set to Load Image Find and check the image file before install Error message is displayed if the image file is not found invalid etc p 35 Checking please wait select OK Press OK to start New image is found Press OK key to continue Press any other key to cancel OK To cancel Press any key other ...

Page 35: ... image insert the USB storage with a new image then set Welcome Image The installation process will start to repeat the previous procedures Audio is not output while displaying the Welcome Image When the image file is not installed default image Panasonic Logo is displayed To check the Welcome Image The Welcome Image is displayed for designated seconds by turning on the main power of the TV or tur...

Page 36: ..._ _______ Data copy Local Authentication Input password Follow the instructions on screen to complete copying the data Follow the instructions on restart request Data copied successfully Press and hold the TV s POWER button not remote for 10 seconds then release FINISH Data copy Local Authentication Restart as Local Authentication mode If these procedures are successful TA Ctrl menu will be change...

Page 37: ...emap Follow the instructions on screen to complete copying the data Follow the instructions on restart request Data copy Channel Remap FINISH Data copied successfully Press and hold the TV s POWER button not remote for 10 seconds then release Restart TV will not restart as Local Authentication mode TA Ctrl menu will be changed to Off automatically Since Hotel Mode will not be changed to On automat...

Page 38: ...name hotelsys pwd Copy the setting data to the USB storage above Insert the USB storage to the master TV Displays the data copy screen automatically Insert Remove the USB storage p 19 Input 4 digit password 7970 7970 Input password Data copy Hotel Follow the instructions on screen to complete copying the data The data folder will be automatically created at root directory of the USB storage Folder...

Page 39: ...ATINGS C E L R E Exempt Exempt programming includes news sports documentaries and other information programming talk shows music videos and variety programming C Programming intended for children under age 8 No offensive language nudity or sexual content C8 Programming generally considered acceptable for children 8 years and over No profanity nudity or sexual content G General programming suitable...

Page 40: ...TSC TV broadcasts in the United States and Canada Aspect Ratio FORMAT Press the FORMAT button to cycle through the aspect modes This lets you choose the aspect depending on the format of the received signal and your preference p 16 e g in case of 4 3 image Full JUST Full JUST Enlarges the 4 3 image horizontally to the screen s side edges Recommended for anamorphic picture Stretches to justify the ...

Page 41: ...n if they fulfill these conditions Depending on how you make USB Flash Memory files and folders may not be displayed in the order you numbered Depending on how you create the files and the structure of folders the files and folders may not be displayed When there are many files and folders operation may take time to complete or some files may not be displayed or playable Media player cannot displa...

Page 42: ... Use with a PC is not assumed All signals are reformatted before being displayed on the screen If the connected device has an aspect adjustment function set the aspect ratio to 16 9 These HDMI connectors are type A These HDMI connectors are compatible with HDCP High Bandwidth Digital Content Protection copyright protection A device having no digital output terminal may be connected to the input te...

Page 43: ...e PC models cannot be connected to the set There is no need to use an adapter for computers with IBM PC AT compatible D sub 15P terminal The maximum resolution 1 280 1 024 If the display resolution exceeds these maximums it may not be possible to show fine detail with sufficient clarity Signal Names for D sub 15P Connector 1 6 7 8 3 9 4 5 10 15 14 13 12 11 2 Pin No Signal Name Pin No Signal Name P...

Page 44: ...ssary Please see p 45 regarding Commands and Parameters Note With standby mode this TV responds to PON and QPW commands only Wait for the response of the first command to come from this unit before sending the next command If multiple commands are transmitted be sure to keep intervals of 250msec Send the command again when the call back command is unusual If an incorrect command is sent by mistake...

Page 45: ... QAS ZOOM FULL JUST NORM 4 3 HFIL ASPECT Toggle DAM INPUT SELECT CH UP CHU CH DOWN CHD TV IMS TV QMI QMI TV Component IMS C1 C1 Video IMS V1 V1 HDMI 1 IMS H1 H1 HDMI 2 IMS H2 H2 HDMI 3 IMS H3 H3 PC IMS PC PC USB storage IMS SP SP Toggle IMS PICTURE MODE Vivid VPC VVT QPC QPC VVT Standard VPC STD STD Custom VPC CST CST CHANNEL COMMAND LAST CH LCH OTHER COMMAND Information INF QIF QIF 480i 480p 576i...

Page 46: ...local dealer The display panel moves slightly when it is pushed with a finger A clattering sound might be heard This is not a malfunction There is some looseness around the panel to prevent damage to the panel The remote control does not work Are the batteries installed correctly p 7 Are the batteries new Pictures from external equipment are distorted when the unit is connected via HDMI Is the HDM...

Page 47: ...ted p 17 Black Box appears Change settings of Closed Caption CC No sound is produced Are the speakers cables connected correctly Is Sound Mute active p 15 Is the volume set to the minimum Change SAP settings p 16 Check HDMI 1 in HDMI 2 in or HDMI 3 in settings p 24 If the TV is connected to a Panasonic Home Theater via HDMI cable then check VIERA Link controls Sound is unusual Set SAP setting to S...

Page 48: ...the cabinet and then wipe it dry with a dry cloth Do not allow any mild liquid dish soap to come into direct contact with the surface of the LCD TV If water droplets get inside the unit operating problems may result Avoid contact with volatile substances such as insect sprays solvents and thinner otherwise the quality of the cabinet surface may be adversely affected or the coating may peel off Fur...

Page 49: ...TV Set only 11 5 lb 5 2 NET 18 8 lb 8 5 NET 32 0 lb 14 5 NET Sound Speaker 1 way 2 bottom SP System Audio Output 20 W 10 W 10 W FEATURES 3D Y C FILTER CLOSED CAPTION V Chip Vesa compatible Integrated Pro Idiom Embedded b LAN LRU70 Operating Conditions Temperature 32 F 95 F 0 C 35 C Humidity 20 80 RH non condensing Channel Capability ATSC NTSC Digital Analog VHF UHF 2 69 CATV 1 135 support MPEG4 H ...

Page 50: ... 0 76 mm 38 0 963 mm 17 8 450 mm 22 3 566 mm 24 8 629 mm 2 8 71 mm 9 9 250 mm 28 9 734 mm 17 2 437 mm 19 7 500 mm 17 8 450 mm Note Design and Specifications are subject to change without notice Mass and Dimensions shown are approximate TH 32LRU70 TH 32LRU7 TH 42LRU70 TH 42LRU7 TH 50LRU70 ...

Page 51: ...51 Support Information Specifications ...

Page 52: ...ice purposes Model Number Serial Number Panasonic Corporation 2014 Panasonic System Communications Company of North America Unit of Panasonic Corporation of North America Panasonic Canada Inc 5770 Ambler Drive Mississauga Ontario L4W 2T3 CANADA Executive Office Two Riverfront Plaza Newark NJ 07102 5490 U S A USA only Disposal may be regulated in your community due to environmental considerations F...

Reviews: