background image

SUPER-D3 ON:

Enables SUPER-D3 to compensate backlight automatically.

SUPER-D3 OFF:

Enables manual setting to compensate backlight.

Notes:

• When set to ON, the available parameters for SHUTTER and SENS-UP will be limited

as shown on the next page.

• Set SUPER-D3 to OFF when noise in a bright portion, flickerings, or color deterioration

are observed.

1. Select ALC for ALC/ELC on the CAM SETUP menu

and press SET.

→ 

The ALC CONT menu opens.

2. Select ON for SUPER-D3.
3. Adjust the video output level (LEVEL) by moving the

"I" cursor. It may be better to adjust LEVEL slightly
higher.

First, select a language for menu display and camera ID display.

Language Setup (LANGUAGE SETUP)

1. Select LANGUAGE on the top menu and press SET.

The LANGUAGE SETUP menu opens.

2. Select a language. The default setting is English.

Available languages:

ENGLISH, FRANÇAIS,

DEUTSCH, ESPAÑOL, ITALIANO, 

êìëëäàâ

,

JAPANESE, CHINESE

3. Select SET on the menu and press the SET button.

1. Camera Identification Setting (CAMERA ID)

Assign a name to the camera using up to 16 characters
to display it overlaying on the camera picture in the
selected position. 

Note:

If you change the language selection after the

assignment of camera ID, it will be erased.

1. On the CAMERA SETUP menu, select ON

or OFF

for CAMERA ID and press SET.

ON

:

Displays entered camera ID.

OFF

:

Does not display the ID.

The CAMERA ID menu opens.

2. Select a character from the character area

and press SET. 

The selected characters are displayed

in the editing area.

3. Repeat these procedures until all charac-

ters are entered.

• To enter a blank space, select SPACE and

press SET.

• To replace a specific character in the edit-

ing area:

1. Move the cursor to the editing area

and then move the pointer to the char-
acter to be replaced pressing the L
and R buttons.

2. Move the cursor to a candidate char-

acter in the character area and press
SET.

• To erase all characters of the camera ID,

select RESET and press SET.

Note:

For Chinese language, up to 8 char-

acters can be entered.

4 To specify the ID display position:

1. Select POSI and press SET.

The entered camera ID will be highlighted on the screen.

2. Move it into the appropriate position and press SET.

The position is determined and the screen will return to the CAMERA ID menu.

Note:

Keep pressing any of L/R/U/D for a second or more to move the camera ID

faster as necessary.

2. Light Control Mode Setting (ALC/ELC)

Select a light control mode depending on the lens type mounted. The default setting is ALC.

ALC

:

Is applicable to the auto iris lens. SUPER-D3 is available with this selection.

ELC

:

Is applicable to the fixed or manual iris lens.

Cautions: 

1. Under bright lighting conditions such as outdoors, use an ALC lens because the ELC

control range is not wide enough under these conditions.

2. Use an ALC type lens if the following phenomena occur:

• Strong smear and/or blooming on highlighted objects such as a spotlight or sunlight

from windows.

• Noticeable flicker in the picture and/or color rendition variations.

3. If ELC is selected, SUPER-D3 and SHUTTER are not available and the white balance

mode is automatically set to ATW1 or ATW2 previously set.

4. If ELC is selected and a fixed iris lens is used, the focal depth becomes shallower

than with the use of an ALC lens. Therefore, the range of focus-to-object distance
becomes narrower.

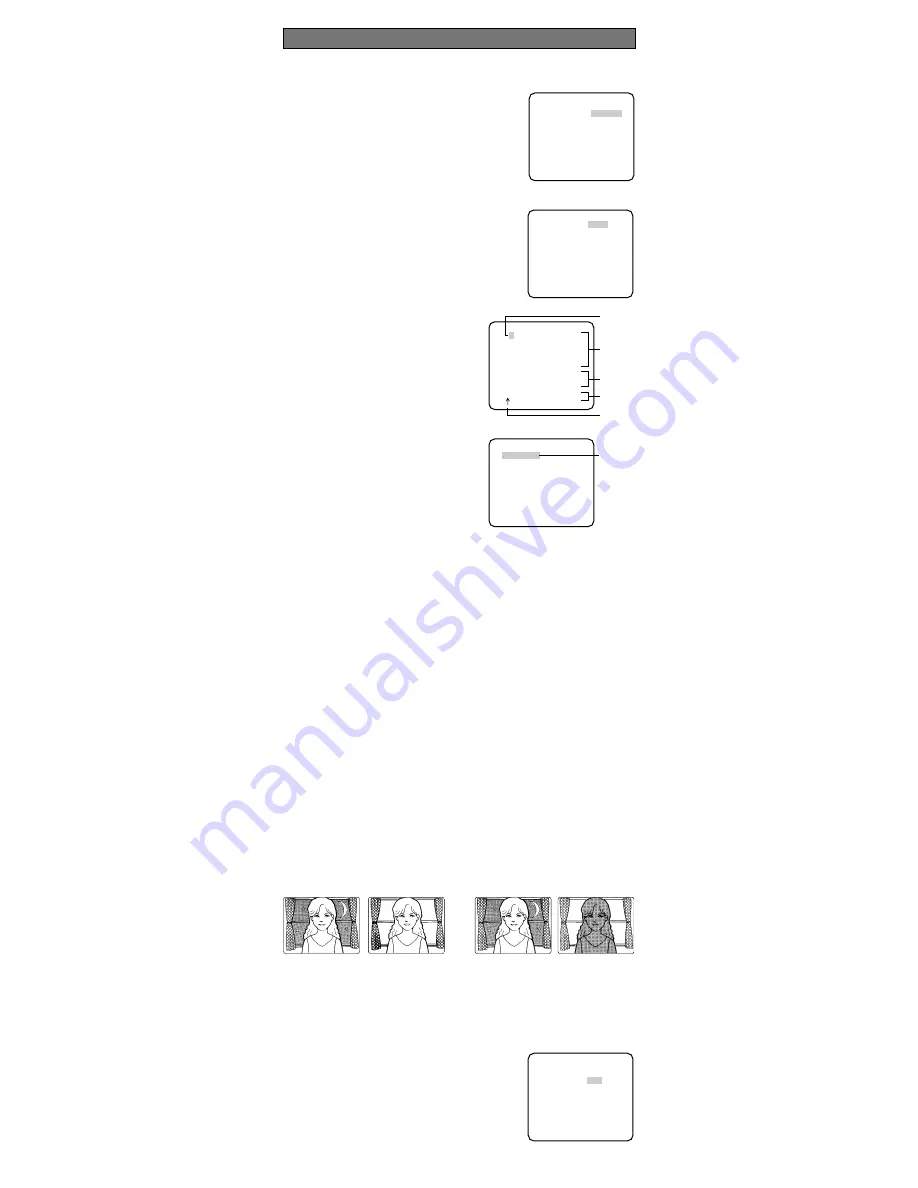
2-1. ALC Mode with SUPER-D3 ON

Super Dynamic 3 Function (SUPER-D3)

In the SUPER-D3 mode, more photometric weight is given to the center of the screen than to
the edge where a bright backlight would most likely be located. 

    **CAMERA SETUP** 1/2
CAMERA ID     OFF   
ALC/ELC       ALC  
SHUTTER       OFF  
AGC           ON(HIGH)  
SENS UP       OFF
SYNC          INT
WHITE BAL     ATW1
MOTION DET    OFF
DNR           HIGH
RESOLUTION    HIGH
BW MODE

(To be continued reverse page)

SETTING PROCEDURES

      **ALC CONT**      
     BACK LIGHT COMP

SUPER-D3      ON


LEVEL        ..I......
             -       +

 RET TOP END

WV-CP480

Highlighted

    CAMERA ID
    0123456789
    ABCDEFGHIJKLM
    NOPQRSTUVWXYZ
    ().,'":;&#!?=
    +-*/%$

   SPACE POSI
   RET TOP END RESET

   ................

Character
Cursor

Pointer

Character
Area

Command

Editing
Area

Nighttime

Nighttime

Daytime

Daytime

SUPER-D3 ON

SUPER-D3 OFF

   **LANGUAGE SETUP**  

LANGUAGE      ENGLISH

 SET
 RET TOP END

Summary of Contents for Super Dynamic III WV-CP480

Page 1: ...y and if not installed and used in accor dance with the instruction manual may cause harmful interference to radio communications Operation of this equipment in a residential area is likely to cause harmful interference in which case the user will be required to correct the interference at his own expense FCC Caution To assure continued compli ance example use only shielded interface cables when c...

Page 2: ... IN GND WV CP480 WV CP484 q e w r t y u i q e w r ty u o 0 1 UP LEFT RIGHT DOWN SET FAR ABF MENU Hi Z G L75Ω NEAR o 0 1 The side panel is provided for the WV CP480 only Slide the panel to the left until it locks Panasonic s WV CP480 series cameras introduce a new level of high picture quality by use of Super Dynamic 1 3 inch CCD and digital signal processing LSIs Super Dynamic 128x with zone free ...

Page 3: ...der etc Specifications are open collector output 16 V DC 100 mA max OFF High inactive ON Low active DAY NIGHT IN Connect an external device such as an optical sensor Specifications are pulled up input 5 V DC 2 mA min OFF Open contact inactive ON Closed contact active Notes To validate the sensor inputs select EXT for BW on the BW MODE menu Use a relay unit if the voltage or current of the connecte...

Page 4: ...s Mount Adapter C mount Less than 13 mm 1 2 CS mount Less than 8 mm 5 16 Lens Mount NEAR FAR I INDICATOR 9999 Not larger than ø20 mm ø13 16 Hints Before Back focus Adjustment Adjustment procedures vary depending on the lens Refer to the instructions includ ed with the lens Reset the back focus by pressing the L and R buttons simultaneously on the cam era and adjust the back focus Move the lens foc...

Page 5: ...ble Disable the menu 2 Move the cursor to SETUP DISABLE ENABLE press SET Scroll up or down the page Hold down or Notes NA Not Applicable 1 Reset all is an irrevocable procedure that resets all settings to the default values The PIX OFF setting will not be reset We recommend that you take note of settings before executing this command except the PIX OFF settings 2 Before operating the menu change S...

Page 6: ...or Chinese language up to 8 char acters can be entered 4 To specify the ID display position 1 Select POSI and press SET The entered camera ID will be highlighted on the screen 2 Move it into the appropriate position and press SET The position is determined and the screen will return to the CAMERA ID menu Note Keep pressing any of L R U D for a second or more to move the camera ID faster as necessa...

Page 7: ...c gain control mode This setting raises the gain and brightens the image under low light conditions The default setting is ON HIGH Available modes ON HIGH high ON MID medium ON LOW low OFF 5 Electronic Sensitivity Enhancement SENS UP Select a proper enhancement rate when the camera is set to ALC mode The higher rate you select the brighter the picture will be The default setting is OFF AUTO Sets A...

Page 8: ...Adjustable range From zero to 2 0 microseconds SC Sub carrier Phase Adjustment Connect the camera to a special effect generator SEG and supply the output of the SEG to a monitor Select a proper COARSE phase from 4 steps 90 degrees step while observing the original scene and the scene on the monitor to make these colors similar Select a proper FINE phase so that these colors match as closely as pos...

Page 9: ...images 10 Resolution Setting RESOLUTION Select a horizontal resolution mode The default setting is HIGH NORMAL Resolves more than 480 TV lines HIGH Resolves typically 540 TV lines though noise may increase when SENSE UP is activated in low lighting conditions 11 Black and White Mode Setting BW MODE 1 Select BW MODE on the CAMERA SETUP menu and press SET The BW MODE menu opens 2 Select a mode for B...

Page 10: ...N some effective pixels on the edge of the CCD are used by the stabi lization function This may result in a small reduction in resolution and a narrower angle of view After activating the image stabilizer function check that the field of view is correct Image stabilization may not function where there is excessive camera movement or when the scene is low light or low contrast objects 16 Back focus...

Page 11: ... black level 17 4 Chroma Phase Hue Setting HUE 1 Move the cursor to HUE 2 While observing the vectorscope or color video monitor move the I cursor to adjust the hue chroma phase level 17 5 Pixel Compensation Setting PIX OFF Perform settings to compensate a maximum of 16 blemish pixels on the pickup device 1 Select PIX OFF and press SET The PIX OFF menu opens with numbers from 1 to 16 2 Select a nu...

Page 12: ...ANUAL AUTO PRESET FIX Special Chroma Aperture Pedestal HUE adjustable Ambient Operating Temperature 10 C 50 C 14 F 122 F Ambient Operating Humidity Less than 90 Power Source and Power Consumption WV CP480 120 V AC 60 Hz 4 8 W WV CP484 24 V AC 60 Hz 4 7 W WV CP484 12 V DC 410 mA Dimensions without lens WV CP480 70 mm W x 65 mm H x 129 mm D WV CP480 2 3 4 W x 2 9 16 H x 5 1 16 D WV CP484 67 mm W x 6...

Reviews: