


Open one knock-out hole on junction box.
There are two knock-out holes, please open
one which is convenient for wiring.
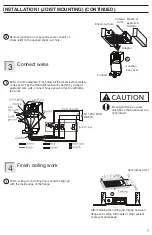
Fix the flange of frame to joist by 2 long
screws (ST4.2X30), and fix the suspension
bracket to joist by 2 long screws (ST4.2X30).
The screws for fixing suspension
bracket should not be replaced by
other screws, otherwise the cord in the
PCB box may be damaged and cause a
fire.
Suspension bracket
2-Screws
(ST4.2x6)
A 4 inch circular duct is needed to connect to the
relevant part of adaptor. Squeeze a circular exhaust
duct to fit the adaptor, then slip it onto adaptor and
secure it with clamps, or ties and seal it with mastic
or approved foil tape.
4 inch
Squeeze
Note:
If using 3 inch round duct, please purchase the 26 gauge
steel Panasonic 4" Oval - 3" Round reducer from our
representative.
Open knock-out hole
1
Before installation, please remove the tape which
protects the damper during shipping and accessory
screws from the adaptor. Afterwards, check that the
damper can open and close smoothly.
Damper
Tape
Adaptor
Accessory
screws
2
Junction box
Knock-out hole
1
2
Install circular exhaust duct
1
Joist
Suspension bracket
PCB box
2-Long screws
(ST4.2X30)
2-Long screws
(ST4.2X30)
2
1
2
6
INSTALLATION I (JOIST MOUNTING)


