ENGLISH - 63
2) Press the <ENTER> button.
f
The [Keystone] screen is displayed.
3) Press
as
to select [Curved correction].
4) Press the <ENTER> button.
f
The [Curved correction] screen is displayed.
5) Press
asqw
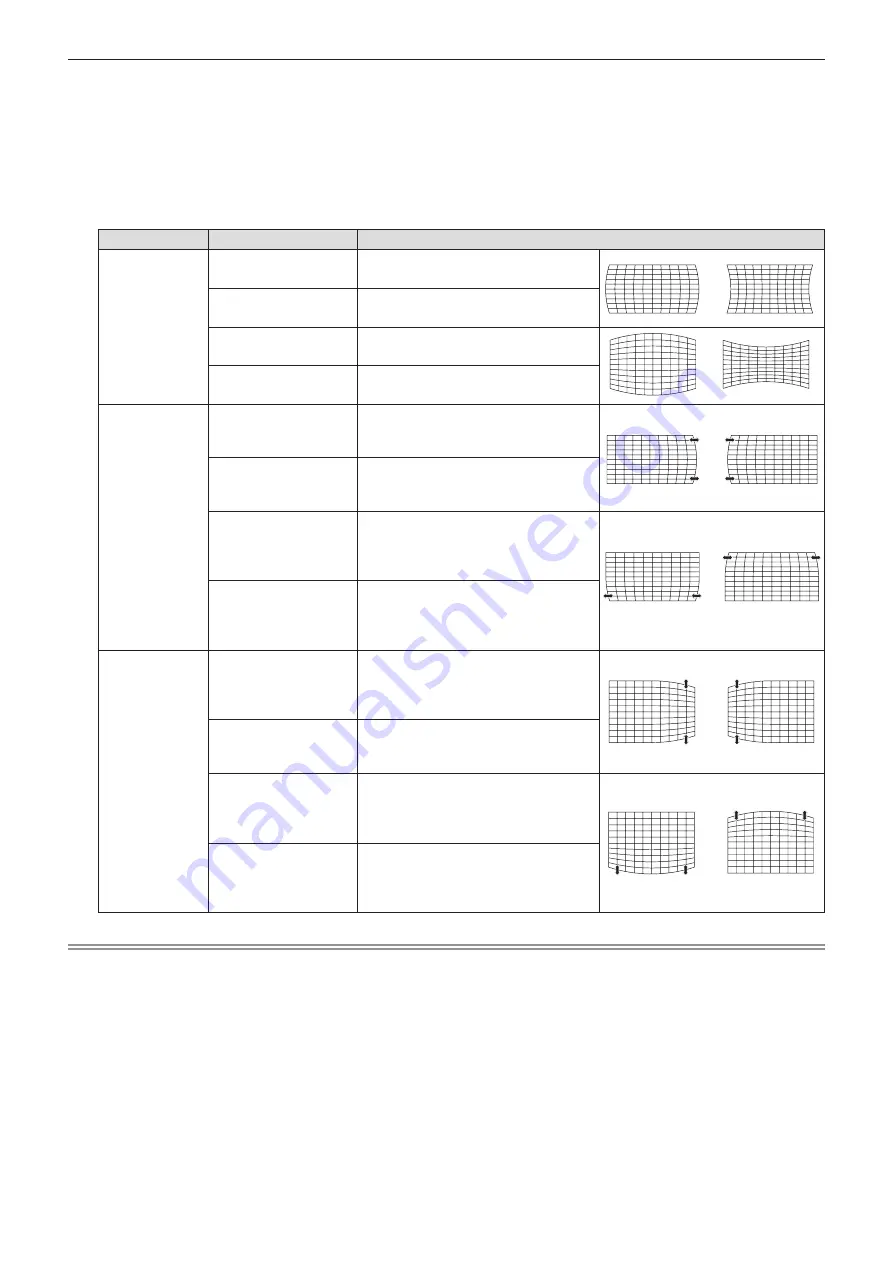
to adjust the item.
Items
Operation
Adjustment
[Curved
correction X/Y
Gain]
Press the
w
button.
Extend the vertical lines to left and
right.
Press the
q
button.
Dent the vertical lines to left and right.
Press the
a
button.
Extend the horizontal lines to top and
bottom.
Press the
s
button.
Dent the horizontal lines to top and
bottom.
[Curved
correction X
Offset]
Press the
w
button.
Used to correct the right side vertical
lines. Extend the top and bottom while
keeping the center part as it is.
Press the
q
button.
Used to correct the left side vertical
lines. Extend the top and bottom while
keeping the center part as it is.
Press the
a
button.
Used to correct the both sides of the
vertical lines. Extend the lower corners
while keeping the center part and the
upper part as they are.
Press the
s
button.
Used to correct the both sides of the
vertical lines. Extend the top corners
while keeping the center part and the
lower part as they are.
[Curved
correction Y
Offset]
Press the
w
button.
Used to correct the right side
horizontal lines. Extend the top and
bottom while keeping the center part
as it is.
Press the
q
button.
Used to correct the left side horizontal
lines. Extend the top and bottom while
keeping the center part as it is.
Press the
a
button.
Used to correct the both sides of the
horizontal lines. Extend the lower
corners while keeping the center part
and the upper part as they are.
Press the
s
button.
Used to correct the both sides of the
horizontal lines. Extend the top corners
while keeping the center part and the
lower part as they are.
Note
f
Either [H/V Keystone] or [Corner correction] setting value is valid. If the other item is adjusted after [H/V Keystone] or [Corner
correction] was adjusted, the previous setting value will be reset.
f
The [Curved correction X Offset] and the [Curved correction Y Offset] cannot be adjusted independently. After adjusting the
[Curved correction X/Y Gain] at the beginning, please adjust the [Curved correction X Offset] and the [Curved correction Y
Offset].
f
Press the <KEYSTONE> button on the control panel or on the remote control when the [H/V Keystone], [Corner correction]
or [Curved correction] individual adjustment screen is displaying, the individual adjustment screen will switch as follows.
- [H/V Keystone]
[Corner correction] (Upper left)
[Corner correction] (Upper right)
[Corner correction] (Lower right)
[Corner correction] (Lower left)
[Curved correction X/Y Gain]
[Curved correction X Offset]
[Curved correction Y
Offset]
[H/V Keystone]
...
f
Correcting up to ±30° for the tilt in the vertical direction and ±15°
*1
for the tilt in the horizontal direction are available for
adjustments with [Keystone]. However, the image quality will degrade and it will get harder to focus with more correction.
Install the projector so that the correction will be as small as possible.
*1
The tilt in horizontal direction is not available for
PT-LB300 and PT-LB280.
Chapter 4 Settings - [Expand] menu


