Chapter 4
Settings — [NETWORK] menu
90 - ENGLISH
[WIRELESS LAN]
Displays the network information of the wireless LAN set on the projector.
[ANTENNA LEVEL]
Displays the signal status of wireless LAN.
[NETWORK]
Displays the connection method of wireless LAN.
[CHANNEL]
Displays the channel used for wireless LAN.
[SSID]
Displays the string of SSID.
[AUTHENTICATION]
Displays the user authentication method.
[EAP]
Displays the type of EAP.
[ENCRYPTION]
Displays the encryption method.
[DEFAULT KEY]
Displays the number of the default key.
[DHCP]
Displays the status of use of DHCP server.
[IP ADDRESS]
Displays the IP address.
[SUBNET MASK]
Displays the subnet mask.
[DEFAULT GATEWAY]
Displays the default gateway.
[DNS1]
Displays the address of the primary DNS server.
[DNS2]
Displays the address of the secondary DNS server.
[MAC ADDRESS]
Displays the MAC address of wireless LAN.
Note
f
When [DISABLE] is selected in the [NETWORK] menu
→
[WIRELESS LAN] (
x
page 84) and an item other than [WIRELESS LAN] is
selected in [Art-Net] (
x
page 90), the wireless LAN page on the [NETWORK STATUS] screen is not displayed.
f
If the string of SSID exceeds 16 characters, the SSID will be displayed in two lines.
[Art-Net]
Make settings to use the Art-Net function.
1) Press
as
to select [Art-Net].
2) Press
qw
to switch the item.
f
The items will switch each time you press the button.
[OFF]
Disables the Art-Net function.
[WIRED LAN]
Uses the Art-Net function with wired LAN connection.
[WIRELESS LAN]
Uses the Art-Net function with wireless LAN connection.
Note
f
Refer to “Setting address for [WIRED LAN]” (
x
page 90) or “Setting address for [WIRELESS LAN]” (
x
page 91) for how to set the IP
address.
f
If [Art-Net] is set to other than [OFF], the [NETWORK] menu
→
[WIRED LAN] (
x
page 83) or [WIRELESS LAN] (
x
page 84) is
disabled.
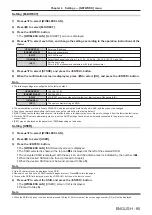
Setting address for [WIRED LAN]
1) Press
as
to select [Art-Net].
2) Press
qw
to select [WIRED LAN].
3) Press the <ENTER> button.
f
The
[Art-Net (WIRED LAN)]
screen (1/2) is displayed.
4) Press
as
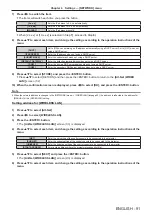
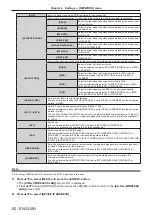
to select each item, and change the settings according to the operation instructions of the
menu.
[NET]
Enter the net setting of the control console to be connected to the projector.
[SUB NET]
Enter the subnet setting of the control console to be connected to the projector.
[UNIVERSE]
Enter the universe setting of the control console to be connected to the projector.
[START ADDRESS]
Enter a start address where the projector processes Art-Net.
5) Press
as
to select [NEXT], and press the <ENTER> button.
f
The
[Art-Net (WIRED LAN)]
screen (2/2) is displayed.
6) Press
as
to select [DEVICE IP ADDRESS].

