Projecting
ENGLISH - 45
Basic Operation
Projecting
Check the external device connections (
page 36) and power cord connections (
page 41) and then turn on the
power (
page 43) to start projection. Select the input signal and adjust the image.
Selecting the input signal
Select an input signal.
The images selected using the <INPUT> button on the control panel or the <INPUT 1> to <INPUT 4> buttons on
the remote control are projected. (
page 47)
Attention
■
z
Images may not be projected properly depending on the connected device, DVD, video tape, etc. to be played.
■
z
The <INPUT> button on the control panel cannot be used to select input signals. The input signal for each
input terminal must be selected in advance using the [Input] menu. If you press the <INPUT> button without
having correctly selected the input signal, the projector will not project the image correctly.
Adjusting the image
■
■
Adjusting the position of the lens
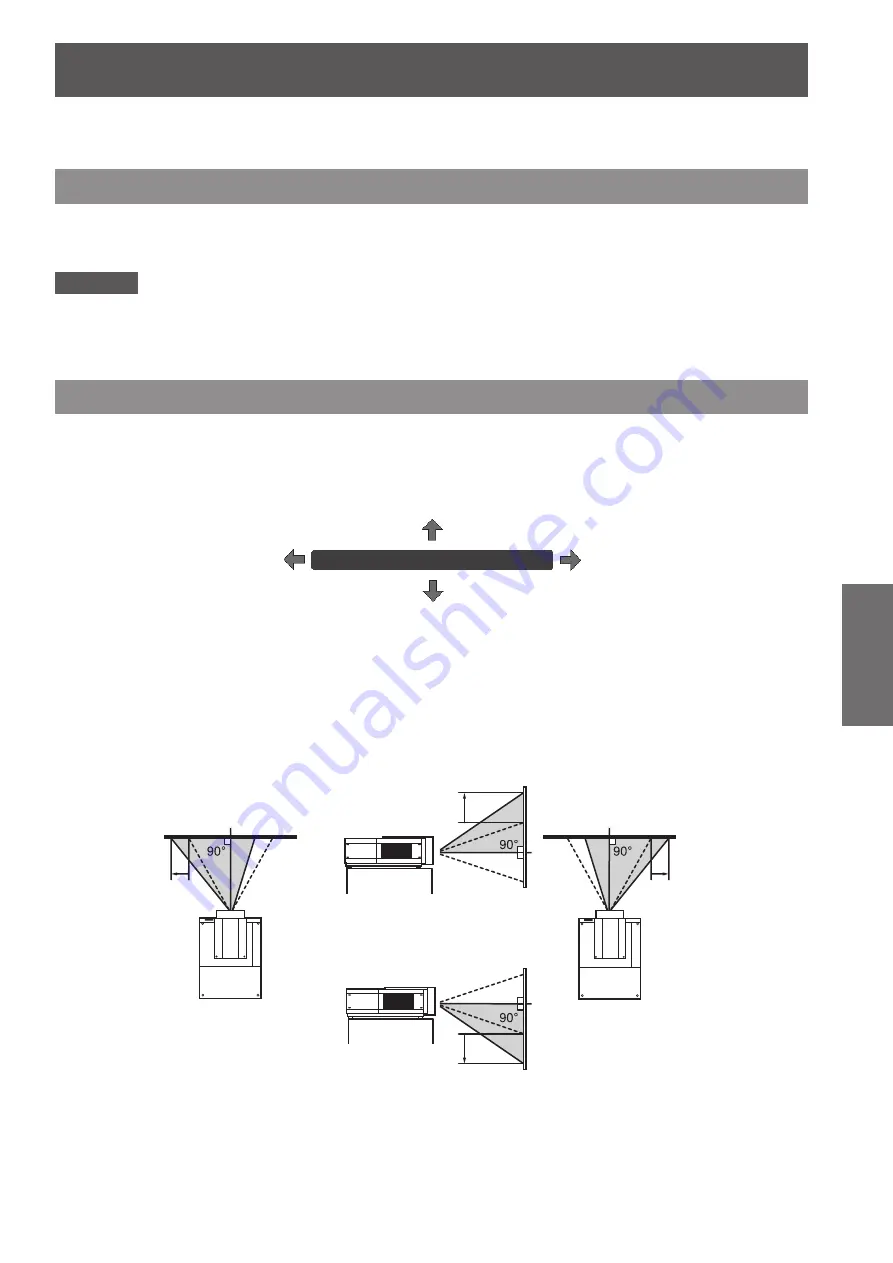
1) Press the <LENS SHIFT> button on the remote control or the control panel.
■
z
[Lens shift] is displayed on the screen for four seconds.
Lens shift
2) While the display appears, press
▲▼◀▶
to move the image horizontally and
vertically.
■
z
As you move the image, there is a certain position at which the arrows pointing up, down, left and right turn
red. This position is the center for the lens.
■
z
At positions of maximum shift, the arrows disappear.
■
z
The projector stores the setting made using the lens shift function when the power is turned off.
■
z
When the position of the image is shifted, the image may become a little darker.
* The figure below shows an example of when the standard lens is attached.
With the lens moved completely up
With the lens moved completely down
With the lens moved completely to
the right
With the lens moved completely to
the left
Moves the image up
approx. 50% of its
height.
Moves the image
left approx. 10% of
its width.
Moves the image
right approx. 10%
of its width.
Moves the image
down approx. 50% of
its height.


