background image

 3.1 Recommendations for wiring

3

Wiring

3.1

Recommendations for wiring

It is the customer's responsibility to apply the countermeasures that they consider necessary
to comply with current regulations on wiring, safety and reducing EMI.

Do not forget to meet the specifications indicated in the hardware manual for each of the
devices being wired. If any specifications in the manual conflict with the information in this
document, the manufacturer's manual takes preference.

For detailed information on reducing EMI, please refer to 

Recommendations for EMC-

compliant wiring of servo drivers and motors

.

3.2

Connectors of the servo driver

XA connector (main power connector)

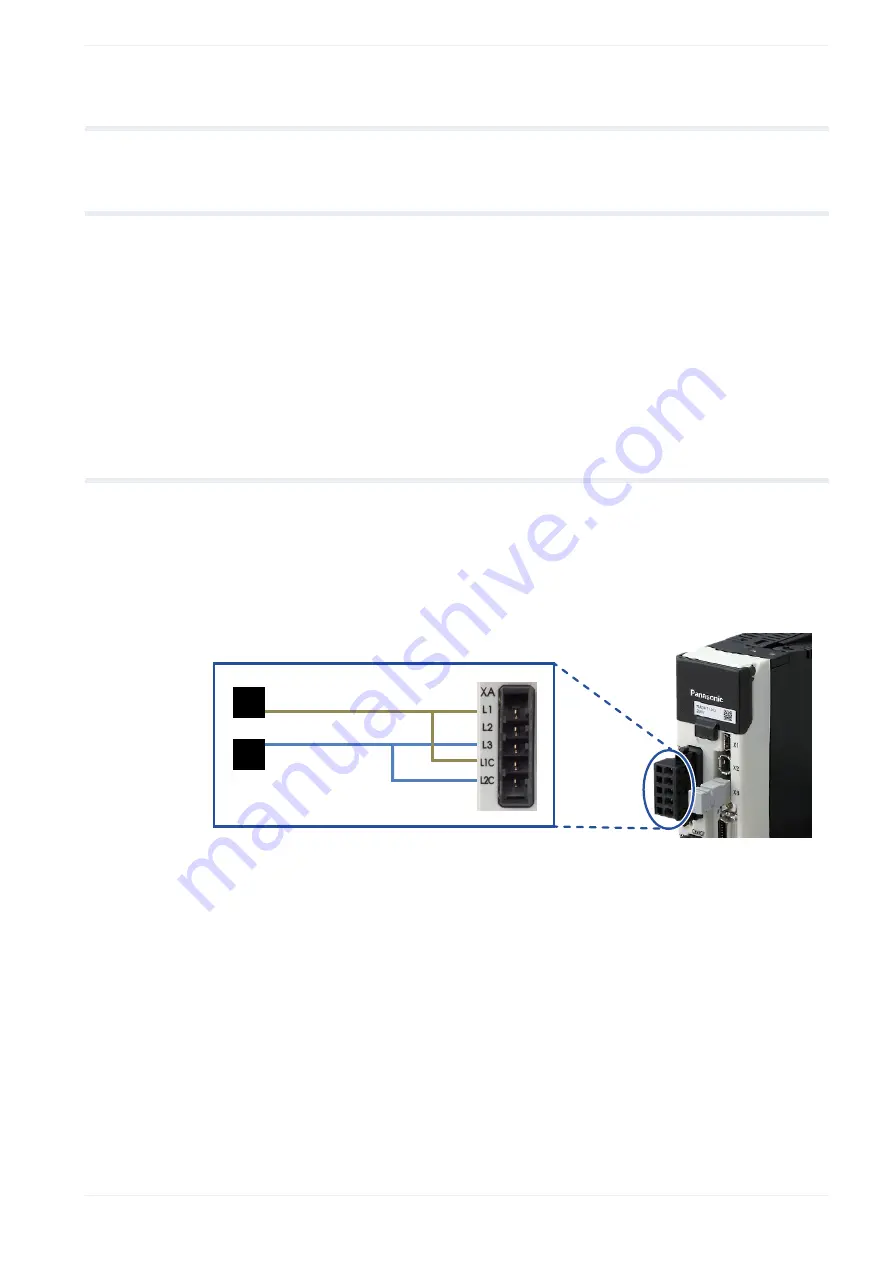
Connect the power supply cable to the XA connector. For a 1-phase power supply of 230V,
connect a 2-wire cable to the servo driver as illustrated. The L2 pin is not used in 1-phase
mode.

L

N

Wiring of the XA connector for a power supply of 230V

XB connector (motor connector)

Connect the motor cable to the XB connector. The wires are labeled with the letters U, V, and
W. Do not change the sequence of the motor phases, e.g. by connecting V to W.

QS2002_V1.0_EN

 7

Summary of Contents for MINAS A6 Series

Page 1: ...Servo Drives Quick Start Guide Position control by block operation using Modbus commands MINAS A6 QS2002_V1 0_EN 2019 07 www panasonic electric works com...

Page 2: ...tinuous improvement of the design and performance of its products Therefore we reserve the right to change the manual product without notice In no event will PEWEU be liable for direct special inciden...

Page 3: ...w 10 4 2 Pr0 00 Motor rotation direction 11 4 3 Pr0 01 Control mode 11 4 4 Pr0 08 Number of pulse signals per motor revolution 11 4 5 Pr4 05 Function assignment for pin 29 of X4 connector 12 4 6 Pr5 2...

Page 4: ...ation Click on the following links to download the documents from our Panasonic Download Center Information on wiring position control and parameters Operating Instructions Overall AC Servo Motors Dri...

Page 5: ...ning 1 4 Available software The following software is available free of charge in our Panasonic Download Center Click on the link to start the download PC configuration software PANATERM PC programmin...

Page 6: ...in a block operation table in the servo driver Block operation table You can set the command blocks using the PANATERM configuration software or by Modbus commands if you are using a PLC with a Modbu...

Page 7: ...preference For detailed information on reducing EMI please refer to Recommendations for EMC compliant wiring of servo drivers and motors 3 2 Connectors of the servo driver XA connector main power con...

Page 8: ...ion X2 connector serial communication interface Connect the serial communication cable DV0PM20024CAB to the X2 connector and to COM port 0 RS232C interface of the FP0H PLC Connector X2 for serial comm...

Page 9: ...3 2 Connectors of the servo driver Connector X1 for PC connection QS2002_V1 0_EN 9...

Page 10: ...e the parameters in the servo driver select the Trans icon 6 Select the parameter list for your type of servo driver 7 To change a parameter setting select the desired parameter class and enter a valu...

Page 11: ...response waiting time Pr6 28 0 to 2 Block operation mode 4 2 Pr0 00 Motor rotation direction PANATERM parameter Rotational direction setting Setting range 0 or 1 The default value is 1 Rotation in CC...

Page 12: ...and in the servo driver are identical In this example select 6 115200bit s 4 7 Pr5 30 RS485 baud rate Set this parameter if the servo driver is connected via RS485 PANATERM parameter RS485 communicat...

Page 13: ...The default value is 0 Even 1 bit Make sure the parity and stop bit setting in the PLC program and in the servo driver are identical In this example select Odd 1 bit 4 11 Pr5 39 Modbus response waiti...

Page 14: ...starts and opens the demo project included in the library 4 Select Online PLC type and set the connected PLC type 5 Check the communication settings of the serial port you are using and make sure the...

Page 15: ...tarts the SD RD LED of the selected COM port begins to flicker 10 Set bEnablePower of MB_MC_Power to TRUE to send a servo ON request signal to the servo driver When the servo is on bPower will be TRUE...

Page 16: ...e any questions or if you have any suggestions for improvement In that case we ask you to include the Quick Start Guide number in the email subject line You can find the number starting with QS on the...

Page 17: ...4 12 Pr6 28 Block operation mode 7 Record of changes QS2002_V1 0_EN 2019 07 First edition QS2002_V1 0_EN 17...

Page 18: ...del Commercio 3 5 Z I Ferlina 37012 Bussolengo VR Tel 39 0456752711 Fax 39 0456700444 www panasonic electric works it Nordic Countries Panasonic Electric Works Europe AG Panasonic Fire Security Europe...

Reviews: